This content comes from @ What is worth buying APP, the views only represent the author himself | author: I am Wang Xiaolang
Synopsis:
Because of all the tutorials seen on the Internet, almost none of them are reliable, all of them are the steps that Xiao Bai has pounded out by himself, there are many problems in the comments, and it is painful to see, so when the baby is asleep, hurry to sort out a nanny-style pit avoidance tutorial.
The advantages of this tutorial are as follows:
1. Window-type operation on Synology desktop throughout the whole process, no need to open SSH permission, no need to download SSH client, no need to use Synology SSH maximum permission, nor do you need to understand Linux commands, to avoid all unnecessary risks;
2. Do not waste a single bit of NAS hardware resources, do not need Docker to run The Linux operating system container, do not need to install any Docker web management panel, Docker native running, performance directly pulled full;
3. The key steps are repeatedly instructed to add illustrations, avoid stepping on the pit, and take good care until the smooth configuration is completed.
First of all, let's talk about the main topic, the operation process is as follows:
First, the administrator logs on to the Synology desktop, this is nonsense, but still want to say, for example, my administrator account is [xlang].
2. Open File Station and create the required folders and files:
docker/icloudpd/xlang
homes/xlang/Photos/iCloud
homes/xlang/Photos/iCloud/.mounted
3. Open Synology Suite Center to install docker kits.
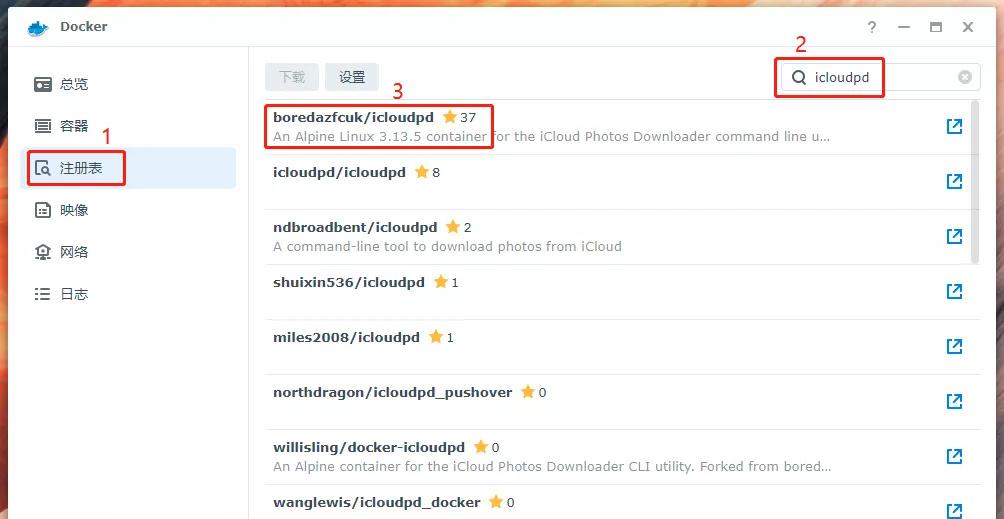
Fourth, open the installed [Docker] suite, click the left menu [Registry], search for the keyword "icloudpd", and double-click the one with the most downloaded stars [boredazfcuk/icloudpd].
5. Switch to [Image] in the left menu, wait a while, and when the download is complete, double-click to start creating the container.

Sixth, the name of the container, depending on your preferences, for example, I just entered an "icloudpd-xlang", and then clicked [Advanced Settings] at the bottom left.
Seven, check "enable automatic restart", this is not necessary, if you want to lose it for a long time, let the NAS run automatically, then check it, not check it is also OK.
8. Switch to the [Storage Space] setting bar and add the status path of the following two folders:
docker/icloudpd/xlang --> /config
homes/xlang/Photos/iCloud --> /iCloud
1. Select the folder docker/icloudpd/xlang, mount path/config
2. Select the folder homes/xlang/Photos/iCloud, load path/iCloud
As shown in the following figure:
9. Switch to the [Environment] setting bar and add the following three variables:
apple_id:[email protected]
TZ:CST-8
download_path:/iCloud
1. apple_id:[email protected]
You must, enter the AppleID of your iCloud service.
2. TZ:CST-8
Non-essential, China time zone according to this fill in, online requirements to fill in Asia/Shanghai is invalid, it is better not to add this variable.
3. download_path:/iCloud
Must, otherwise default to /home/${user}/iCloud.
10. Click "Application" in the lower right corner, return to the main interface of creating a container, click "Next", and finally click "Finish" to start the created container.
Eleven, back to the Docker interface, double-click the just created "icloudpd-xlang" container, view the log, you can see the operation of the container, the lower right corner of the circle icon refreshed several times, will see the following error prompt, you can enter the most exciting key file creation process.
ERROR Keyring file /config/python_keyring/keyring_pass.cfg does not exist.
INFO - Please add the your password to the system keyring using the --Initialise script command line option.
INFO - Syntax: docker exec -it <container name> sync-icloud.sh --Initialise
INFO - Example: docker exec -it icloudpd sync-icloud.sh --InitialiseINFO Restarting in 5 minutes...
12. Well, it's time to hold your breath: 1. Switch to the [Terminal] column and click the drop-down arrow on the right side of [New];
2. Select [Start by Command];
3. Enter "/bin/sh" in the pop-up dialog box and click [OK];
4. Select open the newly created [sh] terminal in the left menu;
5. Enter the following command to initialize:
sync-icloud.sh --Initialise
13. Start the two-factor authentication of Apple account, create a cookie file, the validity period is 90 days by default, and you need to verify again after expiration:
1. As shown in the following figure, enter your AppleID password as prompted, enter blindly, here will not show what you entered, enter after the input is completed;
Enter iCloud password for [email protected]:
2. If the password is correct, you will be prompted to ask whether to save, enter the "y" after entering, otherwise the whole drama will end;
Save password in keyring? [y/N]: y
3. At this time, the device you log in to AppleID will prompt whether to allow login pop-up window, first ignore it, enter the number "0" after prompting to ask;
Which device would you like to use? [0]: 0
4. On the device that receives the prompt, click [Allow] to log in, get the pop-up verification code, enter the verification code according to the following prompts, and then enter the car;
Please enter validation code: 123456
5. After the verification is passed, Apple will send the secondary verification code through the SMS, note that the SMS is sent, at this time you have a pop-up window on the device to click [Allow], the pop-up verification code does not need to be ignored, after the SMS verification code is received, as shown in the following figure, enter the number 0 after entering the prompt, enter the 6-digit SMS verification code according to the prompt, and complete the creation of the secondary verification file after entering.
Please choose an option: [0]: 0
Please enter two-factor authentication code: 123456
Fourteen, all configuration to this end, restart the container, view the log, see the following content, instructions run successfully, generate a file list in iCloud, wait for the automatic download of iCloud photos, the default is 24 hours incremental download once, the default download of the original size file.
With the above method,
Download 12740 full-size photos and videos on iCloud,
It takes 9 hours and 45 minutes to complete,
And with iPhone download,
From 18:52:13 on February 6,
To now (18:56 on February 9) exactly 72 hours,
There are 5660 files left waiting to be downloaded,
Countless times during the period because the memory of the phone is full,
Causes WeChat to be unusable (prompts WeChat to use 5.4G space for normal use),
You can only delete content that has been downloaded and backed up,
to make a little space to run.
Some extended trivia:
1. The first open source software on the Internet is icloud_photos_downloader, that is, the second one found in the [registry] [icloudpd/icloudpd], due to the author's abandonment, it has not been updated for more than a year, but even so, but still thanks to the contribution of the originator.
2. The current use of [boredazfcuk/icloudpd] is the current author in the original [icloudpd] on the basis of the expansion, the function is quite comprehensive, the configuration is very simple, simply heaven, may be due to the author's understanding of Docker is not deep enough, so the operation method given is still the Linux command line way to configure, which may lead to many people the first step to use Docker to install a Linux operating system, Then install Portainer to manage Docker, wasting a lot of performance resources, here is still to remind everyone to avoid pitfalls.
For example, the following tutorial:
【Zhihu】How to backup iCloud photos to NAS?
The author installed the Ubuntu 20.04 environment with Docker at the beginning, and then deployed the Docker environment with a large number of command lines, and then installed the Docker management panel Porer to facilitate future management of Docker, loop matryoshka dolls, and waste a lot of performance.
【Zhihu】Indirectly realize iOS background automatic backup of photos to Synology through icloudpd
The author conducted basic research to avoid the waste of some resources, but there are a lot of unnecessary operations in it by opening Synology SSH, installing SSH clients, and using Synology system root permissions to configure.
【Zhihu】Synology uses Docker's icloudpd to synchronize iCloud photos to Synology Photos and automatically refresh
The author made changes in the previous tutorial, which may be the reason for the layout, and it is even more confusing to see.
【Small white record】Qunhui docker iCloud photo original size backup
The author used the original icloudpd, also installed Ubuntu at the beginning, and should have been successful in the end, but the configuration was cumbersome, easy to make mistakes, and 100 photos were backed up at a time.
3. In all tutorials, the time zone setting is Asia/Shanghai, which is an invalid setting, the final result is that the container running time is UTC time, 8 hours later than Beijing time, the correct setting should be [CST-8], if you don't mind, the impact is not large, when creating the container can not add [TZ] This variable.
Some extended features of icloudpd:
Tip: The following variables can be added or changed when the container is stopped to adjust the corresponding settings.
1. Set the synchronization time period, the default is 86400 seconds (24 hours), automatically run the synchronization of new content on iCloud, if you need to modify, you can create a container, add a variable synchronisation_interval, and set the corresponding values, such as 43200 (12 hours), 129600 (36 hours), etc., theoretically set to 1 second is also OK, but Apple tends to restrict too frequent access to its server links, The default setting personally believes that it is the best value, the iPhone will immediately upload the files to iCloud, if the phone is lost, the content taken that day is also safe in iCloud, and the container will download these contents when it runs at night.
synchronisation_interval:43200
2. Set the number of minutes for multiple containers to synchronize, the default is 0, if you need to automatically synchronize too much AppleID iCloud content, you can set it, add variables synchronisation_delay, such as 30 minutes, to avoid multiple accounts access at the same time by Apple's risk control restrictions.
synchronisation_delay:30
3. Set the iCloud account authentication type, the default is 2FA, if two-factor authentication is enabled, the valid value is 2FA, otherwise it is web, if the iCloud account is not enabled for two-factor authentication, you must add a new variable authentication_type, set to Web, as follows:
authentication_type:Web
4. Set the folder structure of the download target directory, the variable folder_structure, the default is {:%Y/%m/%d} (year/month/day), which can be adjusted as needed, for example: year/month
folder_structure:{:%Y/%m}
5. Set whether to skip the download check (incremental synchronization), default to False (not skipped), that is, the default is to synchronize only new content every time you start, if you want to re-synchronize completely, you can set the value of the variable skip_check to True
skip_check:True
6. Set scan the "Recently Deleted" folder and delete all the files found in it, meaning, the deleted photos on your phone, whether to sync delete, default is not to scan, that is, not to synchronize delete, if you want to sync delete or restore, you can set the value of the variable auto_delete to True
auto_delete:True
7. Set the size of the photo to be downloaded, the default is original (original size), if you need to adjust, you can set the value of the variable photo_size to original (original size), medium (medium quality), thumb (thumbnail), as shown below (choose one of the two):
photo_size:medium
photo_size:thumb
8. Set whether to convert HEIC file to JPEG format when downloading, while keeping the original file, if you set this variable convert_heic_to_jpeg, no matter what value, then convert.
9. Set the quality of heIC file to JPEG conversion, you can set the variable jpeg_quality, the value is 0 (lowest quality) to 100 (highest quality), the default is 90, if you want to get the highest quality conversion, you can set it as follows:
jpeg_quality:100
10. Set whether to force the use of Guizhou on the cloud as the download source, such as your iCloud operated by Guizhou on the cloud, and your NAS is in foreign countries, you can set the variable icloud_china, no matter what the value, will be forced to icloud.com.cn as the download source, NAS is not used in China, will automatically resolve to the IP of Guizhou on the cloud.
The above is the general use of the variable settings, if you want to understand other uncommon function settings, you can visit [boredazfcuk/icloudpd] Author in docker Hub page, address: https://registry.hub.docker.com/r/boredazfcuk/icloudpd/
Well, the tutorial ends here, so many photos are so good-looking, memorable, it should be well saved, I wish everyone a smooth configuration and a pleasant use! If you are skilled, 2 minutes should be configurable.
I am Wang Xiaolang, a very lazy person, so rarely will be patient out of the tutorial, originally prepared to record a video, but because of laziness, not ready to come out, I want to go with the baby, and then check whether there is a typo later.
The author declares that there is no interest in this article, and welcomes reasonable exchanges and harmonious discussions among value friends