github pages可以使用自己的html,js等资源建站。我们可以使用hexo在本地生产静态网页然后发布到github上。废话少说,按照下列步骤执行
并新建一个 用户名+github.io的repository。
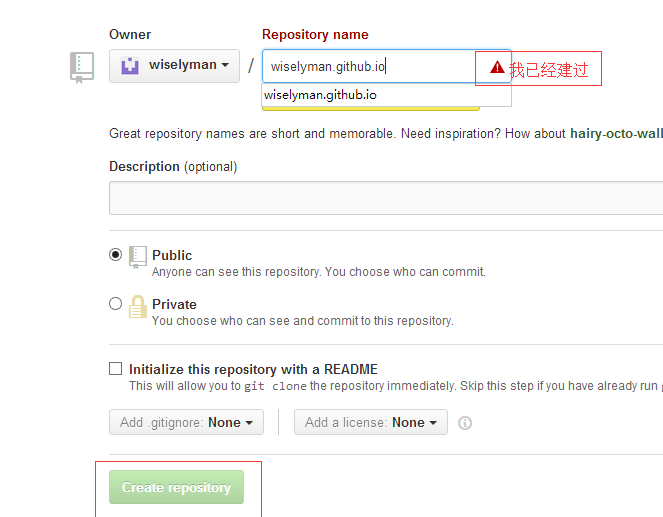 利用Github pages建站-超简单小白专属1、注册github账号
2、安装nodejs3、安装hexo4、配置_config.yml5、启动hexo6、访问首页7、发布新的博客8、发布到github9、访问github上你的博客
利用Github pages建站-超简单小白专属1、注册github账号
2、安装nodejs3、安装hexo4、配置_config.yml5、启动hexo6、访问首页7、发布新的博客8、发布到github9、访问github上你的博客 <a href="http://nodejs.org/download/" target="_blank">下载地址</a>
在cmd中执行
 利用Github pages建站-超简单小白专属1、注册github账号
2、安装nodejs3、安装hexo4、配置_config.yml5、启动hexo6、访问首页7、发布新的博客8、发布到github9、访问github上你的博客
利用Github pages建站-超简单小白专属1、注册github账号
2、安装nodejs3、安装hexo4、配置_config.yml5、启动hexo6、访问首页7、发布新的博客8、发布到github9、访问github上你的博客 node -v
检测是否安装成功,若提示node命令不存在的时候,请将c:\program files\nodejs添加到用户环境变量的path中
利用Github pages建站-超简单小白专属1、注册github账号
2、安装nodejs3、安装hexo4、配置_config.yml5、启动hexo6、访问首页7、发布新的博客8、发布到github9、访问github上你的博客 $ npm install hexo -g
$ mkdir wiselyman.local
$ hexo init wiselyman.local
$ npm install
$ npm install hexo-admin --save #安装hexo管理插件,可编辑发布博客
我这里只写出需要和github配合那块的代码
利用Github pages建站-超简单小白专属1、注册github账号
2、安装nodejs3、安装hexo4、配置_config.yml5、启动hexo6、访问首页7、发布新的博客8、发布到github9、访问github上你的博客 #注意冒号后面有一空格,否则报错
deploy:
type: github
repository: https://github.com/wiselyman/wiselyman.github.io.git #此地址如下有截图
branch: master
利用Github pages建站-超简单小白专属1、注册github账号
2、安装nodejs3、安装hexo4、配置_config.yml5、启动hexo6、访问首页7、发布新的博客8、发布到github9、访问github上你的博客 利用Github pages建站-超简单小白专属1、注册github账号
2、安装nodejs3、安装hexo4、配置_config.yml5、启动hexo6、访问首页7、发布新的博客8、发布到github9、访问github上你的博客 hexo server -d
http://localhost:4000
利用Github pages建站-超简单小白专属1、注册github账号
2、安装nodejs3、安装hexo4、配置_config.yml5、启动hexo6、访问首页7、发布新的博客8、发布到github9、访问github上你的博客 http://localhost:4000/admin 使用的是markdown编辑,很简单自行学习。
利用Github pages建站-超简单小白专属1、注册github账号
2、安装nodejs3、安装hexo4、配置_config.yml5、启动hexo6、访问首页7、发布新的博客8、发布到github9、访问github上你的博客 利用Github pages建站-超简单小白专属1、注册github账号
2、安装nodejs3、安装hexo4、配置_config.yml5、启动hexo6、访问首页7、发布新的博客8、发布到github9、访问github上你的博客 $ hexo clean
$ hexo generate
$ hexo deploy #此句执行完以后会让你输入github的账号和密码,输入完成后将会将你当前的静态页面push到github上
第一次发布要等很长时间才能看到效果,后面发布就很快了。
http:wiselyman.github.io
利用Github pages建站-超简单小白专属1、注册github账号
2、安装nodejs3、安装hexo4、配置_config.yml5、启动hexo6、访问首页7、发布新的博客8、发布到github9、访问github上你的博客