github pages可以使用自己的html,js等資源建站。我們可以使用hexo在本地生産靜态網頁然後釋出到github上。廢話少說,按照下列步驟執行
并建立一個 使用者名+github.io的repository。
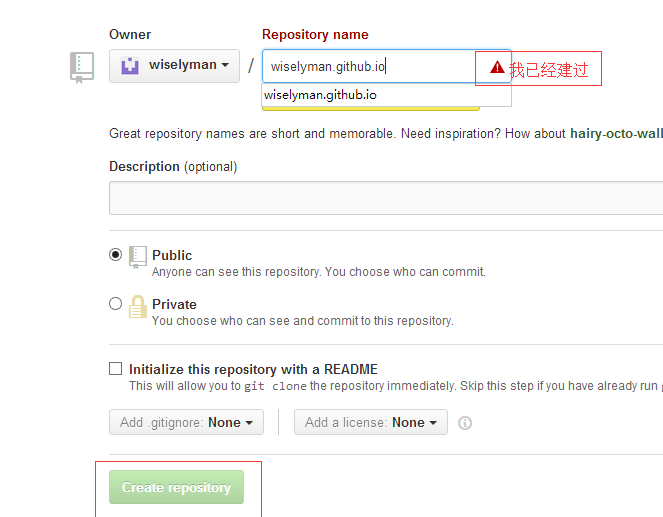 利用Github pages建站-超簡單小白專屬1、注冊github賬号
2、安裝nodejs3、安裝hexo4、配置_config.yml5、啟動hexo6、通路首頁7、釋出新的部落格8、釋出到github9、通路github上你的部落格
利用Github pages建站-超簡單小白專屬1、注冊github賬号
2、安裝nodejs3、安裝hexo4、配置_config.yml5、啟動hexo6、通路首頁7、釋出新的部落格8、釋出到github9、通路github上你的部落格 <a href="http://nodejs.org/download/" target="_blank">下載下傳位址</a>
在cmd中執行
 利用Github pages建站-超簡單小白專屬1、注冊github賬号
2、安裝nodejs3、安裝hexo4、配置_config.yml5、啟動hexo6、通路首頁7、釋出新的部落格8、釋出到github9、通路github上你的部落格
利用Github pages建站-超簡單小白專屬1、注冊github賬号
2、安裝nodejs3、安裝hexo4、配置_config.yml5、啟動hexo6、通路首頁7、釋出新的部落格8、釋出到github9、通路github上你的部落格 node -v
檢測是否安裝成功,若提示node指令不存在的時候,請将c:\program files\nodejs添加到使用者環境變量的path中
利用Github pages建站-超簡單小白專屬1、注冊github賬号
2、安裝nodejs3、安裝hexo4、配置_config.yml5、啟動hexo6、通路首頁7、釋出新的部落格8、釋出到github9、通路github上你的部落格 $ npm install hexo -g
$ mkdir wiselyman.local
$ hexo init wiselyman.local
$ npm install
$ npm install hexo-admin --save #安裝hexo管理插件,可編輯釋出部落格
我這裡隻寫出需要和github配合那塊的代碼
利用Github pages建站-超簡單小白專屬1、注冊github賬号
2、安裝nodejs3、安裝hexo4、配置_config.yml5、啟動hexo6、通路首頁7、釋出新的部落格8、釋出到github9、通路github上你的部落格 #注意冒号後面有一空格,否則報錯
deploy:
type: github
repository: https://github.com/wiselyman/wiselyman.github.io.git #此位址如下有截圖
branch: master
利用Github pages建站-超簡單小白專屬1、注冊github賬号
2、安裝nodejs3、安裝hexo4、配置_config.yml5、啟動hexo6、通路首頁7、釋出新的部落格8、釋出到github9、通路github上你的部落格 利用Github pages建站-超簡單小白專屬1、注冊github賬号
2、安裝nodejs3、安裝hexo4、配置_config.yml5、啟動hexo6、通路首頁7、釋出新的部落格8、釋出到github9、通路github上你的部落格 hexo server -d
http://localhost:4000
利用Github pages建站-超簡單小白專屬1、注冊github賬号
2、安裝nodejs3、安裝hexo4、配置_config.yml5、啟動hexo6、通路首頁7、釋出新的部落格8、釋出到github9、通路github上你的部落格 http://localhost:4000/admin 使用的是markdown編輯,很簡單自行學習。
利用Github pages建站-超簡單小白專屬1、注冊github賬号
2、安裝nodejs3、安裝hexo4、配置_config.yml5、啟動hexo6、通路首頁7、釋出新的部落格8、釋出到github9、通路github上你的部落格 利用Github pages建站-超簡單小白專屬1、注冊github賬号
2、安裝nodejs3、安裝hexo4、配置_config.yml5、啟動hexo6、通路首頁7、釋出新的部落格8、釋出到github9、通路github上你的部落格 $ hexo clean
$ hexo generate
$ hexo deploy #此句執行完以後會讓你輸入github的賬号和密碼,輸入完成後将會将你目前的靜态頁面push到github上
第一次釋出要等很長時間才能看到效果,後面釋出就很快了。
http:wiselyman.github.io
利用Github pages建站-超簡單小白專屬1、注冊github賬号
2、安裝nodejs3、安裝hexo4、配置_config.yml5、啟動hexo6、通路首頁7、釋出新的部落格8、釋出到github9、通路github上你的部落格