使用自己的資料訓練MobileNet SSD v2目标檢測--TensorFlow object detection
- 1. 配置
-
- 1.1 下載下傳models-1.12.0
- 2. 準備資料集
- 3. 配置檔案和模型
-
- 3.1 下載下傳預訓練模型
- 3.2 修改配置檔案
- 4. 訓練
-
- 4.1 使用tensorboard檢視訓練過程
- 5. 當機模型參數
- 6. 調用pb檔案進行預測
1. 配置
| 基本配置 | 版本号 |
|---|---|
| CPU | Intel® Core™ i5-8400 CPU @ 2.80GHz × 6 |
| GPU | GeForce RTX 2070 SUPER/PCIe/SSE2 |
| OS | Ubuntu18.04 |
| openjdk | 1.8.0_242 |
| python | 3.6.9 |
1.1 下載下傳models-1.12.0
https://github.com/tensorflow/models/tree/v1.12.0
在~/.bashrc中加入配置
export PYTHONPATH=$PYTHONPATH:
pwd
:
pwd
/slim
2. 準備資料集
我是檢測鴿子的頭部,頸部和尾部. 将自己的資料集圖檔存放在/models/research/object_detection下建立的images檔案夾内,images檔案夾下建立dove_three和test_three兩個檔案夾,分别将訓練和測試的圖檔放進檔案夾.
接下來使用 LabelImg 這款小軟體(自行百度如何安裝), 對dove_three和test_three裡的圖檔進行人工标注, 如下圖所示。
對于每個标注框都要進行标簽的命名.
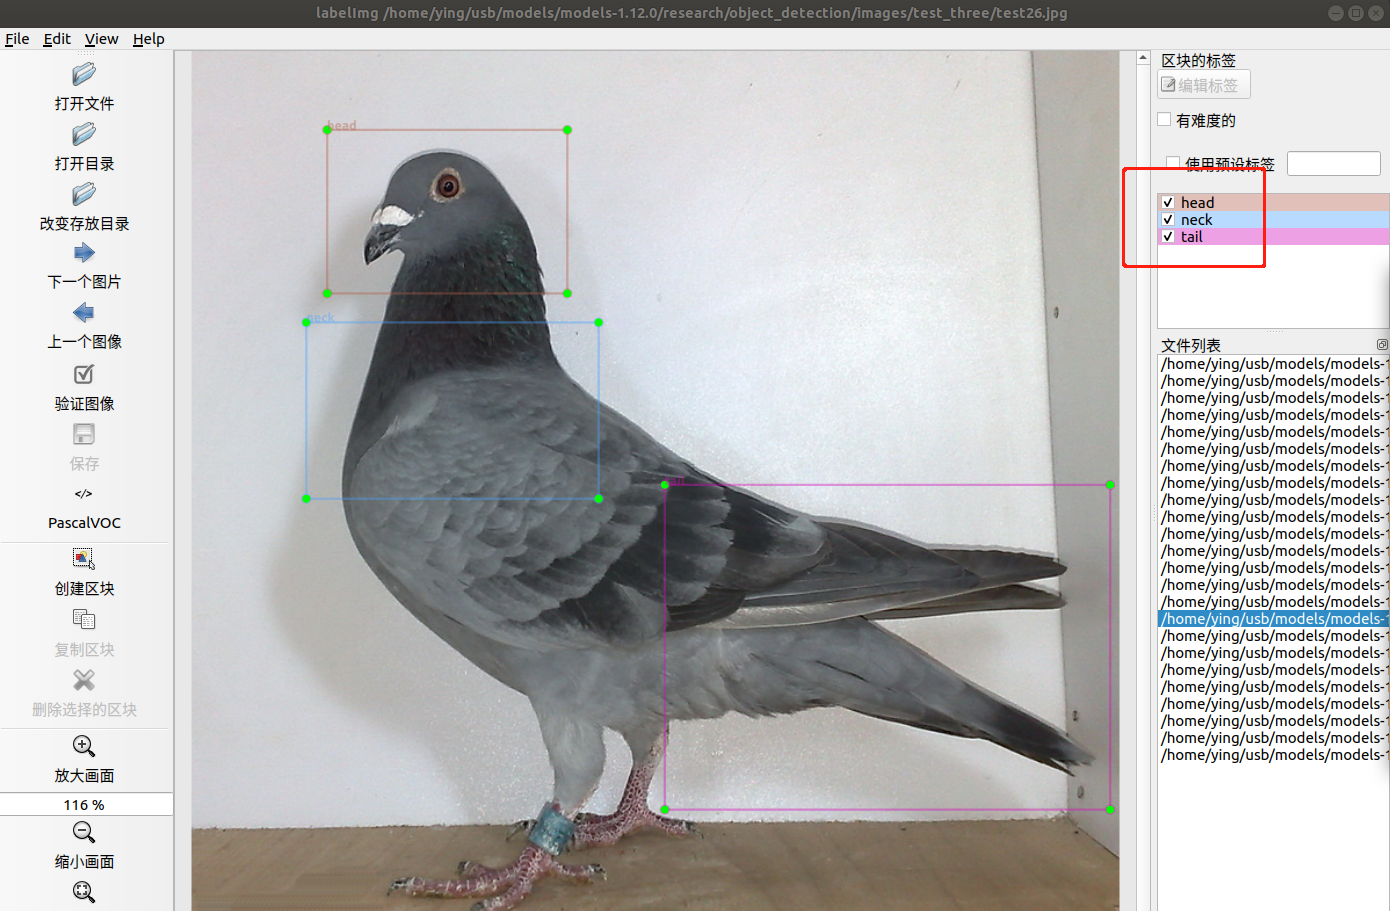
标注完成後儲存為同名的xml檔案,并存在原檔案夾中。
對于Tensorflow,需要輸入專門的 TFRecords Format 格式。
寫兩個小python腳本檔案,第一個将檔案夾内的xml檔案内的資訊統一記錄到.csv表格中,第二個從.csv表格中建立tfrecord格式。
附上對應代碼:
xml轉換為csv
# xml2csv.py

import os
import glob
import pandas as pd
import xml.etree.ElementTree as ET

os.chdir('/home/ying/usb/models/models-1.12.0/research/object_detection/images/test_three')
path = '/home/ying/usb/models/models-1.12.0/research/object_detection/images/test_three'

def xml_to_csv(path):
    xml_list = []
    for xml_file in glob.glob(path + '/*.xml'):
        tree = ET.parse(xml_file)
        root = tree.getroot()
        for member in root.findall('object'):
            value = (root.find('filename').text,
                     int(root.find('size')[0].text),
                     int(root.find('size')[1].text),
                     member[0].text,
                     int(member[4][0].text),
                     int(member[4][1].text),
                     int(member[4][2].text),
                     int(member[4][3].text)
                     )
            xml_list.append(value)
    column_name = ['filename', 'width', 'height', 'class', 'xmin', 'ymin', 'xmax', 'ymax']
    xml_df = pd.DataFrame(xml_list, columns=column_name)
    return xml_df


def main():
    image_path = path
    xml_df = xml_to_csv(image_path)
    xml_df.to_csv('test.csv', index=None) #需要更改
    print('Successfully converted xml to csv.')


main()
csv轉換為tfrecord
指令:
python csv2tfrecord.py --csv_input=images/test_three/test.csv --output_path=images/test.record
# csv2tfrecord.py

# -*- coding: utf-8 -*-


"""
Usage:
  # From tensorflow/models/
  # Create train data:
  python csv2tfrecord.py --csv_input=images/dove_three/train.csv  --output_path=images/train.record
  # Create test data:
  python csv2tfrecord.py --csv_input=images/test_three/test.csv  --output_path=images/test.record
"""


import os
import io
import pandas as pd
import tensorflow as tf

from PIL import Image
from object_detection.utils import dataset_util
from collections import namedtuple, OrderedDict

os.chdir('/home/ying/usb/models/models-1.12.0/research/object_detection')

flags = tf.app.flags
flags.DEFINE_string('csv_input', '', 'Path to the CSV input')
flags.DEFINE_string('output_path', '', 'Path to output TFRecord')
FLAGS = flags.FLAGS


# TO-DO replace this with label map
def class_text_to_int(row_label):   # 根據自己的标簽修改
    if row_label == 'head':
        return 1
    elif row_label == 'neck':
        return 2
    elif row_label == 'tail':
        return 3
    else:
        None


def split(df, group):
    data = namedtuple('data', ['filename', 'object'])
    gb = df.groupby(group)
    return [data(filename, gb.get_group(x)) for filename, x in zip(gb.groups.keys(), gb.groups)]


def create_tf_example(group, path):
    with tf.gfile.GFile(os.path.join(path, '{}'.format(group.filename)), 'rb') as fid:
        encoded_jpg = fid.read()
    encoded_jpg_io = io.BytesIO(encoded_jpg)
    image = Image.open(encoded_jpg_io)
    width, height = image.size

    filename = group.filename.encode('utf8')
    image_format = b'jpg'
    xmins = []
    xmaxs = []
    ymins = []
    ymaxs = []
    classes_text = []
    classes = []

    for index, row in group.object.iterrows():
        xmins.append(row['xmin'] / width)
        xmaxs.append(row['xmax'] / width)
        ymins.append(row['ymin'] / height)
        ymaxs.append(row['ymax'] / height)
        classes_text.append(row['class'].encode('utf8'))
        classes.append(class_text_to_int(row['class']))

    tf_example = tf.train.Example(features=tf.train.Features(feature={
        'image/height': dataset_util.int64_feature(height),
        'image/width': dataset_util.int64_feature(width),
        'image/filename': dataset_util.bytes_feature(filename),
        'image/source_id': dataset_util.bytes_feature(filename),
        'image/encoded': dataset_util.bytes_feature(encoded_jpg),
        'image/format': dataset_util.bytes_feature(image_format),
        'image/object/bbox/xmin': dataset_util.float_list_feature(xmins),
        'image/object/bbox/xmax': dataset_util.float_list_feature(xmaxs),
        'image/object/bbox/ymin': dataset_util.float_list_feature(ymins),
        'image/object/bbox/ymax': dataset_util.float_list_feature(ymaxs),
        'image/object/class/text': dataset_util.bytes_list_feature(classes_text),
        'image/object/class/label': dataset_util.int64_list_feature(classes),
    }))
    return tf_example


def main(_):
    writer = tf.python_io.TFRecordWriter(FLAGS.output_path)
    path = os.path.join(os.getcwd(), 'images/test_three')         #  需改動
    examples = pd.read_csv(FLAGS.csv_input)
    grouped = split(examples, 'filename')
    for group in grouped:
        tf_example = create_tf_example(group, path)
        writer.write(tf_example.SerializeToString())

    writer.close()
    output_path = os.path.join(os.getcwd(), FLAGS.output_path)
    print('Successfully created the TFRecords: {}'.format(output_path))


if __name__ == '__main__':
    tf.app.run()
3. 配置檔案和模型
為了友善,我把images下的dove_three和test_three的csv和record檔案都放到object_detection/data目錄下.
在object_detection建立training檔案夾, 用于一會存放config檔案.
3.1 下載下傳預訓練模型
https://github.com/tensorflow/models/blob/master/research/object_detection/g3doc/detection_model_zoo.md

3.2 修改配置檔案
- 在object_detection/data下建立three.pbtxt記錄标簽, 内容如下:
item {
  name: "head"
  id: 1
  display_name: "head"
}
item {
  name: "neck"
  id: 2
  display_name: "neck"
}
item {
  name: "tail"
  id: 3
  display_name: "tail"
}
-
關于配置檔案,我們能夠在/research/object_detection/samples/configs/ 檔案夾下找到很多配置檔案模闆。由于我們下載下傳的是ssd_mobilenet_v2_coco模型,那麼我們就找ssd_mobilenet_v2_coco.config檔案,将這個檔案複制到training檔案夾下
開始進行配置.
model {
  ssd {
    num_classes: 3
    image_resizer {
      fixed_shape_resizer {
        height: 300
        width: 300
      }
    }
    feature_extractor {
      type: "ssd_mobilenet_v2"
      depth_multiplier: 1.0
      min_depth: 16
      conv_hyperparams {
        regularizer {
          l2_regularizer {
            weight: 3.99999989895e-05
          }
        }
        initializer {
          truncated_normal_initializer {
            mean: 0.0
            stddev: 0.0299999993294
          }
        }
        activation: RELU_6
        batch_norm {
          decay: 0.999700009823
          center: true
          scale: true
          epsilon: 0.0010000000475
          train: true
        }
      }
      #batch_norm_trainable: true
      use_depthwise: true
    }
    box_coder {
      faster_rcnn_box_coder {
        y_scale: 10.0
        x_scale: 10.0
        height_scale: 5.0
        width_scale: 5.0
      }
    }
    matcher {
      argmax_matcher {
        matched_threshold: 0.5
        unmatched_threshold: 0.5
        ignore_thresholds: false
        negatives_lower_than_unmatched: true
        force_match_for_each_row: true
      }
    }
    similarity_calculator {
      iou_similarity {
      }
    }
    box_predictor {
      convolutional_box_predictor {
        conv_hyperparams {
          regularizer {
            l2_regularizer {
              weight: 3.99999989895e-05
            }
          }
          initializer {
            truncated_normal_initializer {
              mean: 0.0
              stddev: 0.0299999993294
            }
          }
          activation: RELU_6
          batch_norm {
            decay: 0.999700009823
            center: true
            scale: true
            epsilon: 0.0010000000475
            train: true
          }
        }
        min_depth: 0
        max_depth: 0
        num_layers_before_predictor: 0
        use_dropout: false
        dropout_keep_probability: 0.800000011921
        kernel_size: 3
        box_code_size: 4
        apply_sigmoid_to_scores: false
      }
    }
    anchor_generator {
      ssd_anchor_generator {
        num_layers: 6
        min_scale: 0.20000000298
        max_scale: 0.949999988079
        aspect_ratios: 1.0
        aspect_ratios: 2.0
        aspect_ratios: 0.5
        aspect_ratios: 3.0
        aspect_ratios: 0.333299994469
      }
    }
    post_processing {
      batch_non_max_suppression {
        score_threshold: 0.300000011921
        iou_threshold: 0.600000023842
        max_detections_per_class: 100
        max_total_detections: 100
      }
      score_converter: SIGMOID
    }
    normalize_loss_by_num_matches: true
    loss {
      localization_loss {
        weighted_smooth_l1 {
        }
      }
      classification_loss {
        weighted_sigmoid {
        }
      }
      hard_example_miner {
        num_hard_examples: 3000
        iou_threshold: 0.990000009537
        loss_type: CLASSIFICATION
        max_negatives_per_positive: 3
        min_negatives_per_image: 3
      }
      classification_weight: 1.0
      localization_weight: 1.0
    }
  }
}
train_config {
  batch_size: 4
  data_augmentation_options {
    random_horizontal_flip {
    }
  }
  data_augmentation_options {
    ssd_random_crop {
    }
  }
  optimizer {
    rms_prop_optimizer {
      learning_rate {
        exponential_decay_learning_rate {
          initial_learning_rate: 0.00400000018999
          decay_steps: 800720
          decay_factor: 0.949999988079
        }
      }
      momentum_optimizer_value: 0.899999976158
      decay: 0.899999976158
      epsilon: 1.0
    }
  }
  fine_tune_checkpoint: "/home/ying/usb/models/models-1.12.0/research/object_detection/ssd_mobilenet_v2_coco_2018_03_29/model.ckpt"
  num_steps: 200000
  fine_tune_checkpoint_type: "detection"
  from_detection_checkpoint: true
}
train_input_reader {
  label_map_path: "/home/ying/usb/models/models-1.12.0/research/object_detection/data/three.pbtxt"
  tf_record_input_reader {
    input_path: "/home/ying/usb/models/models-1.12.0/research/object_detection/data/train_three.record"
  }
}
eval_config {
  num_examples: 24
  max_evals: 10
  use_moving_averages: false
  metrics_set: "coco_detection_metrics"
}
eval_input_reader {
  label_map_path: "/home/ying/usb/models/models-1.12.0/research/object_detection/data/three.pbtxt"
  shuffle: false
  num_readers: 1
  tf_record_input_reader {
    input_path: "/home/ying/usb/models/models-1.12.0/research/object_detection/data/test_three.record"
  }
}
由于配置檔案參數很多,我就講幾個隻要簡單改動後就能訓練的參數:
1)num_classes: 這個參數就是你所訓練模型的檢測目标數(我的是三類)
2)decay_steps: 這個參數的意義是每訓練decay_steps步數,就進行将學習率将低一次(new_learning_rate = old_learnning_rate * decay_factor)這個根據個人訓練情況改,因為這裡并不是從頭訓練(我使用的遷移學習方法),而且我就準備疊代20000步,是以就加快降低學習率的速度(學習率過大會導緻準确率一直震蕩,很難收斂)。
3)fine_tune_checkpoint: 這個參數就是加載預訓練模型的路徑,也就是我們下載下傳解壓的ssd_mobilenet_v2_coco路徑。
4)from_detection_checkpoint: 這個參數是選擇加載全部模型參數true,還是隻加載前置網絡模型參數(分類網絡)false。
5)num_steps: 20000 這個參數就是總疊代步數
6)input_path: 這個參數就是讀取tfrecord檔案的路徑,在train_input_reader中填pascal_train.record路徑,在eval_input_reader中填pascal_val.record路徑。
7)label_map_path: 這個參數就是pascal_label_map.pbtxt字典檔案的路徑。
8)num_examples: 這個參數就是你驗證集的圖像數目。
9)metrics_set: 這個參數指定在驗證時使用哪種評價标準,這裡使用的是"coco_detection_metrics"
關于如何控制驗證頻率的問題:
在之前的版本中可以在eval_config中設定eval_interval_secs的值來改變驗證之間的間隔,但現在已經失效了。官方也有說要解決這個問題,但到現在還未解決。下面給出一個控制驗證間隔的方法:
打開 research/object_detection/model_lib.py檔案在create_train_and_eval_specs函數中,大概750行左右的位置有如下代碼:
tf.estimator.EvalSpec(
                name=eval_spec_name,
                input_fn=eval_input_fn,
                steps=None,
                exporters=exporter)
在tf.estimator.EvalSpec函數中添加如下一行(throttle_secs=3600,代表間隔1個小時驗證一次,在Tensorflow文檔,tf.estimator.EvalSpec函數中,預設參數start_delay_secs=120,throttle_secs=600代表預設從訓練開始的第120秒開始第一次驗證,之後每隔600秒驗證一次):
tf.estimator.EvalSpec(
                name=eval_spec_name,
                input_fn=eval_input_fn,
                steps=None,
                exporters=exporter,
                throttle_secs=3600)
修改完配置檔案後,我們就可以開始訓練模型了
4. 訓練
我們回到 models-1.12.0/research檔案夾下,建立一個訓練模型的腳本檔案(train.sh):
PIPELINE_CONFIG_PATH=/home/ying/usb/models/models-1.12.0/research/object_detection/training/pipeline.config
MODEL_DIR=/home/ying/usb/models/models-1.12.0/research/object_detection/train
NUM_TRAIN_STEPS=20000
SAMPLE_1_OF_N_EVAL_EXAMPLES=1
python object_detection/model_main.py \
    --pipeline_config_path=${PIPELINE_CONFIG_PATH} \
    --model_dir=${MODEL_DIR} \
    --num_train_steps=${NUM_TRAIN_STEPS} \
    --sample_1_of_n_eval_examples=$SAMPLE_1_OF_N_EVAL_EXAMPLES \
    --logtostderr
其中PIPELINE_CONFIG_PATH是我們的config配置檔案路徑;MODEL_DIR是訓練模型的儲存位置;NUM_TRAIN_STEPS是總共訓練的步數;SAMPLE_1_OF_N_EVAL_EXAMPLES是驗證過程中對樣本的采樣頻率(在之前說過,假設為n則表示隻對驗證樣本中的n分一的樣本進行采樣驗證),若為1表示将驗證所有樣本,一般設為1。建立好腳本檔案後通過sh train_VOC.sh開始執行。
如果需要在背景運作可通過以下指令,通過該指令将終端輸出資訊定向輸出到train.log檔案中:
通過下面指令檢視log中的資訊:
tail -f train.log
若需要提前終止程式,可通過查詢對應程式的pid進行終止。
ps -ef | grep python  # 查找背景運作的所有pyhton程式的pid
    kill -9 9208  # 終端pid為9208的程式
在coco的檢測标準中IOU=0.50:0.95對應的Average Precision為0.367,IOU=0.50(IOU=0.5可以了解為pscal voc的評價标準)對應的Average Precision為0.604。
4.1 使用tensorboard檢視訓練過程
在訓練過程中,所有的訓練檔案都儲存在我們的train檔案夾下,打開train檔案夾你會發現裡面有個eval_0檔案夾,這個檔案裡儲存是在整個訓練過程中在驗證集上的準确率變化。我們通過終端進入train檔案夾,接着輸入以下指令調用tensorboard:
輸入指令後終端會列印出一個本地網頁連結,複制該連結,打開你的浏覽器輸入該連結就能看到整個過程的訓練結果。在SCALARS欄中有DetectionBoxes_Precision、DetectionBoxes_Pecall、Loss、leaning_rate等曲線,在IMAGES欄中有使用模型在驗證集上預測的圖像,左側是預測的結果右側是标準檢測結果。GRAPHS是整個訓練的流程圖。
5. 當機模型參數
模型訓練完成後所有的參數是以model.ckpt.data、model.ckpt.meta和model.ckpt.index三個檔案共同儲存,在我們使用的ssd_mobilenet_v2模型中,模型ckpt檔案大小約78M,如果将模型參數當機後隻有20M。當然,不論是ckpt檔案還是當機後的pb檔案我們都能夠進行調用,但ckpt檔案更适合在訓練模型等實驗過程中使用,而pb檔案是根據我們需要的輸出節點反向查找将ckpt中不需要的節點全部删除後獲得的檔案(還将模型參數的儲存形式進行了改變)由于該檔案占用記憶體更小,更适合部署在你所需要使用的裝置上。(tensorflow還有很多方法能夠将模型的大小進一步縮減占用更少的記憶體)
我們直接進入 models-1.12.0/research/ 檔案夾下,建立當機模型權重腳本(export_Pb.sh):
INPUT_TYPE=image_tensor
PIPELINE_CONFIG_PATH=/home/ying/usb/models/models-1.12.0/research/object_detection/training/pipeline.config
TRAINED_CKPT_PREFIX=/home/ying/usb/models/models-1.12.0/research/object_detection/train/model.ckpt-20000
EXPORT_DIR=/home/ying/usb/models/models-1.12.0/research/object_detection/eval
python object_detection/export_inference_graph.py \
    --input_type=${INPUT_TYPE} \
    --pipeline_config_path=${PIPELINE_CONFIG_PATH} \
    --trained_checkpoint_prefix=${TRAINED_CKPT_PREFIX} \
    --output_directory=${EXPORT_DIR}
PIPELINE_CONFIG_PATH就是模型的config配置檔案路徑;TRAINED_CKPT_PREFIX是訓練模型的ckpt權重最後面的數字對應的訓練步數(一般選擇最後儲存的一個ckpt就行);EXPORT_DIR就是當機模型pb的輸出位置。執行腳本後在/xxx/model/eval/目錄下就會生成我們所需要的pb檔案(frozen_inference_graph.pb)。
6. 調用pb檔案進行預測
object_detection檔案夾下的test_images檔案夾中放測試圖檔
建立一個python檔案main.py,将下面代碼複制到py檔案中,該代碼是根據官網的object_detection_tutorial.ipynb教程簡單修改得到的。代碼中也有注釋,便于了解。
import numpy as np
import os
import glob
import tensorflow as tf
import time
from distutils.version import StrictVersion
import matplotlib
from matplotlib import pyplot as plt
from PIL import Image
import keras
import tensorflow as tf

from object_detection.utils import ops as utils_ops

from object_detection.utils import label_map_util

from object_detection.utils import visualization_utils as vis_util

config = tf.ConfigProto()
config.gpu_options.allow_growth = True
keras.backend.tensorflow_backend.set_session(tf.Session(config=config))
# 防止backend='Agg'導緻不顯示圖像的情況
#os.environ["CUDA_VISIBLE_DEVICES"] = "-1"        #CPU
matplotlib.use('TkAgg')

if StrictVersion(tf.__version__) < StrictVersion('1.12.0'):
    raise ImportError('Please upgrade your TensorFlow installation to v1.12.*.')

MODEL_NAME = 'eval'

# Path to frozen detection graph. This is the actual model that is used for the object detection.
PATH_TO_FROZEN_GRAPH = MODEL_NAME + '/frozen_inference_graph.pb'

# List of the strings that is used to add correct label for each box.
PATH_TO_LABELS = 'data/three.pbtxt'

detection_graph = tf.Graph()
with detection_graph.as_default():
    od_graph_def = tf.GraphDef()
    with tf.gfile.GFile(PATH_TO_FROZEN_GRAPH, 'rb') as fid:
        serialized_graph = fid.read()
        od_graph_def.ParseFromString(serialized_graph)
        tf.import_graph_def(od_graph_def, name='')

category_index = label_map_util.create_category_index_from_labelmap(PATH_TO_LABELS, use_display_name=True)

def load_image_into_numpy_array(image):
    im_width, im_height = image.size
    return np.array(image.getdata()).reshape(
        (im_height, im_width, 3)).astype(np.uint8)

# For the sake of simplicity we will use only 2 images:
# image1.jpg
# image2.jpg
# If you want to test the code with your images, just add path to the images to the TEST_IMAGE_PATHS.
PATH_TO_TEST_IMAGES_DIR = 'test_images/*.jpg'
TEST_IMAGE_PATHS = glob.glob(PATH_TO_TEST_IMAGES_DIR)

# Size, in inches, of the output images.
IMAGE_SIZE = (12, 8)

def run_inference_for_single_image(image, graph):
    with graph.as_default():
        with tf.Session() as sess:
            # Get handles to input and output tensors
            ops = tf.get_default_graph().get_operations()
            all_tensor_names = {output.name for op in ops for output in op.outputs}
            tensor_dict = {}
            for key in [
                'num_detections', 'detection_boxes', 'detection_scores',
                'detection_classes', 'detection_masks'
            ]:
                tensor_name = key + ':0'
                if tensor_name in all_tensor_names:
                    tensor_dict[key] = tf.get_default_graph().get_tensor_by_name(
                        tensor_name)
            if 'detection_masks' in tensor_dict:
                # The following processing is only for single image
                detection_boxes = tf.squeeze(tensor_dict['detection_boxes'], [0])
                detection_masks = tf.squeeze(tensor_dict['detection_masks'], [0])
                # Reframe is required to translate mask from box coordinates to image coordinates and fit the image size.
                real_num_detection = tf.cast(tensor_dict['num_detections'][0], tf.int32)
                detection_boxes = tf.slice(detection_boxes, [0, 0], [real_num_detection, -1])
                detection_masks = tf.slice(detection_masks, [0, 0, 0], [real_num_detection, -1, -1])
                detection_masks_reframed = utils_ops.reframe_box_masks_to_image_masks(
                    detection_masks, detection_boxes, image.shape[1], image.shape[2])
                detection_masks_reframed = tf.cast(
                    tf.greater(detection_masks_reframed, 0.5), tf.uint8)
                # Follow the convention by adding back the batch dimension
                tensor_dict['detection_masks'] = tf.expand_dims(
                    detection_masks_reframed, 0)
            image_tensor = tf.get_default_graph().get_tensor_by_name('image_tensor:0')

            # Run inference
            output_dict = sess.run(tensor_dict,
                                   feed_dict={image_tensor: image})

            # all outputs are float32 numpy arrays, so convert types as appropriate
            output_dict['num_detections'] = int(output_dict['num_detections'][0])
            output_dict['detection_classes'] = output_dict[
                'detection_classes'][0].astype(np.int64)
            output_dict['detection_boxes'] = output_dict['detection_boxes'][0]
            output_dict['detection_scores'] = output_dict['detection_scores'][0]
            if 'detection_masks' in output_dict:
                output_dict['detection_masks'] = output_dict['detection_masks'][0]
    return output_dict

for image_path in TEST_IMAGE_PATHS:
    image = Image.open(image_path)
    start = time.time()
    # the array based representation of the image will be used later in order to prepare the
    # result image with boxes and labels on it.
    image_np = load_image_into_numpy_array(image)
    # Expand dimensions since the model expects images to have shape: [1, None, None, 3]
    image_np_expanded = np.expand_dims(image_np, axis=0)
    # Actual detection.
    output_dict = run_inference_for_single_image(image_np_expanded, detection_graph)
    # Visualization of the results of a detection.
    vis_util.visualize_boxes_and_labels_on_image_array(
        image_np,
        output_dict['detection_boxes'],
        output_dict['detection_classes'],
        output_dict['detection_scores'],
        category_index,
        instance_masks=output_dict.get('detection_masks'),
        use_normalized_coordinates=True,
        line_thickness=8)
    print("class:",output_dict['detection_classes'])
    print("score:",output_dict['detection_scores'])
    end = time.time()
    print("internel:",end-start)
    plt.figure(figsize=IMAGE_SIZE)
    plt.imshow(image_np)
    plt.show()