一 安装MinGW:
首先去官网下载一个安装器mingw-get-inst-20120426,下载后只是个安装器,需要在线下载真正的安装内容,所以速度不会快。具体步骤如下:
1、选择安装版本(Repository Catalogues)
有两个选择,一个是当前打包版本,另一个是下载最新版本。只要你的安装器是从官方下载的,选择前者即可,结果一般就是最新版本。
2、设置安装目录 默认安装到C:\MinGW
3、选择安装组件
这个根据大家需要选择安装组件(C编译器、C++编译器、Fortran编译器、ObjC编译器、Ada编译器等),一般选择C/C++编译器即可,看各位用途确定,组件列表中还有MSYS小系统等可供选择。(简单应用只选C/C++ 编译器就行)
4、等待下载并安装完成
5、设置MinGW环境变量
依次鼠标点击桌面“我的电脑”->选择左侧的“高级系统设置”,选择“高级”->“环境变量”,然后再Path里增加;C:\MinGW\bin声明。点击确定。(环境变量一般重启后生效)。
另外注意,一般添加上面一个path就可以了,若不行,可以添加下面详细配置:(4.5.4是MinGW当前版本)
path 添加 C:\MinGW\bin;C:\MinGW\libexec\gcc\mingw32\4.5.2;C:\MinGW\mingw32\bin
include 添加 C:\MinGW\include;C:\MinGW\lib\gcc\mingw32\4.5.2\include
lib 添加 C:\MinGW\lib;
6. 重启后,简单测试:
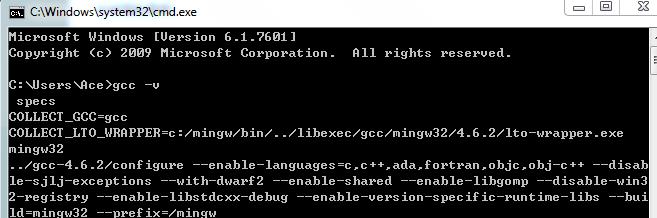
① cmd输入Gcc -v查看Gcc 版本信息 正确如下:
② 编译运行C 程序
text.cpp
#include <stdio.h>
   int main() {
	printf("Hello World!");
        return 0;
    }
编译命令:g++ test.cpp -o test
输出结果为:test.exe
cmd下运行程序:输出Hello World! 安装设置正确
二、 不利用下面的插件NppExec来添加编译运行命令:
①"Run"-> "Run..." 代开对话框如下:cmd /k "g++ $(FULL_CURRENT_PATH) -o $(CURRENT_DIRECTORY)\$(NAME_PART) "& PAUSE & EXIT,然后Svae为ComplieCpp,运行即可编译。
②“Run” -> "Run...", 打开对话框如下,输入cmd /k "$(CURRENT_DIRECTORY)\$(NAME_PART).exe" & PAUSE & EXIT ,然后Save为RunCppExe运行,
③在Menu->"Run“下来菜单下,可以看到ComplieCpp和RunCppExe选项

三、NotePad++ Plugins
注意自己的NotePad++ 应该也是Unicode版
google搜 notepad plugins 可以找到这两个软件的最新版下载即可
1、Function List ( Unicode )
当前最新版本:Version 2.1
发布日期:2010-02-18
2、NppExec ( Unicode )
当前最新版本:Version 0.4.1
发布日期:2010-07-22
3. 安装说明
如何安装NotePad++的插件,其官网原文如下:
Usually, the only installation procedure plugins require is to
place the dll in the plugins subfolder of the Notepad++ install folder;
place any configuration file it comes with in plugin\config
preferrably, place all documentation files in plugin\doc, or in some subfolder of it
Notepad++ loads plugins at startup. To load a new plugin, you can either close and restart Notepad++, or use the Settings -> Import -> Import plugin command. The latter will copy the dll in the plugin folder if it is not already there.
译文:
通常情况下,安装程序插件只需要执行如下方法:
将DLL文件复制到Notepad++安装目录的plugins目录下;
将配置文件复制到plugins\Config目录下;
更好的做法,将所有的文档文件复制到plugins\doc目录下,或它的子目录下。
Notepad++在启动的时候载入插件。要载入一个新插件,你可以关闭并重启Notepad++,或使用 Setting -> Import -> Import plugin 命令。稍后将复制插件的DLL到plugins目录下。
一般下载一个插件,里面都有其install.txt 可以查看
4. FunctionList 安装
Function list 2.1 hangs (up to "50%" indicated) with VHDL and crashes when selecting other language.
Function List 2.01 crashes, npp (from 5.8 to 6.3.2) doesn't launch.
插件好久不更新了,好像有问题,安装不成功。附加一个文章:
http://blog.sina.com.cn/s/blog_53d27b3a0101bmqz.html
In Windows Vista:-
Copy FunctionList.dll in C:\Program Files\Notepad++\plugins-
Copy C++.flb and Gmod Lua.bmp in C:\Program Files\Notepad++\plugins\Config-
Copy FunctionListRules.xml in C:\Users\USERNAME\AppData\Roaming\Notepad++\plugins\config
下面中文方法不采用
1>、下载并解压 FunctionList_2_1_UNI_dll.zip。
2>、将 FunctionList.dll 复制到Notepad++ 的 plugins 目录下。
3>、将C++.flb、FunctionListRules.xml、Gmod Lua.bmp 复制到 plugins\Config 目录下。
4>、重启NotePad++。
5. NppExec插件安装和配置 / Howto Install and Configure Plugin "NppExec"
1、NppExec安装。
下载并解压 NppExec_041_dll_Unicode.zip。
将 NppExec.dll 和目录NppExec 复制到Notepad++ 的 plugins 目录下。
将doc目录下的 fparser.html、NppExec.txt、NppExec_Manual.chm、NppExec_Manual.knt、NppExec_TechInfo.txt 复制到 plugins\doc\NppExec 目录下。
重启NotePad++。
2、NppExec配置。
1. Menu -> Plugins -> NppExec -> Execute...。
打开Execute...对话框
2. 配置编译C文件。
进入“Execute...” 对话框,输入 cmd /c "gcc $(FULL_CURRENT_PATH) -o $(CURRENT_DIRECTORY)\$(NAME_PART) ",点击“Save...”按钮保存,命名为“CompileC”。
MinGW 安装 及 NotePad++配置C/C ++环境 插件安装一 安装MinGW:二、 不利用下面的插件NppExec来添加编译运行命令:三、NotePad++ Plugins 四、NotePad++ 开启自动联想提示 / NotePad++ - Enable Autocompletion 注:
运行下方,点击保存成常用运行命令,并可设置快捷键
$(NAME_PART) :当前操作文件的文件名,不含后缀
$(FULL_CURRENT_PATH) :当前操作文件的完整路径,包括盘符、路径、文件名、后缀
& PAUSE :运行后暂停等待键盘操作
& EXIT :完成后退出运行窗口,回到notepad++
GCC :C语言编译器
G++ : C++语言编译器
MinGW 安装 及 NotePad++配置C/C ++环境 插件安装一 安装MinGW:二、 不利用下面的插件NppExec来添加编译运行命令:三、NotePad++ Plugins 四、NotePad++ 开启自动联想提示 / NotePad++ - Enable Autocompletion 3. 配置编译C++文件。
进入“Execute...” 对话框,输入 cmd /c "g++ $(FULL_CURRENT_PATH) -o $(CURRENT_DIRECTORY)\$(NAME_PART) ",点击“Save...”按钮保存,命名为“CompileC++”。
MinGW 安装 及 NotePad++配置C/C ++环境 插件安装一 安装MinGW:二、 不利用下面的插件NppExec来添加编译运行命令:三、NotePad++ Plugins 四、NotePad++ 开启自动联想提示 / NotePad++ - Enable Autocompletion 4、 运行C/C ++ 当前编译后的*.exe程序MinGW 安装 及 NotePad++配置C/C ++环境 插件安装一 安装MinGW:二、 不利用下面的插件NppExec来添加编译运行命令:三、NotePad++ Plugins 四、NotePad++ 开启自动联想提示 / NotePad++ - Enable Autocompletion
进入“Execute...” 对话框,输入cmd /c "$(CURRENT_DIRECTORY)\$(NAME_PART).exe" ,点击“Save...”按钮保存,命名为“RunProgram” (名字自定)。MinGW 安装 及 NotePad++配置C/C ++环境 插件安装一 安装MinGW:二、 不利用下面的插件NppExec来添加编译运行命令:三、NotePad++ Plugins 四、NotePad++ 开启自动联想提示 / NotePad++ - Enable Autocompletion MinGW 安装 及 NotePad++配置C/C ++环境 插件安装一 安装MinGW:二、 不利用下面的插件NppExec来添加编译运行命令:三、NotePad++ Plugins 四、NotePad++ 开启自动联想提示 / NotePad++ - Enable Autocompletion 5、将“CompileC”,“CompileC++”,“RunProgram” 添加到宏菜单(Macros)下并添加快捷键。
1)打开菜单 Plugins -> NppExec ->Advanced Options...
2)在Associated script:下面下拉框中选择“CompileC”,“CompileC++”,点击“Add/Modify”按钮将它们依次添加到Menu items下面的列表中。
选择 "Place to the Macros submenu"复选框。
MinGW 安装 及 NotePad++配置C/C ++环境 插件安装一 安装MinGW:二、 不利用下面的插件NppExec来添加编译运行命令:三、NotePad++ Plugins 四、NotePad++ 开启自动联想提示 / NotePad++ - Enable Autocompletion MinGW 安装 及 NotePad++配置C/C ++环境 插件安装一 安装MinGW:二、 不利用下面的插件NppExec来添加编译运行命令:三、NotePad++ Plugins 四、NotePad++ 开启自动联想提示 / NotePad++ - Enable Autocompletion 3)打开菜单 Macro ,可以看到“CompileC”,“CompileC++” "RunProgram"都已经添加到宏菜单(Macros)下。
注意:在编译运行的程序中,路名名称内不要含有空格
4) 添加命令快捷键:
- Go to Menu Settings -> Shortcut mappter -> Plugins -> search for the script name
- Select the shortcut to use (ie ctrl + F9/F10), click ok (note: It cannot work when I set ctrl+1/2/3, Why? )
- Verify that you can now run the script created with the shortcut selected.
四、NotePad++ 开启自动联想提示 / NotePad++ - Enable Autocompletion
1、打开菜单 Settings -> Preferences...。
2、点击 Backup/Auto-Completion 选项卡。
选择 Enable auto-completion on each input.
选择 World completion。
选择 Function parameters hint on input
3、在编辑区域中,输入内容,自动联想提示功能效果如下图所示。
MinGW 安装 及 NotePad++配置C/C ++环境 插件安装一 安装MinGW:二、 不利用下面的插件NppExec来添加编译运行命令:三、NotePad++ Plugins 四、NotePad++ 开启自动联想提示 / NotePad++ - Enable Autocompletion 原文参考资料: 1. http://aofengblog.blog.163.com/blog/static/63170212010111164752194 2. http://www.metsky.com/archives/588.html 注明:本文因参考资料配置未能成功,参考网上一些资料,整理出来,以备后用。MinGW 安装 及 NotePad++配置C/C ++环境 插件安装一 安装MinGW:二、 不利用下面的插件NppExec来添加编译运行命令:三、NotePad++ Plugins 四、NotePad++ 开启自动联想提示 / NotePad++ - Enable Autocompletion