RestFul风格是一种非常流行的架构风格,相关实战可以参考我的这篇博客: SSM框架之RestFul示例
论文可参考:https://www.ics.uci.edu/~fielding/pubs/dissertation/top.htm
关于论文,我想说的是,程序员不要对英文产生恐惧感,现在的翻译工具多的多,当然了,多也代表一些杂碎的也不少,所以就需要我们学会如何甄别。
我英语也不好,不过我目前也在学会如何看英文文档,其实英文并没有那么可怕,相反,它还是很有趣的,毕竟我们天天对诸如Eclipse或IDEA这样的英文软件,而且还写着一大堆的英文代码,日子久了,自然都知道是什么意思了。
记得唐代有句古诗:熟读唐诗三百首,不会做诗也会吟。
对于天天敲着英文代码的我们而言,也是如此。每个人都有一个过程,过程周期有长有短。
在这里再闲扯一句,外国人的技术创新能力不容小觑,我们现在用的很多技术,都已经是人家用了好多年甚至已经过时了的,随着经济全球化越来越广越来越深,而且目前国内的培训机构和大学生研究生硕士博士等,如果不想被淘汰,必须要掌握强大学习能力。其中有一项就是英文要会。先不说会不会说,发音标不标准,至少要看的懂是什么意思吧。
总而言之,送我自己和大家一句话,循序渐进。
构建环境为:JDK8+MAVNE3以上+Eclipse
本示例参考Spring官方文档:https://spring.io/guides/gs/rest-service/
一、构建maven依赖
<?xml version="1.0" encoding="UTF-8"?>
<project xmlns="http://maven.apache.org/POM/4.0.0" xmlns:xsi="http://www.w3.org/2001/XMLSchema-instance"
    xsi:schemaLocation="http://maven.apache.org/POM/4.0.0 http://maven.apache.org/xsd/maven-4.0.0.xsd">
    <modelVersion>4.0.0</modelVersion>

    <groupId>org.springframework</groupId>
    <artifactId>gs-rest-service</artifactId>
    <version>0.1.0</version>

    <parent>
        <groupId>org.springframework.boot</groupId>
        <artifactId>spring-boot-starter-parent</artifactId>
        <version>1.5.8.RELEASE</version>
    </parent>

    <dependencies>

        <dependency>
            <groupId>org.springframework.boot</groupId>
            <artifactId>spring-boot-starter-web</artifactId>
        </dependency>
        <dependency>
            <groupId>org.springframework.boot</groupId>
            <artifactId>spring-boot-starter-test</artifactId>
            <scope>test</scope>
        </dependency>
        <dependency>
            <groupId>com.jayway.jsonpath</groupId>
            <artifactId>json-path</artifactId>
            <scope>test</scope>
        </dependency>
    </dependencies>

    <properties>
        <java.version>1.8</java.version>
    </properties>


    <build>
        <plugins>
            <plugin>
                <groupId>org.springframework.boot</groupId>
                <artifactId>spring-boot-maven-plugin</artifactId>
            </plugin>
        </plugins>
    </build>

    <repositories>
        <repository>
            <id>spring-releases</id>
            <url>https://repo.spring.io/libs-release</url>
        </repository>
    </repositories>
    <pluginRepositories>
        <pluginRepository>
            <id>spring-releases</id>
            <url>https://repo.spring.io/libs-release</url>
        </pluginRepository>
    </pluginRepositories>
</project>
二、构建实体
package hello;

public class Greeting {
    private final long id;
    private final String content;

    public Greeting(long id, String content) {
        this.id = id;
        this.content = content;
    }

    public long getId() {
        return id;
    }

    public String getContent() {
        return content;
    }
}
三、构建Controller
package hello;

import java.util.concurrent.atomic.AtomicLong;

import org.springframework.web.bind.annotation.RequestMapping;
import org.springframework.web.bind.annotation.RequestParam;
import org.springframework.web.bind.annotation.RestController;

@RestController
public class GreetingController {
      private static final String template = "Hello, %s!";
        private final AtomicLong counter = new AtomicLong();

        @RequestMapping("/greeting")
        public Greeting greeting(@RequestParam(value="name", defaultValue="World") String name) {
            return new Greeting(counter.incrementAndGet(),
                                String.format(template, name));
        }
}
关于RestController和Controller存在什么不同,主要是RestController中存在一个全局的ResponseBody,从而保证返回的异步数据为JSON数据。
可参考我的博客:
前后端交互之封装Ajax+SpringMVC源码分析另外这里也说说@RequestParam,其实加这个不加这个都可以获取参数,唯一的区别是,如果不加@RequestParm,你必须要确保前台的ajax或者同步请求的参数名必须与后台Controller中对应方法上参数列表中的参数名保持一致,否则会导致参数传输不过来,从而导致某些异常错误信息。
而加了@RequestParam,你可以让前台的值不与后台一致,你只需如下即可:
例如我前台的参数名叫test,我后台加了@RequestParam(value="test") String test001,这样就可以获取对应的参数了。同时的话,我还有可以增加一个叫required的参数,required无论是在input的属性还是后台,都有一个共性叫是否必填。后台中默认是false,不必填,当为true时,为必填。
而前台html中input,加了required,如果不在对应的表单中输入信息,就会提示此表单为必填项诸如此类的信息。
提到@RequestParam时,还不得不提一个叫@PathVariable的注解,这个注解对于经常写博客的友友们非常不陌生,为什么这么说了,比如大家有没有观察到博客园的导航栏
例如:
以我为例
https://home.cnblogs.com/u/youcong/
/u,我想应该是关于用户对应的名称或参数名,而/youcong就是对应的参数值。
这和https://i.cnblogs.com/posts?page=2本质上是一样的,只是参数呈现的表现方式不一样。
从而也凸显@RequestParam和@PathVariable的区别之一。
四、构建启动类
package hello;
import org.springframework.boot.SpringApplication;
import org.springframework.boot.autoconfigure.SpringBootApplication;
@SpringBootApplication
public class Application {
public static void main(String[] args) {
SpringApplication.run(Application.class, args);
}
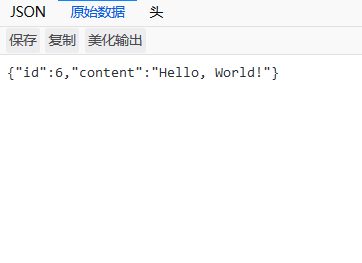
} 五、执行Application中的main方法即可运行一个SpringBoot的restful风格
最终结果如下图所示:
另外不得不提下SpringBootApplication的源码:
源码如下:
* Copyright 2012-2017 the original author or authors.

package org.springframework.boot.autoconfigure;

import java.lang.annotation.Documented;
import java.lang.annotation.ElementType;
import java.lang.annotation.Inherited;
import java.lang.annotation.Retention;
import java.lang.annotation.RetentionPolicy;
import java.lang.annotation.Target;

import org.springframework.boot.SpringBootConfiguration;
import org.springframework.boot.context.TypeExcludeFilter;
import org.springframework.context.annotation.Bean;
import org.springframework.context.annotation.ComponentScan;
import org.springframework.context.annotation.ComponentScan.Filter;
import org.springframework.context.annotation.Configuration;
import org.springframework.context.annotation.FilterType;
import org.springframework.core.annotation.AliasFor;

/**
 * Indicates a {@link Configuration configuration} class that declares one or more
 * {@link Bean @Bean} methods and also triggers {@link EnableAutoConfiguration
 * auto-configuration} and {@link ComponentScan component scanning}. This is a convenience
 * annotation that is equivalent to declaring {@code @Configuration},
 * {@code @EnableAutoConfiguration} and {@code @ComponentScan}.
 *
 * @author Phillip Webb
 * @author Stephane Nicoll
 * @since 1.2.0
 */
@Target(ElementType.TYPE)
@Retention(RetentionPolicy.RUNTIME)
@Documented
@Inherited
@SpringBootConfiguration
@EnableAutoConfiguration
@ComponentScan(excludeFilters = {
		@Filter(type = FilterType.CUSTOM, classes = TypeExcludeFilter.class),
		@Filter(type = FilterType.CUSTOM, classes = AutoConfigurationExcludeFilter.class) })
public @interface SpringBootApplication {

	/**
	 * Exclude specific auto-configuration classes such that they will never be applied.
	 * @return the classes to exclude
	 */
	@AliasFor(annotation = EnableAutoConfiguration.class, attribute = "exclude")
	Class<?>[] exclude() default {};

	/**
	 * Exclude specific auto-configuration class names such that they will never be
	 * applied.
	 * @return the class names to exclude
	 * @since 1.3.0
	 */
	@AliasFor(annotation = EnableAutoConfiguration.class, attribute = "excludeName")
	String[] excludeName() default {};

	/**
	 * Base packages to scan for annotated components. Use {@link #scanBasePackageClasses}
	 * for a type-safe alternative to String-based package names.
	 * @return base packages to scan
	 * @since 1.3.0
	 */
	@AliasFor(annotation = ComponentScan.class, attribute = "basePackages")
	String[] scanBasePackages() default {};

	/**
	 * Type-safe alternative to {@link #scanBasePackages} for specifying the packages to
	 * scan for annotated components. The package of each class specified will be scanned.
	 * <p>
	 * Consider creating a special no-op marker class or interface in each package that
	 * serves no purpose other than being referenced by this attribute.
	 * @return base packages to scan
	 * @since 1.3.0
	 */
	@AliasFor(annotation = ComponentScan.class, attribute = "basePackageClasses")
	Class<?>[] scanBasePackageClasses() default {};

}
另外也提提@SpringBootApplication的注解包含的意思:
-
@Configuration
-
@EnableAutoConfiguration
- 通常你会添加
@EnableWebMvc
DispatcherServlet
-
@ComponentScan
hello
![GitHub连夜封杀!这份阿里 10W 字内部 Java 字面试手册到底有多强?[图]](data:image/gif;base64,R0lGODlhAQABAIAAAP///wAAACwAAAAAAQABAAACAkQBADs=)