Source | Noone's blog
Commonly used thoracic forms and distributions
The provincial highway forms are rich and colorful, both in the form of provincial seams, as well as in different positions, and in single provinces and multiple provinces. But to sum up, the provincial road forms we often use, the most basic main are the following: sleeve augmentation province, sleeve breast augmentation province, chest and shoulder province, chest and neck province, chest and neck province, chest and waist province, armpit province. The most important back provinces are the following: sleeve ridge back province, back shoulder province, back inter-shoulder province.
Transfer methods for provincial roads
There are basically two kinds of transfer methods for provincial roads: one is the shear transfer method; The second is the geometric transfer method. The so-called shear transfer method is a method of rotating the pre-made prototype paper sample down on the chest height point to transfer the savings to a new position. This method is intuitive and easy to understand, many plate makers use this method, the disadvantage is that the operation steps are troublesome. The so-called geometric transfer method is a method of using geometry to map the chest height point or the back high point as the center of the circle, transfer a part of the model according to the same angle, and transfer the provincial road to a new location. This method is fast and can be done in one step for cost-effective transfers. The shear plate making method is the basis of the geometric transfer method.
In the geometric transfer method, in order to facilitate the transfer of the provincial road, as shown in the following figure, we divide the upper piece into the upper middle piece and the upper side piece through the upper line; The lower slice is divided into lower mid-slice and lower-side-by-side via the downline. The specific partitioning method is as follows:
We call the upper line above the back high the back line. The back line starts at the back high, ends at the back high and is perpendicular to the back high, then also parallel to the back center of gravity. In this way, the post-upper film is divided into the post-upper middle plate and the post-upper side plate.
We call the lower line below the back high the back line the back line. The dorsal line starts at the dorsal high, ends at the waistline (which ends at the hip line in the thorax-hip prototype) and is perpendicular to the waistline, then also parallel to the posterior center of gravity line. In this way, the rear lower film is divided into the rear lower middle piece and the rear lower side piece (the principle of the division of the front upper piece and the front lower piece is the same as the rear piece). By dividing the upper piece on the upper piece, the back shoulder width 19 is also divided into two segments, namely 10 and 9; The front shoulder width 18 is also divided into two segments, namely 8.4 and 9.6.
The above is about the segmentation of the upper part of the line. The following describes the reference lines for the transfer of four provincial roads: the back-province busbar and the back-province sub-line, the chest-saving busbar and the chest-province sub-line. For the convenience and easy control of the transfer of the provincial road, these two busbars and two sub-lines are designed here. The busbar starts at the back high or chest height, and ends at the back circle or chest circle, which can also be understood as the radius line of the back circle or chest circle. However, one of the biggest features of these two busbars is that no matter what the situation, the busbar is always vertical, and the angle between the busbar and the sub-line is equal to the amount of provincial tract. This angled state between the sub-line and the busbar will not change during any plate making process.
The figure below is the basic structural frame line of the prototype, and the provincial road geometric transfer of the meter prototype is based on the large frame line. The advantage of this drawing method is that it is easy to understand and grasp the cumbersome provincial road transfer, and the complex provincial road transfer and the prototype esoteric structural principles are generalized and unified. On the basis of grasping the overall structure of the plate making, the details are drawn.

As shown in Figures 16 and 17, busbars and sublines were added to the box meter prototype, and some data was added, which also needed to be memorized skillfully.
Transfer of the lower province of the sleeve and the province of the back of the sleeve
(1) Shearing method
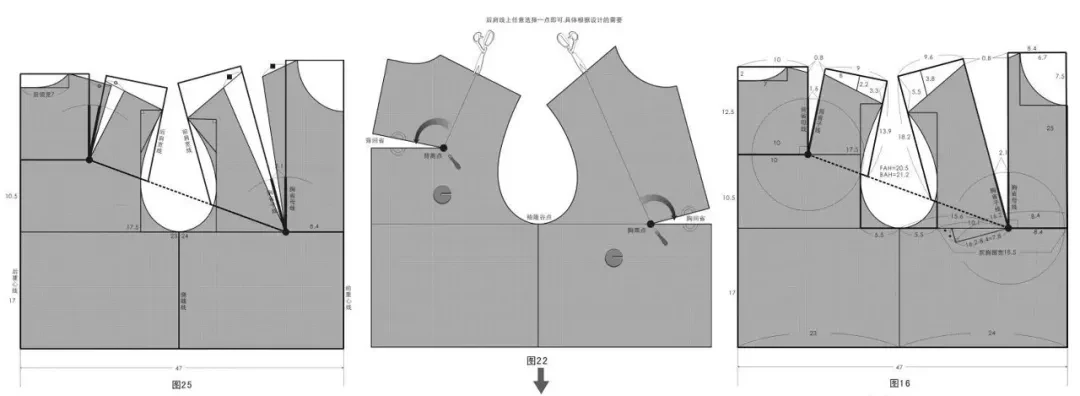
Shown in the figure above is an existing box meter prototype. Now let's first transfer the backlash with the shear method. As shown in Figure 16, first we press the rear lower piece with heavy objects (such as scales, stones, etc.), determine a point according to the design position on the arc of the rear sleeve, connect this point with the back high point into a line, and cut along this line with scissors. Always align the back high point of the rear upper film with the back high point of the rear lower piece, and then rotate the back top piece counterclockwise until the dorsal province merges. In this way, the dorsal province is transferred to the cuff ridge arc line to become the cuff brachiophore (as shown in Figures 16 and 17).
Let's take a look at the shear transfer method of the cuff ridge province. As shown in Figure 16, first of all, we press the front lower piece with a heavy object, and connect the cuff ridge point (that is, the point where the cuff ridge arc and the bust line are tangent, which is also the lowest point of the cuff ridge arc line) and the chest height point into a line, and cut it along this line with scissors. Always align the chest height of the anterior upper and anterior upper film with the chest height of the anterior lower film, and then rotate the front upper film clockwise until the chest provinces merge. In this way, the chest province is transferred to the position of the bottom of the cuff, that is, the point of the cuff ridge. This is the shear transfer method of the lower province of the sleeve.
After the above operation, it was found that the shear method is intuitive and easy to understand, but the disadvantage is that there must be a pre-prepared prototype to complete this transfer process.
(2) Geometry
The geometry method is more abstract than the shear method, because there is no ready-made prototype, and the required transferred version must be drawn directly in one step. Especially in the practical application of plate making, because the chest province and the back province have been divided and transferred to different parts, which adds to the difficulty of transfer. In order to facilitate the use, the concept of busbars and sublines is proposed, and the busbars and sublines are fixed at the relative position of the chest height point or the back high point, so as to refer to the transfer or allocation of the provincial road. For example, the back-saving busbar and the back-saving sub-line, the back-saving busbar is always in a vertical state, the back-saving busbar is always on the right side of the back-saving busbar and keeps the amount of back-saving 1.6 unchanged.The chest-saving busbar is always in a vertical state, the chest-saving busbar is always on the left side of the chest-saving busbar and keeps the chest-saving amount 2.1 unchanged.With the reference of the busbar and the sub-line, it can be freely transferred or allocated to save. The following is to explain this topic as an example.
No matter in any style of plate making, we first draw the upper side piece and the front upper side piece, because these two side pieces determine the drawing of the shoulder line and the sleeve ridge arc, and are also an important part of the drawing of the upper piece, relatively speaking, the drawing of the back upper middle piece and the front upper middle piece is in a secondary position in the drawing step. As shown in Figure 18, draw first and then the upper side piece. Before drawing the upper side piece after drawing, we first determine its position. The back line of the rear upper side piece is professionally used to control the position of the rear upper side piece. In order to be able to draw a complete back cuff, the back line of the side piece must be coincided with the back line to determine the position of the back upper side piece, and then the shoulder line is drawn, and then the complete back sleeve ridge arc is drawn, as shown in Figure 19.
To determine the position of the pre-upper film, the front upper line of the previous upper film can be directly coincided with the chest busbar to determine the position of the previous upper film. Then the front sleeve rumble arc is drawn.
Transfer of the dorsal and thoracic-shoulder provinces
Shown in the figure above is an existing box meter prototype. Now let's first transfer the backlash with the shear method. First of all, we press the rear lower piece with heavy objects (such as scales, stones, etc.), determine a point on the back shoulder line according to the design position, connect this point with the back high point into a line, and cut along this line with scissors. Always align the back high point of the rear upper film with the back high point of the rear lower piece, and then rotate the back top piece counterclockwise until the dorsal province merges. In this way, the dorsal province is transferred to the back shoulder line to become a dorsal shoulder province (as shown in Figure 22). This is the shear transfer method of the dorsal shoulder province.
Let's take another look at the shear transfer method of the chest and shoulder province. As shown in the figure above, first we press the front and lower pieces with a heavy object, determine a point on the front shoulder line according to the designed position, connect this point with the chest height point into a line, and cut along this line with scissors. Always align the chest height of the anterior upper and anterior upper film with the chest height of the anterior lower film, and then rotate the front upper film clockwise until the chest provinces merge. In this way, the chest province is transferred to the position of the front shoulder line. This is the cut transfer method of the chest and shoulder province.
After the previous introduction to geometric drawing methods, we have a deeper understanding of busbars and sublines. Now let's explain this example so that we can use it skillfully.
As shown in Figure 24, the upper and upper side pieces are drawn first. On this basis, details such as shoulder lines and cuff curves are drawn.
As shown in Figure 25, after the side pieces have been drawn, the drawing of the middle pieces includes its details.