The material is excerpted from Tianjin Yangliuqing Painting Society's "Gongbi Flower Lotus Painting Method", edited and drawn by Chen Tiesheng, excerpts of network shared content for reference only, if you need in-depth study, please purchase genuine books from formal channels.
Lotus painting method
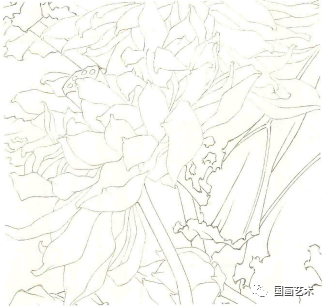
1. Flower head (pink tip white) and flower bud (pink) drawing method
Step 1: Use light ink to hook the petals, and the middle ink to hook the lotus and stem. When drawing the line, the center line should be used, the petal line is slightly thin, rounded and smooth, and attention should be pressed. The lines are slightly thicker when hooking stems and lotus puffs, and they should be strong and powerful. ↓↓↓
Step 2: The back of the petals is dyed with light akewara from the head to the root, there is no need to divide the dyeing too much, the roots of the petals are stained with gray green (Zhu Zhen plus three greens), and the flower stems and lotus pons are stained with light ink. You can draw some background colors to highlight the color of the light flowers, so the picture flats the background with blue. ↓↓↓

Step 3: Continue to use aeroscent to stain the back of the petals, the area of the staining is gradually reduced, and pay attention to the folds on the back of the petals. The roots of the petals continue to be stained with gray-green, and the area gradually shrinks. ↓↓↓
Step 4: Use rouge accent to stain the tip of the petal so that it is divided into anterior and posterior layers. Use the root of the petals of the goose yellow to give it a triangular shape. Pay attention to the influence of environmental hue on the flowers, and slightly bake the inside of the flowers and stems. Use light rouge to hook the tendons, pay attention to the direction, and make it round. Use goose yellow to dot the flower buds, and when they are semi-dry, raise the white on the tip of the buds. ↓↓↓
2. Lotus flower head (white) painting method
Step 1: Use light ink to hook the petals with the center, and the lotus and flower stems with the middle ink. When the line is hooked, the petal line is slightly thin, rounded and smooth, pay attention to the press. The lines are slightly thicker when the stems and lotuses are hooked. ↓↓↓
Step 2: Use flower green and Garcinia and ochre to adjust it to a gray-green color to stain the roots of the petals, pay attention to the relationship between the flowers and the flowers, and dye the lotus canopy with a gray-green cover. ↓↓↓
Step 3: The root of the petals is stained with juice green, the tip of the petal is stained with titanium white, and the lotus canopy is dyed with juice green. ↓↓↓
Step 4: The petals continue to be stained with titanium dioxide, distinguishing the anteroposterior relationship of the flower head and the front and back of the petals, and the main petals can be repeatedly raised white. The roots of the petals continue to be stained with juice green, the lotus canopy is stained with rouge and vermilion to create a three-dimensional feeling, and finally the flower buds are dotted with thick white (propylene). ↓↓↓
Lotus leaf and lotus painting method
Step 1: Use medium and heavy ink to hook the stem, the front edge of the lotus leaf, the reverse side of the lotus leaf and the leaf tendon in the middle ink, pay attention to the flexibility of the leaf tendon and the strength and frustration of the lotus leaf edge, and then dye the structure with light ink. ↓↓↓
Step 2: Dye the positive leaves with flower green ink, and then use the flower green and garcinia to mix it into grass green flat coating, and use emerald green to dye the reverse leaves, lotus ponchos, and stems, and dye the edges of the leaves with vermilion. ↓↓↓
Step 3: Continue to stain the front leaves, the color is the same as the previous step, and the dark part can be stained multiple times and add some mottled color spots. The back of the lotus leaf is stained with three greens to avoid the large area of the lotus leaf and appear hollow. The top of the lotus canopy is stained with rouge and vermilion, and the lotus seed is dyed with light ink and flower blue to create a rounded effect. ↓↓↓
The "Warm Dew with Affection" step
Step 1: First use light ink to hook the petals, and then use medium ink to hook the lotus, flower stem, and lotus leaves. When the line is hooked, the petal line is slightly thin, rounded and smooth, pay attention to the press. The lines of the stems, lotuses and leaves are slightly thicker, and attention should be paid to the sharpening of the press and the dense interspersing of the lines. Use light ink to hook the bird's body, and the middle ink hooks the beak, eyes, claws, feathers and tail. ↓↓↓
Step 2: In addition to the abdomen of the white flower and the bird, use the three greens and the whole cinnabar to dye it several times, and then use this color to dye the root of the petals and distinguish the antecedent and anterior relationship of the flower head. Dye the front of the leaf with a little garcinia, dye the back of the leaf and the lotus canopy with a light emerald green cover, and dye the tip of the leaf with a light vermilion. Dye the beak, eyes, wings and tail of the bird with light ink. ↓↓↓
Step 3: Dye the background with vermilion and light emerald green, and use light emerald green to dye the roots, lotus and back of the leaves. Dye the front of the leaf with a little garcinia and a little ink, and use this color dot to draw the leaf mottled effect after drying. Stain the tip of the leaf with a pale vermilion and point out the bite site. The bird's eyeballs, beak and claws are dyed with light ink and vermilion, and the feathers and tail are dyed with light ink. ↓↓↓
Step 4: Stain the main leaves and lotus ponchos with phthalocyanine blue and garcinia, stain the front mottled dots of the leaves with light ink and emerald green dots, and stain the broken parts of the leaves with rouge and vermilion dots. The back of the leaves is stained with three greens. The roots of the petals are stained with vermilion and goose yellow. Use light ink to lift the eyeballs and feathers of the bird, use light ink plus emerald green, vermilion and rouge to adjust the background, goose yellow dot flower buds, and remove white powder after semi-drying. ↓↓↓
"Into the Night" step
Step 1: This work is composed in an inverse C-shape. When the line is hooked, the petals are hooked with light ink, and the lotus canopy, flower stem, and flower leaves are hooked in medium ink, and the petal lines are slightly thin, rounded and smooth, pay attention to the press. The lines of the stems, lotuses and leaves are slightly thicker, and attention should be paid to the lifting and pressing. Use light ink to hook the bird's body, and the middle ink hooks the beak, eyes, claws, feathers and tail. ↓↓↓
Step 2: In addition to the white flower head and the bird's abdomen, use light flower blue to cover the whole multiple times. After drying, the leaves are dyed with a flower blue and emerald green cover, and the roots of the flowers are dyed with this color to distinguish the dark relationship, and the tip of the leaf is stained with rouge and vermilion. Dye the structure of the bird with light ink. ↓↓↓
Step 3: Use light ink and flower blue to bake the background several times, the area is gradually reduced, pay attention to the virtual reality. Use this color to color the leaves and stems. The tip of the leaf is stained with rouge and vermilion, and the back and chest of the bird are stained with this color. The petals are stained with light rouge, and the pink lotus flowers can be stained multiple times. ↓↓↓
Step 4: Continue to stain the key parts of the leaf with ink and flower blue and add mottled dots, dot the tip of the leaf with rouge, and use light emerald green on the back of the leaf. Dye the back of the pink flower head with a red and vermilion cover, light akebode red with white flower head tip, vermilion to dye the roots of individual petals (slightly deeper around the lotus canopy), and the lotus canopy with rouge. The bird has rouge silk hairs on its back, a creak and vermilion silk hairs on its thorax, and a pale beak and eyeballs. Use ink and flower blue and rouge to coordinate the whole picture. Pink flowers use light rouge to hook the petal texture, white petals use rouge plus three greens to outline the texture, goose yellow plus titanium dioxide dots. ↓↓↓
Attached: Detailed steps teach you to draw the brush red lotus
Drawing steps
First, the ink line
1. Use the mid-leaf tendon to draw from the front petals with light ink.
The use of the line should be done in one go, natural and smooth, and there is no pause in the pen in the middle.
2. Then outline the lotus canopy, and pay attention to the lotus seeds when sketching.
3. Outline the petals on the outside.
4. Double outline the lotus stem and point out the barbs on it.
Second, flat coating
1. Use a white cloud pen to flatten the white powder on the inside of the petals, paying attention to even and flat.
2. Dip the big red with a white cloud pen and dye the reverse petals.
Third, dye the petals
Color the inner color of the positive flap with a lighter red color.
Note: When dividing the petals, to make a uniform transition, you can do multiple coloring until you feel satisfied.
Fourth, the dyeing lotus
1, with a white cloud pen dipped in juice green (1) flat coating lotus.
2. Dye the lotus with green (2).
Modulation: (1) Juice green: Garcinia plus flower blue plus vermilion (2) Green: garcinia plus flower blue
5. Coloring of lotuses, flower buds, and stems
1. Paint the flower stem with stone green flat and dye the bright place with white.
2. Use Garcinia garcinia and a little white powder to outline the flower buds, and use garcinia plus rouge to outline the stem line of the flower buds.
3. Use a pencil dipped in rouge and water to outline the petal veins, paying attention to the smooth lines.
4. Rouge and water to outline the veins of the inner valve.