JS websocket 實戰——好友聊天
原文位址:websocket 實戰——好友聊天
還不了解 websocket 的同鞋,請先學習阮一峰老師的 WebSocket 教程
websocket
- websocket 在實際項目中有着很廣的應用,如好友聊天,異步請求,react-hot-loader 的熱更新等等
- 本文前端采用原生
WebSocket
express-ws 庫
- 後端 mongodb 資料存儲采用 mongoose 操作,不了解的可以先看看 文檔 哦
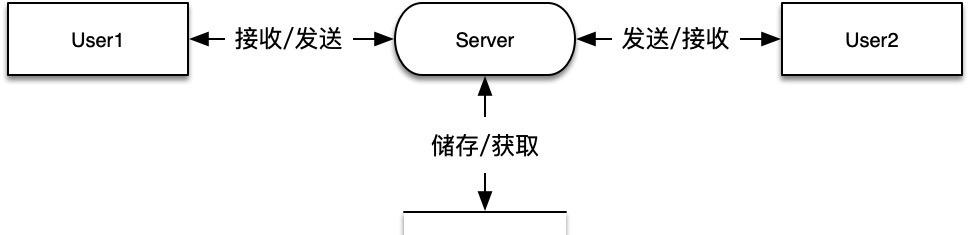
- 聊天原理很簡單,如下圖:
簡單版本
先撸個簡單版本,能夠實作使用者與伺服器之間的通信
- 前端:WsRequest 封裝類
class WsRequest {
  ws: WebSocket

  constructor(url: string) {
    this.ws = new WebSocket(url)

    this.initListeners()
  }

  initListeners() {
    this.ws.onopen = _event => {
      console.log('client connect')
    }

    this.ws.onmessage = event => {
      console.log(`來自伺服器的資訊:${event.data}`)
    }

    this.ws.onclose = _event => {
      console.log('client disconnect')
    }
  }

  send(content: string) {
    this.ws.send(content)
  }

  close() {
    this.ws.close()
  }
}

// 使用
const ws = new WsRequest('your_websocket_url') // 如: ws://localhost:4000/ws
ws.send('hello from user')
- 服務端:WsRouter 封裝類,使用單例模式
import expressWs, { Application, Options } from 'express-ws';
import ws, { Data } from 'ws';
import { Server as hServer } from 'http';
import { Server as hsServer } from 'https';

class WsRouter {
  static instance: WsRouter;

  wsServer: expressWs.Instance;

  clientMap: Map<string, ws>; // 儲存所有連接配接的使用者 id

  constructor(
    private path: string,
    private app: Application,
    private server?: hServer | hsServer,
    private options?: Options
  ) {
    this.wsServer = expressWs(this.app, this.server, this.options);

    this.app.ws(this.path, this.wsMiddleWare);

    this.clientMap = new Map();
  }

  static getInstance(path: string, app: Application, server?: hServer | hsServer, options: Options = {}) {
    if (!this.instance) {
      this.instance = new WsRouter(path, app, server, options);
    }

    return this.instance;
  }

  wsMiddleWare = (wServer: any, _req: any) => {
    this.clientMap.set(id, wServer);

    this.broadcast('hello from server'); // send data to users

    wServer.on('message', async (data: Data) => {
      console.log(`來自使用者的資訊:${data.toString()}`);
    });

    wServer.on('close', (closeCode: number) => {
      console.log(`a client has disconnected: ${closeCode}`);
    });
  }

  broadcast(data: Data) { // 全體廣播
    this.clientMap.forEach((client: any) => {
      if (client.readyState === ws.OPEN) {
        client.send(data);
      }
    });
  }
}

export default WsRouter.getInstance;

// 使用:bootstrap.ts
const server = new InversifyExpressServer(container);
// 注:本項目後端使用的是 [Inversify](https://github.com/inversify) 架構
// 具體傳的 private server?: hServer | hsServer 參數值,請類比改變
server.setConfig((app: any) => WsRouter('/ws/:id', app))
server.build().listen(4000);
更新版本
要實作好友通信,在前後端的
send
方法中,當然要指定
from
和
to
的使用者
再者,背景要記錄發送的消息,也必須要有好友表的主鍵 friendId,表示為這兩個人之間的消息
- mongoose 資料存儲
// user.ts
const userSchema = new Schema(
  {
    name: { type: String, required: true, unique: true }
  }
);

export default model('User', userSchema);

// friend.ts 兩個使用者之間的好友關系
import { Schema, model, Types } from 'mongoose';

const FriendSchema = new Schema(
  {
    user1: { type: Types.ObjectId, ref: 'User', required: true }, // user1Id < user2Id
    user2: { type: Types.ObjectId, ref: 'User', required: true }
  }
);

export default model('Friend', FriendSchema);

// message.ts
const MessageSchema = new Schema(
  {
    friend: { type: Types.ObjectId, ref: 'Friend', required: true }, // 關聯 Friend 表
    from: String,
    to: String,
    content: String,
    type: { type: String, default: 'text' },
  }
);

export default model('Message', MessageSchema);
- 接口說明
type msgType = 'text' | 'emoji' | 'file'

interface IMessage {
  from: string
  to: string
  content: string
  type: msgType
}
- 前端:WsRequest 封裝類
import { IMessage, msgType } from './interface'

export default class WsRequest {
  ws: WebSocket

  constructor(url: string, private userId: string) {
    this.ws = new WebSocket(`${url}/${this.userId}`)

    this.initListeners()
  }

  initListeners() {
    this.ws.onopen = _event => {
      console.log('client connect')
    }

    this.ws.onmessage = event => {
      const msg: IMessage = JSON.parse(event.data)

      console.log(msg.content)
    }

    this.ws.onclose = _event => {
      console.log('client disconnect')
    }
  }

  // friendId 指 Friend Model 的 _id
  async send(friendId: string, content: string, receiverId: string, type: msgType = 'text') {
    const message: IMessage = { from: this.userId, to: receiverId, content, type }

    await this.ws.send(JSON.stringify({ friend: friendId, ...message }))
  }

  close() {
    this.ws.close()
  }
}

// 使用
const ws = new WsRequest('your_websocket_url', 'your_user_id') // example: ws://localhost:4000/ws
await wsRequest.send('Friend_model_id', '你好啊,jeffery', 'jeffery_id')
- 服務端:WsRouter 封裝類,使用單例模式
import expressWs, { Application, Options } from 'express-ws';
import ws, { Data } from 'ws';
import { Server as hServer } from 'http';
import { Server as hsServer } from 'https';
import Message, { IMessage } from 'models/message';
import Friend from 'models/friend';

class WsRouter {
  static instance: WsRouter;

  wsServer: expressWs.Instance;

  clientMap: Map<string, ws>; // 儲存所有連接配接的使用者 id

  constructor(
    private path: string,
    private app: Application,
    private server?: hServer | hsServer,
    private options?: Options
  ) {
    this.wsServer = expressWs(this.app, this.server, this.options);

    this.app.ws(this.path, this.wsMiddleWare);

    this.clientMap = new Map();
  }

  static getInstance(path: string, app: Application, server?: hServer | hsServer, options: Options = {}) {
    if (!this.instance) {
      this.instance = new WsRouter(path, app, server, options);
    }

    return this.instance;
  }

  wsMiddleWare = (wServer: any, req: any) => {
    const { id } = req.params; // 解析使用者 id

    wServer.id = id;
    this.clientMap.set(id, wServer);

    wServer.on('message', async (data: Data) => {
      const message: IMessage = JSON.parse(data.toString());

      const { _id } = await new Message(message).save(); // 更新資料庫

      this.sendMsgToClientById(message);
    });

    wServer.on('close', (closeCode: number) => {
      console.log(`a client has disconnected, closeCode: ${closeCode}`);
    });
  };

  sendMsgToClientById(message: IMessage) {
    const client: any = this.clientMap.get(message.to);

    if (client) {
      client!.send(JSON.stringify(message));
    }
  }

  broadcast(data: Data) {
    this.clientMap.forEach((client: any) => {
      if (client.readyState === ws.OPEN) {
        client.send(data);
      }
    });
  }
}

export default WsRouter.getInstance;

// 使用:bootstrap.ts
const server = new InversifyExpressServer(container);
// 注:本項目後端使用的是 [Inversify](https://github.com/inversify) 架構
// 具體傳的 private server?: hServer | hsServer 參數值,請類比改變
server.setConfig((app: any) => WsRouter('/ws/:id', app))
server.build().listen(4000);
- 心跳檢測
參考:
- ws faq: how-to-detect-and-close-broken-connections
// 服務端
wsMiddleWare = (wServer: any, req: any) => {
  const { id } = req.params;

  wServer.id = id;
  wServer.isAlive = true;
  this.clientMap.set(id, wServer);

  wServer.on('message', async (data: Data) => {...});

  wServer.on('pong', () => {
    wServer.isAlive = true;
  });
}

initHeartbeat(during: number = 10000) {
  return setInterval(() => {
    this.clientMap.forEach((client: any) => {
      if (!client.isAlive) {
        this.clientMap.delete(client.id);

        return client.terminate();
      }

      client.isAlive = false;
      client.ping(() => {});
    });
  }, during);
}
線上測試
一、準備
- 為友善大家測試,可以通路線上的服務端接口:
wss://qaapi.omyleon.com/ws
wss://qaapi.omyleon.com/ws/asdf...
- 用戶端:可以使用谷歌插件:Simple WebSocket Client;也可以通路線上項目,使用項目提供的用戶端,具體參見:qa-app
- 使用線上的一對好友資訊
- friend: jeffery 與 testuser => _id: 5d1328295793f14020a979d5
- jeffery => _id: 5d1327c65793f14020a979ca
- testuser => _id: 5d1328065793f14020a979cf
2019.11.15 更新
線上項目資料已重置,請使用新的 id 測試
friend: jeffery 與 testuser => _id: 5d1328295793f14020a979d5
jeffery => _id: 5dce50cbb869af711db528f1
testuser => _id: 5dce5119b869af711db528fc
二、實際示範
- 打開 WebSocket Client 插件,輸入測試連結,如下圖:
wss://qaapi.omyleon.com/ws/5d1327c65793f14020a979ca

- 點選
Open
Status
Opened
- 發送消息,請根據 IMessage 接口來發送,當然還要附上
friendId
{
  "friend": "5d1328295793f14020a979d5",
  "from": "5d1327c65793f14020a979ca",
  "to": "5d1328065793f14020a979cf",
  "content": "你好呀,testuser,這是通過 simple websocket client 發送的消息",
  "type": "text"
}
- 同時用 simple websocket client 連接配接另一個使用者,會收到發來的消息
wss://qaapi.omyleon.com/ws/5d1328065793f14020a979cf
- 同理,在另一個 client 中改變 from 和 to,就能回複消息給對方
{
  "friend": "5d1328295793f14020a979d5",
  "from": "5d1328065793f14020a979cf",
  "to": "5d1327c65793f14020a979ca",
  "content": "嗯嗯,收到了 jeffery,這也是通過 simple websocket client 發送的",
  "type": "text"
}
- 補充,線上上項目 qa-app 中,也是用的是個原理,隻不過在顯示時候做了解析,隻顯示了 content 字段,而在這個簡易的測試用戶端中沒有做其他處理
源碼擷取
- 前端:qa-app app/websocket/index.ts
- 後端:qa-app-server server/wsRouter/index.ts
- 線上位址,去看看 -> https://qa.omyleon.com