之前一直有寫過自定義View,自定義ViewGroup。但是每次再寫都會重新去網上搜尋。的确這是我們大部分人的習慣,但是有次和公司一個大牛聊天。他告訴我說,一次兩次從網上搜尋沒問題,但是很多次遇到同樣的問題還是隻想着去搜尋就是自己的問題了,你可能根本沒有自己去思考過。于是結合做的項目的一些小功能總結一下Android自定義View和自定義ViewGroup。
1.自定義View
首先要實作的效果是下圖所示的中右側的索引部分。我們要做的很簡單,就是顯示字母地區首字母的索引。
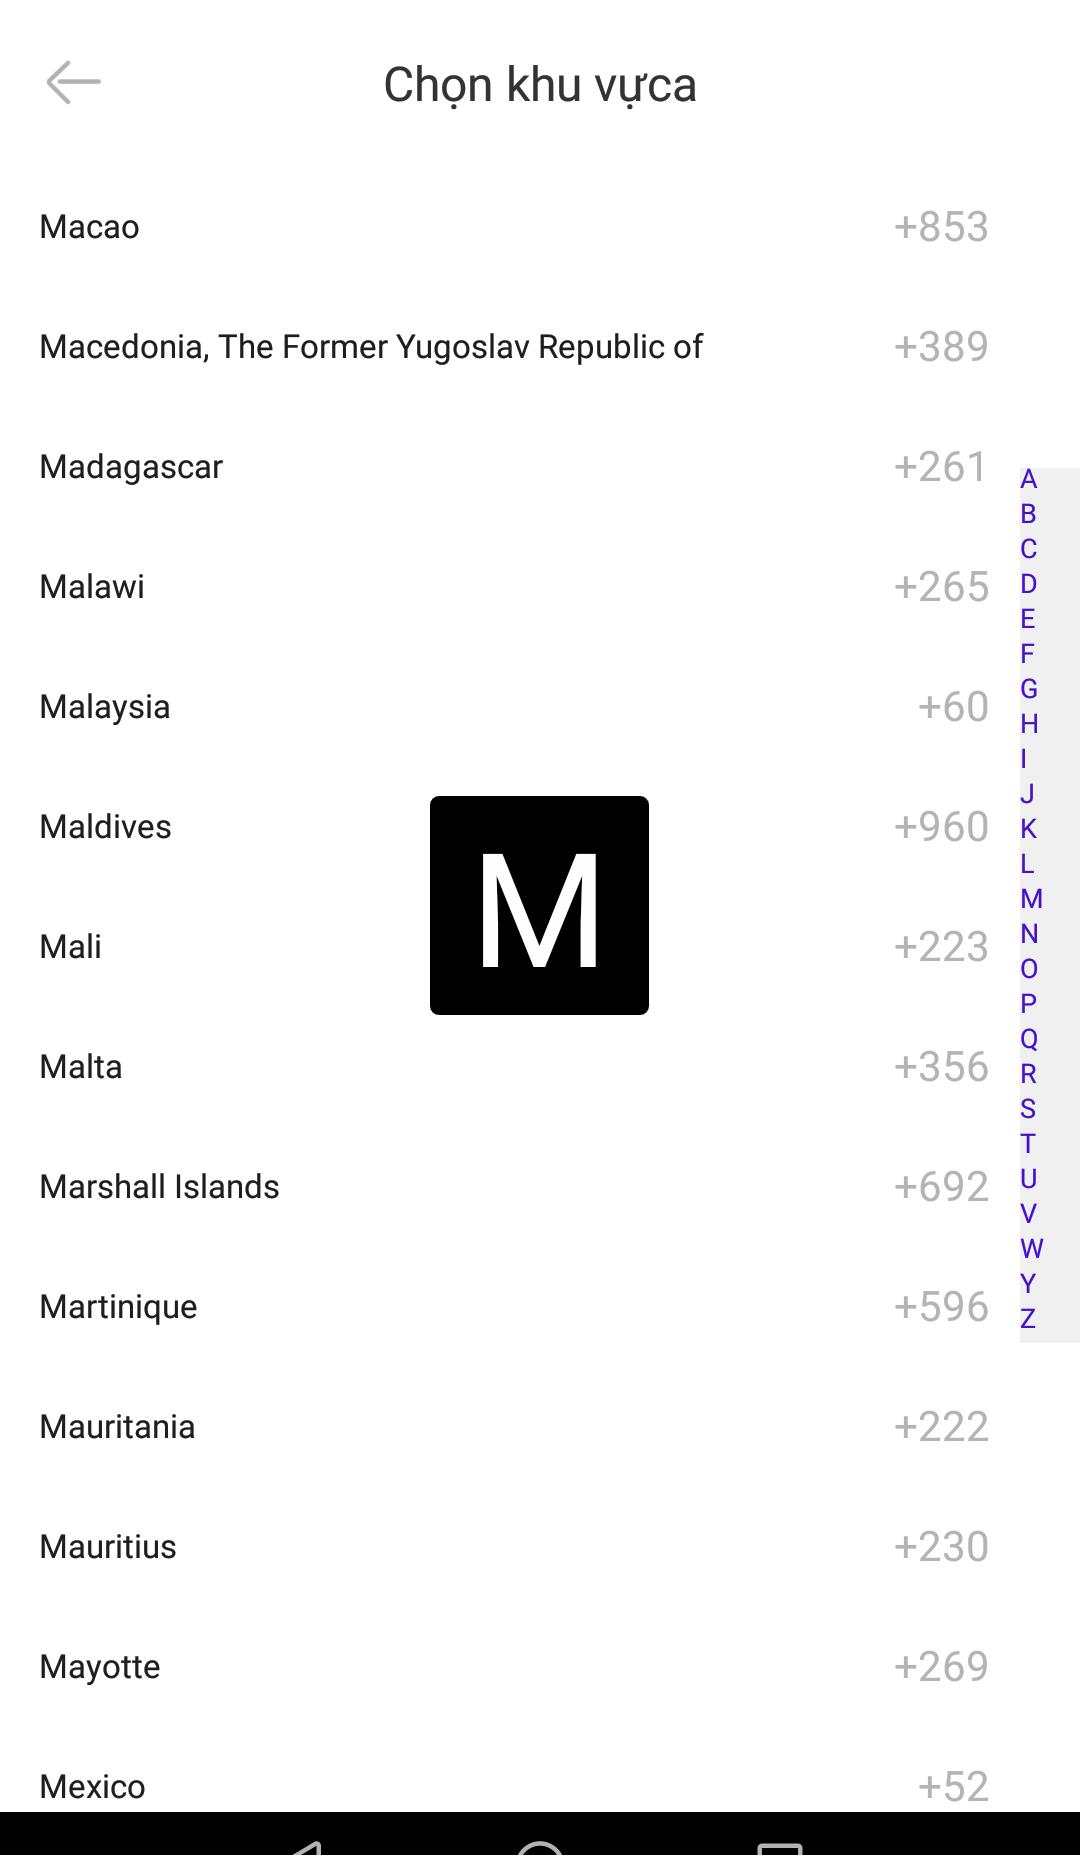
1.分析一下上圖中的索引的實作,首先看需要實作的功能。
當手指在這個View上滑動的時候,外面的地區清單顯示的地區名稱的首字母需要和你手指觸摸的字母相同。另外當你中間有個View會顯示你目前觸摸到的字母。是以首先這個view需要對外提供一個接口,告訴外面手指觸摸到的字母是什麼。中間那個字母的顯示可以通過把字母傳出去在外面顯示,也可以把textview傳遞進來。這裡是我通過把textview傳遞進來顯示。提供的接口如下:
/**
     *  對外接口,将indexview選中的字元傳遞出去
     */
    interface OnSelectedListener {
        void onSelected(String s);
    }

    /**
     * 用于将外界的textview設定進來,控制其顯示
     * @param view
     */
    public void setCenterTextView(TextView view) {
        centerTextView = view;
    }
2.然後分析下這個View本身該怎麼顯示出來。
這個View本身的顯示很簡單的,就是顯示地區的首字元。如果你需要的就是26個字母的話,可以直接在View裡面給一個字元數組寫死。我這裡是想顯示地區的首字母,可能沒有地區的首字母是x,于是我這個地方顯示的字母是由外部傳入的。傳進來之後調用invalidate()方法實作界面重新整理即可。另外提一句,如果你要是想在非ui線程中重新整理就使用postInvalidate()方法,這個方法在使用handler幫你完成了線程切換工作。
/**
     * 設定IndexView要顯示的索引
     * @param indexList
     */
    public void setIndexList(List<String> indexList) {
        if (null == indexList) {
            return;
        }

        mIndexList = indexList;
        invalidate();
    }
接着是字母的顔色,以及字母的大小和字母間的間隔,我們通過自定義屬性來設定。一般我們是把這個放在values/attrs.xml目錄下,也可以直接放在style.xml檔案中。
<declare-styleable name="IndexView">
    <attr name="indexTextColor" format="color"/>
    <attr name="indexTextSize" format="dimension"/>
    <attr name="indexLineSpace" format="dimension"/>
</declare-styleable>
自定義view最重要的就是onMeasure(), onLayout(), onDraw()方法,由于onLayout方法是用來放置子元素的位置,我們這個view沒有子元素。是以接着要做的就是重寫onMeasure()方法,以及onDraw()方法。通過自定義屬性擷取字型顔色以及大小設定給Paint,做一下周遊畫出所有的字母。view的測量,我這裡是通過計算每個字母的寬和高最後疊加計算的。其中有些小細節要注意,比如說我實作的時候發現w和m是要比其他字母稍微寬一點的。
3.最後是重寫dispatchTouchEvent
通過計算手指觸摸的位置,然後計算出字母的position,然後從字母list中取出相應的字母設定給textview,并通過接口提供出去。
貼出完整的代碼:
public class IndexView extends View{

    /**
     * 索引預設顯示的值
     */
    private static final int DEFAULT_TEXT_COLOR = Color.BLACK;
    private static final int DEFAULT_LINE_SPACE = 24;
    private static final int DEFAULT_TEXT_SIZE = 36;

    private OnSelectedListener onSelectedListener;
    private TextView centerTextView;

    private int mTextHeight;
    private List<String> mIndexList = new ArrayList<>();

    private int mTextSize ;
    private int mTextColor ;
    private int mLineSpace ;

    private Paint mTextPaint;


    public IndexView(Context context, @Nullable AttributeSet attrs) {
        super(context, attrs);
        TypedArray a = context.obtainStyledAttributes(attrs, R.styleable.IndexView);
        try {
            mTextColor = a.getColor(R.styleable.IndexView_indexTextColor, DEFAULT_TEXT_COLOR);
            mTextSize = a.getDimensionPixelOffset(R.styleable.IndexView_indexTextSize, DEFAULT_TEXT_SIZE);
            mLineSpace = a.getDimensionPixelOffset(R.styleable.IndexView_indexLineSpace, DEFAULT_LINE_SPACE);
        } finally {
            a.recycle();
        }

        init();
    }

    private void init() {
        /**
         * 繪制索引的畫筆
         */
        mTextPaint = new Paint();
        mTextPaint.setColor(mTextColor);
        mTextPaint.setTextSize(mTextSize);
        mTextPaint.setAntiAlias(true);
    }

    public IndexView(Context context, @Nullable AttributeSet attrs, int defStyleAttr) {
        super(context, attrs, defStyleAttr);
    }


    public void setOnSelectedListener(OnSelectedListener listener) {
        onSelectedListener = listener;
    }

    @Override
    protected void onMeasure(int widthMeasureSpec, int heightMeasureSpec) {

        if (mIndexList.isEmpty()) {
            super.onMeasure(widthMeasureSpec, heightMeasureSpec);
            return;
        }

        /**
         *  Return in bounds (allocated by the caller) the smallest rectangle that
         *  encloses all of the characters, with an implied origin at (0,0).
         */
        Rect rect = new Rect();
        mTextPaint.getTextBounds(String.valueOf(mIndexList.get(0)), 0, 1, rect);
        mTextHeight = rect.height();

        int totalHeight = (mTextHeight + mLineSpace) * mIndexList.size() + getPaddingTop() + getPaddingBottom();
        /**
         * 這裡由于w和M比其他字元寬是以額外加上2dp寬度
         * 感覺應該計算
         */
        int totalWidth = rect.width() + 2 + getPaddingLeft() + getPaddingRight();
        setMeasuredDimension(resolveSize(totalWidth, widthMeasureSpec), resolveSize(totalHeight, totalHeight));
    }

    @Override
    protected void onLayout(boolean changed, int left, int top, int right, int bottom) {
        super.onLayout(changed, left, top, right, bottom);
    }

    @Override
    protected void onDraw(Canvas canvas) {
        for (int i = 0; i < mIndexList.size(); i++) {
            canvas.drawText(String.valueOf(mIndexList.get(i)), getPaddingLeft(), calculateIndexY(i), mTextPaint);
        }
    }

    @Override
    public boolean dispatchTouchEvent(MotionEvent event) {
        int action = event.getAction();
        float y = event.getY();
        switch (action) {
            case MotionEvent.ACTION_DOWN:
                checkSelected(y);
                break;
            case MotionEvent.ACTION_MOVE:
                checkSelected(y);
                break;
            case MotionEvent.ACTION_UP:
                if (centerTextView != null) {
                    centerTextView.setVisibility(View.INVISIBLE);
                }
                break;
            default:
                break;
        }
        return true;
    }

    private void checkSelected(float y) {
        if (onSelectedListener == null) {
            return;
        }

        if (y < getPaddingTop() || y > (getMeasuredHeight() - getPaddingBottom())) {
            return;
        }

        //選中的字元位置
        int position = (int) ((y - getPaddingTop()) / (mTextHeight + mLineSpace));

        if (centerTextView != null) {
            centerTextView.setText(mIndexList.get(position));
            centerTextView.setVisibility(VISIBLE);
        }

        if (onSelectedListener != null) {
            onSelectedListener.onSelected(mIndexList.get(position));
        }

        invalidate();
    }

    private int calculateIndexY(int i) {
        return getPaddingTop() + mTextHeight * (i + 1) + mLineSpace * i;
    }

    /**
     * 設定IndexView要顯示的索引
     * @param indexList
     */
    public void setIndexList(List<String> indexList) {
        if (null == indexList) {
            return;
        }

        mIndexList = indexList;
        invalidate();
    }

    /**
     * 用于将外界的textview設定進來,控制其顯示
     * @param view
     */
    public void setCenterTextView(TextView view) {
        centerTextView = view;
    }

    /**
     *  對外接口,将indexview選中的事件傳遞出去
     */
    interface OnSelectedListener {
        void onSelected(String s);
    }
}
2.自定義ViewGroup
上面實作了一個簡單的自定義view的功能 ,下面介紹一下自定義ViewGroup。就是如下圖所示的電話号碼和密碼輸入的文本框。

1.同樣是先分析一下要實作的功能
這個功能就是簡單的輸入内容,當内容為空的時候不顯示清除按鈕,當内容為空的時候顯示。然後可以設定文本類型,顯示提示的hint,就和普通的edittext一樣。本來這個東西很簡單,就可以用一個edittext,一個用于清除的imageview,一條線來實作的。但是項目中有好幾個地方都需要用到同樣的功能。就直接把他做成了一個自定義viewgroup。
2. viewgroup的顯示
一般來說實作組合控件都是繼承一個現有的viewgroup,如Linearlayout ,RelativeLayout這些。然後其中的元素我們既可以寫在xml中,也可以在代碼中new出來。隻是在代碼中new出來的話,你就要自己來控制每個子view的位置了。這裡我直接寫在了布局檔案中。如下所示:
<?xml version="1.0" encoding="utf-8"?>
<RelativeLayout
    xmlns:android="http://schemas.android.com/apk/res/android"
    android:layout_width="match_parent"
    android:layout_height="40dp"
    android:gravity="center_vertical">

    <EditText
        android:id="@+id/edit_content"
        android:layout_width="match_parent"
        android:layout_toLeftOf="@+id/ic_clear"
        android:textSize="13sp"
        android:textColorHint="#9e9e9e"
        android:textCursorDrawable="@drawable/cursor_color"
        android:background="@null"
        android:layout_height="40dp"/>

    <ImageView
        android:id="@+id/ic_clear"
        android:layout_width="32dp"
        android:layout_height="32dp"
        android:layout_centerVertical="true"
        android:layout_alignParentRight="true"
        android:scaleType="center"
        android:src="@drawable/ic_clear"/>

    <ImageView
        android:layout_width="match_parent"
        android:layout_height="wrap_content"
        android:layout_alignParentBottom="true"
        android:src="#d0d0d0"/>

</RelativeLayout>
同樣的因為hint, 輸入的文本類型都是edittext有的,我們需要通過自定義屬性給組合控件中的edittext設定進去,其中inputtype我們其實可以直接引用系統的<attr name="android:inputType" />的。但是這裡我還是通過普通的string,然後在代碼裡動态擷取之後給edittext設定的文本類型:
<declare-styleable name="ClearableLinearLayout">
    <attr name="clearInputType" format="string"/>
    <attr name="clearHint" format="string"/>
</declare-styleable>
2. viewgroup的邏輯處理
這一步比較簡單,直接通過edittext的addTextChangedListener監聽文本是否顯示,然後控制清除的imageview即可。最後通過方法将文本提供出去即可。
最終的代碼如下:
public class ClearableLinearlayout extends RelativeLayout{

    private final static String TYPE_NUMBER = "number";
    private final static String TYPE_PASSWORD = "password";
    private final static String TYPE_PHONE = "phone";

    private ImageView clear;
    private EditText editText;

    private String inputType = TYPE_PHONE;
    private String hint = "";

    CharSequence beforeText;

    public ClearableLinearlayout(Context context) {
        super(context);
        initView(context);
    }

    public ClearableLinearlayout(Context context, @Nullable AttributeSet attrs) {
        super(context, attrs);
        TypedArray a = context.obtainStyledAttributes(attrs, R.styleable.ClearableLinearLayout);
        inputType = a.getString(R.styleable.ClearableLinearLayout_clearInputType);
        hint = a.getString(R.styleable.ClearableLinearLayout_clearHint);
        a.recycle();
        initView(context);
    }

    private void initView(Context context) {
        LayoutInflater.from(context).inflate(R.layout.clearable_linearlayout, this, true);
        editText = findViewById(R.id.edit_content);
        clear = findViewById(R.id.ic_clear);
        setupActions();
    }

    private void setupActions() {
        editText.addTextChangedListener(new TextWatcher() {
            @Override
            public void beforeTextChanged(CharSequence s, int start, int count, int after) {
                beforeText = s.toString();
            }

            @Override
            public void onTextChanged(CharSequence s, int start, int before, int count) {

            }

            @Override
            public void afterTextChanged(Editable s) {
                clear.setVisibility(s.length() == 0 ? View.INVISIBLE : View.VISIBLE);
                if (StringUtil.length(s) > 20) {
                    editText.setText(beforeText);
                    editText.setSelection(beforeText.length());
                }
            }
        });
        editText.setHint(hint);

        if (TYPE_NUMBER.equals(inputType)) {
            editText.setInputType(InputType.TYPE_CLASS_NUMBER);
        } else if (TYPE_PASSWORD.equals(inputType)) {
            editText.setTransformationMethod(PasswordTransformationMethod.getInstance());
        } else if (TYPE_PHONE.equals(inputType)){
            editText.setInputType(InputType.TYPE_CLASS_PHONE);
        }

        clear.setOnClickListener(new OnClickListener() {
            @Override
            public void onClick(View v) {
                editText.setText("");
            }
        });
    }

    public String getContentString() {
        return editText.getText().toString().trim();
    }

    public void setContentString(String string) {
        editText.setText(string);
        editText.setSelection(string.length());
    }
}