AOP(概念)
-
什麼是AOP
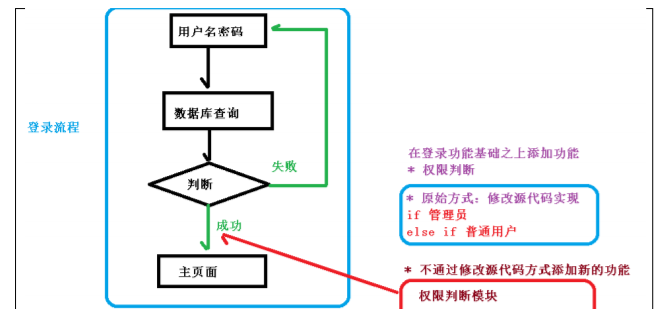
(1)面向切面程式設計(方面),利用AOP可以對業務邏輯的各個部分進行隔離,進而使得業務邏輯各個部分之間的耦合度降低,提高程式的可重用性,同僚提高了開發的效率。
(2)通俗描述就是:不通過修改源代碼的方式,在主幹功能裡添加新功能
(3)使用登入的例子來了解AOP
spring5架構(四)——AOP概念,底層原理,JDK動态代理,AOP術語,AOP操作
AOP(底層原理)
-
AOP底層使用動态代理:有兩種情況的動态代理
(1) 第一種 有接口情況,使用JDK動态代理
(2) 第二種 沒有接口,使用CGLIB動态代理,建立子類的代理對象,增強類的方法
spring5架構(四)——AOP概念,底層原理,JDK動态代理,AOP術語,AOP操作
AOP(JDK動态代理)
- 使用JDK動态代理,使用Proxy類裡面的方法建立代理對象 調用newProxyInstance方法
spring5架構(四)——AOP概念,底層原理,JDK動态代理,AOP術語,AOP操作 spring5架構(四)——AOP概念,底層原理,JDK動态代理,AOP術語,AOP操作 方法有三個參數:
第一個參數,類加載器
第二個參數,增強方法所在的類,在這個實作類的接口,支援多個接口
第三個參數,實作這個接口InvocationHandler,建立代理對象,寫增強部分
- JDK動态代理代碼
(1) 建立接口,定義方法
public interface UserDao {
 public int add(int a,int b);
 public String update(String id);
}
(2) 建立接口實作類,實作方法
public class UserDaoImpl implements UserDao {
 @Override
 public int add(int a, int b) {
 return a+b;
 }
 @Override
 public String update(String id) {
 return id;
 }
}
(3)使用Proxy類建立代理對象
public class JDKProxy {
 public static void main(String[] args) {
 //建立接口實作類代理對象
 Class[] interfaces = {UserDao.class};
 UserDaoImpl userDao = new UserDaoImpl();
 UserDao dao =
(UserDao)Proxy.newProxyInstance(JDKProxy.class.getClassLoader(), interfaces,
new UserDaoProxy(userDao));
 int result = dao.add(1, 2);
 System.out.println("result:"+result);
 }
}
//建立代理對象代碼
class UserDaoProxy implements InvocationHandler {
 //1 把建立的是誰的代理對象,把誰傳遞過來
 //有參數構造傳遞
 private Object obj;
 public UserDaoProxy(Object obj) {
 this.obj = obj;
 }
 //增強的邏輯
 @Override
 public Object invoke(Object proxy, Method method, Object[] args) throws
Throwable {
 //方法之前
 System.out.println("方法之前執行...."+method.getName()+" :傳遞的參
數..."+ Arrays.toString(args));
 //被增強的方法執行
 Object res = method.invoke(obj, args);
 //方法之後
 System.out.println("方法之後執行...."+obj);
 return res;
 }
}
AOP(術語)
-
連接配接點
類裡面的那些方法可以被曾強,這些方法稱為連接配接點
-
切入點
實際被真正增強的方法,稱為切入點
-
通知(增強)
(1)實際增強的邏輯部分稱為通知(增強)
(2)通知有多種類型
前置通知
後置通知
環繞通知
異常通知
最終通知
-
切面
是動作:把通知應用到切入點的過程
AOP操作(準備)
-
Spring架構一般基于AspectJ實作AOP操作
(1)什麼是AspectJ
*AspectJ不是Spring組成部分,獨立AOP架構,一般吧AspectJ和Spring架構一起使用,進行AOP操作
-
基于AspectJ實作AOP操作
(1)基于xml配置檔案實作
(2)基于注解方式實作(使用)
- 在項目的工程裡引入AOP依賴
spring5架構(四)——AOP概念,底層原理,JDK動态代理,AOP術語,AOP操作 -
切入點的表達式
(1)切入點表達式的作用:知道對哪個類裡面的那個方法進行增強
(2)文法結構:
execution([權限修飾符][傳回類型][類全路徑]方法名稱)
舉例1:對com.chen.spring5.BookDao類裡面的add進行增強
Execution(* com.chen.spring5.BookDao.add(…))
舉例2:對com.chen.spring5.BookDao類裡面所有方法進行增強
Execution(* com.chen.spring5.BookDao.(…))
舉例3:對com.chen.spring5裡所有類,類裡面所有方法進行增強
Execution( com.chen.spring5..(…))
AOP操作(AspectJ注解)
- 建立類,在類裡定義方法
public class User {
 public void add() {
 System.out.println("add.......");
 }
}
-
建立增強類(編寫增強邏輯)
(1)在增強類裡面,建立方法,讓不同方法代表不同類型通知類型
//增強的類
public class UserProxy {
 public void before() {//前置通知
 System.out.println("before......");
 }
}
-
進行通知的配置
(1)在spring的配置檔案中,開啟注解的掃描
<?xml version="1.0" encoding="UTF-8"?>
<beans xmlns="http://www.springframework.org/schema/beans"
 xmlns:xsi="http://www.w3.org/2001/XMLSchema-instance"
 xmlns:context="http://www.springframework.org/schema/context"
 xmlns:aop="http://www.springframework.org/schema/aop"
 xsi:schemaLocation="http://www.springframework.org/schema/beans
http://www.springframework.org/schema/beans/spring-beans.xsd
 http://www.springframework.org/schema/context
http://www.springframework.org/schema/context/spring-context.xsd
 http://www.springframework.org/schema/aop
http://www.springframework.org/schema/aop/spring-aop.xsd">
 <!-- 開啟注解掃描 -->
 <context:component-scan basepackage="com.chen.spring5.aopanno"></context:component-scan>
(2)使用注解建立User和UserProxy對象
//被增強的類
@Component
public class User {
    public void add(){
        System.out.println("add...");
    }
}

//增強的類
@Component
public class UserProxy {
}
(3)在增強的類上面添加注解@Aspect
//增強的類
@Component
@Aspect//生成代理對象
public class UserProxy {
}
(4)在spring配置檔案中開啟生成代理對象
<!-- 開啟 Aspect 生成代理對象-->
<aop:aspectj-autoproxy></aop:aspectj-autoproxy>
-
配置不同類型的通知
(1)在增強類裡面,在作為通知方法上面添加通知類型注解,使用切入點表達式配置
//增強的類
@Component
@Aspect//生成代理對象
public class UserProxy {
    //前置通知
    //Before注解表示作為前置通知
    @Before(value = "execution(* com.chen.spring5.aopanno.User.add(..))")
    @Order(2)
    public void before(){
        System.out.println("before...");
    }
    //最終通知
    @After(value = "execution(* com.chen.spring5.aopanno.User.add(..))")
    public void after(){
        System.out.println("after......");
    }

    @AfterThrowing(value = "execution(* com.chen.spring5.aopanno.User.add(..))")
    public void afterThrowing(){
        System.out.println("afterThrowing......");
    }
    //傳回通知
    @AfterReturning(value = "execution(* com.chen.spring5.aopanno.User.add(..))")
    public void afterReturning(){
        System.out.println("afterReturning......");
    }

    @Around(value = "execution(* com.chen.spring5.aopanno.User.add(..))")
    public void around(ProceedingJoinPoint proceedingJoinPoint) throws Throwable {
        System.out.println("環繞之前......");
        proceedingJoinPoint.proceed();
        System.out.println("環繞之後...");
    }
}
- 相同切入點抽取
//相同切入點抽取
@Pointcut(value = "execution(* com.chen.spring5.aopanno.User.add(..))")
public void pointdemo() {
}
//前置通知
//@Before 注解表示作為前置通知
@Before(value = "pointdemo()")
public void before() {
 System.out.println("before.........");
}
-
有多個增強類對同一個方法進行增強,設定增強優先級
(1)在增強類上加注解@Order(數字類型值),數字類型值越小優先級越高
@Component
@Aspect
@Order(1)
public class PersonProxy
-
完全注解開發
(1)建立配置類,不需要建立xml配置檔案
@Configuration
@ComponentScan(basePackages = {"com.chen"})
@EnableAspectJAutoProxy(proxyTargetClass = true)
public class ConfigAop {
}
AOP操作(AspectJ配置檔案)
- 建立兩個類,增強類和被增強類,建立方法
- 在spring配置檔案中建立兩個類對象
<!--建立對象-->
<bean id="book" class="com.chen.spring5.aopxml.Book"></bean>
<bean id="bookProxy" class="com.chen.spring5.aopxml.BookProxy"></bean>
- 在spring配置檔案中配置切入點
<!--配置 aop 增強-->
<aop:config>
 <!--切入點-->
 <aop:pointcut id="p" expression="execution(*
com.atguigu.spring5.aopxml.Book.buy(..))"/>
 <!--配置切面-->
 <aop:aspect ref="bookProxy">
 <!--增強作用在具體的方法上-->
 <aop:before method="before" pointcut-ref="p"/>
 </aop:aspect>
</aop:config>