需要建立兩個工程,一個是 starter 的定義檔案,一個是 starter的調用項目,具體實作邏輯為:邊寫好starter項目後打包至本地倉庫,調用項目通過 maven starter的形式進行調用,此處兩個項目分别定義為 hello_starer、hello_starer_test
1、整體目錄結構
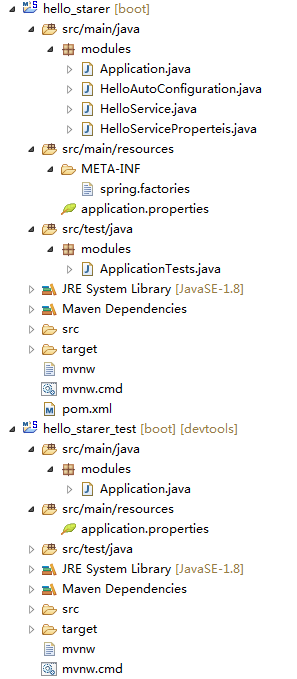
以下為分步操作
2、建立starter定義
建立Spring Boot 工程 hello_starter
1、 pom.xml
<?xml version="1.0" encoding="UTF-8"?>
<project xmlns="http://maven.apache.org/POM/4.0.0" xmlns:xsi="http://www.w3.org/2001/XMLSchema-instance"
    xsi:schemaLocation="http://maven.apache.org/POM/4.0.0 http://maven.apache.org/xsd/maven-4.0.0.xsd">
    <modelVersion>4.0.0</modelVersion>
    <groupId>ruoli</groupId>
    <artifactId>hellostarter</artifactId>
    <version>0.0.1-SNAPSHOT</version>
    <packaging>jar</packaging>
    <name>hello-spring-boot-starter</name>
    <description>測試自定義starter</description>
    <parent>
        <groupId>org.springframework.boot</groupId>
        <artifactId>spring-boot-starter-parent</artifactId>
        <version>1.5.2.RELEASE</version>
        <relativePath/> <!-- lookup parent from repository -->
    </parent>
    <properties>
        <project.build.sourceEncoding>UTF-8</project.build.sourceEncoding>
        <project.reporting.outputEncoding>UTF-8</project.reporting.outputEncoding>
        <java.version>1.8</java.version>
    </properties>
    <dependencies>
        <dependency>
            <groupId>org.springframework.boot</groupId>
            <artifactId>spring-boot-starter</artifactId>
        </dependency>
        <dependency>
            <groupId>org.springframework.boot</groupId>
            <artifactId>spring-boot-starter-test</artifactId>
            <scope>test</scope>
        </dependency>
        <dependency>
            <groupId>org.springframework.boot</groupId>
            <artifactId>spring-boot-configuration-processor</artifactId>
            <optional>true</optional>
        </dependency>
    </dependencies>
    <build>
        <plugins>
            <plugin>
                <groupId>org.springframework.boot</groupId>
                <artifactId>spring-boot-maven-plugin</artifactId>
            </plugin>
        </plugins>
    </build>
</project>
2、HelloServiceProperteis.java
建立HelloServiceProperteis.java 檔案,用于接收配置檔案中配置的内容,
@ConfigurationProperties:用來辨別這個pojo是一個用來接收指定字首的資源配置值
prefix:表示在配置檔案中配置項字首
如下:
package modules;

import org.springframework.boot.context.properties.ConfigurationProperties;

@ConfigurationProperties(prefix = "hello")
public class HelloServiceProperteis {

    private String msg;

    public String getMsg() {
        return msg;
    }

    public void setMsg(String msg) {
        this.msg = msg;
    }
}
3、編寫服務類
HelloService.java
package modules;
public class HelloService {
    private String msg;
    public String sayHello() {
        return "Hello " + msg;
    }
    public String getMsg() {
        return msg;
    }
    public void setMsg(String msg) {
        this.msg = msg;
    }
}
4、配置讀取類
HelloServiceProperteis.java ,用來讀取配置
package modules;
import org.springframework.beans.factory.annotation.Autowired;
import org.springframework.boot.autoconfigure.condition.ConditionalOnClass;
import org.springframework.boot.autoconfigure.condition.ConditionalOnMissingBean;
import org.springframework.boot.autoconfigure.condition.ConditionalOnProperty;
import org.springframework.boot.context.properties.EnableConfigurationProperties;
import org.springframework.context.annotation.Bean;
import org.springframework.context.annotation.Configuration;
@Configuration
@EnableConfigurationProperties(value = HelloServiceProperteis.class)
@ConditionalOnClass(HelloService.class)
@ConditionalOnProperty(prefix = "hello", value = "enable", matchIfMissing = true)
public class HelloAutoConfiguration {
	@Autowired
    private HelloServiceProperteis helloServiceProperteis;
    @Bean
    @ConditionalOnMissingBean(HelloService.class)
    public HelloService helloService() {
        HelloService helloService = new HelloService();
        helloService.setMsg(helloServiceProperteis.getMsg());
        return helloService;
    }
}
@Configuration:辨別此類為一個spring配置類
@EnableConfigurationProperties(value = HelloServiceProperteis.class):啟動配置檔案,value用來指定我們要啟用的配置類,可以有多個,多個時我們可以這麼寫value={xxProperties1.class,xxProperteis2.class....}
@ConditionalOnClass(HelloService.class):表示當classPath下存在HelloService.class檔案時改配置檔案類才有效
@ConditionalOnProperty(prefix = "hello", value = "enable", matchIfMissing = true):表示隻有我們的配置檔案是否配置了以hello為字首的資源項值,并且在該資源項值為enable,如果沒有配置我們預設設定為enable
5、配置 spring.factories
src/main/resources 檔案夾下建立檔案夾 META-INF,在建立的META-INF檔案夾下建立 spring.factories
此檔案配置這個starter子產品被加載後需要自動啟動的類為 :HelloAutoConfiguration
内容為:
org.springframework.boot.autoconfigure.EnableAutoConfiguration=modules.HelloAutoConfiguration
6、打包隻本地倉庫
mvn install
此時本地倉庫中已經有我們剛才寫的這個starter jar檔案了。
3、建立starter調用工程
建立Spring Boot 工程 hello_starer_test
1、pom.xml
<?xml version="1.0" encoding="UTF-8"?>
<project xmlns="http://maven.apache.org/POM/4.0.0" xmlns:xsi="http://www.w3.org/2001/XMLSchema-instance"
    xsi:schemaLocation="http://maven.apache.org/POM/4.0.0 http://maven.apache.org/xsd/maven-4.0.0.xsd">
    <modelVersion>4.0.0</modelVersion>

    <groupId>ruoli</groupId>
    <artifactId>hellostarter.test</artifactId>
    <version>0.0.1-SNAPSHOT</version>
    <packaging>jar</packaging>

    <name>hello-spring-boot-starter-test</name>
    <description>測試自定義starter</description>

    <parent>
        <groupId>org.springframework.boot</groupId>
        <artifactId>spring-boot-starter-parent</artifactId>
        <version>1.5.3.RELEASE</version>
        <relativePath /> <!-- lookup parent from repository -->
    </parent>

    <properties>
        <project.build.sourceEncoding>UTF-8</project.build.sourceEncoding>
        <project.reporting.outputEncoding>UTF-8</project.reporting.outputEncoding>
        <java.version>1.8</java.version>
    </properties>

    <dependencies>
        <dependency>
            <groupId>org.springframework.boot</groupId>
            <artifactId>spring-boot-starter-web</artifactId>
        </dependency>

        <dependency>
            <groupId>org.springframework.boot</groupId>
            <artifactId>spring-boot-starter-test</artifactId>
            <scope>test</scope>
        </dependency>

        <dependency>
            <groupId>ruoli</groupId>
            <artifactId>hellostarter</artifactId>
            <version>0.0.1-SNAPSHOT</version>
        </dependency>
        <dependency>
            <groupId>org.springframework.boot</groupId>
            <artifactId>spring-boot-devtools</artifactId>
        </dependency>
    </dependencies>

    <build>
        <plugins>
            <plugin>
                <groupId>org.springframework.boot</groupId>
                <artifactId>spring-boot-maven-plugin</artifactId>
            </plugin>
        </plugins>
    </build>


</project>
2、建立服務調用Controller
建立HelloController 用與調用上面定義的starter提供的HelloService
package modules;

import org.springframework.beans.factory.annotation.Autowired;
import org.springframework.web.bind.annotation.RequestMapping;
import org.springframework.web.bind.annotation.RestController;

@RestController
public class HelloController {
	 @Autowired
	 private HelloService helloService;

	 @RequestMapping("/")
	 public String index() {
	    return helloService.sayHello();
	 }
}
3、編寫配置
在application.properties 配置檔案中 配置 starter需要的配置項
hello.msg=123
4、啟動工程并通路
http://localhost:8080
得到結果:Hello 123
版權聲明:本文為CSDN部落客「weixin_34408624」的原創文章,遵循CC 4.0 BY-SA版權協定,轉載請附上原文出處連結及本聲明。
原文連結:https://blog.csdn.net/weixin_34408624/article/details/91700913
![Java小案例——随機數猜測随機數猜測[圖]](data:image/gif;base64,R0lGODlhAQABAIAAAP///wAAACwAAAAAAQABAAACAkQBADs=)