1.opencv320安裝
1. 1安裝依賴包
以下均為指令行下的指令:
sudo apt-get install git

sudo apt-get update

sudo apt-get install build-essential cmake git pkg-config

sudo apt-get install libprotobuf-dev libleveldb-dev libsnappy-dev libhdf5-serial-dev protobuf-compiler

sudo apt-get install libatlas-base-dev

sudo apt-get install --no-install-recommends libboost-all-dev

sudo apt-get install libgflags-dev libgoogle-glog-dev liblmdb-dev

sudo apt-get install python-dev #預設安裝python2.7,可以手動安裝python3

sudo apt-get install python-numpy python-scipy

sudo apt install python-pip

sudo pip install protobuf

pip install scikit-image
檢查是否安裝成功可以再次輸入指令,界面提示如下則說明已成功安裝依賴包,否則繼續安裝直到安裝成功。
------------------------------------------------------------------------------------------------------------------------------------------------------------------
将Opencv的壓縮包放到/usr/local下,然後解壓。指令:unzip opencv-3.2.0.zip
繼續安裝Ubuntu系統需要的依賴項:
sudo apt-get install --assume-yes libopencv-dev build-essential cmake git libgtk2.0-dev pkg-config python-dev python-numpy libdc1394-22 libdc1394-22-dev libjpeg-dev libpng12-dev libtiff5-dev libjasper-dev libavcodec-dev libavformat-dev libswscale-dev libxine2-dev libgstreamer0.10-dev libgstreamer-plugins-base0.10-dev libv4l-dev libtbb-dev libqt4-dev libfaac-dev libmp3lame-dev libopencore-amrnb-dev libopencore-amrwb-dev libtheora-dev libvorbis-dev libxvidcore-dev x264 v4l-utils unzi
-------------------------------------------------------------------------------------------------------------------------------------------------------------------------
錯誤問題1:ImportError: No module named 'ConfigParser'
# 修改python為python2
rm /usr/bin/python
ln -s /usr/bin/python2 /usr/bin/python
# 删除python-configparser,再通過aptitude來安裝
sudo apt-get purge --auto-remove python-configparser
sudo aptitude install python-configparser
-------------------------------------------------------------------------------------------------------------------------------------------------------------------------
然後安裝opencv需要的一些依賴項,一些檔案編碼解碼之類的東東:
sudo apt-get install build-essential cmake git
sudo apt-get install ffmpeg libopencv-dev libgtk-3-dev python-numpy python3-numpy libdc1394-22 libdc1394-22-dev libjpeg-dev libpng12-dev libtiff5-dev libjasper-dev libavcodec-dev libavformat-dev libswscale-dev libxine2-dev libgstreamer1.0-dev libgstreamer-plugins-base1.0-dev libv4l-dev libtbb-dev qtbase5-dev libfaac-dev libmp3lame-dev libopencore-amrnb-dev libopencore-amrwb-dev libtheora-dev libvorbis-dev libxvidcore-dev x264 v4l-utils unzip
-------------------------------------------------------------------------------------------------------------------------------------------------------------------------
問題2.現在沒有可用的軟體包 ffmpeg,但是它被其它的軟體包引用了。
解決方式:自己在官網下載下傳一個http://www.ffmpeg.org/download.html解壓後放在/usr/share/doc/目錄下
-------------------------------------------------------------------------------------------------------------------------------------------------------------------------
1.2編譯
在終端中 cd 到 opencv 檔案夾下,然後
建立一個 build 檔案夾,編譯的工程都在這個檔案夾裡:
mkdir build
cd build/
sudo cmke -DCMAKE_BUILD_TYPE=RELEASE -DCMAKE_INSTALL_PREFIX=/usr/local -DWITH_TBB=ON -DWITH_V4L=ON -DWITH_QT=ON -DWITH_OPENGL=ON -DCUDA_NVCC_FLAGS="-D_FORCE_INLINES" ..
cmake 成功後,會出現如下結果,提示配置和生成成功:
-- Configuring done
-- Generating done
-- Build files have been written to: /home/ise/software/opencv-3.2.0/build
然後 make 編譯就可以了:make -j8
上面是将 opencv 編譯成功
如果缺少ippicv之類的東西,在這個網站手動下載下傳一
github:https://github.com/opencv/opencv_3rdparty/tree/ippicv/master_20151201/ippicv
然後放在下載下傳完後替換opencv-3.1.0/3rdparty/ippicv/downloads/linux-*目錄下的同名檔案,重新cmake
如果編譯失敗,出現這樣的狀況:
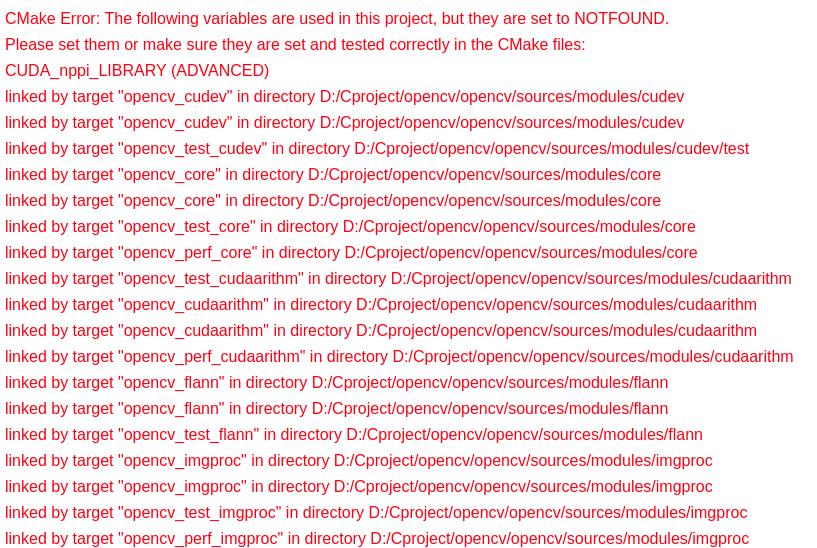
那就比較麻煩了,原因在于cuda9不再支援2.0架構
具體的修改方案如下:https://blog.csdn.net/u014613745/article/details/78310916
配置完成後:

1.3寫入系統生效
但是并沒有安裝到我們的系統中,有很多的設定都沒有寫入到系統中,是以還要進行 install
sudo make install(如果出現問題看下面)
sudo /bin/bash -c 'echo "/usr/local/lib" > /etc/ld.so.conf.d/opencv.conf'
sudo ldconfig
-------------------------------------------------------------------------------------------------------------------------------------------------------------------------
又出現問題:nvcc fatal : Unsupported gpu architecture 'compute_20'
解決方式:
cmake -D CMAKE_BUILD_TYPE=RELEASE -D CMAKE_INSTALL_PREFIX=/usr/local -D CUDA_GENERATION=Kepler -D WITH_TBB=ON -D BUILD_NEW_PYTHON_SUPPORT=ON
-D WITH_V4L=ON -D INSTALL_C_EXAMPLES=ON -D INSTALL_PYTHON_EXAMPLES=ON -D BUILD_EXAMPLES=ON -D WITH_QT=OFF -D WITH_OPENGL=ON -D BUILD_TIFF=ON ..
心态快崩了~~~堅持住 快好了!
慢慢等着就行了~~~(30min~1h)
完成後是這個樣子的:
-------------------------------------------------------------------------------------------------------------------------------------------------------------------------
(此處步驟是為了友善管理,可以不做)
重新開機系統,重新開機系統後 cd 到 build 檔案夾下:
sudo apt-get install checkinstallsudo checkinstall
然後按照提示安裝就可以了。
使用 checkinstall 的目的是為了更好的管理我安裝的 opencv,因為 opencv 的安裝很麻煩,解除安裝更麻
煩,其安裝的時候修改了一大堆的檔案,當我想使用别的版本的 opencv 時,将目前版本的 opencv 卸
載就是一件頭疼的事情,是以需要使用 checkinstall 來管理我的安裝。
執行了 checkinstall 後,會在 build 檔案下生成一個以 backup 開頭的.tgz 的備份檔案和一個以 build 開
頭的.deb 安裝檔案,當你想解除安裝目前的 opencv 時,直接執行 dpkg -r build 即可。
-------------------------------------------------------------------------------------------------------------------------------------------------------------------------
1.4 測試
1.建立一個DisplayImage.cpp檔案,代碼如下:
#include <stdio.h>
#include <opencv2/opencv.hpp>
using namespace cv;
int main(int argc, char** argv )
{
if ( argc != 2 )
{
printf("usage: DisplayImage.out <Image_Path>\n");
return -1;
}
Mat image;
image = imread( argv[1], 1 );
if ( !image.data )
{
printf("No image data \n");
return -1;
}
namedWindow("Display Image", WINDOW_AUTOSIZE );
imshow("Display Image", image);
waitKey(0);
return 0;
}
2.建立一個CMakeLists.txt檔案,代碼如下
cmake_minimum_required(VERSION 2.8)
project( DisplayImage )
find_package( OpenCV REQUIRED )
add_executable( DisplayImage DisplayImage.cpp )
target_link_libraries( DisplayImage ${OpenCV_LIBS} )
3.編譯指令:
cmake .
make
./DisplayImage lena.jpeg
注意:cmake後面哪個. 那個表示在目前目錄
4.效果如圖:
測試方法二:
cd /usr/local/opencv-3.2.0/samples/python
測試一個樣例: