自定義标簽的步驟:
1.建立一個自定義标簽處理器類,實作SimpleTag接口
public class HelloSimpleMyTag implements SimpleTag { 2.在WEB-INF檔案夾下建立一個.tld(标簽庫描述檔案)為擴充名的xml檔案.并拷入固定的部分:并對
description,display-name,tlib-version,short-name,uri做出修改
<?xml version="1.0" encoding="UTF-8" ?>

<taglib xmlns="http://java.sun.com/xml/ns/j2ee"
    xmlns:xsi="http://www.w3.org/2001/XMLSchema-instance"
    xsi:schemaLocation="http://java.sun.com/xml/ns/j2ee http://java.sun.com/xml/ns/j2ee/web-jsptaglibrary_2_0.xsd"
    version="2.0">

  <!-- 描述TLD檔案 -->
  <description>MyTag 1.0 core library</description>
  <display-name>MyTag core</display-name>
  <tlib-version>1.0</tlib-version>

  <!-- 建議在jsp頁面上使用的字首 -->
  <short-name>test</short-name>
  <!-- 作為tld檔案的id,用來标示目前的tld檔案,多個tld檔案的uri不能重複,在
  JSP頁面 通過 taglib 的屬性 uri來引入tld檔案     -->
  <uri>http://www.test.com/mytag/core</uri>
</taglib>
3.在tld檔案中描述自定義的标簽
<tag>
      <!-- 标簽的名字,在jsp頁面上使用标簽的名字 -->
      <name>hello</name>
      <!-- 标簽所在的全類名 -->
      <tag-class>com.java.tag.HelloSimpleMyTag</tag-class>
      <!-- 标簽體類型 -->
     <body-content>empty</body-content>
  </tag>
4.在jsp頁面使用自定義标簽
<%@ taglib uri="http://www.atguigu.com/mytag/core" prefix="test" %> <test:hello/> 使用自定義标簽時,prefix可以自己定義,通常會推薦tld檔案中的<short-name>
-------------------------------------------------------------------------------------
通過使用自定義标簽,會發現,标簽處理器類的 setJspContext(),doTag()會被調用
public class HelloSimpleMyTag implements SimpleTag {

    @Override
    public void doTag() throws JspException, IOException {
    }

    @Override
    public JspTag getParent() {
        return null;
    }

    @Override
    public void setJspBody(JspFragment arg0) {
    }
  //JSP引擎調用
    @Override
    public void setJspContext(JspContext arg0) {
    }

    @Override
    public void setParent(JspTag arg0) {
    }

}
在調用setJspContext(JspContext arg0) 時傳入JspContext 對象,
通過J2EE API 發現
javax.servlet.jsp
Class JspContext
java.lang.Object - Direct Known Subclasses:
- PageContext
PageContext 是 JspContext的一個子類,
在setJspContext(JspContext arg0) 是傳入一個PageContext對象,
private PageContext pageContext;
  //JSP引擎調用,把實際代表PageContext對象傳入
    @Override
    public void setJspContext(JspContext arg0) {
        this.pageContext = (PageContext)arg0;
    }
其中PageContext為JSP的一個隐含對象,通過PageContext可以擷取JSP頁面的其他8個隐含對象
即可以在doTag()中對頁面進行輸出
//執行标簽體邏輯實際應該編寫到該方法中
  @Override
    public void doTag() throws JspException, IOException {
        pageContext.getOut().print("HelloWorld!");
        HttpServletRequest request = (HttpServletRequest)pageContext.getRequest();
        pageContext.getOut().println("Hello: "+request.getParameter("name"));
} 标簽的屬性:
<atguigu:hello value="aaa" count="10"/> 在标簽上使用屬性以下幾個步驟
1.需要在tld檔案中添加标簽屬性的描述
<tag>
      <!-- 标簽的名字,在jsp頁面上使用标簽的名字 -->
      <name>hello</name>
      <!-- 标簽所在的全類名 -->
      <tag-class>com.java.tag.HelloSimpleMyTag</tag-class>
      <!-- 标簽體類型 -->
     <body-content>empty</body-content>
     <attribute>
         <!--該屬性的名字,需要和标簽處理器類settter 方法定義的屬性相同  -->
         <name>value</name>
         <!-- 該屬性是否必須 -->
         <required>true</required>
         <!--rtexprvalue :runtime expression value
         目前屬性是否可以接受運作時表達式的動态值  -->
         <rtexprvalue>true</rtexprvalue>
     </attribute>
     <attribute>
         <name>count</name>
         <required>false</required>
         <rtexprvalue>false</rtexprvalue>
     </attribute>
  </tag>
<!--rtexprvalue :runtime expression value
目前屬性是否可以接受運作時表達式的動态值 -->
<rtexprvalue>true</rtexprvalue>
可以動态指派 <atguigu:hello value="${param.name }" count="10"/> 2.在标簽處理器類中需要出現與上述屬性名相同的成員變量
public class HelloSimpleMyTag implements SimpleTag {

//建議把所有類型都設定成String類型,因為從頁面傳過來是String類型
    private String value;
    private String count;

    public void setValue(String value) {
        this.value = value;
    }
    public void setCount(String count) {
        this.count = count;
    }
當标簽屬性存在時會預設調用setXxx()
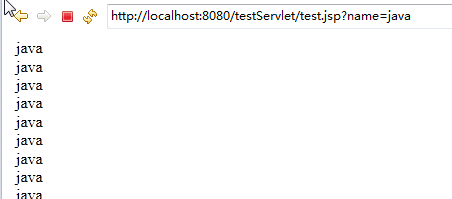
次需求為将value的值列印count次
<atguigu:hello value="${param.name }" count="10"/> @Override
public void doTag() throws JspException, IOException {
// pageContext.getOut().println("HelloWorld!<br>");
// HttpServletRequest request = (HttpServletRequest)pageContext.getRequest();
// pageContext.getOut().println("Hello: "+request.getParameter("name"));
JspWriter out = pageContext.getOut();
int c = Integer.parseInt(count);
for(int i = 0;i<c;i++){
out.print(value);
out.print("<br>");
}
} 
SimpleTag 有一個實作類 SimpleTagSupport
javax.servlet.jsp.tagext
Interface SimpleTag
- All Superinterfaces:
- JspTag
- All Known Implementing Classes:
- SimpleTagSupport
通過繼承SimpleTagSupport可以簡化實作
public class HelloSimpleMyTag extends SimpleTagSupport {
有此擷取PageContext
PageContext pageContext = (PageContext)getJspContext();
帶标簽體的自定義标簽
1.若一個标簽帶有标簽體
<test:bodyContent>HelloWorld</atguigu:test> 在自定義标簽的标簽處理器中使用JspFragment 對象封裝标簽體資訊
2.若配置了标簽含有标簽體,則JSP引擎會調用SimpleTagSupport中的setJspBody(JspFragment jspBody)
把JspFragment對象傳給标簽處理器類,SimpleTagSupport中還定義了一個 protected JspFragment getJspBody()
用于傳回JspFragment對象.
3.JspFragment 的 invoke(Writer):把标簽體内容從Writer中輸出,若為null,則等同于invoke(getJspContext().getOut()),即直接把标簽體内容輸出到頁面.
@Override
    public void doTag() throws JspException, IOException {
        super.doTag();
        JspFragment bodyContent = getJspBody();
        StringWriter sw = new StringWriter();
     //将标簽體的内容輸出到sw中
     bodyContent.invoke(sw);
        bodyContent.invoke(null);
4.在tld檔案中,使用body-content 節點來描述标簽體的類型:
<body-content>:指定标簽體的類型,大部分情況下,取值為scriptless.可能有3中取值:
empty:沒有标簽體
scriptless:标簽體可以包含 el 表達式和 JSP 動作元素,但不能包含JSP的腳本元素
tagdependent:表示标簽體交由标簽本身去解析處理.
若指定tagdependent 在标簽體中的所有代碼都會原封不動的交給标簽處理器,而不是将執行結果傳遞給标簽處理器
如果指定 <body-content>scriptless</body-content>,在頁面上使用
<atguigu:bodyContent><%=request.getParameter("name") %></atguigu:bodyContent> 會報錯
使用<body-content>tagdependent</body-content>
<atguigu:bodyContent>${param.name }</atguigu:bodyContent> 頁面上顯示結果為 ${param.name }
example1: 寫一個自定義标簽将标簽體内容變大寫,重複time次 <test:printStr time="10">HelloWorld</test:printStr>
public class PrintTimesStr extends SimpleTagSupport{

    private String time;

    public void setTime(String time) {
        this.time = time;
    }

    @Override
    public void doTag() throws JspException, IOException {
        super.doTag();
        JspFragment bodyContent = getJspBody();
        StringWriter sw = new StringWriter();
        bodyContent.invoke(sw);
        String content = sw.toString().toUpperCase();
        int count = 1;
        try {
            count = Integer.parseInt(time);
        } catch (Exception e) {
        }
        for(int i = 0;i<count;i++){
            getJspContext().getOut().write(content+"<br>");
        }
    }

}
<tag>
<name>printStr</name>
<tag-class>com.java.tag.PrintTimesStr</tag-class>
<body-content>scriptless</body-content>
<attribute>
<name>time</name>
<required>true</required>
<rtexprvalue>true</rtexprvalue>
</attribute>
</tag> <test:printStr time="10">HelloWorld</test:printStr> example2:模拟<c:forEach>
public class TestForEach extends SimpleTagSupport{

    private Collection<?> item;
    private String var;

    public void setItem(Collection<?> item) {
        this.item = item;
    }
    public void setVar(String var) {
        this.var = var;
    }

    @Override
    public void doTag() throws JspException, IOException {
        super.doTag();
        //周遊item對應的集合
        for(Object obj:item){
            //把正在周遊的集合放到pageContext中,鍵:var 值:正在周遊的對象
            getJspContext().setAttribute(var,obj);
            //把标簽體内容直接輸出到頁面上
            getJspBody().invoke(null);
        }
    }

}
<tag>
<name>forEach</name>
<tag-class>com.java.tag.TestForEach</tag-class>
<body-content>scriptless</body-content>
<attribute>
<name>item</name>
<required>true</required>
<rtexprvalue>true</rtexprvalue>
</attribute>
<attribute>
<name>var</name>
<required>true</required>
<rtexprvalue>true</rtexprvalue>
</attribute>
</tag> <%
Customer customer1 = new Customer(1,"aa","[email protected]");
Customer customer2 = new Customer(2,"bb","[email protected]");
Customer customer3 = new Customer(3,"cc","[email protected]");
List<Customer> customers = new ArrayList<Customer>();
customers.add(customer1);
customers.add(customer2);
customers.add(customer3);
request.setAttribute("customers", customers);
%>
<test:forEach var="customer" item="${requestScope.customers }">
${customer.id }--${customer.name }--${customer.email }<br>
</test:forEach> [email protected]
[email protected]
[email protected]
帶父标簽的自定義标簽
1.父标簽無法擷取子标簽的引用,父标簽僅把子标簽作為标簽體來使用.
2.子标簽可以通過 getParent() 方法來擷取父标簽的引用(需繼承SimpleTagSupport或自實作SimpleTag接口的該方法):
若子标簽的确有父标簽,JSP引擎會把代表父标簽的引用通過setParent(JspTag parent)賦給标簽處理器
3.注意:父标簽的類型是JspTag類型.該接口是一個空接口,但是來統一SimpleTag和Tag的.因為沒法确定父标簽是傳統标簽還是簡單标簽.實際使用需要進行類型轉換.
4.在tld配置檔案中,無需為父标簽有額外的配置.但,子标簽是以标簽體的形式存在的,是以父标簽的<body-content></body-content>
需設定為scriptless ,子标簽的<body-content></body-content>需要設定為empty
5.實作:
<c:choose>
<c:when test="${param.age>24}">大學畢業</c:when>
<c:when test="${param.age>20}">高總畢業</c:when>
<c:otherwise>高中以下...</c:otherwise>
</c:choose>
開發3個标簽:choose,when,otherwise
其中when标簽有一個boolean類型的屬性:test
choose是when和otherwise的父标簽
when在otherwise之前使用
在父标簽choose中定義一個"全局"的boolean類型的flag:用于判斷子标簽在滿足條件的情況下是否執行.
若when的test為true他,且when的父标簽也為true,則執行when的标簽體(正常輸出标簽體的内容),同時把flag設定為false
若when的test為true,且when的父标簽的flag為false,則不執行标簽體.
若flag為true,執行otherwise的标簽體.
貼出代碼
public class ChooseTag extends SimpleTagSupport {

    private boolean flag = true;
    public void setFlag(boolean flag) {
        this.flag = flag;
    }
    public boolean isFlag() {
        return flag;
    }

    @Override
    public void doTag() throws JspException, IOException {
        super.doTag();
        getJspBody().invoke(null);
    }
}
public class WhenTag extends SimpleTagSupport{

    private boolean test;
    public void setTest(boolean test) {
        this.test = test;
    }
    @Override
    public void doTag() throws JspException, IOException {
        super.doTag();
        if(test){
            ChooseTag chooseTag = (ChooseTag)getParent();
            boolean flag = chooseTag.isFlag();
            if(flag){
                getJspBody().invoke(null);
                chooseTag.setFlag(false);
            }
        }
    }
}
public class OtherWiseTag extends SimpleTagSupport {

    @Override
    public void doTag() throws JspException, IOException {
        super.doTag();
        ChooseTag chooseTag = (ChooseTag)getParent();
        boolean flag = chooseTag.isFlag();
        if(flag){
            getJspBody().invoke(null);
        }
    }

}
<tag>
<name>choose</name>
<tag-class>com.java.tag.ChooseTag</tag-class>
<body-content>scriptless</body-content>
</tag>
<tag>
<name>when</name>
<tag-class>com.java.tag.WhenTag</tag-class>
<body-content>scriptless</body-content>
<attribute>
<name>test</name>
<required>true</required>
<rtexprvalue>true</rtexprvalue>
</attribute>
</tag>
<tag>
<name>otherWise</name>
<tag-class>com.java.tag.OtherWiseTag</tag-class>
<body-content>scriptless</body-content>
</tag> 使用标簽:
<test:choose>
        <test:when test="${param.age>24}">大學以上</test:when>
        <test:when test="${param.age>20}">高中以上</test:when>
        <test:otherWise>高中以下</test:otherWise>
    </test:choose>
EL自定義函數
在EL表達式中調用的某個Java類的靜态方法,這個靜态方法需在web應用程式中進行配置
才能被EL表達式調用.
EL自定義函數可以擴充EL表達式的功能,讓EL表達式完成普通Java程式所能完成的功能
public class MyElFunction {

    public static String concat(String str1,String str2){
        return str1+str2;
    }
}
<!--描述EL的自定義函數-->
<function>
<name>concat</name>
<function-class>com.java.tag.MyElFunction</function-class>
<function-signature>java.lang.String concat(java.lang.String,java.lang.String)</function-signature>
</function> 在頁面上使用:
${atguigu:concat(param.str1,param.str2)}
為了簡化在JSP頁面操作字元串,JSTL中提供了一套EL自定義函數,這些自定義函數包含了
JSP頁面經常要用到的字元串操作
在JSTL的表達式中要使用一個函數,其格式為
${fn:methodNames(args...)}
使用這些函數前必須引入
<%@ taglib prefix="fn" uri="http//java.sun.com/jsp/jstl/functions"%>
轉載于:https://www.cnblogs.com/wq3435/p/5174237.html
![Java小案例——随機數猜測随機數猜測[圖]](data:image/gif;base64,R0lGODlhAQABAIAAAP///wAAACwAAAAAAQABAAACAkQBADs=)