1 安裝場景
- 在 anaconda多核心環境中,實作 由 經緯度 得到 geohash 編碼 .
- 實作方式:
- 安裝 Geohash 子產品
- 安裝方式
- 通過指令行安裝
- 在 Anaconda Prompt 視窗中,通過 pip 或 conda 指令安裝Geohash子產品 .
- 通過源代碼安裝
- 下載下傳tar包或者源代碼,通過 setup.py 檔案完整安裝 .
- 安裝方式詳見:
- 用setup.py安裝第三方 Python 包
- 主要版本:
- Geohash 1.0
- __init__.py:
-
from geohash import decode_exactly, decode, encode
- mzgeohash(Mapzen Geohash推薦!)
- __init__.py:
-
from geohash import encode, decode, adjacent, neighbors, neighborsfit
- 即,Geohash 子產品中包含的的方法不同。前者較少,後者較多。
2 較長的描述
- 文章主要記錄在Anaconda Python 2 環境下,通過 geohash 完成編碼的過程。具體為以下 4 方面:
- 安裝 geohash、mzgeohash
- 解決并記錄安裝過程中遇到的問題
- mzgeohash 使用
- 通過 unittest 執行測試用例
3 具體代碼(已安裝mzgeohash)
- 1 mzgeohash 使用說明
# ### mzgeohash
# - 調用方式
# - 實作原理
# ### list all member methods
# In[23]:
dir(mzgeohash)
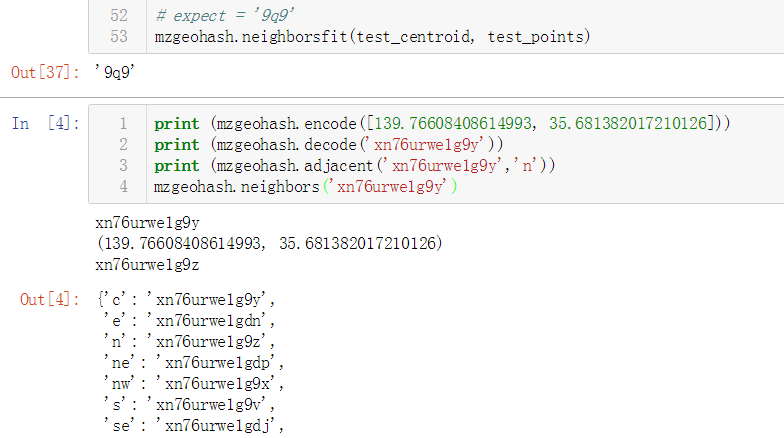
# #### 經緯度 轉換為 geohash
# In[2]:
mzgeohash.encode([139.76608408614993, 35.681382017210126])
# #### geohash 轉換為 經緯度
# In[33]:
mzgeohash.decode('xn76urwe1g9y')
# #### 已知 geohash ,計算某一方向的臨近geohash
# - 參數 1
# - 已知 geohash 串
# - 參數 2
# - 方向
# In[35]:
mzgeohash.adjacent('xn76urwe1g9y','n') #
# #### 已知 geohash ,臨近geohash
# - 九宮格,即周圍 8 個geohash
# In[34]:
mzgeohash.neighbors('xn76urwe1g9y')
# #### 已知 某位置點經緯度和周圍經緯度點集,計算同屬 geohash
# In[37]:
test_centroid = [-122.18472385000001, 37.7881345]
test_points = [
(-122.2992715, 37.9030588),
(-122.396742, 37.792976),
(-122.4474142, 37.72198087),
(-121.9764, 37.557355),
(-122.029095, 37.973737),
(-122.224274, 37.774963),
(-122.271604, 37.803664),
(-122.126871, 37.697185),
(-122.087967, 37.670399),
(-122.123801, 37.893394),
(-122.269029, 37.80787),
(-122.265609, 37.797484),
(-122.267227, 37.828415),
(-122.067423, 37.905628),
(-122.267227, 37.828415),
(-122.38666, 37.599787),
(-122.075567, 37.690754),
(-122.401407, 37.789256),
(-122.283451, 37.87404),
(-122.269029, 37.80787),
(-122.1837911, 37.87836087),
(-122.419694, 37.765062),
(-122.2945822, 37.80467476),
(-122.21244024, 37.71297174),
(-121.945154, 38.018914),
(-122.466233, 37.684638),
(-122.056013, 37.928403),
(-122.406857, 37.784991),
(-122.418466, 37.752254),
(-122.26978, 37.853024),
(-122.251793, 37.844601),
(-121.928099, 37.699759),
(-122.416038, 37.637753),
(-122.1613112, 37.72261921),
(-122.0575506, 37.63479954),
(-122.392612, 37.616035),
(-122.413756, 37.779528),
(-122.353165, 37.936887),
(-122.197273, 37.754006),
(-122.017867, 37.591208),
(-122.024597, 38.003275),
(-122.4690807, 37.70612055),
(-122.268045, 37.869867),
(-122.444116, 37.664174),
(-121.900367, 37.701695),
(-122.317269, 37.925655),
(-122.434092, 37.732921)
]
# expect = '9q9' - mzgeohash 運作Demo
- 2 利用 unittest 建立 mzgeohash 測試用例并執行
# ### 使用unittest進行 mzgeohash 子產品測試
# - 通過 testsuit 執行測試用例
# - TestCase:所有測試用例的基本類,給定測試方法的名稱,傳回測試用例執行個體;
# - TestSuit:組織測試用例的執行個體,支援測試用例的添加和删除,最終将傳遞給 testRunner進行測試執行;
# - TextTestRunner:進行測試用例執行的執行個體,其中Text的意思是以文本形式顯示測試結果。
#     - 測試結果儲存在 TextTestResult 執行個體中,包括運作多少測試用例,成功多少,失敗多少等資訊;

# In[6]:

import unittest
from mzgeohash.test_geohash import Test_encode_decode
from mzgeohash.test_geohash import Test_adjacent
from mzgeohash.test_geohash import Test_neighbors
from mzgeohash.test_geohash import Test_neighborsfit


# In[35]:

suite=unittest.TestSuite()
suite.addTest(Test_encode_decode('test_decode'))
suite.addTest(Test_encode_decode('test_encode'))
suite.addTest(Test_encode_decode('test_roundtrip'))
suite.addTest(Test_neighbors('test_neighbors'))
suite.addTest(Test_adjacent('test_adjacent'))
suite.addTest(Test_neighborsfit('test_neighborsfit'))

runner=unittest.TextTestRunner()
runner.run(suite); - unittest 建立測試用例并執行Demo
4 參考文章
- mzgeohash(Mapzen Geohash) README.md, 推薦
- python利用unittest進行測試用例執行的幾種方式, 推薦
- ImportError: No module named ‘geohash’
- 解壓tar檔案:Not found in archive
- mzgeohash 基礎應用By Python
5 總結
- geohash 版本
- mzgeohash 實作了開發中常用的(fang)方(bian)法,其他版本實作方法較少。如果讀者發現更好的版本,歡迎留言 .
- 後續有機會進一步分析、總結實作原理 .
- ipynb 腳本下載下傳
- mzgeohash github link
![unittest單元測試架構介紹及8種元素定位方法總結[圖]](data:image/gif;base64,R0lGODlhAQABAIAAAP///wAAACwAAAAAAQABAAACAkQBADs=)