一、什麼是代理?
代理是一種常用的設計模式,其目的就是為其他對象提供一個代理以控制對某個對象的通路。代理類負責為委托類預處理消息,過濾消息并轉發消息,以及進行消息被委托類執行後的後續處理。
代理模式UML圖:
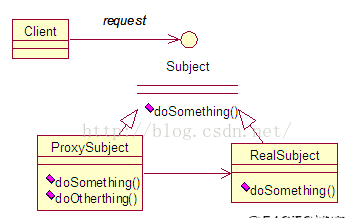

為了保持行為的一緻性,代理類和委托類通常會實作相同的接口,是以在通路者看來兩者沒有絲毫的差別。通過代理類這中間一層,能有效控制對委托類對象的直接通路,也可以很好地隐藏和保護委托類對象,同時也為實施不同控制政策預留了空間,進而在設計上獲得了更大的靈活性。Java 動态代理機制以巧妙的方式近乎完美地實踐了代理模式的設計理念。
二、Java 動态代理類
Java動态代理類位于java.lang.reflect包下,一般主要涉及到以下兩個類:
(1)Interface InvocationHandler:該接口中僅定義了一個方法
[java] view plain copy
- publicobject invoke(Object obj,Method method, Object[] args)
在實際使用時,第一個參數obj一般是指代理類,method是被代理的方法,如上例中的request(),args為該方法的參數數組。這個抽象方法在代理類中動态實作。
(2)Proxy:該類即為動态代理類,其中主要包含以下内容:
protected Proxy(InvocationHandler h):構造函數,用于給内部的h指派。
static Class getProxyClass (ClassLoaderloader, Class[] interfaces):獲得一個代理類,其中loader是類裝載器,interfaces是真實類所擁有的全部接口的數組。
static Object newProxyInstance(ClassLoaderloader, Class[] interfaces, InvocationHandler h):傳回代理類的一個執行個體,傳回後的代理類可以當作被代理類使用(可使用被代理類的在Subject接口中聲明過的方法)
所謂DynamicProxy是這樣一種class:它是在運作時生成的class,在生成它時你必須提供一組interface給它,然後該class就宣稱它實作了這些interface。你當然可以把該class的執行個體當作這些interface中的任何一個來用。當然,這個DynamicProxy其實就是一個Proxy,它不會替你作實質性的工作,在生成它的執行個體時你必須提供一個handler,由它接管實際的工作。
在使用動态代理類時,我們必須實作InvocationHandler接口
通過這種方式,被代理的對象(RealSubject)可以在運作時動态改變,需要控制的接口(Subject接口)可以在運作時改變,控制的方式(DynamicSubject類)也可以動态改變,進而實作了非常靈活的動态代理關系。
動态代理步驟:
1.建立一個實作接口InvocationHandler的類,它必須實作invoke方法
2.建立被代理的類以及接口
3.通過Proxy的靜态方法
newProxyInstance(ClassLoaderloader, Class[] interfaces, InvocationHandler h)建立一個代理
4.通過代理調用方法
三、JDK的動态代理怎麼使用?
1、需要動态代理的接口:
- package jiankunking;
- /**
- * 需要動态代理的接口
- */
- public interface Subject
- {
- /**
- * 你好
- *
- * @param name
- * @return
- */
- public String SayHello(String name);
- * 再見
- public String SayGoodBye();
- }
2、需要代理的實際對象
- * 實際對象
- public class RealSubject implements Subject
- public String SayHello(String name)
- {
- return "hello " + name;
- }
- public String SayGoodBye()
- return " good bye ";
3、調用處理器實作類(有木有感覺這裡就是傳說中的AOP啊)
- import java.lang.reflect.InvocationHandler;
- import java.lang.reflect.Method;
- * 調用處理器實作類
- * 每次生成動态代理類對象時都需要指定一個實作了該接口的調用處理器對象
- public class InvocationHandlerImpl implements InvocationHandler
- * 這個就是我們要代理的真實對象
- private Object subject;
- * 構造方法,給我們要代理的真實對象賦初值
- * @param subject
- public InvocationHandlerImpl(Object subject)
- this.subject = subject;
- * 該方法負責集中處理動态代理類上的所有方法調用。
- * 調用處理器根據這三個參數進行預處理或分派到委托類執行個體上反射執行
- * @param proxy 代理類執行個體
- * @param method 被調用的方法對象
- * @param args 調用參數
- * @throws Throwable
- public Object invoke(Object proxy, Method method, Object[] args) throws Throwable
- //在代理真實對象前我們可以添加一些自己的操作
- System.out.println("在調用之前,我要幹點啥呢?");
- System.out.println("Method:" + method);
- //當代理對象調用真實對象的方法時,其會自動的跳轉到代理對象關聯的handler對象的invoke方法來進行調用
- Object returnValue = method.invoke(subject, args);
- //在代理真實對象後我們也可以添加一些自己的操作
- System.out.println("在調用之後,我要幹點啥呢?");
- return returnValue;
4、測試
- import java.lang.reflect.Proxy;
- * 動态代理示範
- public class DynamicProxyDemonstration
- public static void main(String[] args)
- //代理的真實對象
- Subject realSubject = new RealSubject();
- /**
- * InvocationHandlerImpl 實作了 InvocationHandler 接口,并能實作方法調用從代理類到委托類的分派轉發
- * 其内部通常包含指向委托類執行個體的引用,用于真正執行分派轉發過來的方法調用.
- * 即:要代理哪個真實對象,就将該對象傳進去,最後是通過該真實對象來調用其方法
- */
- InvocationHandler handler = new InvocationHandlerImpl(realSubject);
- ClassLoader loader = handler.getClass().getClassLoader();
- Class[] interfaces = realSubject.getClass().getInterfaces();
- * 該方法用于為指定類裝載器、一組接口及調用處理器生成動态代理類執行個體
- Subject subject = (Subject) Proxy.newProxyInstance(loader, interfaces, handler);
- System.out.println("動态代理對象的類型:"+subject.getClass().getName());
- String hello = subject.SayHello("jiankunking");
- System.out.println(hello);
- // String goodbye = subject.SayGoodBye();
- // System.out.println(goodbye);
5、輸出結果如下:
示範demo下載下傳位址:javascript:void(0)
四、動态代理怎麼實作的?
從使用代碼中可以看出,關鍵點在:
- Subject subject = (Subject) Proxy.newProxyInstance(loader, interfaces, handler);
通過跟蹤提示代碼可以看出:當代理對象調用真實對象的方法時,其會自動的跳轉到代理對象關聯的handler對象的invoke方法來進行調用。
也就是說,當代碼執行到:
subject.SayHello("jiankunking")這句話時,會自動調用InvocationHandlerImpl的invoke方法。這是為啥呢?
======================橫線之間的是代碼跟分析的過程,不想看的朋友可以直接看結論=====================================
既然生成代理對象是用的Proxy類的靜态方newProxyInstance,那麼我們就去它的源碼裡看一下它到底都做了些什麼?
- public static Object newProxyInstance(ClassLoader loader,
- Class<?>[] interfaces,
- InvocationHandler h)
- throws IllegalArgumentException
- {
- //檢查h 不為空,否則抛異常
- Objects.requireNonNull(h);
- final Class<?>[] intfs = interfaces.clone();
- final SecurityManager sm = System.getSecurityManager();
- if (sm != null) {
- checkProxyAccess(Reflection.getCallerClass(), loader, intfs);
- }
- /*
- * 獲得與指定類裝載器和一組接口相關的代理類類型對象
- */
- Class<?> cl = getProxyClass0(loader, intfs);
- * 通過反射擷取構造函數對象并生成代理類執行個體
- try {
- if (sm != null) {
- checkNewProxyPermission(Reflection.getCallerClass(), cl);
- }
- //擷取代理對象的構造方法(也就是$Proxy0(InvocationHandler h))
- final Constructor<?> cons = cl.getConstructor(constructorParams);
- final InvocationHandler ih = h;
- if (!Modifier.isPublic(cl.getModifiers())) {
- AccessController.doPrivileged(new PrivilegedAction<Void>() {
- public Void run() {
- cons.setAccessible(true);
- return null;
- }
- });
- //生成代理類的執行個體并把InvocationHandlerImpl的執行個體傳給它的構造方法
- return cons.newInstance(new Object[]{h});
- } catch (IllegalAccessException|InstantiationException e) {
- throw new InternalError(e.toString(), e);
- } catch (InvocationTargetException e) {
- Throwable t = e.getCause();
- if (t instanceof RuntimeException) {
- throw (RuntimeException) t;
- } else {
- throw new InternalError(t.toString(), t);
- } catch (NoSuchMethodException e) {
- }
我們再進去getProxyClass0方法看一下:
- * Generate a proxy class. Must call the checkProxyAccess method
- * to perform permission checks before calling this.
- */
- private static Class<?> getProxyClass0(ClassLoader loader,
- Class<?>... interfaces) {
- if (interfaces.length > 65535) {
- throw new IllegalArgumentException("interface limit exceeded");
- // If the proxy class defined by the given loader implementing
- // the given interfaces exists, this will simply return the cached copy;
- // otherwise, it will create the proxy class via the ProxyClassFactory
- return proxyClassCache.get(loader, interfaces);
真相還是沒有來到,繼續,看一下proxyClassCache
- * a cache of proxy classes
- private static final WeakCache<ClassLoader, Class<?>[], Class<?>>
- proxyClassCache = new WeakCache<>(new KeyFactory(), new ProxyClassFactory());
奧,原來用了一下緩存啊
那麼它對應的get方法啥樣呢?
- * Look-up the value through the cache. This always evaluates the
- * {@code subKeyFactory} function and optionally evaluates
- * {@code valueFactory} function if there is no entry in the cache for given
- * pair of (key, subKey) or the entry has already been cleared.
- *
- * @param key possibly null key
- * @param parameter parameter used together with key to create sub-key and
- * value (should not be null)
- * @return the cached value (never null)
- * @throws NullPointerException if {@code parameter} passed in or
- * {@code sub-key} calculated by
- * {@code subKeyFactory} or {@code value}
- * calculated by {@code valueFactory} is null.
- public V get(K key, P parameter) {
- Objects.requireNonNull(parameter);
- expungeStaleEntries();
- Object cacheKey = CacheKey.valueOf(key, refQueue);
- // lazily install the 2nd level valuesMap for the particular cacheKey
- ConcurrentMap<Object, Supplier<V>> valuesMap = map.get(cacheKey);
- if (valuesMap == null) {
- //putIfAbsent這個方法在key不存在的時候加入一個值,如果key存在就不放入
- ConcurrentMap<Object, Supplier<V>> oldValuesMap
- = map.putIfAbsent(cacheKey,
- valuesMap = new ConcurrentHashMap<>());
- if (oldValuesMap != null) {
- valuesMap = oldValuesMap;
- // create subKey and retrieve the possible Supplier<V> stored by that
- // subKey from valuesMap
- Object subKey = Objects.requireNonNull(subKeyFactory.apply(key, parameter));
- Supplier<V> supplier = valuesMap.get(subKey);
- Factory factory = null;
- while (true) {
- if (supplier != null) {
- // supplier might be a Factory or a CacheValue<V> instance
- V value = supplier.get();
- if (value != null) {
- return value;
- }
- // else no supplier in cache
- // or a supplier that returned null (could be a cleared CacheValue
- // or a Factory that wasn't successful in installing the CacheValue)
- // lazily construct a Factory
- if (factory == null) {
- factory = new Factory(key, parameter, subKey, valuesMap);
- if (supplier == null) {
- supplier = valuesMap.putIfAbsent(subKey, factory);
- if (supplier == null) {
- // successfully installed Factory
- supplier = factory;
- // else retry with winning supplier
- if (valuesMap.replace(subKey, supplier, factory)) {
- // successfully replaced
- // cleared CacheEntry / unsuccessful Factory
- // with our Factory
- } else {
- // retry with current supplier
- supplier = valuesMap.get(subKey);
我們可以看到它調用了 supplier.get(); 擷取動态代理類,其中supplier是Factory,這個類定義在WeakCach的内部。
來瞅瞅,get裡面又做了什麼?
- public synchronized V get() { // serialize access
- // re-check
- Supplier<V> supplier = valuesMap.get(subKey);
- if (supplier != this) {
- // something changed while we were waiting:
- // might be that we were replaced by a CacheValue
- // or were removed because of failure ->
- // return null to signal WeakCache.get() to retry
- // the loop
- return null;
- // else still us (supplier == this)
- // create new value
- V value = null;
- try {
- value = Objects.requireNonNull(valueFactory.apply(key, parameter));
- } finally {
- if (value == null) { // remove us on failure
- valuesMap.remove(subKey, this);
- // the only path to reach here is with non-null value
- assert value != null;
- // wrap value with CacheValue (WeakReference)
- CacheValue<V> cacheValue = new CacheValue<>(value);
- // try replacing us with CacheValue (this should always succeed)
- if (valuesMap.replace(subKey, this, cacheValue)) {
- // put also in reverseMap
- reverseMap.put(cacheValue, Boolean.TRUE);
- throw new AssertionError("Should not reach here");
- // successfully replaced us with new CacheValue -> return the value
- // wrapped by it
- return value;
發現重點還是木有出現,但我們可以看到它調用了valueFactory.apply(key, parameter)方法:
- * A factory function that generates, defines and returns the proxy class given
- * the ClassLoader and array of interfaces.
- private static final class ProxyClassFactory
- implements BiFunction<ClassLoader, Class<?>[], Class<?>>
- // prefix for all proxy class names
- private static final String proxyClassNamePrefix = "$Proxy";
- // next number to use for generation of unique proxy class names
- private static final AtomicLong nextUniqueNumber = new AtomicLong();
- @Override
- public Class<?> apply(ClassLoader loader, Class<?>[] interfaces) {
- Map<Class<?>, Boolean> interfaceSet = new IdentityHashMap<>(interfaces.length);
- for (Class<?> intf : interfaces) {
- /*
- * Verify that the class loader resolves the name of this
- * interface to the same Class object.
- */
- Class<?> interfaceClass = null;
- try {
- interfaceClass = Class.forName(intf.getName(), false, loader);
- } catch (ClassNotFoundException e) {
- if (interfaceClass != intf) {
- throw new IllegalArgumentException(
- intf + " is not visible from class loader");
- * Verify that the Class object actually represents an
- * interface.
- if (!interfaceClass.isInterface()) {
- interfaceClass.getName() + " is not an interface");
- * Verify that this interface is not a duplicate.
- if (interfaceSet.put(interfaceClass, Boolean.TRUE) != null) {
- "repeated interface: " + interfaceClass.getName());
- String proxyPkg = null; // package to define proxy class in
- int accessFlags = Modifier.PUBLIC | Modifier.FINAL;
- /*
- * Record the package of a non-public proxy interface so that the
- * proxy class will be defined in the same package. Verify that
- * all non-public proxy interfaces are in the same package.
- */
- int flags = intf.getModifiers();
- if (!Modifier.isPublic(flags)) {
- accessFlags = Modifier.FINAL;
- String name = intf.getName();
- int n = name.lastIndexOf('.');
- String pkg = ((n == -1) ? "" : name.substring(0, n + 1));
- if (proxyPkg == null) {
- proxyPkg = pkg;
- } else if (!pkg.equals(proxyPkg)) {
- throw new IllegalArgumentException(
- "non-public interfaces from different packages");
- if (proxyPkg == null) {
- // if no non-public proxy interfaces, use com.sun.proxy package
- proxyPkg = ReflectUtil.PROXY_PACKAGE + ".";
- * Choose a name for the proxy class to generate.
- long num = nextUniqueNumber.getAndIncrement();
- String proxyName = proxyPkg + proxyClassNamePrefix + num;
- * Generate the specified proxy class.
- byte[] proxyClassFile = ProxyGenerator.generateProxyClass(
- proxyName, interfaces, accessFlags);
- return defineClass0(loader, proxyName,
- proxyClassFile, 0, proxyClassFile.length);
- } catch (ClassFormatError e) {
- * A ClassFormatError here means that (barring bugs in the
- * proxy class generation code) there was some other
- * invalid aspect of the arguments supplied to the proxy
- * class creation (such as virtual machine limitations
- * exceeded).
- throw new IllegalArgumentException(e.toString());
通過看代碼終于找到了重點:
- //生成位元組碼
- byte[] proxyClassFile = ProxyGenerator.generateProxyClass(proxyName, interfaces, accessFlags);
那麼接下來我們也使用測試一下,使用這個方法生成的位元組碼是個什麼樣子:
- import sun.misc.ProxyGenerator;
- import java.io.File;
- import java.io.FileNotFoundException;
- import java.io.FileOutputStream;
- import java.io.IOException;
- // 将生成的位元組碼儲存到本地,
- createProxyClassFile();
- private static void createProxyClassFile(){
- String name = "ProxySubject";
- byte[] data = ProxyGenerator.generateProxyClass(name,new Class[]{Subject.class});
- FileOutputStream out =null;
- try {
- out = new FileOutputStream(name+".class");
- System.out.println((new File("hello")).getAbsolutePath());
- out.write(data);
- } catch (FileNotFoundException e) {
- e.printStackTrace();
- } catch (IOException e) {
- }finally {
- if(null!=out) try {
- out.close();
- } catch (IOException e) {
- e.printStackTrace();
- }
- }
我們用jd-jui 工具将生成的位元組碼反編譯:
- import java.lang.reflect.UndeclaredThrowableException;
- import jiankunking.Subject;
- public final class ProxySubject
- extends Proxy
- implements Subject
- private static Method m1;
- private static Method m3;
- private static Method m4;
- private static Method m2;
- private static Method m0;
- public ProxySubject(InvocationHandler paramInvocationHandler)
- {
- super(paramInvocationHandler);
- }
- public final boolean equals(Object paramObject)
- try
- return ((Boolean)this.h.invoke(this, m1, new Object[] { paramObject })).booleanValue();
- catch (Error|RuntimeException localError)
- throw localError;
- catch (Throwable localThrowable)
- throw new UndeclaredThrowableException(localThrowable);
- public final String SayGoodBye()
- return (String)this.h.invoke(this, m3, null);
- public final String SayHello(String paramString)
- return (String)this.h.invoke(this, m4, new Object[] { paramString });
- public final String toString()
- return (String)this.h.invoke(this, m2, null);
- public final int hashCode()
- return ((Integer)this.h.invoke(this, m0, null)).intValue();
- static
- m1 = Class.forName("java.lang.Object").getMethod("equals", new Class[] { Class.forName("java.lang.Object") });
- m3 = Class.forName("jiankunking.Subject").getMethod("SayGoodBye", new Class[0]);
- m4 = Class.forName("jiankunking.Subject").getMethod("SayHello", new Class[] { Class.forName("java.lang.String") });
- m2 = Class.forName("java.lang.Object").getMethod("toString", new Class[0]);
- m0 = Class.forName("java.lang.Object").getMethod("hashCode", new Class[0]);
- return;
- catch (NoSuchMethodException localNoSuchMethodException)
- throw new NoSuchMethodError(localNoSuchMethodException.getMessage());
- catch (ClassNotFoundException localClassNotFoundException)
- throw new NoClassDefFoundError(localClassNotFoundException.getMessage());
這就是最終真正的代理類,它繼承自Proxy并實作了我們定義的Subject接口
也就是說:
這裡的subject實際是這個類的一個執行個體,那麼我們調用它的:
- public final String SayHello(String paramString)
就是調用我們定義的InvocationHandlerImpl的 invoke方法:
五、結論
到了這裡,終于解答了: subject.SayHello("jiankunking")這句話時,為什麼會自動調用InvocationHandlerImpl的invoke方法? 因為JDK生成的最終真正的代理類,它繼承自Proxy并實作了我們定義的Subject接口,在實作Subject接口方法的内部,通過反射調用了 InvocationHandlerImpl的invoke方法。 包含生成本地class檔案的demo:javascript:void(0) 通過分析代碼可以看出Java 動态代理,具體有如下四步驟: - 通過實作 InvocationHandler 接口建立自己的調用處理器;
- 通過為 Proxy 類指定 ClassLoader 對象和一組 interface 來建立動态代理類;
- 通過反射機制獲得動态代理類的構造函數,其唯一參數類型是調用處理器接口類型;
- 通過構造函數建立動态代理類執行個體,構造時調用處理器對象作為參數被傳入。