作者|冬島 阿裡雲技術專家
本篇主要介紹 Knative Serving 的流量灰階,通過一個 rest-api 的例子示範如何建立不同的 Revision、如何在不同的 Revision 之間按照流量比例灰階。
部署 rest-api v1
- 代碼
測試之前我們需要寫一段 rest-api 的代碼,并且還要能夠區分不同的版本。下面我基于官方的
例子進行了修改,為了使用友善去掉了
github.com/gorilla/mux
依賴,直接使用 Golang 系統包
net/http
替代。這段代碼可以通過 RESOURCE 環境變量來區分不同的版本。
package main

import (
    "fmt"
    "io/ioutil"
    "log"
    "net/http"
    "net/url"
    "os"

    "flag"
)

var resource string

func main() {
    flag.Parse()
    //router := mux.NewRouter().StrictSlash(true)

    resource = os.Getenv("RESOURCE")
    if resource == "" {
        resource = "NOT SPECIFIED"
    }

    root := "/" + resource
    path := root + "/{stockId}"

    http.HandleFunc("/", Index)
    http.HandleFunc(root, StockIndex)
    http.HandleFunc(path, StockPrice)

    if err := http.ListenAndServe(fmt.Sprintf(":%s", "8080"), nil); err != nil {
        log.Fatalf("ListenAndServe error:%s ", err.Error())
    }
}

func Index(w http.ResponseWriter, r *http.Request) {
    fmt.Fprintf(w, "Welcome to the %s app! \n", resource)
}

func StockIndex(w http.ResponseWriter, r *http.Request) {
    fmt.Fprintf(w, "%s ticker not found!, require /%s/{ticker}\n", resource, resource)
}

func StockPrice(w http.ResponseWriter, r *http.Request) {
    stockId := r.URL.Query().Get("stockId")

    url := url.URL{
        Scheme: "https",
        Host:   "api.iextrading.com",
        Path:   "/1.0/stock/" + stockId + "/price",
    }

    log.Print(url)

    resp, err := http.Get(url.String())
    if err != nil {
        fmt.Fprintf(w, "%s not found for ticker : %s \n", resource, stockId)
        return
    }

    defer resp.Body.Close()

    body, err := ioutil.ReadAll(resp.Body)

    fmt.Fprintf(w, "%s price for ticker %s is %s\n", resource, stockId, string(body))
} - Dockerfile
建立一個叫做 Dockerfile 的檔案,把下面這些内容複制到檔案中。執行
docker build --tag registry.cn-hangzhou.aliyuncs.com/knative-sample/rest-api-go:v1 --file ./Dockerfile .
指令即可完成鏡像的編譯。
你在測試的時候請把
registry.cn-hangzhou.aliyuncs.com/knative-sample/rest-api-go:v1
換成你自己的鏡像倉庫位址。
編譯好鏡像以後執行
docker push registry.cn-hangzhou.aliyuncs.com/knative-sample/rest-api-go:v1
把鏡像推送到鏡像倉庫。
FROM registry.cn-hangzhou.aliyuncs.com/knative-sample/golang:1.12 as builder

WORKDIR /go/src/github.com/knative-sample/rest-api-go
COPY . .

RUN CGO_ENABLED=0 GOOS=linux go build -v -o rest-api-go
FROM registry.cn-hangzhou.aliyuncs.com/knative-sample/alpine-sh:3.9
COPY --from=builder /go/src/github.com/knative-sample/rest-api-go/rest-api-go /rest-api-go

CMD ["/rest-api-go"] - Service 配置
鏡像已經有了,我們開始部署 Knative Service。把下面的内容儲存到 revision-v1.yaml 中,然後執行
kubectl apply -f revision-v1.yaml
即可完成 Knative Service 的部署。
apiVersion: serving.knative.dev/v1alpha1
kind: Service
metadata:
 name: stock-service-example
 namespace: default
spec:
 template:
   metadata:
     name: stock-service-example-v1
   spec:
     containers:
     - image: registry.cn-hangzhou.aliyuncs.com/knative-sample/rest-api-go:v1
       env:
         - name: RESOURCE
           value: v1
       readinessProbe:
         httpGet:
           path: /
         initialDelaySeconds: 0
         periodSeconds: 3
首次安裝會建立出一個叫做
stock-service-example-v1
的 Revision,并且是把 100% 的流量都打到
stock-service-example-v1
上。
驗證 Serving 的各個資源
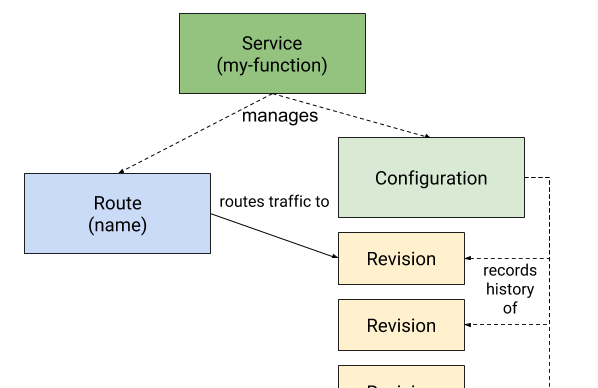
如下圖所示,我們先回顧一下 Serving 涉及到的各種資源。接下來我們分别看一下剛才部署的
revision-v1.yaml
各個資源配置。
- Knative Service
kubectl get ksvc stock-service-example --output yaml - Knative Configuration
kubectl get configuration -l \
"serving.knative.dev/service=stock-service-example" --output yaml - Knative Revision
kubectl get revision -l \
"serving.knative.dev/service=stock-service-example" --output yaml - Knative Route
kubectl get route -l \
"serving.knative.dev/service=stock-service-example" --output yaml
通路 rest-api 服務
我們部署的 Service 名稱是: stock-service-example。通路這個 Service 需要擷取 Istio Gateway 的 IP,然後使用 stock-service-example Domain 綁定 Host 的方式發起 curl 請求。為了友善測試我寫成了一個腳本。建立一個 run-test.sh 檔案,把下面這些内容複制到檔案内,然後賦予檔案可執行權限。執行執行此腳本就能得到測試結果。
#!/bin/bash

SVC_NAME="stock-service-example"
export INGRESSGATEWAY=istio-ingressgateway
export GATEWAY_IP=`kubectl get svc $INGRESSGATEWAY --namespace istio-system --output jsonpath="{.status.loadBalancer.ingress[*]['ip']}"`
export DOMAIN_NAME=`kubectl get route ${SVC_NAME} --output jsonpath="{.status.url}"| awk -F/ '{print $3}'`

curl -H "Host: ${DOMAIN_NAME}" http://${GATEWAY_IP}
測試結果:
從下面的指令輸出結果可以看到現在傳回的是 v1 的資訊,說明請求打到 v1 上面了。
└─# ./run-test.sh
Welcome to the v1 app!
灰階 50% 的流量到 v2
修改 Service 建立 v2 revision , 建立一個
revision-v2.yaml
檔案,内容如下:
apiVersion: serving.knative.dev/v1alpha1
kind: Service
metadata:
  name: stock-service-example
  namespace: default
spec:
  template:
    metadata:
      name: stock-service-example-v2
    spec:
      containers:
      - image: registry.cn-hangzhou.aliyuncs.com/knative-sample/rest-api-go:v1
        env:
          - name: RESOURCE
            value: v2
        readinessProbe:
          httpGet:
            path: /
          initialDelaySeconds: 0
          periodSeconds: 3
  traffic:
  - tag: v1
    revisionName: stock-service-example-v1
    percent: 50
  - tag: v2
    revisionName: stock-service-example-v2
    percent: 50
  - tag: latest
    latestRevision: true
    percent: 0
我們對比一下 v1 版本和 v2 版本可以發現,v2 版本的 Service 中增加了
traffic:
的配置。在 traffic 中指定了每一個 Revision。 執行
kubectl apply -f revision-v2.yaml
安裝 v2 版本的配置。然後執行測試腳本就能看到現在傳回的結果中 v1 和 v2 基本上是各占 50% 的比例。下面這是我真實測試的結果。
└─# ./run-test.sh
Welcome to the v2 app!
└─# ./run-test.sh
Welcome to the v1 app!
└─# ./run-test.sh
Welcome to the v2 app!
└─# ./run-test.sh
Welcome to the v1 app!
提前驗證 Revision
上面展示的 v2 的例子,在建立 v2 的時候直接就把流量分發到 v2 ,如果此時 v2 有問題就會導緻有 50% 的流量異常。下面我們就展示一下如何在轉發流量之前驗證新的 revision 服務是否正常。我們再建立一個 v3 版本。
建立一個
revision-v3.yaml
的檔案,内容如下:
apiVersion: serving.knative.dev/v1alpha1
kind: Service
metadata:
  name: stock-service-example
  namespace: default
spec:
  template:
    metadata:
      name: stock-service-example-v3
    spec:
      containers:
      - image: registry.cn-hangzhou.aliyuncs.com/knative-sample/rest-api-go:v1
        env:
          - name: RESOURCE
            value: v3
        readinessProbe:
          httpGet:
            path: /
          initialDelaySeconds: 0
          periodSeconds: 3
  traffic:
  - tag: v1
    revisionName: stock-service-example-v1
    percent: 50
  - tag: v2
    revisionName: stock-service-example-v2
    percent: 50
  - tag: latest
    latestRevision: true
    percent: 0
執行
kubectl apply -f revision-v3.yaml
部署 v3 版本。然後檢視一下 Revision 情況:
└─# kubectl get revision
NAME                       SERVICE NAME               GENERATION   READY   REASON
stock-service-example-v1   stock-service-example-v1   1            True
stock-service-example-v2   stock-service-example-v2   2            True
stock-service-example-v3   stock-service-example-v3   3            True
可以看到現在已經建立出來了三個 Revision 。
此時我們再看一下 stock-service-example 的真實生效:
└─# kubectl get ksvc stock-service-example -o yaml
apiVersion: serving.knative.dev/v1beta1
kind: Service
metadata:
  annotations:
...
status:
...
  traffic:
  - latestRevision: false
    percent: 50
    revisionName: stock-service-example-v1
    tag: v1
    url: http://v1-stock-service-example.default.example.com
  - latestRevision: false
    percent: 50
    revisionName: stock-service-example-v2
    tag: v2
    url: http://v2-stock-service-example.default.example.com
  - latestRevision: true
    percent: 0
    revisionName: stock-service-example-v3
    tag: latest
    url: http://latest-stock-service-example.default.example.com
  url: http://stock-service-example.default.example.com
可以看到 v3 Revision 雖然建立出來了,但是因為沒有設定 traffic,是以并不會有流量轉發。此時你執行多少次
./run-test.sh
都不會得到 v3 的輸出。
在 Service 的 status.traffic 配置中可以看到 latest Revision 的配置:
- latestRevision: true
    percent: 0
    revisionName: stock-service-example-v3
    tag: latest
    url: http://latest-stock-service-example.default.example.com
每一個 Revision 都有一個自己的 URL,是以隻需要基于 v3 Revision 的 URL 發起請求就能開始測試了。
我已經寫好了一個測試腳本,你可以把下面這段腳本儲存在
latest-run-test.sh
檔案中,然後執行這個腳本就能直接發起到 latest 版本的請求:
#!/bin/bash
export INGRESSGATEWAY=istio-ingressgateway
export GATEWAY_IP=`kubectl get svc $INGRESSGATEWAY --namespace istio-system --output jsonpath="{.status.loadBalancer.ingress[*]['ip']}"`
export DOMAIN_NAME=`kubectl get route ${SVC_NAME} --output jsonpath="{.status.url}"| awk -F/ '{print $3}'`

export LAST_DOMAIN=`kubectl get ksvc stock-service-example --output jsonpath="{.status.traffic[?(@.tag=='latest')].url}"| cut -d'/' -f 3`

curl -H "Host: ${LAST_DOMAIN}" http://${GATEWAY_IP}
測試 v3 版本如果沒問題就可以把流量分發到 v3 版本了。
下面我們再建立一個檔案
revision-v3-2.yaml
, 内容如下:
apiVersion: serving.knative.dev/v1alpha1
kind: Service
metadata:
  name: stock-service-example
  namespace: default
spec:
  template:
    metadata:
      name: stock-service-example-v3
    spec:
      containers:
      - image: registry.cn-hangzhou.aliyuncs.com/knative-sample/rest-api-go:v1
        env:
          - name: RESOURCE
            value: v3
        readinessProbe:
          httpGet:
            path: /
          initialDelaySeconds: 0
          periodSeconds: 3
  traffic:
  - tag: v1
    revisionName: stock-service-example-v1
    percent: 40
  - tag: v2
    revisionName: stock-service-example-v2
    percent: 30
  - tag: v3
    revisionName: stock-service-example-v3
    percent: 30
  - tag: latest
    latestRevision: true
    percent: 0
用 vimdiff 看一下 revision-v3.yaml 和 revision-v3-2.yaml 的差別:

revision-v3-2.yaml 增加了到 v3 的流量轉發。此時執行
./run-test.sh
可以看到 v1、v2 和 v3 的比例基本是:4:3:3
└─# ./run-test.sh
Welcome to the v1 app!
└─# ./run-test.sh
Welcome to the v2 app!
└─# ./run-test.sh
Welcome to the v1 app!
└─# ./run-test.sh
Welcome to the v2 app!
└─# ./run-test.sh
Welcome to the v3 app!
... ...
版本復原
Knative Service 的 Revision 是不能修改的,每次 Service Spec 的更新建立的 Revision 都會保留在 kube-apiserver 中。如果應用釋出到某個新版本發現有問題想要復原到老版本的時候隻需要指定相應的 Revision,然後把流量轉發過去就行了。
小結
Knative Service 的灰階、復原都是基于流量的。Workload(Pod) 是根據過來的流量自動建立出來的。是以在 Knative Serving 模型中流量是核心驅動。這和傳統的應用釋出、灰階模型是有差別的。
假設有一個應用 app1 ,傳統的做法首先是設定應用的執行個體個數( Kubernetes 體系中就是 Pod ),我們假設執行個體個數是 10 個。如果要進行灰階釋出,那麼傳統的做法就是先釋出一個 Pod,此時 v1 和 v2 的分布方式是:v1 的 Pod 9個,v2 的 Pod 1 個。如果要繼續擴大灰階範圍的話那就是 v2 的 Pod 數量變多,v1 的 Pod 數量變少,但總的 Pod 數量維持 10 個不變。
在 Knative Serving 模型中 Pod 數量永遠都是根據流量自适應的,不需要提前指定。在灰階的時候隻需要指定流量在不同版本之間的灰階比例即可。每一個 Revision 的執行個體數都是根據流量的大小自适應,不需要提前指定。
從上面的對比中可以發現 Knative Serving 模型是可以精準的控制灰階影響的範圍的,保證隻灰階一部分流量。而傳統的模型中 Pod 灰階的比例并不能真實的代表流量的比例,是一個間接的灰階方法。