0x1 摘要
WindowOperator可以說是Flink視窗功能非常核心核心的類,是視窗功能源碼的一條主線,延着這條主線去慢慢看源碼會輕松很多。注:此文基于Flink 1.4.2 版本源碼。
0x2 WindowOperator 類結構分析
先來看一下類結構圖,可以使用idea來生成類圖,下圖經過稍微加工,去掉一些不重要類的結構圖:
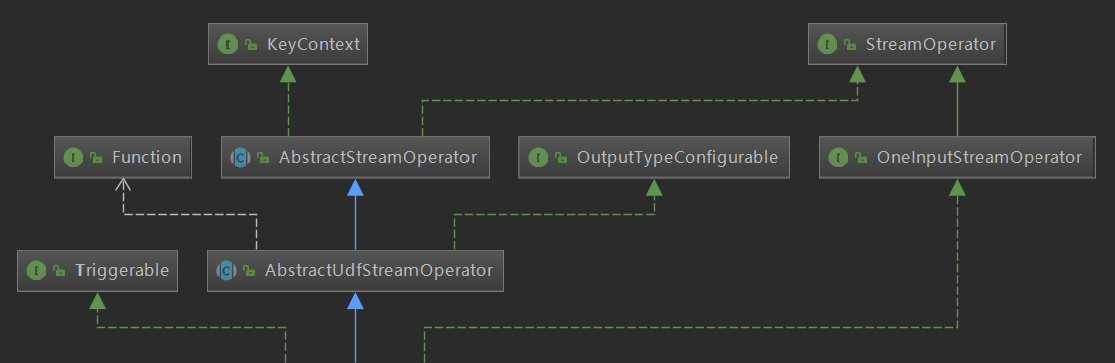
我們核心重點關注以下一個接口:
- OneInputStreamOperator
public interface OneInputStreamOperator<IN, OUT> extends StreamOperator<OUT> {
 /**
  * Processes one element that arrived at this operator.
  * This method is guaranteed to not be called concurrently with other methods of the operator.
  */
 void processElement(StreamRecord<IN> element) throws Exception;

 /**
  * Processes a {@link Watermark}.
  * This method is guaranteed to not be called concurrently with other methods of the operator.
  *
  * @see org.apache.flink.streaming.api.watermark.Watermark
  */
 void processWatermark(Watermark mark) throws Exception;

 void processLatencyMarker(LatencyMarker latencyMarker) throws Exception;
}
0x3 OneInputStreamOperator 具體實作分析
此接口三個方法
WindowOperator
類隻實作了
processElement
方法,其餘兩個方法實作全部在
AbstractStreamOperator
抽象類中,此文不去講解,此文重點介紹
processElement
方法,這個方法也是最重要的方法。
從方法注釋可以看出,每一條消息過來都會調用此方法,此方法主體很清晰,看下面條件判斷語句:
final Collection<W> elementWindows = windowAssigner.assignWindows(
    element.getValue(), element.getTimestamp(), windowAssignerContext);

//if element is handled by none of assigned elementWindows
boolean isSkippedElement = true;

final K key = this.<K>getKeyedStateBackend().getCurrentKey();

if (windowAssigner instanceof MergingWindowAssigner) {
    ...
} else {
    ...
}

// side output input event if
// element not handled by any window
// late arriving tag has been set
// windowAssigner is event time and current timestamp + allowed lateness no less than element timestamp
if (isSkippedElement && isElementLate(element)) {
    if (lateDataOutputTag != null){
        sideOutput(element);
    } else {
        this.numLateRecordsDropped.inc();
    }
}
分為合并視窗配置設定器和非合并視窗配置設定器,我們平時使用的
TumblingProcessingTimeWindows
都屬于非合并視窗,今天就介紹非合并視窗,即代碼中
else
邏輯。
原代碼如下:
for (W window: elementWindows) {

    // drop if the window is already late
    if (isWindowLate(window)) {
        continue;
    }
    isSkippedElement = false;

    windowState.setCurrentNamespace(window);
    windowState.add(element.getValue());

    triggerContext.key = key;
    triggerContext.window = window;

    TriggerResult triggerResult = triggerContext.onElement(element);

    if (triggerResult.isFire()) {
        ACC contents = windowState.get();
        if (contents == null) {
            continue;
        }
        emitWindowContents(window, contents);
    }

    if (triggerResult.isPurge()) {
        windowState.clear();
    }
    registerCleanupTimer(window);
}
第一步:判斷視窗是否延遲,如果延遲直接踩過,判斷延遲的邏輯相對簡單可自行檢視源碼
第二步:設定
isSkippedElement
标志位,此标志位等于
false
說明,目前元素可以比對到視窗,
true
說明比對不到視窗,後面會有處理邏輯
第三步:下面四行代碼是一些狀态設定
第四步:根據目前元素傳回一個觸發器結果
第五步:判斷觸發器結果是否需要執行,如果需要執行,則調用
emitWindowContents
方法執行
第六步:判斷是否需要清理視窗狀态資訊
第七步:注冊清除定時器
protected void registerCleanupTimer(W window) {
    long cleanupTime = cleanupTime(window);
    if (cleanupTime == Long.MAX_VALUE) {
        // don't set a GC timer for "end of time"
        return;
    }

    if (windowAssigner.isEventTime()) {
        triggerContext.registerEventTimeTimer(cleanupTime);
    } else {
        triggerContext.registerProcessingTimeTimer(cleanupTime);
    }
}
首先計算清除時間:
private long cleanupTime(W window) {
    if (windowAssigner.isEventTime()) {
        long cleanupTime = window.maxTimestamp() + allowedLateness;
        return cleanupTime >= window.maxTimestamp() ? cleanupTime : Long.MAX_VALUE;
    } else {
        return window.maxTimestamp();
    }
}
如果是事件時間則需要算上允許延遲時間,調用
triggerContext
注冊
Time
注:
processElement
方法開頭代碼
final Collection<W> elementWindows = windowAssigner.assignWindows(
    element.getValue(), element.getTimestamp(), windowAssignerContext);
這段代碼是視窗的配置設定,後面單獨文章來分析視窗配置設定實作原理。
0x4 結束語
整個
WindowOperator
核心流程代碼不多,但代碼量還是比較大,裡面涉及到視窗配置設定、時間觸發器,每個點都涉及比較多的源碼,不能一次性去講完,需要慢慢去挖。
![Java小案例——随機數猜測随機數猜測[圖]](data:image/gif;base64,R0lGODlhAQABAIAAAP///wAAACwAAAAAAQABAAACAkQBADs=)