目标
- 了解HTTP 請求/響應頭及常見的屬性;
- 了解如何使用SpringBoot處理頭資訊 ;
- 了解如何使用SpringBoot處理Cookie ;
- 學會如何對 Session 進行讀寫;
- 了解如何在不同請求間傳遞 flash參數
一、Http 頭資訊
HTTP 頭(Header)是一種附加内容,獨立于請求内容和響應内容。
HTTP 協定中的大量特性都通過Header資訊互動來實作,比如内容編解碼、緩存、連接配接保活等等。
如下面的一個請求響應:
Request
Accept: text/html,application/xhtml+xml,application/xml;q=0.9,image/webp,image/apng,*/*;q=0.8
Accept-Encoding: gzip, deflate
Accept-Language: zh-CN,zh;q=0.9
Cache-Control: max-age=0
Connection: keep-alive
Host: www.cnblogs.com
If-Modified-Since: Wed, 18 Jul 2018 13:47:45 GMT
Upgrade-Insecure-Requests: 1
User-Agent: Mozilla/5.0 (Windows NT 6.1; Win64; x64) AppleWebKit/537.36 (KHTML, like Gecko) Chrome/65.0.3325.181 Safari/537.36 | 名稱 | 用途 |
|---|---|
| Accept | 用戶端期望的MIME 類型清單 |
| Accept-Encoding | 用戶端期望的編解碼方式 |
| Accept-Language | 用戶端期望的語言 |
| Cache-Control | 緩存控制 |
| Connection | 連接配接行為(keep-alive) |
| Host | 請求通路的主機 |
| If-Modified-Since | |
| Upgrade-Insecure-Requests | 支援安全加密标記 |
| User-Agent | 使用者代理(用戶端辨別) |
Response
Cache-Control: private, max-age=10
Connection: keep-alive
Content-Encoding: gzip
Content-Type: text/html; charset=utf-8
Date: Wed, 18 Jul 2018 13:47:51 GMT
Expires: Wed, 18 Jul 2018 13:48:01 GMT
Last-Modified: Wed, 18 Jul 2018 13:47:51 GMT
Transfer-Encoding: chunked
Vary: Accept-Encoding
X-Frame-Options: SAMEORIGIN
X-UA-Compatible: IE=10 | Content-Encoding | 編解碼方式 |
| Content-Type | 内容類型(MIME) |
| Date | 目前響應時間 |
| Expires | 文檔過期時間 |
| Last-Modified | 最後一次更新時間 |
| Transfer-Encoding | 傳輸編碼方式 |
| Vary | 需要重新整理的請求Header |
| X-Frame-Options | FRAME展示政策(用于同源控制) |
| X-UA-Compatible | IE相容屬性 |
更多的** Http Header **可以從
這裡找到二、SpringBoot 處理頭資訊
前面的内容中已經講過如何完成Controller方法及請求的映射。
在SpringBoot可通過@RequestHeader注解方式
将請求頭資訊映射到參數,如下面的片段:
@GetMapping("/some")
    @ResponseBody
    public String someHeader(@RequestHeader(value = "Host") String host,
            @RequestHeader(value = "User-Agent") String userAgent,
            @RequestHeader(value = "Cache-Control", required = false) String cacheControl,
            HttpServletResponse response) {

        logger.info("host:{}", host);
        logger.info("User-Agent:{}", userAgent);
        logger.info("Cache-Control:{}", cacheControl);

        // 設定響應頭
        response.setHeader("Cache-Control", "no-cache,no-store,must-revalidate");
        response.setHeader("Pragma", "no-cache");
        response.setDateHeader("Expires", 0);

        return "OK";
    }
而響應頭呢,可以通過聲明一個HttpServletResponse參數後,
通過該對象進行設定,上面的代碼非常容易了解。
如果希望獲得全部的請求頭,可以使用HttpHeaders對象:
@GetMapping("/all")
    public ResponseEntity<Map<String, List<String>>> allHeaders(@RequestHeader HttpHeaders headers) {

        Map<String, List<String>> valueMap = new HashMap<String, List<String>>();
        for (String header : headers.keySet()) {
            valueMap.put(header, headers.get(header));
            logger.info("header[{}]={}", header, headers.get(header));
        }

        // 通過ResponseEntity設定響應頭
        ResponseEntity<Map<String, List<String>>> entity = ResponseEntity.status(HttpStatus.OK)
                .header("new header", UUID.randomUUID().toString()).body(valueMap);
        return entity;
    }
上面的一段代碼中,可以将所有請求頭資訊全部列印出來。
此外還須注意到,傳回響應使用了ResponseEntity對象,這是一個用于直接表示
響應資訊頭、内容的對象,利用ResponseEntity可以很友善的設定響應頭資訊。
三、Cookie處理
Cookie一開始伺服器用于辨識使用者資訊而記錄在浏覽器上的資訊。
到目前為止Cookie作為用戶端的存儲有了非常多的應用場景。
SpringBoot 提供了@CookieValue以支援參數方式注入,如下:
@GetMapping("/some")
    @ResponseBody
    public String someCookie(@CookieValue(value = "counter", defaultValue = "0") int counter,
            HttpServletResponse response) {

        logger.info("counter:{}", counter);
        counter += 1;

        String newValue = counter + "";

        // 設定Cookie
        response.addCookie(new Cookie("counter", newValue));
        return newValue;
    }
上述代碼中,通路/some 可以獲得一個counter的cookie值,
且每通路一次則自增一次,這是一個簡單的通路計數器功能。
如果希望擷取全部的Cookie,可以參考以下代碼:
@GetMapping("/all")
    public ResponseEntity<Map<String, String>>allCookies(HttpServletRequest request, HttpServletResponse response) {

        Map<String, String> valueMap = new HashMap<String, String>();
        for (Cookie cookie : request.getCookies()) {

            valueMap.put(cookie.getName(), cookie.getValue());
            logger.info("cookie[{}]={}", cookie.getName(), cookie.getValue());
        }

        // 設定Cookie
        response.addCookie(new Cookie("key", UUID.randomUUID().toString()));
        return new ResponseEntity<Map<String, String>>(valueMap, HttpStatus.OK);
    }
清理全部Cookie
@GetMapping("/clear")
    public ResponseEntity<Map<String, String>> clearCookies(HttpServletRequest request, HttpServletResponse response) {

        Map<String, String> valueMap = new HashMap<String, String>();
        for (Cookie cookie : request.getCookies()) {

            valueMap.put(cookie.getName(), cookie.getValue());
            logger.info("cookie[{}]={}", cookie.getName(), cookie.getValue());

            // 清除
            cookie.setMaxAge(0);
            response.addCookie(cookie);
        }

        return new ResponseEntity<Map<String, String>>(valueMap, HttpStatus.OK);
    }
Cookie機制存在一定的缺陷,盡可能在考慮一些風險後使用
- 安全性無法保證,除非使用HTTPS;
- 浏覽器端隻有4KB大小的存儲上限;
四、Session處理
Session 指的是會話,是建立于Cookie機制上的一種身份識别方式。
由于Cookie自身的安全性和容量限制,大多數應用中是在Cookie中存放一個唯一憑證;
服務側通過憑證再進行身份資訊的存取,這就是會話的由來。
不同的語言、架構采用的實作方式有些差異,比如JavaEE采用JSESSION_ID,而PHP則是PHPSESSID
Session的互動原理可以參考下面一個圖:
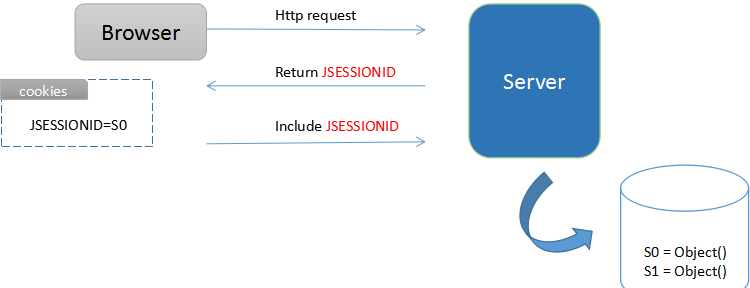
Springboot 内嵌了Servlet容器,則是沿用的JSESSION_ID。是以在浏覽一些JavaWeb站點時會發現該Cookie。
使用@SessionAttribute可以将會話中的屬性映射到方法參數;
如果希望對Session屬性進行操作,可以在Controller上聲明@SessionAttributes注解以指定想要變更的屬性;
之後,通過Model參數進行寫入即可(由架構自動檢測并修改Session)
@SessionAttributes("seed")
public class SessionController {

    private static final Logger logger = LoggerFactory.getLogger(SessionController.class);
    @GetMapping("/some")
    @ResponseBody
    public String someSession(@SessionAttribute(value = "seed", required = false) Integer seed, Model model) {

        logger.info("seed:{}", seed);
        if (seed == null) {
            seed = (int) (Math.random() * 10000);
        } else {
            seed += 1;
        }
        model.addAttribute("seed", seed);

        return seed + "";
    }
上面的例子與Cookie實作通路計數器的功能是一樣的!
如果希望擷取全部會話,可以使用HttpSession
@GetMapping("/all")
    public ResponseEntity<Map<String, Object>> allSessions(HttpSession session) {

        Map<String, Object> valueMap = new HashMap<String, Object>();
        Enumeration<String> iSession = session.getAttributeNames();

        while (iSession.hasMoreElements()) {
            String sessionName = iSession.nextElement();
            Object sessionValue = session.getAttribute(sessionName);

            valueMap.put(sessionName, sessionValue);
            logger.info("sessoin[{}]={}", sessionName, sessionValue);
        }

        // 寫入session
        session.setAttribute("timestmap", new Date());
        return new ResponseEntity<Map<String, Object>>(valueMap, HttpStatus.OK);
    }
清除會話
@GetMapping("/clear")
    public ResponseEntity<Map<String, Object>> clearSessions(HttpSession session) {

        Map<String, Object> valueMap = new HashMap<String, Object>();
        Enumeration<String> iSession = session.getAttributeNames();

        while (iSession.hasMoreElements()) {
            String sessionName = iSession.nextElement();
            Object sessionValue = session.getAttribute(sessionName);

            valueMap.put(sessionName, sessionValue);
            logger.info("sessoin[{}]={}", sessionName, sessionValue);

            session.removeAttribute(sessionName);
        }

        return new ResponseEntity<Map<String, Object>>(valueMap, HttpStatus.OK);
    }
五、Flash參數傳遞
Flash的意思是一瞬間,一閃而過的,是以很好了解,這是一類僅用來消費一次的參數,有些類似閱後即焚。
試想這樣的場景,你确認完購物車,完成訂單支付後進入訂單管理界面,而此時界面上提示你"下單成功,請等待發貨"。
這便可以通過Flash傳參來實作。
Flash的意義是用作請求之間的瞬時參數傳遞,僅消費一次後便不再用。
以下是一個示例:
/**
     * 執行跳轉,并設定傳值
     *
     * @param counter
     * @param response
     * @return
     */
    @GetMapping("/first")
    public String first(final RedirectAttributes redirectAttrs) {

        logger.info("redirect start:{}");

        redirectAttrs.addFlashAttribute("flash", UUID.randomUUID().toString());
        return "redirect:/flash/second";
    }

    /**
     * 擷取傳值
     *
     * @param session
     * @param response
     * @return
     */
    @GetMapping("/second")
    @ResponseBody
    public String second(@ModelAttribute("flash") String flash) {

        logger.info("redirect receive {}", flash);
        return flash;
    }
互動原理

Sprintboot中Flash機制也是利用Session實作的,其中FlashMapManager接口實作了Flash參數的管理。
預設的實作是SessionFlashMapManager,可以通過RequestContextUtils獲得上下文中的FlashMapManager對象。
RequestContextUtils通過Request Scope(請求上下文)存取對象
這也是一個本文未提及的scope域,Request上下文是利用線程變量實作的,通常用于線程内業務處理的資料互動。
小結
HTTP 頭資訊是一種附加内容,用于實作HTTP協定中的各種特性,在開始部分介紹了常見的頭資訊定義。
本文主要介紹了幾種常見的HTTP scope資訊的存取方法,包括如何對header、cookie進行讀取及修改。
springboot 内嵌了Servlet容器,會話處理機制上沿用了JSESSIONID,通過代碼示例介紹了會話的處理方法;
Flash參數是一種閱後即焚的資料,其底層實作也用了session的實作方案。
歡迎繼續關注"美碼師的補習系列-springboot篇" ,期待更多精彩内容^-^
原文連結:
https://www.cnblogs.com/littleatp/p/9345801.html 作者:
zale出處:
http://www.cnblogs.com/littleatp/, 如果喜歡我的文章,請
關注我的公衆号本文版權歸作者和部落格園共有,歡迎轉載,但未經作者同意必須保留此段聲明,且在文章頁面明顯位置給出
原文連結如有問題, 可留言咨詢.