小程式上線一月有餘,有不少創業團隊如朝夕月曆、小睡眠、小密圈等工具性的應用享受了這一波産品紅利,收獲了數十萬新使用者。
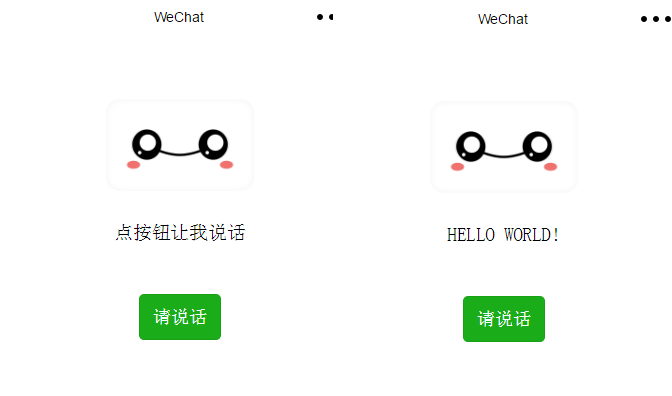
筆者近期接觸了不少從事後端開發的Java、C++程式員,紛紛表示了想要了解小程式開發技術的興趣。下面,結合一個Hello world的小程式示例,給大家簡單講解一下如何在騰訊雲上開發一個簡單的小程式demo,小程式示例的完成結果如下:

app.js定義了小程式的啟動邏輯
app.json定義了小程式的頁面結構,目前我們的小程式隻有一個index頁面
index.wxml定義了歡迎頁面的有什麼,目前我們放了一張gif、一個按鈕和一個文字标簽。
index.wxss 定義了歡迎頁面的樣式
index.js定義了歡迎頁面的業務邏輯
騰訊雲CVM:https://www.qcloud.com/product/cvm
騰訊雲Mysql:https://www.qcloud.com/product/cdb
XMP.JS:https://git.oschina.net/xpmjs/xpmjs
//app.js
App({ onLaunch: function () { var logs = wx.getStorageSync('logs') || [] }, globalData:{ userInfo:null } })
//app.json
{ "pages": "pages/index/index" , "window":{ "backgroundTextStyle":"light", "navigationBarBackgroundColor": "#fff", "navigationBarTitleText": "WeChat", "navigationBarTextStyle":"black"
//index.js
//擷取應用執行個體 var app = getApp() Page({ data: { words: '點按鈕讓我說話', userInfo: {} }, say: function( e ) { var hello = require('../../utils/hello.js'); hello( this ); onLoad: function () {
//index.wxml
<view class="container"> <view bindtap="bindViewTap" class="userinfo"> <image class="userinfo-avatar" src="/res/face.gif" mode="widthFix"></image> <text class="userinfo-nickname">{{userInfo.nickName}}</text> </view> <view class="hello" > <text>{{words}}</text> </view> <button type="primary" size="{{primarySize}}" loading="{{loading}}" plain="{{plain}}" disabled="{{disabled}}" bindtap="say"> 請說話 </button></view>
//Hello.js 定義兩個版本的Hello world邏輯,V1是将标簽文字替換為“Hello world”,V2是将從騰訊雲資料庫拉取回的資料(不同語言的hellow world)顯示在标簽裡。
function hello_v1( page ) { page.setData({words:'HELLO WORLD!'}); }function hello_v2( page ) {page.setData({words:'LOADING...'}); wx.request({ url: 'http://wwp.appcook.cn/test.php', //僅為示例,并非真實的接口位址 data: {t:Date.parse(new Date())}, header: { 'content-type': 'application/json' success: function(res) { page.setData({words:res.data}); }module.exports = hello_v1
連結騰訊雲主機上XMP.JS的Baas服務,把資料庫中讀取的資訊顯示在index.wxml頁面的 <text>{{words}}</text>标簽裡。
//檔案test.PHP
<?php $mysqli = new mysqli("10.66.151.210", "root", "yun123456", "words"); /* check connection */ if ($mysqli->connect_errno) { printf("Connect failed: %s\n", $mysqli->connect_error); exit(); $query = "SELECT * FROM `hello` ORDER BY RAND() LIMIT 1"; $result = $mysqli->query($query); /* associative array */ $row = $result->fetch_array(MYSQLI_ASSOC); echo json_encode(end($row)); /* free result set */ $result->free(); /* close connection */ $mysqli->close();
相關推薦