一、业务需求
在公司企业环境中,有业务服务A、业务服务B、业务服务C等等,这样就面临多套业务都需要往线上部署,并且都需要通过
nginx
进行
web
服务的反向代理或者
web
服务的配置,那么多套业务该如何来进行配置和部署呢?
二、部署方式
- 每个服务对应一个
nginx
nginx
nginx
- 采用虚拟主机配置,该方式可以使用同一个
nginx
三、什么是虚拟主机
什么叫做虚拟主机配置呢,用一句话概括就是在同一个
nginx
上运行多个单独不同的业务,每个业务之间彼此独立,互不干扰。
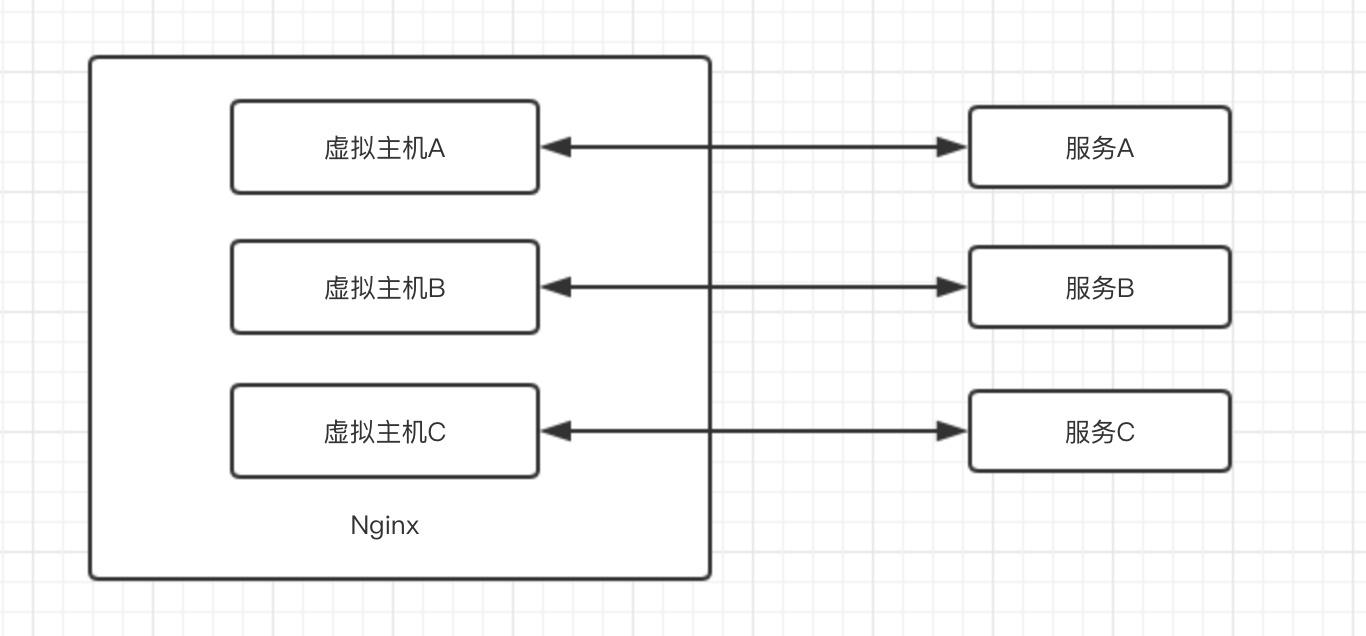
虚拟主机配置.jpg
四、虚拟主机常见配置场景
- 基于主机多IP方式

主机多IP.jpg
在同一个
nginx
主机上分别配置了三个不同的IP,服务A、B、C分别通过三个不同的IP进行访问,这样就实现了主机多IP的配置方式,具体配置如下:在
nginx
主机上配置多个IP地址
[root@node1 conf.d]# ip a add 192.168.30.11/24 dev eth1
[root@node1 conf.d]# ip a
1: lo: <LOOPBACK,UP,LOWER_UP> mtu 65536 qdisc noqueue state UNKNOWN group default qlen 1000
    link/loopback 00:00:00:00:00:00 brd 00:00:00:00:00:00
    inet 127.0.0.1/8 scope host lo
       valid_lft forever preferred_lft forever
    inet6 ::1/128 scope host
       valid_lft forever preferred_lft forever
...
3: eth1: <BROADCAST,MULTICAST,UP,LOWER_UP> mtu 1500 qdisc pfifo_fast state UP group default qlen 1000
    link/ether 08:00:27:a4:b0:78 brd ff:ff:ff:ff:ff:ff
    inet 192.168.30.10/24 brd 192.168.30.255 scope global noprefixroute eth1
       valid_lft forever preferred_lft forever
    inet 192.168.30.11/24 scope global secondary eth1
       valid_lft forever preferred_lft forever
    inet6 fe80::a00:27ff:fea4:b078/64 scope link
       valid_lft forever preferred_lft forever
复制
进入
nginx
配置目录分别创建
vserver1.conf
和
vserver2.conf
[root@node1 ~]# cd /etc/nginx/conf.d/
[root@node1 conf.d]# ls
default.conf  vserver1.conf  vserver2.conf
[root@node1 conf.d]#
复制
在
/opt/app/code
和
/opt/app/code1
目录下均创建server.html文件
[root@node1 conf.d]# cat /opt/app/code/server.html

<h1>Hello, vserver1<h1>
[root@node1 conf.d]# cat /opt/app/code1/server.html

<h1>Hello,vserver2<h1>
[root@node1 conf.d]#
复制
编辑
vserver1.conf
和
vserver2.conf
,将
server
模块下
listen
参数改为对应的IP地址,并将
location
下
root
目录分别改为
/opt/app/code
和
/opt/app/code1
server {
    listen       192.168.30.10;
    server_name  localhost;

    #charset koi8-r;
    #access_log  /var/log/nginx/host.access.log  main;

    location / {
        #root   /usr/share/nginx/html;
	root   /opt/app/code;
        index  index.html index.htm;
    }

    #error_page  404              /404.html;

    # redirect server error pages to the static page /50x.html
    #
    error_page   500 502 503 504  /50x.html;
    location = /50x.html {
        root   /usr/share/nginx/html;
    }

    # proxy the PHP scripts to Apache listening on 127.0.0.1:80
    #
    #location ~ \.php$ {
    #    proxy_pass   http://127.0.0.1;
    #}

    # pass the PHP scripts to FastCGI server listening on 127.0.0.1:9000
    #
    #location ~ \.php$ {
    #    root           html;
    #    fastcgi_pass   127.0.0.1:9000;
    #    fastcgi_index  index.php;
    #    fastcgi_param  SCRIPT_FILENAME  /scripts$fastcgi_script_name;
    #    include        fastcgi_params;
    #}

    # deny access to .htaccess files, if Apache's document root
    # concurs with nginx's one
    #
    #location ~ /\.ht {
    #    deny  all;
    #}
}
复制
检查
nginx
语法配置并重启
nginx
服务
[root@node1 conf.d]# nginx -tc /etc/nginx/nginx.conf
nginx: the configuration file /etc/nginx/nginx.conf syntax is ok
nginx: configuration file /etc/nginx/nginx.conf test is successful
[root@node1 conf.d]# nginx -s reload -c /etc/nginx/nginx.conf
[root@node1 conf.d]# ps -aux|grep nginx
root     25919  0.0  0.4  47256  2088 ?        Ss   08:34   0:00 nginx: master process nginx -c /etc/nginx/nginx.conf
nginx    26227  0.0  0.4  47260  2060 ?        S    11:15   0:00 nginx: worker process
root     26231  0.0  0.1 112712   972 pts/0    S+   11:15   0:00 grep --color=auto nginx
[root@node1 conf.d]#
复制
通过浏览器输入http://192.168.30.10/server.html 和 http://192.168.30.11/server.html进行访问, 一个页面输出
Hello,vserver1
一个页面输出
Hello,vserver2
,基于多IP的配置方式成功。
- 基于端口的方式
基于端口虚拟主机配置.jpg
在同一个
nginx
主机上,对于不同虚拟主机让其监听不同端口,服务A、B、C分别通过同一IP不同端口进行访问,这样就实现了基于端口虚拟主机的配置方式,具体配置如下:编辑
vserver1.conf
和
vserver2.conf
,将
server
模块下
listen
参数改为对应监听的端口即可
server {
    listen       80;
    server_name  localhost;

    #charset koi8-r;
    #access_log  /var/log/nginx/host.access.log  main;

    location / {
        #root   /usr/share/nginx/html;
	root   /opt/app/code;
        index  index.html index.htm;
    }

    #error_page  404              /404.html;

    # redirect server error pages to the static page /50x.html
    #
    error_page   500 502 503 504  /50x.html;
    location = /50x.html {
        root   /usr/share/nginx/html;
    }

    # proxy the PHP scripts to Apache listening on 127.0.0.1:80
    #
    #location ~ \.php$ {
    #    proxy_pass   http://127.0.0.1;
    #}

    # pass the PHP scripts to FastCGI server listening on 127.0.0.1:9000
    #
    #location ~ \.php$ {
    #    root           html;
    #    fastcgi_pass   127.0.0.1:9000;
    #    fastcgi_index  index.php;
    #    fastcgi_param  SCRIPT_FILENAME  /scripts$fastcgi_script_name;
    #    include        fastcgi_params;
    #}

    # deny access to .htaccess files, if Apache's document root
    # concurs with nginx's one
    #
    #location ~ /\.ht {
    #    deny  all;
    #}
}
复制
检查
nginx
语法配置并重启
nginx
服务
[root@node1 conf.d]# nginx -tc /etc/nginx/nginx.conf
nginx: the configuration file /etc/nginx/nginx.conf syntax is ok
nginx: configuration file /etc/nginx/nginx.conf test is successful
[root@node1 conf.d]# nginx -s reload -c /etc/nginx/nginx.conf
[root@node1 conf.d]# ps -aux|grep nginx
root     25919  0.0  0.4  47256  2088 ?        Ss   08:34   0:00 nginx: master process nginx -c /etc/nginx/nginx.conf
nginx    26227  0.0  0.4  47260  2060 ?        S    11:15   0:00 nginx: worker process
root     26231  0.0  0.1 112712   972 pts/0    S+   11:15   0:00 grep --color=auto nginx
[root@node1 conf.d]#
复制
通过浏览器输入http://192.168.30.10:80/server.html和http://192.168.30.11:81/server.html进行访问, 一个页面输出
Hello,vserver1
一个页面输出
Hello,vserver2
,基于端口的配置方式成功。
- 基于多host名称方式(多域名,通过HTTP协议实现)
基于hostname的配置.jpg
在
HTTP
协议中,host信息会通过客户端的
request
请求携带并发送给服务端,在同一个
nginx
主机上收到客户端的请求信息后,会根据请求中携带的
hostname
将不同的请求发送给对应的虚拟主机进行处理,这样就实现了基于多host名称方式虚拟主机的配置,具体配置如下:编辑
vserver1.conf
和
vserver2.conf
,将
server
模块下
server_name
参数改为对应的
hostname
即可
server {
    listen       80;
    server_name  1.hellboycc.cn;

    #charset koi8-r;
    #access_log  /var/log/nginx/host.access.log  main;

    location / {
        #root   /usr/share/nginx/html;
	root   /opt/app/code;
        index  index.html index.htm;
    }

    #error_page  404              /404.html;

    # redirect server error pages to the static page /50x.html
    #
    error_page   500 502 503 504  /50x.html;
    location = /50x.html {
        root   /usr/share/nginx/html;
    }

    # proxy the PHP scripts to Apache listening on 127.0.0.1:80
    #
    #location ~ \.php$ {
    #    proxy_pass   http://127.0.0.1;
    #}

    # pass the PHP scripts to FastCGI server listening on 127.0.0.1:9000
    #
    #location ~ \.php$ {
    #    root           html;
    #    fastcgi_pass   127.0.0.1:9000;
    #    fastcgi_index  index.php;
    #    fastcgi_param  SCRIPT_FILENAME  /scripts$fastcgi_script_name;
    #    include        fastcgi_params;
    #}

    # deny access to .htaccess files, if Apache's document root
    # concurs with nginx's one
    #
    #location ~ /\.ht {
    #    deny  all;
    #}
}
复制
检查
nginx
语法配置并重启
nginx
服务
[root@node1 conf.d]# nginx -tc /etc/nginx/nginx.conf
nginx: the configuration file /etc/nginx/nginx.conf syntax is ok
nginx: configuration file /etc/nginx/nginx.conf test is successful
[root@node1 conf.d]# nginx -s reload -c /etc/nginx/nginx.conf
[root@node1 conf.d]# ps -aux|grep nginx
root     25919  0.0  0.4  47256  2088 ?        Ss   08:34   0:00 nginx: master process nginx -c /etc/nginx/nginx.conf
nginx    26227  0.0  0.4  47260  2060 ?        S    11:15   0:00 nginx: worker process
root     26231  0.0  0.1 112712   972 pts/0    S+   11:15   0:00 grep --color=auto nginx
[root@node1 conf.d]#
复制
修改本机host文件进行测试,我本机是Mac,直接修改
/etc/hosts
文件,如果服务器搭建了
DNS
服务,可以进行域名解析,然后测试是否配置生效
~ cat /etc/hosts
##
# Host Database
#
# localhost is used to configure the loopback interface
# when the system is booting. Do not change this entry.
##
127.0.0.1 localhost
255.255.255.255 broadcasthost
::1 localhost
172.20.10.2 hadoop000
192.168.30.10 1.hellboycc.cn
192.168.30.10 2.hellboycc.cn 复制
通过浏览器输入http://1.hellboycc.cn/server.html和http://2.hellboycc.cn/server.html进行访问,一个页面输出
Hello,vserver1
一个页面输出
Hello,vserver2
,基于多host名称的配置方式成功。
五、总结
- 通过上面三种方式,实现了在同一个
nginx
- 在实际部署环境中,基于host名称的部署方式应用较多,要重点掌握。
- 通过修改本地host文件,对基于host名称的部署方式进行对应测试验证。
技术创作101训练营