本方案基于OpenHarmony LiteOS-M内核,使用联盛德W800芯片的润和软件海王星系列Neptune100开发板,进行开发移植。移植架构采用
Board
与
SoC
分离方案,支持通过Kconfig图形化配置编译选项,增加玄铁
ck804ef
架构移植,实现了
HDF
、
XTS
等子系统及组件的适配。
适配准备
准备ubuntu20.04系统环境,安装csky-abiv2-elf-gcc交叉编译工具链。
编译构建
目录规划
本方案的目录结构使用Board和Soc解耦的思路:
芯片适配目录规划为:
device
├── board                                --- 单板厂商目录
│   └── hihope                           --- 单板厂商名字:HiHope
│       └── neptune100                   --- 单板名:Neptune100
└── soc                                  --- SoC厂商目录
    └── winnermicro                      --- SoC厂商名字:联盛德
        └── wm800                        --- SoC Series名:w800系列芯片
产品样例目录规划为:
vendor
└── hihope                               --- 开发产品样例厂商目录,润和软件的产品样例
    ├── neptune_iotlink_demo             --- 产品名字:Neptune100产品样例代码
    └── ...
产品定义
vendor/hihope/neptune_iotlink_demo/config.json
文件下,描述了产品使用的内核、单板、子系统等信息。其中,内核、单板型号、单板厂商需提前规划好,是预编译指令
hb set
关注的。例如:
{
  "product_name": "neptune_iotlink_demo",   --- 产品名
  "ohos_version": "OpenHarmony 3.1",        --- 使用的OS版本
  "type":"mini",                            --- 系统类型: mini
  "version": "3.0",                         --- 系统版本: 3.0
  "device_company": "hihope",               --- 单板厂商:hihope
  "board": "neptune100",                    --- 单板名:neptune100
  "kernel_type": "liteos_m",                --- 内核类型:liteos_m
  "kernel_version": "3.0.0",                --- 内核版本:3.0.0
  "subsystems": []                          --- 子系统
}
填入的信息与规划的目录相对应,其中
device_company
和
board
用于关联出
device/board/<device_company>/
目录。
单板配置
关联到的<board>目录下,在
device/board/hihope/neptune100/liteos_m
目录下放置
config.gni
文件,该配置文件用于描述该单板信息,包括CPU型号、交叉编译工具链及全局编译、链接参数等重要信息:
# Kernel type, e.g. "linux", "liteos_a", "liteos_m".
kernel_type = "liteos_m"

# Kernel version.
kernel_version = "3.0.0"

# Board CPU type, e.g. "cortex-a7", "riscv32".
board_cpu = "ck804ef"

# Board arch, e.g.  "armv7-a", "rv32imac".
board_arch = "ck803"

# Toolchain name used for system compiling.
# E.g. gcc-arm-none-eabi, arm-linux-harmonyeabi-gcc, ohos-clang,  riscv32-unknown-elf.
# Note: The default toolchain is "ohos-clang". It's not mandatory if you use the default toolchain.
board_toolchain = "csky-elfabiv2-gcc"

#use_board_toolchain = true

# The toolchain path installed, it's not mandatory if you have added toolchain path to your ~/.bashrc.
board_toolchain_path = ""

# Compiler prefix.
board_toolchain_prefix = "csky-elfabiv2-"

# Compiler type, "gcc" or "clang".
board_toolchain_type = "gcc"

# config.json parse
if (product_path != "") {
  product_conf = read_file("${product_path}/config.json", "json")
  product_name = product_conf.product_name
  bin_list = product_conf.bin_list
}

# Board related common compile flags.
board_cflags = [
  "-mcpu=ck804ef",
  "-mhard-float",
  "-DGCC_COMPILE=1",
  "-DTLS_CONFIG_CPU_XT804=1",
  "-DNIMBLE_FTR=1",
  "-D__CSKY_V2__=1",
  "-DCPU_CK804",
  "-O2",
  "-g3",
  "-Wall",
  "-ffunction-sections",
  "-MMD",
  "-MP",
]

board_cxx_flags = board_cflags

board_asmflags = [
  "-mcpu=ck804ef",
  "-DCPU_CK804",
]

board_ld_flags = []

# Board related headfiles search path.
board_include_dirs = []

# Board adapter dir for OHOS components.
board_adapter_dir = ""

# Sysroot path.
board_configed_sysroot = ""

# Board storage type, it used for file system generation.
storage_type = ""
预编译
在工程根目录下输入预编译指令
hb set
可显示相关产品信息,如下:
hb set
OHOS Which product do you need?  (Use arrow keys)

hihope
 > neptune_iotlink_demo

OHOS Which product do you need?  neptune_iotlink_demo
执行
hb set
后,会在根目录下自动生成
ohos_config.json
文件,文件中会列出待编译的产品信息。
通过
hb env
可以查看选择出来的预编译环境变量。
[OHOS INFO] root path: /home/xxxx/openharmony_w800
[OHOS INFO] board: neptune100
[OHOS INFO] kernel: liteos_m
[OHOS INFO] product: neptune_iotlink_demo
[OHOS INFO] product path: /home/xxxx/openharmony_w800/vendor/hihope/neptune_iotlink_demo
[OHOS INFO] device path: /home/xxxx/openharmony_w800/device/board/hihope/neptune100/liteos_m
[OHOS INFO] device company: hihope
至此,预编译适配完成,但工程还不能执行hb build进行编译,还需要准备好后续的LiteOS-M内核移植。
内核移植
Kconfig适配
在
kernel/liteos_m
的编译中,需要在相应的单板以及SoC目录下使用
Kconfig
文件进行索引。
- 在
vendor/hihope/neptune_iotlink_demo
debug.config
- 打开
kernel/liteos_m/Kconfig
device/board
device/soc
Kconfig
orsource "../../device/board/*/Kconfig.liteos_m.shields" orsource "../../device/board/$(BOARD_COMPANY)/Kconfig.liteos_m.defconfig.boards" orsource "../../device/board/$(BOARD_COMPANY)/Kconfig.liteos_m.boards" orsource "../../device/soc/*/Kconfig.liteos_m.defconfig" orsource "../../device/soc/*/Kconfig.liteos_m.series" orsource "../../device/soc/*/Kconfig.liteos_m.soc" - 在
device/board/hihope
Kconfig
├── neptune100 --- neptune100单板配置目录 │ ├── Kconfig.liteos_m.board --- 单板的配置选项 │ ├── Kconfig.liteos_m.defconfig.board --- 单板的默认配置项 │ └── liteos_m │ └── config.gni --- 单板的配置文件 ├── Kconfig.liteos_m.boards --- 单板厂商下Boards配置信息 └── Kconfig.liteos_m.defconfig.boards --- 单板厂商下Boards默认配置信息 - 修改
Board
Kconfig
在
neptune100/Kconfig.liteos_m.board
中添加,
config BOARD_NEPTUNE100
    bool "select board neptune100"
    depends on SOC_WM800
配置只有SOC_WM800被选后,BOARD_NEPTUNE100才可被选。
在
neptune100/Kconfig.liteos_m.defconfig.board
中添加,
if BOARD_NEPTUNE100

endif #BOARD_NEPTUNE100
用于添加 BOARD_NEPTUNE100默认配置
- 在
device/soc/winnermicro
Kconfig
├── wm800 --- W800系列 │ ├── Kconfig.liteos_m.defconfig.wm800 --- W800芯片默认配置 │ ├── Kconfig.liteos_m.defconfig.series --- W800系列默认配置 │ ├── Kconfig.liteos_m.series --- W800系列配置 │ └── Kconfig.liteos_m.soc --- W800芯片配置 ├── Kconfig.liteos_m.defconfig --- SoC默认配置 ├── Kconfig.liteos_m.series --- Series配置 └── Kconfig.liteos_m.soc --- SoC配置 - 修改
Soc
Kconfig
在
wm800/Kconfig.liteos_m.defconfig.wm800
中添加:
config SOC
    string
    default "wm800"
    depends on SOC_WM800
在
wm800/Kconfig.liteos_m.defconfig.series
中添加:
if SOC_SERIES_WM800

rsource "Kconfig.liteos_m.defconfig.wm800"

config SOC_SERIES
    string
    default "wm800"

endif
在
wm800/Kconfig.liteos_m.series
中添加:
config SOC_SERIES_WM800
    bool "winnermicro 800 Series"
    select ARM
    select SOC_COMPANY_WINNERMICRO              --- 选择 SOC_COMPANY_WINNERMICRO
    select CPU_XT804
    help
        Enable support for winnermicro 800 series
在选择了 SOC_SERIES_WM800之后,才可选
wm800/Kconfig.liteos_m.soc
文件中的 SOC_WM800:
choice
    prompt "Winnermicro 800 series SoC"
    depends on SOC_SERIES_WM800

config SOC_WM800                         --- 选择 SOC_WM800
    bool "SoC WM800"

endchoice
综上所述,要编译单板BOARD_NEPTUNE100,则要分别选中:SOC_COMPANY_WINNERMICRO、SOC_SERIES_WM800、SOC_WM800
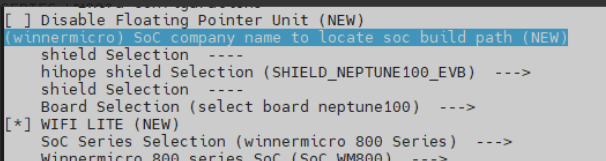
7. 在
kernel/liteos_m
中执行
make menuconfig
进行选择配置,能够对SoC Series进行选择:
配置后的文件会默认保存在
vendor/hihope/neptune_iotlink_demo/kernel_configs/debug.config
,也可以直接填写
debug.config
:
LOSCFG_PLATFORM_QEMU_CSKY_SMARTL=y
LOSCFG_SOC_SERIES_WM800=y
模块化编译
Board
和
SoC
的编译采用模块化的编译方法,从
kernel/liteos_m/BUILD.gn
开始逐级向下递增。本方案的适配过程如下:
- 在
device/board/hihope
BUILD.gn
在上述if (ohos_kernel_type == "liteos_m") { import("//kernel/liteos_m/liteos.gni") module_name = get_path_info(rebase_path("."), "name") module_group(module_name) { modules = [ "neptune100", --- 单板模块 "shields", ] } }BUILD.gn
- 在
device/soc/winnermicro
BUILD.gn
if (ohos_kernel_type == "liteos_m") { import("//kernel/liteos_m/liteos.gni") module_name = get_path_info(rebase_path("."), "name") module_group(module_name) { modules = [ "hals", "wm800", ] } } - 在
device/soc/winnermicro
BUILD.gn
device/soc/winnermicro/wm800/board/platform/sys/BUILD.gn
import("//kernel/liteos_m/liteos.gni") module_name = get_path_info(rebase_path("."), "name") kernel_module(module_name) { --- 编译的模块 sources = [ --- 编译的源文件 "wm_main.c", ] include_dirs = [ --- 模块内使用到的头文件 ".", ] } - 为了组织链接以及一些编译选项,在
device/soc/winnermicro/wm800/board/BUILD.gn
config("board_config")
config("board_config") { ldflags = [] --- 链接参数,包括ld文件 libs = [] --- 链接库 include_dirs = [] --- 公共头文件 - 为了组织一些产品侧的应用,需要强制链接到产品工程中来,本方案在vendor相应的
config.json
vendor/hihope/neptune_iotlink_demo/config.json
将demo应用作为模块库来管理,开启/关闭某个demo,在bin_list中增减相应库文件即可。bin_list在gn中可以直接被读取,在"bin_list": [ --- demo list { "elf_name": "hihope", "enable": "false", --- list开关 "force_link_libs": [ "bootstrap", "broadcast", ... ] }device/board/hihope/neptune100/liteos_m/config.gni
读取list后即可在相应的链接选项上加入相关的组件库,在# config.json parse if (product_path != "") { product_conf = read_file("${product_path}/config.json", "json") product_name = product_conf.product_name bin_list = product_conf.bin_list }//device/soc/winnermicro/wm800/BUILD.gn
foreach(bin_file, bin_list) {
   build_enable = bin_file.enable
   ...
   if(build_enable == "true")
   {
     ...
     foreach(force_link_lib, bin_file.force_link_libs) {
     ldflags += [ "-l${force_link_lib}" ]
     }
     ...
   }
}
内核子系统适配
在
vendor/hihope/neptune_iotlink_demo/config.json
添加内核子系统及相关配置,如下:
"subsystems": [
 {
   "subsystem": "kernel",
   "components": [
     { "component": "liteos_m", "features":[]
     }
   ]
},
内核启动适配
由于Neptune100开发板的芯片架构为Openharmony不支持的ck804ef架构,需要进行ck804ef架构移植。适配
kernel\liteos_m\arch\include
中定义的通用的文件以及函数列表,并放在了
kernel\liteos_m\arch\csky\v2\ck804\gcc
文件夹下。
内核初始化示例如下:
osStatus_t ret = osKernelInitialize();                    --- 内核初始化
if(ret == osOK)
{
 threadId = osThreadNew((osThreadFunc_t)sys_init,NULL,&g_main_task); --- 创建init线程
 if(threadId!=NULL)
 {
     osKernelStart();                                          --- 线程调度
 }
}
board_main在启动OHOS_SystemInit之前,需要初始化必要的动作,如下:
...
UserMain();         --- 启动OpenHarmony  OHOS_SystemInit的之前完成驱动的初始化
...
OHOS_SystemInit();  --- 启动OpenHarmony服务,以及组件初始化
...
UserMain函数在
device/soc/winnermicro/wm800/board/app/main.c
文件中,如下:
...
if (DeviceManagerStart()) {                                      --- HDF初始化
    printf("[%s] No drivers need load by hdf manager!",__func__);
}
...
HDF驱动框架适配
HDF驱动框架提供了一套应用访问硬件的统一接口,可以简化应用开发,添加HDF组件需要在
//vendor/hihope/neptune_iotlink_demo/kernel_configs
添加:
LOSCFG_DRIVERS_HDF=y
LOSCFG_DRIVERS_HDF_PLATFORM=y
驱动适配相关文件放置在
drivers/adapter/platform
中,对应有gpio,i2c,pwm,spi,uart,watchdog,都是通过HDF机制加载,本章节以GPIO和UART为例进行详细说明。
GPIO适配
- 芯片驱动适配文件位于
drivers/adapter/platform
gpio_wm.c
BUILD.gn
... if (defined(LOSCFG_SOC_COMPANY_WINNERMICRO)) { sources += [ "gpio_wm.c" ] } ... -
gpio_wm.c
/* HdfDriverEntry definitions */ struct HdfDriverEntry g_GpioDriverEntry = { .moduleVersion = 1, .moduleName = "WM_GPIO_MODULE_HDF", .Bind = GpioDriverBind, .Init = GpioDriverInit, .Release = GpioDriverRelease, }; HDF_INIT(g_GpioDriverEntry); - 在
device/board/hihope/shields/neptune100/neptune100.hcs
root { platform { gpio_config { match_attr = "gpio_config"; groupNum = 1; pinNum = 48; } } } - 在GpioDriverInit获取hcs参数进行初始化,如下:
...
 gpioCntlr = GpioCntlrFromHdfDev(device);        --- gpioCntlr节点变量获取具体gpio配置
 if (gpioCntlr == NULL) {
     HDF_LOGE("GpioCntlrFromHdfDev fail\r\n");
     return HDF_DEV_ERR_NO_DEVICE_SERVICE;
 }
 ...
UART适配
- 芯片驱动适配文件位于
drivers/adapter/platform
uart_wm.c
BUILD.gn
... if (defined(LOSCFG_SOC_COMPANY_WINNERMICRO)) { sources += [ "uart_wm.c" ] } ... -
uart_wm.c
/* HdfDriverEntry definitions */ struct HdfDriverEntry g_UartDriverEntry = { .moduleVersion = 1, .moduleName = "W800_UART_MODULE_HDF", .Bind = UartDriverBind, .Init = UartDriverInit, .Release = UartDriverRelease, }; /* Initialize HdfDriverEntry */ HDF_INIT(g_UartDriverEntry); - 在
device/board/hihope/shields/neptune100/neptune100.hcs
root { platform { uart_config { /* uart0 { match_attr = "uart0_config"; num = 0; baudrate = 115200; parity = 0; stopBit = 1; data = 8; }*/ uart1 { match_attr = "uart1_config"; num = 1; baudrate = 115200; parity = 0; stopBit = 1; data = 8; } } } } - 在UartDriverInit获取hcs参数进行初始化,如下:
...
 host = UartHostFromDevice(device);
 if (host == NULL) {
     HDF_LOGE("%s: host is NULL", __func__);
     return HDF_ERR_INVALID_OBJECT;
 }
 ...
Openharmony子系统适配
子系统的编译选项入口在相应产品
config.json
下,如:
vendor/hihope/neptune_iotlink_demo/config.json
。
wifi_lite组件
首先,在
config.json
文件中,增加
communication
子系统的
wifi_lite
部件,如下:
{
  "subsystem": "communication",
  "components": [
    {
      "component": "wifi_lite",
      "optional": "true"
    }
  ]
},
wifi_lite
部件在
build/lite/components/communication.json
文件中,描述如下:
{
  "component": "wifi_lite",
  "targets": [
    "//foundation/communication/wifi_lite:wifi"       --- wifi_lite的编译目标
  ],
},
在本案例中,
wifi
适配源码可见
device/soc/winnermicro/wm800/board/src/wifi/wm_wifi.c
,如下:
int tls_wifi_netif_add_status_event(tls_wifi_netif_status_event_fn event_fn)   ---用于增加wifi事件功能
{
  u32 cpu_sr;
  struct tls_wifi_netif_status_event *evt;
  //if exist, remove from event list first.
  tls_wifi_netif_remove_status_event(event_fn);
  evt = tls_mem_alloc(sizeof(struct tls_wifi_netif_status_event));
  if(evt==NULL)
      return -1;
  memset(evt, 0, sizeof(struct tls_wifi_netif_status_event));
  evt->status_callback = event_fn;
  cpu_sr = tls_os_set_critical();
  dl_list_add_tail(&wifi_netif_status_event.list, &evt->list);
  tls_os_release_critical(cpu_sr);

  return 0;
}
系统服务管理子系统适配
系统服务管理子系统适配添加
samgr_lite
部件,直接在
config.json
配置,如下:
{
  "subsystem": "distributedschedule",
  "components": [
    {
      "component": "samgr_lite"
    }
  ]
},
公共基础库子系统适配
公共基础库子系统适配添加了
kv_store、file
部件,直接在
config.json
配置,如下:
{
  "subsystem": "utils",
  "components": [
    {
      "component": "kv_store",
      "features": [
        "enable_ohos_utils_native_lite_kv_store_use_posix_kv_api = true"
      ]
    },
    { "component": "file", "features":[] }
  ]
},
适配
kv_store
部件时,键值对会写到文件中。在轻量系统中,文件操作相关接口有
POSIX
接口与
HalFiles
接口这两套实现。
因为对接内核的文件系统,采用
POSIX
相关的接口,所以
features
需要增加
enable_ohos_utils_native_lite_kv_store_use_posix_kv_api = true
。
启动恢复子系统适配
启动恢复子系统适配添加了
bootstrap_lite、syspara_lite
部件,直接在
config.json
配置,如下:
{
  "subsystem": "startup",
  "components": [
    {
      "component": "bootstrap_lite"
    },
    {
      "component": "syspara_lite",
      "features": [
        "enable_ohos_startup_syspara_lite_use_posix_file_api = true",
        "config_ohos_startup_syspara_lite_data_path = \"/data/\""
      ]
    }
  ]
},
适配bootstrap_lite部件时,需要在链接脚本文件
device/soc/winnermicro/wm800/board/ld/w800/gcc_csky.ld
中手动新增如下段:
.zinitcall_array :
{
 . = ALIGN(0x4) ;
 PROVIDE_HIDDEN (__zinitcall_core_start = .);
 KEEP (*(SORT(.zinitcall.core*)))
 KEEP (*(.zinitcall.core*))
 PROVIDE_HIDDEN (__zinitcall_core_end = .);
 . = ALIGN(0x4) ;
 PROVIDE_HIDDEN (__zinitcall_device_start = .);
 KEEP (*(SORT(.zinitcall.device*)))
 KEEP (*(.zinitcall.device*))
 PROVIDE_HIDDEN (__zinitcall_device_end = .);
 . = ALIGN(0x4) ;
 PROVIDE_HIDDEN (__zinitcall_bsp_start = .);
 KEEP (*(SORT(.zinitcall.bsp*)))
 KEEP (*(.zinitcall.bsp*))
 PROVIDE_HIDDEN (__zinitcall_bsp_end = .);
 . = ALIGN(0x4) ;
 PROVIDE_HIDDEN (__zinitcall_sys_service_start = .);
 KEEP (*(SORT(.zinitcall.sys.service*)))
 KEEP (*(.zinitcall.sys.service*))
 PROVIDE_HIDDEN (__zinitcall_sys_service_end = .);
 . = ALIGN(0x4) ;
 PROVIDE_HIDDEN (__zinitcall_app_service_start = .);
 KEEP (*(SORT(.zinitcall.app.service*)))
 KEEP (*(.zinitcall.app.service*))
 PROVIDE_HIDDEN (__zinitcall_app_service_end = .);
 . = ALIGN(0x4) ;
 PROVIDE_HIDDEN (__zinitcall_sys_feature_start = .);
 KEEP (*(SORT(.zinitcall.sys.feature*)))
 KEEP (*(.zinitcall.sys.feature*))
 PROVIDE_HIDDEN (__zinitcall_sys_feature_end = .);
 . = ALIGN(0x4) ;
 PROVIDE_HIDDEN (__zinitcall_app_feature_start = .);
 KEEP (*(SORT(.zinitcall.app.feature*)))
 KEEP (*(.zinitcall.app.feature*))
 PROVIDE_HIDDEN (__zinitcall_app_feature_end = .);
 . = ALIGN(0x4) ;
 PROVIDE_HIDDEN (__zinitcall_run_start = .);
 KEEP (*(SORT(.zinitcall.run*)))
 KEEP (*(.zinitcall.run*))
 PROVIDE_HIDDEN (__zinitcall_run_end = .);
 . = ALIGN(0x4) ;
 PROVIDE_HIDDEN (__zinitcall_test_start = .);
 KEEP (*(SORT(.zinitcall.test*)))
 KEEP (*(.zinitcall.test*))
 PROVIDE_HIDDEN (__zinitcall_test_end = .);
 . = ALIGN(0x4) ;
 PROVIDE_HIDDEN (__zinitcall_exit_start = .);
 KEEP (*(SORT(.zinitcall.exit*)))
 KEEP (*(.zinitcall.exit*))
 PROVIDE_HIDDEN (__zinitcall_exit_end = .);
} > REGION_RODATA
需要新增上述段是因为
bootstrap_init
提供的对外接口,见
utils/native/lite/include/ohos_init.h
文件,采用的是灌段的形式,最终会保存到上述链接段中。主要的服务自动初始化宏如下表格所示:
| 接口名 | 描述 |
|---|---|
| SYS_SERVICE_INIT(func) | 标识核心系统服务的初始化启动入口 |
| SYS_FEATURE_INIT(func) | 标识核心系统功能的初始化启动入口 |
| APP_SERVICE_INIT(func) | 标识应用层服务的初始化启动入口 |
| APP_FEATURE_INIT(func) | 标识应用层功能的初始化启动入口 |
通过上面加载的组件编译出来的lib文件需要手动加入强制链接。
如在
vendor/hihope/neptune_iotlink_demo/config.json
中配置了
bootstrap_lite
部件
{
  "subsystem": "startup",
  "components": [
    {
      "component": "bootstrap_lite"
    },
    ...
  ]
},
bootstrap_lite
部件会编译
base/startup/bootstrap_lite/services/source/bootstrap_service.c
,该文件中,通过
SYS_SERVICE_INIT
将
Init
函数符号灌段到
__zinitcall_sys_service_start
和
__zinitcall_sys_service_end
中,由于
Init
函数是没有显式调用它,所以需要将它强制链接到最终的镜像。如下:
static void Init(void)
{
    static Bootstrap bootstrap;
    bootstrap.GetName = GetName;
    bootstrap.Initialize = Initialize;
    bootstrap.MessageHandle = MessageHandle;
    bootstrap.GetTaskConfig = GetTaskConfig;
    bootstrap.flag = FALSE;
    SAMGR_GetInstance()->RegisterService((Service *)&bootstrap);
}
SYS_SERVICE_INIT(Init);   --- 通过SYS启动即SYS_INIT启动就需要强制链接生成的lib
在
base/startup/bootstrap_lite/services/source/BUILD.gn
文件中,描述了在
out/neptune100/neptune_iotlink_demo/libs
生成
libbootstrap.a
,如下:
static_library("bootstrap") {
  sources = [
    "bootstrap_service.c",
    "system_init.c",
  ]
  ...
适配
syspara_lite
部件时,系统参数会最终写到文件中进行持久化保存。在轻量系统中,文件操作相关接口有POSIX接口与HalFiles接口这两套实现。
因为对接内核的文件系统,采用POSIX相关的接口,所以features字段中需要增加
enable_ohos_startup_syspara_lite_use_posix_file_api = true
。
XTS子系统适配
XTS子系统的适配,直接在
config.json
中加入组件选项:
{
 "subsystem": "xts",
 "components": [
   {
     "component": "xts_acts",
     "features":
        [
       "config_ohos_xts_acts_utils_lite_kv_store_data_path = \"/data\"",
       "enable_ohos_test_xts_acts_use_thirdparty_lwip = true"
     ]
   },
   { "component": "xts_tools", "features":[] }
 ]
}
另外,XTS功能也使用了list来组织,在
config.json
文件中增减相应模块:
"bin_list": [
  {
    "enable": "true",
    "force_link_libs": [
       "module_ActsParameterTest",
       "module_ActsBootstrapTest",
       "module_ActsDfxFuncTest",
       "module_ActsHieventLiteTest",
       "module_ActsSamgrTest",
       "module_ActsUtilsFileTest",
       "module_ActsKvStoreTest",
       "module_ActsWifiServiceTest"
    ]
  }
],
其它组件的适配过程与官方以及其它厂商的过程类似,不再赘述。
![[OpenHarmony] [RK2206] 构建OpenHarmony编译器 (二)[图]](data:image/gif;base64,R0lGODlhAQABAIAAAP///wAAACwAAAAAAQABAAACAkQBADs=)