目录
一、概述
二、基本概念
三、组件
1. source
1.1 NetCat Source
1.2 Avro Source
1.3 Exec Source
1.4 Spooling Directory Source
1.5 Squence Generator Source
1.6 HTTP Source
1.7 自定义Custom Source
2. Channel
2.1 Memory Channel
2.2 File Channel
2.3 JDBC Channel
2.4 内存溢出通道
3. Sink
3.1 Logger Sink
3.2 File_roll Sink
3.3 HDFS Sink
3.4 Avro Sink
四、流动方式
1. 多级流动
2. 扇出流
3. 扇入案
五、Source模式
1. 复制模式
2. 路由模式
六、interceptor
1. 时间戳Timestamp Interceptor
案列:存到HDFS上,并且按天存放
2. Search And Replace Interceptor
3. Regex Filtering Interceptor
七、Processor
1. 崩溃恢复 Failover Sink Processor
2. 负载均衡 Load Balancing Sink Processor
八、事务机制
1. source——channel:put事务流程
2. channel——sink:Take事务
Flume是Cloudera设计的,后来贡献给了Apache
Flume是一个分布式、可靠的、用于进行日志收集的系统 - 采集、汇总、传输
Flume中传输的每一条数据是一条日志
Event:在Flume中,将它传输的每一条日志封装成一个Event对象,也就意味着在Flume中传输的Event对象。Event对象展现形式是一个json串,这个json串分为了两部分:headers和body
Agent:在Flume中,传输数据用的组件就是Agent。Agent中包含了三个子组件:
Source:从数据源采集数据
Channel:临时存储数据
Sink:将数据发往目的地
3. 流动方式:单级流动,多级流动,扇入流动,扇出流动 (每一个Sink只能绑定一个Channel)
NetCat Source用来监听一个指定端口,并接收监听到的数据,接收的数据是字符串形式
在测试时使用,实际开发少
配置:
a1.sources = s1 a1.channels = c1 a1.sinks = k1 a1.sources.s1.type = netcat a1.sources.s1.bind = 0.0.0.0 a1.sources.s1.port = 8090 a1.channels.c1.type = memory a1.channels.c1.capacity = 10000 a1.channels.c1.transactionCapacity=1000 a1.sinks.k1.type = logger a1.sources.s1.channels = c1 a1.sinks.k1.channel = c1
客户端:
[root@lj02 software]# rpm -ivh nc-1.84-22.el6.x86_64.rpm //安装nc
[root@lj02 software]# nc lj02 8090 hello OK
avro-source接收到的是经过avro序列化后的数据,然后反序列化数据继续传输。
利用Avro source可以实现多级流动、扇出流、扇入流等效果
可以接收通过flume提供的avro客户端发送的日志信息
a1.sources=s1 a1.channels=c1 a1.sinks=k1 a1.sources.s1.type=avro a1.sources.s1.bind=0.0.0.0 a1.sources.s1.port=8090 a1.channels.c1.type=memory a1.channels.c1.capacity=1000 a1.channels.c1.transactionCapacity=100 a1.sinks.k1.type=logger a1.sources.s1.channels=c1 a1.sinks.k1.channel=c1
启动服务器端:
[root@lj02 bin]# flume-ng agent -n a1 -c ../conf/ -f ../data/2avrosource.conf -Dflume.root.logger=INFO,console
出现Avro source s1 started. 说明启动成功
avro客户端启动
[root@lj02 bin]# flume-ng avro-client -H 0.0.0.0 -p 8090 -F /home/a.txt -c ../conf/
在服务器端可以看见文件里面的数据
Event: { headers:{} body: 6A 6A 6A 6A 6A 6A 6A 6A 6A 6A 6A 6A 6A 6A 6A 6A jjjjjjjjjjjjjjjj }
可以将命令产生的输出作为源来进行传递
配置
a1.sources.s1.type = exec a1.sources.s1.command = cat /home/a.txt a1.channels.c1.capacity =1000 a1.channels.c1.transactionCapacity =100
服务器端启动:[root@lj02 bin]# flume-ng agent -n a1 -c ../conf/ -f ../data/3execsource -Dflume.root.logger=INFO,console
直接显示结果:
2019-07-05 11:28:39,750 (pool-3-thread-1) [INFO - org.apache.flume.source.ExecSource$ExecRunnable.run(ExecSource.java:376)] Command [cat /home/a.txt] exited with 0
flume会持续监听指定的目录,把放入这个目录中的文件当做source来处理
注意:一旦文件被放到“自动收集”目录中后,便不能修改,如果修改,flume会报错。也不能有重名的文件,负责flume也会报错
a1.sources.s1.type = spooldir a1.sources.s1.spoolDir = /home/flumedata
服务器端启动:
[root@lj02 bin]# flume-ng agent -n a1 -c ../conf/ -f ../data/4spolldirsource.conf -Dflume.root.logger=INFO,console
文件再被监听后,名称后面会有变化 a.txt.COMPLETED 文件已被监听。
一个简单的序列发生器,不断的产生事件,值是从0开始每次递增1,主要用来测试
a1.sources.s1.type = seq a1.sources.s1.batchSize = 5
[root@lj02 data]# ../bin/flume-ng agent -n a1 -c ../conf/ -f ../data/5seqgensource.conf -Dflume.root.logger=INFO,console
打印结果:是有顺序的一大批数字
此Source接受HTTP的GET和POST请求作为Flume的事件
GET方式只用于试验,所以实际使用过程中以POST请求居多
如果想让flume正确解析Http协议信息,比如解析出请求头、请求体等信息,需要提供一个可插拔的"处理器"来将请求转换为事件对象,这个处理器必须实现HTTPSourceHandler接口。这个处理器接受一个 HttpServletRequest对象,并返回一个Flume Envent对象集合
a1.sources.s1.type = http a1.sources.s1.port = 8070 a1.channels.c1.capacity = 500 a1.channels.c1.transactionCapacity = 100
执行启动命令
[root@hlj01 data]# ../bin/flume-ng agent -n a1 -c ../conf -f httpsource.conf -Dflume.root.logger=INFO,console
另一个机器执行:执行curl 命令,模拟一次http的Post请求:
curl -X POST -d '[{"headers":{"name":"lj","age":"20"},"body":"you are beautiful"}]' http://0.0.0.0:8090
通常情况下,Flume提供的source应该是够用的,但是有时候因为业务场景的需求,可能会导致Flume中提供的source不够用,那这个时候就需要自定义Source
实现Configurable,作用是用于获取文件中的配置
实现EventDrivenSource或者PollableSource
3.1 EventDrivenSource:事件驱动source,被动等待 - 只要处理完数据就会一直等待,等待有新数据过来 - Avro Source、HTTP Source、NetCat Source - 覆盖start和stop方法,启动逻辑放在start中,中止回收是放在stop中
3.2 PollableSource:轮训发送Source,主动产生数据发送数据 - 自带了线程,会不断的调用这个线程往channel发数据 - Sequence Generator Source、Spooling Directory Source、Exec Source - 覆盖process方法,source的执行逻辑是放在process方法中
事件将被存储在内存中(指定大小的队列里)
非常适合那些需要高吞吐量且允许数据丢失的场景下
将数据临时存储到计算机的磁盘的文件中
性能比较低,但是即使程序出错数据不会丢失
[root@hlj01 data]# vim filechannel.conf
a1.channels.c1.type = file a1.channels.c1.dataDirs = /home/flumechannels
启动:
[root@hlj01 data]# ../bin/flume-ng agent -n a1 -c ../conf -f filechannel.conf -Dflume.root.logger=INFO,console
另一台机器:
[root@hlj01 data]# cd /home/
[root@hlj01 home]# mkdir flumechannels
[root@hlj01 home]# nc 0.0.0.0 8090
gahgha
注:Ctrl+退格键,可以修改数据
事件会被持久化(存储)到可靠的数据库里
目前只支持嵌入式Derby数据库。但是Derby数据库不太好用,所以JDBC Channel目前仅用于测试,不能用于生产环境。
是文件型,切换路径数据就找不到,在哪个路径操作,就会产生 derby.meta文件
是单连接,只能一个客户端连接,不能调节连接数量(大数据讲究高并发,分布式)
优先把Event存到内存中,如果存不下,在溢出到文件中
目前处于测试阶段,还未能用于生产环境
记录指定级别(比如INFO,DEBUG,ERROR等)的日志,通常用于调试
要求,在 --conf(-c )参数指定的目录下有log4j的配置文件
根据设计,logger sink将body内容限制为16字节,从而避免屏幕充斥着过多的内容。如果想要查看调试的完整内容,那么你应该使用其他的sink,也许可以使用file_roll sink,它会将日志写到本地文件系统中
每隔指定时长生成文件保存这段时间内收集到的日志信息.
[root@hlj01 data]# vim filerollsink.conf
a1.sinks.k1.type = file_roll a1.sinks.k1.sink.directory = /home/flumedata //文件被存储的目录 a1.sinks.k1.sink.rollInterval = 3600 //channel中的数据每隔1小时产生一个新文件
启动测试
[root@hlj01 data]# ../bin/flume-ng agent -n a1 -c ../conf -f filerollsink.conf -Dflume.root.logger=INFO,console
换机器:
[root@hlj01 home]# mkdir flumedata
lijing
换机器:我刚刚写的两条数据已经自动到了指定目录下自动生成的文件里面了
[root@hlj01 data]# cd /home/flumedata/
[root@hlj01 flumedata]# ls
1560142854808-1
[root@hlj01 flumedata]# cat 1560142854808-1
lijing
目前它支持创建文本文件和序列化文件,并且对这两种格式都支持压缩
将事件写入到Hadoop分布式文件系统HDFS中
a1.channels.c1.capacity = 1000 a1.sinks.k1.type = hdfs a1.sinks.k1.hdfs.path = hdfs://hlj01:9000/flume //HDFS 目录路径 a1.sinks.k1.hdfs.fileType = DataStream //SequenceFile-序列化文件,DataStream-文本文件,CompressedStream-压缩文件 a1.sinks.k1.hdfs.rollInterval = 3600 //文件生成的间隔事件
[root@hlj01 data]# ../bin/flume-ng agent -n a1 -c ../conf -f hdfssink.conf -Dflume.root.logger=INFO,console
到hdfs查看
将源数据利用avro进行序列化之后写到指定的节点上
是实现多级流动、扇出流(1到多) 扇入流(多到1) 的基础
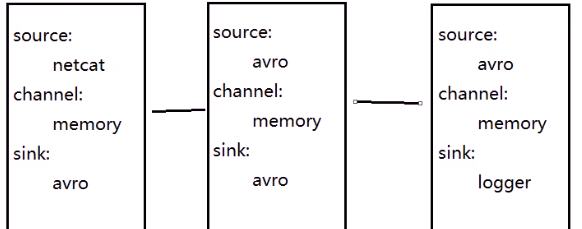
配置:vim multi.conf
01机的配置示例:
a1.sinks.k1.type = avro a1.sinks.k1.hostname = lj02 a1.sinks.k1.port = 8090
传到其他机器:
[root@lj01 data]# scp -r /home/software/flume-1.6.0/ root@lj02:/home/software/
02机的配置示例:
a1.sources.s1.type = avro a1.sinks.k1.hostname = lj03
03机的配置:
启动测试: 启动顺序 3 2 1 ,每隔机器都执行下面的启动命令
[root@hlj01 data]# ../bin/flume-ng agent -n a1 -c ../conf -f multi.conf -Dflume.root.logger=INFO,console
复制一个机器01
我们可以看到数据从01机器到了03机器了
编辑配置文件:vim shanchu.conf
01机的配置文件
#配置Agent a1 的组件 a1.channels=c1 c2 a1.sinks=k1 k2 #描述/配置a1的source1 a1.sources.s1.type=netcat a1.channels.c2.type=memory a1.channels.c2.capacity=1000 a1.channels.c2.transactionCapacity=100 #描述sink a1.sinks.k1.type=avro a1.sinks.k1.hostname=lj02 a1.sinks.k1.port=8090 a1.sinks.k2.type=avro a1.sinks.k2.hostname=lj03 a1.sinks.k2.port=8090 a1.sources.s1.channels=c1 c2 a1.sinks.k2.channel=c2
02,03配置示例:
a1.channels=c1 a1.sinks=k1
启动测试: 启动顺序 3 2 1
[root@hlj01 data]# ../bin/flume-ng agent -n a1 -c ../conf -f shanchu.conf -Dflume.root.logger=INFO,console
效果:01节点发送消息,2,3 节点都收到消息

01节点:
02节点:
a1.sources.s1.bind = /home/flumedata
[root@hadoop01 home]# mkdir flumedata
[root@hadoop01 home]# cd flumedata/
[root@hadoop01 flumedata]# vim a.txt
03节点配置:
启动命令:
[root@hlj01 data]# ../bin/flume-ng agent -n a1 -c ../conf -f shanru.conf -Dflume.root.logger=INFO,console
在复制模式下,当source接收到数据后,会复制多分,分发给每一个avro sink
a1.source.r1.selector.type = replicating(这个是默认的)
用户可以指定转发的规则。selector根据规则进行数据的分发。基于扇入模式,用http,source
配置:vim selector.conf
01机器
a1.sources.s1.type=http a1.sources.s1.selector.type=multiplexing //multiplexing 表示路由模式 a1.sources.s1.selector.header=name //指定要监测的头的名称 a1.sources.s1.selector.mapping.xiaoli=c1 匹配规则 a1.sources.s1.selector.mapping.bobo=c2
02,03配置示例:用 shanchu.conf的内容
[root@hlj01 ~]# curl -X POST -d '[{"headers":{"name":"xiaoli","age":"20"},"body":"hello I am fine"}]' http://0.0.0.0:8090
[root@hlj01 ~]# curl -X POST -d '[{"headers":{"name":"bobo","age":"18"},"body":"hello happy"}]' http://0.0.0.0:8090
对应的节点才会收到信息。
拦截器采用了责任链模式,多个拦截器可以按指定顺序拦截
配置文件:Vim timestamp.conf
a1.sources.s1.interceptors=i1 a1.sources.s1.interceptors.i1.type=timestamp
[root@hlj01 data]# ../bin/flume-ng agent -n a1 -c ../conf -f timestamp.conf -Dflume.root.logger=INFO,console
测试:
效果:在头多了一个时间
Event: { headers:{timestamp=1560151351709} body: 6C 6B 6B
配置文件:
a1.sinks.k1.hdfs.path = hdfs://hlj01:9000/log/time=%Y-%m-%D a1.sinks.k1.hdfs.fileType = DataStream a1.sinks.k1.hdfs.rollInterval = 3600
到hdfs查看:lj02:50070
基于字符串的正则搜索和替换功能,过滤替换
配置文件:vim search.conf
a1.sources.s1.interceptors.i1.type= search_replace a1.sources.s1.interceptors.i1.searchPattern= [0-9] //要搜索和替换的正则表达式 a1.sources.s1.interceptors.i1.replaceString= # //要替换为的字符串 a1.sinks.k1.type = loggera1.sources.s1.channels = c1
[root@hlj01 data]# ../bin/flume-ng agent -n a1 -c ../conf -f search.conf -Dflume.root.logger=INFO,console
[root@hlj01 data]# nc 0.0.0.0 8090
li123jing
接收到 :li###jing
用来包含或刨除事件
a1.sources.s1.interceptors.i1.type= regex_filter a1.sources.s1.interceptors.i1.regex= ^.*[0-9].*$ // 所要匹配的正则表达式 a1.sources.s1.interceptors.i1.excludeEvents=true //如果是true则刨除匹配的事件,false则包含匹配的事件。
Sink Group允许用户将多个Sink组合成一个实体
Flume Sink Processor 可以通过切换组内Sink用来实现负载均衡的效果,或在一个Sink故障时切换到另一个Sink
a1.sinkgroups = g1 a1.sinkgroups.g1.sinks = k1 k2 a1.sinkgroups.g1.processor.type = failover #优先级 a1.sinkgroups.g1.processor.priority.k1 = 5 //设置优先级,注意,每个sink的优先级必须是唯一的 a1.sinkgroups.g1.processor.priority.k2 =7
优先发给优先级高的,高的挂了。等一会。才发给优先级低的
如果没有指定优先级,则优先级顺序取决于sink们的配置顺序,先配置的默认优先级高于后配置的
提供了在多个sink之间实现负载均衡的能力
它支持轮询(round_robin)或随机方式(random),哈希取模(hash)的负载均衡,默认值是轮询方式,通过配置指定
也可以通过实现AbstractSinkSelector接口实现自定义的选择机制
a1.sinkgroups=g1 a1.sinkgroups.g1.sinks=s1 s2 a1.sinkgroups.g1.processor.type=load_balance a1.sinkgroups.g1.processor.selector=round_robin // 轮叫调度算法(轮询发送)
doPut:将批数据先写入临时缓冲区putList(Linkedblockingdequeue)
doCommit:检查channel内存队列是否足够合并。
doRollback:channel内存队列空间不足,回滚,等待内存通道的容量满足合并
putList就是一个临时的缓冲区,数据会先put到putList,最后由commit方法会检查channel是否有足够的缓冲区,有则合并到channel的队列
doTake:先将数据取到临时缓冲区takeList(linkedBlockingDequeue)
将数据发送到下一个节点
doCommit:如果数据全部发送成功,则清除临时缓冲区takeList
doRollback:数据发送过程中如果出现异常,rollback将临时缓冲区takeList中的数据归还给channel内存队列