(Some film friends left a message in "Talking about photography with light (6)": look at the color in the light, look at the texture of the side light, and look at the outline in the backlight.) I replied: There is some truth to it. Side light and backlight, with different emphasis on reflecting texture)
Canon 100 micro, manual: f/7.1, shutter 1/60 shooting, snail: fairy tales in spring
When we describe the characteristics of the side light, it is said that the side light can be depicted very delicately and naturally by the texture of the surface structure of the subject and the three-dimensional sense of the form. Therefore, it is often referred to as: texture, three-dimensional light.

In side light, the 17-40mm lens is 17mm, and the light is f/8 (1/800) shooting
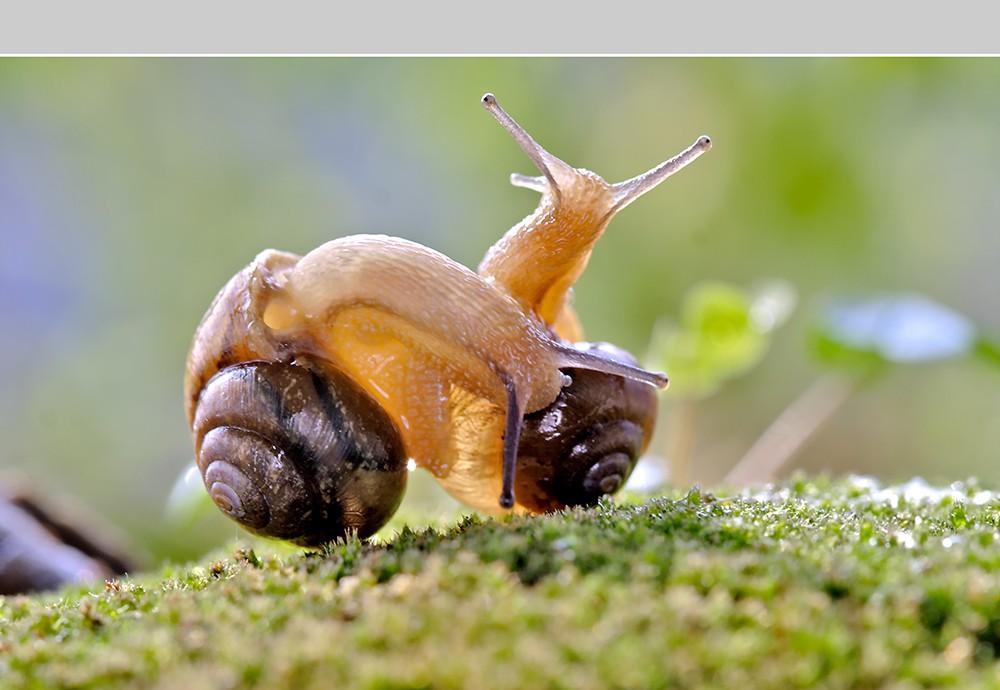
Backlight is the light that comes from behind the subject, so it has a certain "penetration" characteristic. When shooting some subjects, you can show their inner texture and texture transparently (or with some transparency). Like a small snail shot in the backlight.
Shot in the backlight, the gum texture of the snail's body part and the texture of the snail shell are expressed with some transparency effects
Let's take a look at a few other films shot in backlight.
Ecological insects, shot in backlight
The body of the leafhopper nymph, under the backlight, takes on a jade-like texture
Ephemera, the texture of the wings under the backlight is clearly presented, and the body is slightly transparent
Cockroaches, leathery wings, also permeated with textured texture in the backlight
Floral plants, shot in backlight
Red lotus petals, textured and clearly rendered in backlight
White lotus petals, thick texture, perfectly rendered in backlight (manual HDR shooting)
The magnolia flowers in the distance, under the backlight, the texture of the thicker petals are also presented
Phone shooting, backlit, texture of dead leaves
Compared with the side light, the reflection of the backlight on the texture of the subject has certain limitations in the choice of the subject, and the focus of the performance is also different. Similarly, the unique display ability of backlight on texture is also the side of the side light short board, which has its own strengths and different emphases. Following and being good at using side light and backlight for shooting should be self-reminded and used in photography practice from time to time.
Canon 100 micro, manual: f/8, shutter 1/25, ISO: 200 shooting, snail: fairy tale in spring
Beautiful view in the early morning and dusk. Shooting scenes under the backlight during this period is not limited to sunrise and sunset scenery, but also includes shimmering light and rainbow scenery.
Metering point selection for early morning and dusk landscape shooting. The camera is usually set to: Spot metering mode. Whether it is a camera or a mobile phone shooting, I mostly shoot the highlight parts of the scene and take the metering value, in order to ensure that the highlights are not exposed too much. In the following illustration,
If you're shooting with a phone, tap the highlights (red circles) on the screen with your finger as metering points
One of the techniques for shooting early morning and dusk landscapes: "HDR" mode (HDR mode shooting of SLR cameras, in the article already in "Talk about photography with light (1)" has a detailed operation process, I will not share it here).
Briefly speaking about the shooting method of the mobile phone "HDR". The "HDR" mode of the mobile phone (taking the thousand yuan Android machine as an example) can be opened from the "More" menu of the mobile phone camera (now some mobile phone cameras will automatically trigger the opening), as shown in the following illustration.
For mobile phone "HDR" shooting, you only need to click the shutter button once. After the phone automatically shoots three films, it automatically merges into one "HDR" film
The phone shoots sunrise and sunset in "HDR mode". Most use the sun as the exposure point. Before pressing the shutter, tap the sun on the screen with your finger. This not only ensures that the sun is not exposed, but also ensures that the details of the scene (such as the foreground mountain forest) in the backlight (shadow) are not lost. As shown in the following legend.
Also under the premise of taking the sun as the exposure value, shooting in regular mode and HDR mode, the scene in the backlight shadow is obviously different in detail performance
If the "HDR" film taken is convenient, it can be produced by making appropriate adjustments through the mobile phone picture software (such as Snapseed). As shown in the following legend. (I'm used to making adjustments on computer PS tools)
Adjust the film effect before and after. Note: Not used to use this mobile phone APP, here is only a gesture of adjustment
Sunrise and sunset landscape shooting. Different areas, different terrain, different seasons, early morning and dusk shooting scenes, will be very different. But I think that the method of shooting can still be learned from each other.
Manual panoramic filming (a set of 3 photos) shot, morning
There are usually two ways to shoot sunrise and sunset.
(1) Take a sunrise and sunset scene as a silhouette. This is the most commonly photographed. Anyone can pick up a camera (mobile phone) and take a silhouette of the sunrise and sunset anytime, anywhere.
Mobile phone shooting, quiet mountain city
During the shooting of the silhouette, the exposure should be based on the sun in the shooting scene as the exposure value point. What needs special attention is: pay attention to the integrity and beauty of the silhouette lines of the subject, pay attention to the orderly layout between the scene objects in the shooting screen, and avoid the chaotic overlap between the scene objects, which is not conducive to the disorganized sense of the picture.
Cell phone shooting, sunset
(2) Use "HDR" mode to shoot sunrise and sunset. This is a very useful and practical photographic technique that is used in response to the backlight and shows the details of each part of the shooting scene at various levels. (See the previous statement for specific operations)
17-40mm lens 17mm end, vertical shooting, manual HDR + panoramic film (eight groups of 24 photos) shooting, fog gushing horseback mountain
Phone HDR mode shooting
Shoot a view of the clouds in the early morning or at dusk. This kind of shooting scene is also the most popular shooting. As long as you master some of the basic skills of photography and shoot seriously, most of them can shoot eye-catching films. It should be noted here that in the later color and tone adjustment, it is not appropriate to over-render. Oversaturation and rendering can have a distorted look.
17-40mm lens 17mm end, tripod, manual (f/8, 8 sec), shooting, sunset: thunderstorm
Mobile panoramic mode shooting, quiet mountain city
Early morning or dusk landscape shooting in shimmering light. Mostly before sunrise or after sunset, the sky is illuminated. The shooting of this kind of scene is mostly based on reflecting the atmosphere of the shooting scene (such as: soft and quiet). Therefore, in the scheduling of shooting scene objects, it is advisable to be static and not to move (excessively), static movement is appropriate, and movement is static service.
Phone panorama mode shooting, quiet sand creek
Whether it is shooting in the low light, shooting in the clouds, or shooting at sunrise and sunset, you can choose the shooting method and technique (silhouette or HDR) according to the shooting intention and the specific situation of the shooting scene.
Mobile phone shooting, quiet sand creek
Depending on the shooting intent and needs, you can also choose a single-frame or "Panorama" mode (or: HDR + Panoramic Film) shooting. The shooting of the "Panoramic Film" mode can provide a wider shooting picture and cover more shooting scenes.
17-40mm 19mm end, vertical shot, manual HDR + panorama mode (eleven groups of 33 shots) shooting, far away village
(The "Talk about Photography with Light" series of articles that have been shared: (1) Smooth light, high color saturation, bright and clear picture but poor three-dimensional sense.) (2) The metering points taken by the mobile phone under the light, starting from the message of the shadow friend. (3) Side light, texture, three-dimensional light, is the most widely used photographic light. (4) Side light, the application in the photographic scene, the key point of metering value. (5) Backlight, known as dream contour light, backlit landscape photography skills. (6) The use of backlight in the scene: contour light, silhouette, dream effect)
Canon 100 micro, manual panoramic filming (a group of 4 photos) shooting, snail: fairy tales in spring
(Original photography graphics, share the real photography feelings, if you have any doubts, please leave a message.) Thank you for your viewing appreciation and encouragement) Respect the original, please do not carry plagiarism.