檔案共享伺服器:
ftp:(檔案傳輸協定) ftp協定
client /server
client tcp/ip cmd
浏覽器
cuteftp leapftp flashxp ssl
server
windows iis server-u
linux wu-ftp vsftpd pureftp
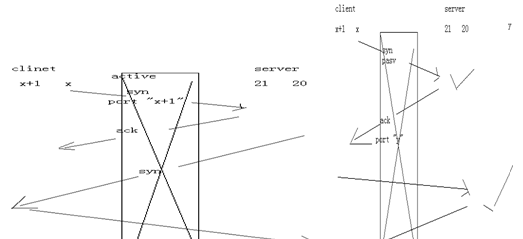
ftp 工作方式 :主動方式 被動方式
21(連接配接控制端口) 20(傳遞資料端口)
用戶端通路(1)主動方式 (2)被動方式
ftp指令 (cmd)
pwd 在哪
cd 切換目錄
dir 遠端檢視目錄
get(下載下傳) mget (多個下載下傳)
put(上傳) mput(多個上傳)
!dir(檢視本地)
lcd(切換本地)
傳輸方式: ascii和bin(二進制)
使用linux做ftp伺服器
安裝包為:vsftpd-2.0.5-16.el5_4.1.i386.rpm
vsftpd的主配置檔案為:/etc/vsftpd/vsftpd.conf
安裝完後最初可以直接啟用
[root@mail server]# service vsftpd start
為 vsftpd 啟動 vsftpd: [确定]
這時我們可以通過很多方式登入
[root@mail sasl2]# ftp 127.0.0.1
connected to 127.0.0.1.
220 (vsftpd 2.0.5)
530 please login with user and pass.
kerberos_v4 rejected as an authentication type
name (127.0.0.1:root): anonymous
331 please specify the password.
password:
230 login successful.
remote system type is unix.
using binary mode to transfer files.
ftp> dir 檢視目錄
227 entering passive mode (127,0,0,1,133,210)
150 here comes the directory listing.
drwxr-xr-x 2 0 0 4096 dec 04 2009 pub
226 directory send ok.
ftp> pwd 檢視位置
257 "/"
ftp> !dir 檢視本地目錄
libanonymous.la liblogin.la libplain.la libsasldb.la sendmail.conf
libanonymous.so liblogin.so libplain.so libsasldb.so smtpd.conf
libanonymous.so.2 liblogin.so.2 libplain.so.2 libsasldb.so.2
libanonymous.so.2.0.22 liblogin.so.2.0.22 libplain.so.2.0.22 libsasldb.so.2.0.22
ftp> bye
221 goodbye.
[root@mail sasl2]# touch /home/user1/f1 在user1使用者的家目錄建立檔案
[root@mail sasl2]# lftp 127.0.0.1 使用lftp方式登入(預設匿名登入)
lftp 127.0.0.1:~> pwd
ftp://127.0.0.1
lftp 127.0.0.1:~> dir
lftp 127.0.0.1:/> user user1 切換使用者登入
密碼:
lftp [email protected]:~> dir
-rw-r--r-- 1 0 0 0 jul 24 09:13 f1
drwx------ 3 500 500 4096 jul 24 08:30 mail
lftp [email protected]:~>
[root@mail sasl2]# lftp -u user1 127.0.0.1 使用使用者名登入
lftp [email protected]:~> pwd
ftp://[email protected]
lftp [email protected]:~> bye 登出
隻用linux才支援lftp登入方式
針對資源的權限:本地權限,網絡權限 ,如果看、兩個權限沖突時取最小權限
編譯vsftpd的主配置文檔
預設狀态下ftp的共享檔案夾/var/ftp/pub的權限為:
[root@mail ftp]# ll
drwxr-xr-x 2 root root 4096 2009-12-04 pub 不允許其他使用者寫入的,為了便于他們的上傳我們改一下目錄權限
[root@mail ftp]# chmod a+wt pub 不允許删除該目錄
[root@mail sasl2]# vim /etc/vsftpd/vsftpd.conf 配置參數可以使用 man 5 vsftpd找到
12 anonymous_enable=yes 允許嗎、匿名使用者登入的
15 local_enable=yes 允許本地使用者登入
18 write_enable=yes 本地與網絡可讀可寫
22 local_umask=022 屏蔽權限
23anon_umask=073 預設是077,為匿名使用者上傳的檔案保留可以下載下傳權限(添加的)
27 #anon_upload_enable=yes 匿名使用者向ftp上傳東西被禁用
31 #anon_mkdir_write_enable=yes 匿名賬号建立檔案夾(但是隻有它會隻能傳不能下載下傳)
anon_other_write_enable=yes 添加别的寫權限後才能執行對上傳的目錄執行删除改名
35 dirmessage_enable=yes 進入目錄提示目錄消息(需要在該目錄下建立.message檔案)
39 xferlog_enable=yes 啟用傳輸時的日志記錄
42 connect_from_port_20=yes
53 xferlog_file=/var/log/xferlog 打開它才會在傳輸時記錄日志(該檔案在傳輸時才會産生)
57 xferlog_std_format=yes 記錄的日志的格式,該格式為标準格式
58 log_ftp_protocol=no 在日志中記錄使用者登入上執行的操作指令(但是日志格式必須為非标準,即上一行為no)
60 #idle_session_timeout=600 會話空閑逾時
63 #data_connection_timeout=120 連接配接逾時(三次握手)
86 ftpd_banner=welcome to blah ftp service. 進入ftp時的消息,排頭,不用登入就能看見
90 deny_email_enable=yes 匿名賬号的密碼可以用郵箱的賬号,那麼ftp就會把ftp的一些相關資訊發到該郵箱中,不利于安全,我們可以借此禁用默寫郵箱做密碼,将其寫入banned_emails檔案中
91 # (default follows) 預設是允許的
92 banned_email_file=/etc/vsftpd/banned_emails 列入禁止使用郵箱賬号做密碼的名單,該檔案需要先收工建立
97 chroot_list_enable=yes 根據列出的表單将使用者鎖定在家目錄中
98 # (default follows)
99 chroot_list_file=/etc/vsftpd/chroot_list 該檔案寫入被鎖定的賬号(手動建立)
100 chroot_local_user=yes 将登入的所有使用者都鎖定在家目錄
111 listen=yes (可以做成依賴于超級守護程序的伺服器xinetd)
118 pam_service_name=vsftpd ftp賬戶使用pam驗證
119 userlist_enable=yes 開啟針對清單中使用者的通路權限,該清單為/etc/vsftpd/user_list
120 userlist_deny=yes 決定該清單中的使用者的通路時拒絕(yes)還是允許(no)
121 tcp_wrappers=yes 使用系統中的簡易防火牆(這個簡易防火牆有兩個檔案/etc/hosts.allow與/etc/hosts.deny)
修改ftp的主配置檔案後一定要重新開機vsftpd
系統的建議防火牆,主要依靠/etc/hosts.allow和/etc/hosts.deny
在/etc/hosts.deny系統先看到它預設動作是allow(可以改成deny)
vsftpd:192.168.20.33:allow 文法格式:服務:來源:動作(允許該位址通路)
在/etc/hosts.deny中系統最後才讀取
vsftpd:all:deny

下面做一個ftp的小執行個體
1.新購一塊磁盤,将ftp資料傳到該目錄下 —》分區格式化——》挂載/mnt/ftp
建立目錄 public 公共文檔 ,隻許下載下傳,不許上傳與更改
2.每個使用者家目錄 home/使用者 空間限制10m
3.同時線上使用者3個 ,每使用者連接配接數2
4.傳遞速率 1m/s 本地使用者 100k/s 匿名使用者
将新增磁盤分區格式化後,然後啟用磁盤配額
[root@mail ~]# vim /etc/fstab
/dev/sdb1 /mnt/ftp auto defaults,usrquota 0 0
然後使用mount -a 或者重新開機,是這些參數生效
[root@mail ~]# mount
/dev/sdb1 on /mnt/ftp type ext2 (rw,usrquota) 生效了
對使用者做磁盤配額的控制
[root@mail ~]# quotacheck -augvc
在/mnt/ftp就生成檔案:aquota.user
[root@mail ftp]# edquota -u user1
filesystem blocks soft hard inodes soft hard
/dev/sdb1 0 10000 10000 3 0 0
[root@mail ftp]# edquota -p user1 user2 将user1的設定拷貝給user2
[root@mail ftp]# quotaon /dev/sdb1
[root@mail ftp]# vim /etc/rc.d/rc.local 編譯開機啟動配額
quotaon /dev/sdb1 添加該項
在/mnt/ftp下建立匿名賬号通路的公共目錄public(對other使用者沒有寫權限)
[root@mail ftp]# mkdir public
[root@mail ftp]# cd public/
[root@mail public]# touch l1
[root@mail public]# touch l2
在 /mnt/ftp 為使用者建立家目錄
[root@mail ftp]# mkdir home
[root@mail ftp]# mv /home/user* home/ 将本地使用者轉移過來
[root@mail ftp]# ll home/
總計 2
drwx------ 4 user1 user1 1024 07-24 17:13 user1
drwx------ 4 user2 user2 1024 07-24 16:42 user2
[root@mail ftp]# vim /etc/passwd 修改passwd檔案中使用者家目錄的路徑
user1:x:500:500::/mnt/ftp/home/user1:/bin/bash
user2:x:501:501::/mnt/ftp/home/user2:/bin/bash
但是建立的賬号家目錄還是在/home/下,那麼我們需要建立賬号預設的家目錄
[root@mail ftp]# useradd -d -b /mnt/ftp/home 那麼在建立的賬号預設的家目錄就改了
[root@mail ftp]# useradd user3
[root@mail ftp]# grep user /etc/passwd
user3:x:502:502::/mnt/ftp/home/user3:/bin/bash
預設匿名賬号的根預設是/var/ftp/pub,我們需要改變它的根,讓它為/mnt/ftp/public
在主配置檔案中添加
[root@mail ftp]# vim /etc/vsftpd/vsftpd.conf
anon_upload_enable=yes 允許匿名使用者下載下傳
anon_root=/mnt/ftp/public
此時配額已經做我們可以上傳檔案是試試
建立規定大小檔案:dd if=/dev/zero of=f2 bs=1m count=5
做使用者連接配接數以及本地與匿名賬戶傳輸速率做限制
max_clients=3 最大使用者連接配接數位3
max_per_ip=2 每使用者最多連接配接數位2
local_max_rate=1000000 本地最大傳輸速率為100m
anon_max_rate=100000 匿名使用者最大傳輸速率為10m
重新開機vsftpd就可以做測試了
<b>實作基于超級守護程序的ftp</b>
我們将ftp服務做成超級守護程序就能實作在規定時間可以通路了
首先編譯主配置檔案/etc/vsftpd/vsftpd.conf
listen=no 切換服務模式
[root@mail ~]# cd /etc/xinetd.d/
[root@mail xinetd.d]# cp -p tftp vsftpd 生成ftp的超級守護程序檔案
[root@mail ~]# vim /etc/xinetd.d/vsftpd 編譯該檔案
service ftp
{
id =vsftpd
socket_type = stream
protocol = tcp
wait = no
user = root
server = /usr/sbin/vsftpd
server_args = /etc/vsftpd/vsftpd.conf
disable = no
access_times = 08:00-20:00
}
[root@mail ~]# service xinetd restart 便可以啟動ftp了
ftp安全
1.加密ftp ssl ftps 證書
讓ca給自己頒發一個證書利用證書加密
[root@mail ~]# cd /etc/pki/
[root@mail pki]# vim tls/openssl.cnf
45 dir = /etc/pki/ca
88 countryname = optional
89 stateorprovincename = optional
90 organizationname = optional
:80,90 r/match/optional
[root@mail ca]# mkdir crl certs newcerts 建立這些目錄
[root@mail ca]# touch index.txt serial 建立檔案
[root@mail ca]# vim serial 給該檔案一個起始序列号
01
在ca目錄下産生一個鑰匙
[root@mail pki]# cd ca/
[root@mail ca]# openssl genrsa 1024 >private/cakey.pem
generating rsa private key, 1024 bit long modulus
...........................................++++++
.......++++++
e is 65537 (0x10001)
然後産生一個自簽發的證書
[root@mail ca]# openssl req -new -x509 -key private/cakey.pem -days 3650 -out cacert.pem
[root@mail ca]# ll
總計 12
-rw-r--r-- 1 root root 1074 07-17 11:26 cacert.pem 證書檔案産生
drwx------ 2 root root 4096 07-17 11:24 private
[root@mail ca]# chmod 600 private/cakey.pem 對私鑰進行權限處理
[root@mail ca]# mkdir -pv /etc/ftp/certs 建立多級子目錄存放ftp的證書檔案
mkdir: 已建立目錄 “/etc/ftp”
mkdir: 已建立目錄 “/etc/ftp/certs”
[root@mail ca]# cd /etc/ftp/certs/
[root@mail certs]# openssl genrsa 1024 >vsftpd.key 産生鑰匙
..++++++
.........++++++
根據鑰匙做請求檔案:
[root@mail certs]# openssl req -new -key vsftpd.key -out vsftpd.csr
[root@mail certs]# ll
總計 8
-rw-r--r-- 1 root root 1094 07-17 11:36 vsftpd.csr
-rw-r--r-- 1 root root 887 07-17 11:34 vsftpd.key
[root@mail certs]# openssl ca -in vsftpd.csr -out vsftpd.crt 頒發證書
-rw-r--r-- 1 root root 3032 07-17 11:55 vsftpd.crt
-rw-r--r-- 1 root root 639 07-17 11:54 vsftpd.csr
-rw-r--r-- 1 root root 887 07-17 11:52 vsftpd.key
[root@mail certs]# chmod 600 * 更改一下權限
我們為了測試可是使用wireshark抓包
[root@mail certs]# yum install wireshark -y
[root@mail ~]# tshark -ni eth0 -r "tcp.dstport eq 21" 抓取ftp關于21端口的包
20.610580 192.168.20.22 -> 192.168.20.66 ftp request: user user1
20.853138 192.168.20.22 -> 192.168.20.66 tcp 1377 > 21 [ack] seq=13 ack=69 win=372232 len=0
22.257695 192.168.20.22 -> 192.168.20.66 ftp request: pass 123
在未啟用加密驗證的情況下,使用賬戶通路ftp,很容易就會抓到賬号與密碼
那麼我們啟用ftp加密
在ftp主配置檔案中沒有關于加密的,但我們可以根據man vsftpd.conf檢視ftp手冊來找到
[root@mail certs]# vim /etc/vsftpd/vsftpd.conf
force_local_logins_ssl=yes 強制本地賬号登陸加密
force_local_data_ssl=yes 本賬号傳遞資料加密
ssl_enable=yes 打開ssl驗證
ssl_tlsv1=yes 啟用ssl的版本号
ssl_sslv3=yes
ssl_sslv2=yes
rsa_cert_file=/etc/ftp/certs/vsftpd.crt 本地證書存放位置
rsa_private_key_file=/etc/ftp/certs/vsftpd.key 本地鑰匙存放位置
之後重新開機ftp服務
這時我們使用ftp用戶端軟體測試登陸(指令行不支援ftps)
此時再抓包便不會再抓到有關賬号跟密碼的資料包了
2.虛拟賬号(linux作業系統部存在的賬号,但是可以登入ftp進行通路)
[root@mail certs]# vim /etc/vsftpd/vuser.txt 建立一個文本,放置虛拟賬号
jim 賬号
000 密碼
然後我們需要生成hash加密的資料庫檔案以便讓後續的pam.userdb這個子產品來讀取我們的使用者名密碼進行驗證,我們需要安裝 db4-utils包
[root@mail certs]# yum install db4-utils -y
[root@mail certs]# cd /etc/vsftpd/
[root@mail vsftpd]# db_load -t -t hash -f vuser.txt vuser.db 生成資料庫檔案
vsftpd要啟動虛拟賬号需要跟pam認證子產品結合,在/etc/pam.d/有一個vsftpd檔案,這是vsftpd利用pam這個認證子產品認證賬戶登入的,我們産生這樣一個類似虛拟賬号的認證檔案
[root@mail vsftpd]# ll
總計 36
-rw------- 1 root root 125 2009-12-04 ftpusers
-rw------- 1 root root 361 2009-12-04 user_list
-rw------- 1 root root 4864 07-17 12:13 vsftpd.conf
-rwxr--r-- 1 root root 338 2009-12-04 vsftpd_conf_migrate.sh
-rw-r--r-- 1 root root 12288 07-17 12:41 vuser.db
-rw-r--r-- 1 root root 18 07-17 12:36 vuser.txt
[root@mail vsftpd]# cd /etc/pam.d/
[root@mail pam.d]# cp vsftpd vsftpd.t
[root@mail pam.d]# vim vsftpd.t
auth required pam_userdb.so db=/etc/vsftpd/vuser
account required pam_userdb.so db=/etc/vsftpd/vuser
上面dn=後面的就是我們生成好的hash資料檔案,檔案字尾的不需要打,pam_userdb.so這個子產品會自動幫我們識别的,虛拟賬号必須映射到系統的一個本地賬号上,可以不設密碼。
[root@mail pam.d]# vim /etc/vsftpd/vsftpd.conf
pam_service_name=vsftpd.t
guest_enable=yes 打開guest賬号
guest_username=test1 設定虛拟賬号的映射
跟登入相關的日志放在/var/log/secure