本節書摘來自異步社群出版社《c++ 黑客程式設計揭秘與防範(第2版)》一書中的第6章,第6.4節,作者:冀雲,更多章節内容可以通路雲栖社群“異步社群”公衆号檢視。
c++ 黑客程式設計揭秘與防範(第2版)
前面講的都是概念性的知識,本節主要編寫一些關于pe檔案結構的程式代碼,以幫助讀者加強對pe結構的了解。
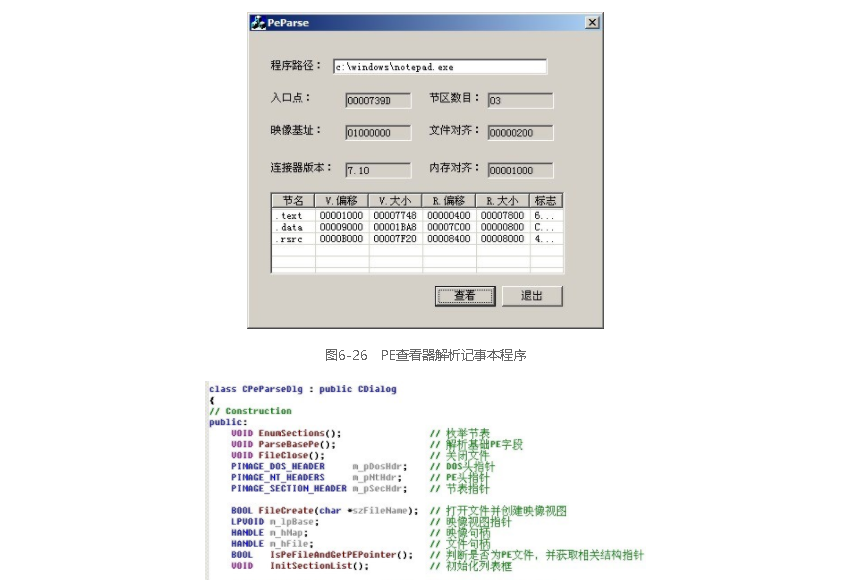
寫pe檢視器并不是件複雜的事情,隻要按照pe結構一步一步地解析就可以了。下面簡單地解析其中幾個字段内容,顯示一下節表的資訊,其餘的内容隻要稍作修改即可。pe檢視器的界面如圖6-26所示。
pe檢視器的界面按照圖6-26所示的設定,不過這個可以按照個人的偏好進行布局設定。編寫該pe檢視器的步驟為打開檔案并建立檔案記憶體映像,判斷檔案是否為pe檔案并獲得pe格式相關結構體的指針,解析基本的pe字段,枚舉節表,最後關閉檔案。需要在類中添加幾個成員變量及成員函數,添加的内容如圖6-27所示。
按照前面所說的順序,依次實作添加的各個成員函數。
handle createfilemapping(
handle hfile, // handle to file
lpsecurity_attributes lpattributes, // security
dword flprotect, // protection
dword dwmaximumsizehigh, // high-order dword of size
dword dwmaximumsizelow, // low-order dword of size
lpctstr lpname // object name
);<code>`</code>
參數說明如下。
hfile:該參數是createfile()函數傳回的句柄。
lpattributes:是安全屬性,該值通常是null。
flprotect:建立檔案映射後的屬性,通常設定為可讀可寫page_readwrite。如果需要像裝載可執行檔案那樣把檔案映射入記憶體的話,那麼需要使用sec_image。
最後3個參數在這裡為0。如果建立的映射需要在多程序中共享資料的話,那麼最後一個參數設定為一個字元串,以便通過該名稱找到該塊共享記憶體。
該函數的傳回值為一個記憶體映射的句柄。
bool unmapviewoffile(
lpcvoid lpbaseaddress // starting address
該函數的參數就是mapviewoffile()函數的傳回值。
接着說pe檢視器,檔案已經打開,就要判斷檔案是否為有效的pe檔案了。如果是有效的pe檔案,就把解析pe格式的相關結構體的指針也得到。代碼如下:
void cpeparsedlg::parsebasepe()
{
cstring strtmp;
// 入口位址
strtmp.format("%08x", m_pnthdr->optionalheader.addressofentrypoint);
setdlgitemtext(idc_edit_ep, strtmp);
// 映像基位址
strtmp.format("%08x", m_pnthdr->optionalheader.imagebase);
setdlgitemtext(idc_edit_imagebase, strtmp);
// 連接配接器版本号
strtmp.format("%d.%d",
m_pnthdr->optionalheader.majorlinkerversion,
m_pnthdr->optionalheader.minorlinkerversion);
setdlgitemtext(idc_edit_linkversion, strtmp);
// 節表數量
strtmp.format("%02x", m_pnthdr->fileheader.numberofsections);
setdlgitemtext(idc_edit_sectionnum, strtmp);
// 檔案對齊值大小
strtmp.format("%08x", m_pnthdr->optionalheader.filealignment);
setdlgitemtext(idc_edit_filealign, strtmp);
// 記憶體對齊值大小
strtmp.format("%08x", m_pnthdr->optionalheader.sectionalignment);
setdlgitemtext(idc_edit_secalign, strtmp);
}<code>`</code>
pe格式的基礎資訊,就是簡單地擷取結構體的成員變量,沒有過多複雜的内容。擷取導入表、導出表比擷取基礎資訊複雜。關于導入表、導出表的内容将在後面介紹。接下來進行節表的枚舉,具體代碼如下:
"x55x8bxecx6axffx68x00x65x41x00" \
"x68xe8x2dx40x00x64xa1x00x00x00" \
"x00x50x64x89x25x00x00x00x00x83" \
"xc4x94"<code>`</code>
根據這個步驟,把aspack的特征碼也提取出來,提取結果如下:
typedef struct _sign
char szname[namelen];
byte bsign[signlen + 1];
}sign, *psign;
利用該資料結構定義2個儲存特征碼的全局變量,如下:
sign sign[2] =
{
// vc6
"vc6",
"x55x8bxecx6axffx68x00x65x41x00" \
"x68xe8x2dx40x00x64xa1x00x00x00" \
"x00x50x64x89x25x00x00x00x00x83" \
"xc4x94"
},
// aspack
"aspack",
"x60xe8x03x00x00x00xe9xebx04x5d" \
"x45x55xc3xe8x01x00x00x00xebx5d" \
"xbbxedxffxffxffx03xddx81xebx00"
"xc0x01"
}};<code>`</code>
程式界面是在pe檢視器的基礎上完成的,如圖6-32所示。

圖6-32 查殼程式結果
提取特征碼後,查殼工作隻剩特征碼比對了。這非常簡單,隻要用檔案的入口處代碼和特征碼進行比對,比對相同就會給出相應的資訊。查殼的代碼如下:
dword cpeparsedlg::getaddr()
char szaddr[10] = { 0 };
dword dwaddr = 0;
switch ( m_nselect )
case 1:
{
getdlgitemtext(idc_edit_va, szaddr, 10);
hexstrtoint(szaddr, &dwaddr);
break;
}
case 2:
getdlgitemtext(idc_edit_rva, szaddr, 10);
case 3:
getdlgitemtext(idc_edit_fileoffset, szaddr, 10);
}
return dwaddr;
擷取該位址所屬的第幾個節的代碼如下:
void cpeparsedlg::calcaddr(int ninnum, dword dwaddr)
dword dwva = 0;
dword dwrva = 0;
dword dwfileoffset = 0;
dwva = dwaddr;
dwrva = dwva - m_pnthdr->optionalheader.imagebase;
dwfileoffset = m_psechdr[ninnum].pointertorawdata
+ (dwrva - m_psechdr[ninnum].virtualaddress);
dwva = dwaddr + m_pnthdr->optionalheader.imagebase;
dwrva = dwaddr;
dwfileoffset = dwaddr;
dwrva = m_psechdr[ninnum].virtualaddress
+ (dwfileoffset - m_psechdr[ninnum].pointertorawdata);
dwva = dwrva + m_pnthdr->optionalheader.imagebase;
setdlgitemtext(idc_edit_section, (const char *)m_psechdr[ninnum].name);
cstring str;
str.format("%08x", dwva);
setdlgitemtext(idc_edit_va, str);
str.format("%08x", dwrva);
setdlgitemtext(idc_edit_rva, str);
str.format("%08x", dwfileoffset);
setdlgitemtext(idc_edit_fileoffset, str);
代碼都不複雜,關鍵就是calcaddr()中3種位址的轉換。如果讀者沒能了解代碼,請參考前面手動轉換3種位址的方法,這裡就不進行介紹了。
添加節區在很多場合都會用到,比如在加殼中、在免殺中都會經常用到對pe檔案添加一個節區。添加一個節區的方法有4步,第1步是在節表的最後面添加一個image_secti on_header,第2步是更新image_file_header中的numberofsections字段,第3步是更新image_optional_
header中的sizeofimage字段,最後一步則是添加檔案的資料。當然,前3步是沒有先後順序的,但是最後一步一定要明确如何改變。
注:某些情況下,在添加新的節區項以後會向新節區項的資料部分添加一些代碼,而這些代碼可能要求在程式執行之前就被執行,那麼這時還需要更新image_optional _header中的addressofentrypoint字段。
1.手動添加一個節區
先來進行一次手動添加節區的操作,這個過程是個熟悉上述步驟的過程。網上有很多現成的添加節區的工具。這裡自己編寫工具的目的是掌握和了解其實作方法,鍛煉程式設計能力;手動添加節區是為了鞏固前面的知識,熟悉添加節區的步驟。
接下來還是使用前面的測試程式。使用c32asm用十六進制編輯方式打開這個程式,并定位到其節表處,如圖6-35所示。
圖6-35 節表位置資訊
從圖6-35中可以看到,該pe檔案有3個節表。直接看十六進制資訊可能很不友善(看多了就習慣了),為了直覺友善地檢視節表中image_section_header的資訊,那麼使用lordpe進行檢視,如圖6-36所示。
圖6-36 使用lordpe檢視該節表資訊
用lordpe工具檢視的确直覺多了。對照lordpe顯示的節表資訊來添加一個節區。回顧一下image_section_header結構體的定義,如下:
m_hmap = createfilemapping(m_hfile, null,
page_readwrite /| sec_image/,
0, 0, 0);
if ( m_hmap == null )
closehandle(m_hfile);
return bret;
}<code>`</code>
這裡要把sec_image宏注釋掉。因為要修改記憶體檔案映射,有這個值會使添加節區失敗,是以要将其注釋掉或者直接删除掉。
圖6-46 添加節區界面
程式的界面如圖6-46所示。
首先編寫“添加”按鈕響應事件,代碼如下:
void cpeparsedlg::addsec(char *szsecname, int nsecsize)
int nsecnum = m_pnthdr->fileheader.numberofsections;
dword dwfilealignment = m_pnthdr->optionalheader.filealignment;
dword dwsecalignment = m_pnthdr->optionalheader.sectionalignment;
pimage_section_header ptmpsec = m_psechdr + nsecnum;
// 拷貝節名
strncpy((char *)ptmpsec->name, szsecname, 7);
// 節的記憶體大小
ptmpsec->misc.virtualsize = alignsize(nsecsize, dwsecalignment);
// 節的記憶體起始位置
ptmpsec->virtualaddress=m_psechdr[nsecnum-1].virtualaddress+alignsize(m_psechdr
[nsecnum - 1].misc.virtualsize, dwsecalignment);
// 節的檔案大小
ptmpsec->sizeofrawdata = alignsize(nsecsize, dwfilealignment);
// 節的檔案起始位置
ptmpsec->pointertorawdata=m_psechdr[nsecnum-1].pointertorawdata+alignsize(m_pse
chdr[nsecnum - 1].sizeofrawdata, dwsecalignment);
// 修正節數量
m_pnthdr->fileheader.numberofsections ++;
// 修正映像大小
m_pnthdr->optionalheader.sizeofimage += ptmpsec->misc.virtualsize;
flushviewoffile(m_lpbase, 0);
// 添加節資料
addsecdata(ptmpsec->sizeofrawdata);
enumsections();
代碼中每一步都按照相應的步驟來完成,其中用到的2個函數分别是alignsize()和addsecdata()。前者是用來進行對齊的,後者是用來在檔案中添加實際的資料内容的。這兩個函數非常簡單,代碼如下: