本文主要基于
<a href="http://www.codinglabs.org/html/intro-of-nginx-module-development.html">http://www.codinglabs.org/html/intro-of-nginx-module-development.html</a>
和
<a href="http://www.evanmiller.org/nginx-modules-guide.html#compiling">http://www.evanmiller.org/nginx-modules-guide.html#compiling</a>
的學習些的
handler:接收請求+産生Output
filters:處理hander産生的output
load-balancer:負載均衡,選擇一個後端server發送請求(如果把nginx當做負載均衡伺服器的話,這個角色必須實作)
圖檔講解:
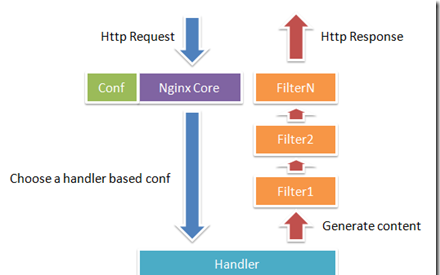
Client sends HTTP request → Nginx chooses the appropriate handler based on the location config → (if applicable) load-balancer picks a backend server → Handler does its thing and passes each output buffer to the first filter → First filter passes the output to the second filter → second to third → third to fourth → etc. → Final response sent to client
中文講解:
用戶端發送http請求 -- nginx根據配置檔案conf中的location來确定由哪個handler處理-- handler執行完request傳回output給filter--第一個filter處理output -- 第二個filter處理output--- … -- 生成Response
1 Module Configuration Struct(s) 子產品配置結構
2 Module Directives 子產品指令結構
3 The Module Context子產品内容
3.1 create_loc_conf
3.2 merge_loc_conf
4 The Module Definition子產品整合
5 Module Installation子產品安裝
這個結構的命名規則為ngx_http_[module-name]_[main|srv|loc]_conf_t。
main,srv,loc表示這個子產品的作用範圍是配置檔案中的main/server/location三種範圍(這個需要記住,後面會經常用到)
例子:
1
2
3
4
5
<code>typedef</code><code>struct</code> <code>{</code>
<code>ngx_str_t ed;</code><code>//echo子產品隻有一個參數 比如 echo "hello"</code>
<code>} ngx_http_echo_loc_conf_t;</code><code>//echo 子產品</code>
6
7
8
9
10
11
12
13
14
15
16
17
18
19
<code>static</code> <code>ngx_command_t ngx_http_echo_commands[] = {</code>
<code>{ ngx_string(</code><code>"echo"</code><code>),</code><code>//指令名字</code>
<code>NGX_HTTP_LOC_CONF|NGX_CONF_TAKE1,</code><code>//代表是local配置,帶一個參數</code>
<code>ngx_http_echo,</code><code>//組裝子產品配置結構</code>
<code>NGX_HTTP_LOC_CONF_OFFSET,</code><code>//上面的組裝子產品配置擷取完參數後存放到哪裡?使用這個和下面的offset參數來進行定位</code>
<code>offsetof(ngx_http_echo_loc_conf_t, ed),</code><code>//同上</code>
<code>NULL</code><code>// Finally, post is just a pointer to other crap the module might need while it's reading the configuration. It's often NULL.我也沒了解是什麼意思。通常情況下設定為NULL</code>
<code>},</code>
<code>ngx_null_command</code><code>//必須使用ngx_null_command作為commands的結束标記</code>
<code>};</code>
注1:
ngx_http_echo 是組裝子產品配置結構的函數指針,有三個參數:
ngx_conf_t *cf 包含這個指令的所有參數
ngx_command_t *cmd 執行這個command指令結構的指針
void *conf 子產品訂制的配置結構
這個函數比較不好了解,其功能是把參數傳到指令結構體中,并且把合适的值放入到子產品配置結構中。我們稱之為"setup function"。它會在指令運作的時候被調用。
nginx已經提供了幾個現成的方法了:
ngx_conf_set_flag_slot
ngx_conf_set_str_slot
ngx_conf_set_num_slot
ngx_conf_set_size_slot
…
是以你可以這樣定義cmd:
<code>{ ngx_string(</code><code>"add_after_body"</code><code>),</code>
<code>NGX_HTTP_MAIN_CONF|NGX_HTTP_SRV_CONF|NGX_HTTP_LOC_CONF|NGX_CONF_TAKE1,</code>
<code>ngx_conf_set_str_slot,</code>
<code>NGX_HTTP_LOC_CONF_OFFSET,</code>
<code>offsetof(ngx_http_addition_conf_t, after_body),</code>
<code>NULL },</code>
也可以這樣:
20
21
22
23
24
25
26
27
28
29
30
31
32
33
34
35
<code>{ ngx_string(</code><code>"echo"</code><code>),</code>
<code>NGX_HTTP_LOC_CONF|NGX_CONF_TAKE1,</code>
<code>ngx_http_echo,</code>
<code>offsetof(ngx_http_echo_loc_conf_t, ed),</code>
<code>ngx_null_command</code>
<code>static</code> <code>char</code> <code>*</code>
<code>ngx_http_echo(ngx_conf_t *cf, ngx_command_t *cmd,</code><code>void</code> <code>*conf)</code>
<code>{</code>
<code>ngx_http_core_loc_conf_t *clcf;</code>
<code>clcf = ngx_http_conf_get_module_loc_conf(cf, ngx_http_core_module);</code>
<code>clcf->handler = ngx_http_echo_handler;</code><code>//這裡指定了handler,那麼就會使用新的handler進行處理</code>
<code>ngx_conf_set_str_slot(cf,cmd,conf);</code><code>//這裡還是使用系統的函數</code>
<code>return</code> <code>NGX_CONF_OK;</code>
<code>}</code>
static ngx_http_module_t ngx_http_circle_gif_module_ctx = {
NULL, /* preconfiguration */
NULL, /* postconfiguration 這裡是放置filter的地方,在filter章節會說*/
NULL, /* create main configuration */
NULL, /* init main configuration */
NULL, /* create server configuration */
NULL, /* merge server configuration */
ngx_http_circle_gif_create_loc_conf, /* create location configuration */
ngx_http_circle_gif_merge_loc_conf /* merge location configuration */
};
子產品的内容ngx_http_<module name>_module_ctx是為了定義各種鈎子函數,就是nginx在各個不同的時期将會運作的函數。
一般的location隻需要配置create location configuration(在建立location配置的時候運作)和merge location configuration(和server config如何合并,一般包含如果配置有錯誤的話應該抛出異常)
static void *
ngx_http_circle_gif_create_loc_conf(ngx_conf_t *cf)
{
ngx_http_circle_gif_loc_conf_t *conf;
conf = ngx_pcalloc(cf->pool, sizeof(ngx_http_circle_gif_loc_conf_t));
if (conf == NULL) {
return NGX_CONF_ERROR;
}
conf->min_radius = NGX_CONF_UNSET_UINT; //對conf中的每個參數進行配置,min_redius和max_redius是nginx_circle_gif子產品的配置結構的字段
conf->max_radius = NGX_CONF_UNSET_UINT;
return conf;
static char *
ngx_http_circle_gif_merge_loc_conf(ngx_conf_t *cf, void *parent, void *child)
ngx_http_circle_gif_loc_conf_t *prev = parent; //server的loc配置
ngx_http_circle_gif_loc_conf_t *conf = child; // 自己的loca配置
ngx_conf_merge_uint_value(conf->min_radius, prev->min_radius, 10);
ngx_conf_merge_uint_value(conf->max_radius, prev->max_radius, 20);
if (conf->min_radius < 1) {
ngx_conf_log_error(NGX_LOG_EMERG, cf, 0,
"min_radius must be equal or more than 1");
return NGX_CONF_ERROR; //這裡負責抛出錯誤
if (conf->max_radius < conf->min_radius) {
"max_radius must be equal or more than min_radius");
return NGX_CONF_OK;
注1 : ngx_conf_merge_uint_value是nginx core中自帶的函數
ngx_conf_merge_<data type>_value
ngx_conf_merge_uint_value(conf->min_radius, prev->min_radius, 10);的意思是:
如果設定了conf->min_redius的話使用conf->min_redius
如果沒有設定conf->min_redius的話使用 prev->min_radius
如果兩個都沒有設定的話使用10
ngx_module_t ngx_http_<module name>_module = {
NGX_MODULE_V1,
&ngx_http_<module name>_module_ctx, /* module context 子產品内容 */
ngx_http_<module name>_commands, /* module directives 子產品指令*/
NGX_HTTP_MODULE, /* module type 子產品類型,HTTP子產品,或者HTTPS*/
NULL, /* init master */
NULL, /* init module */
NULL, /* init process */
NULL, /* init thread */
NULL, /* exit thread */
NULL, /* exit process */
NULL, /* exit master */
NGX_MODULE_V1_PADDING
5 子產品安裝
子產品安裝檔案的編寫依賴于這個子產品是handler,filter還是load-balancer的工作角色
下面開始是Handler,filter,load-balancer的編寫和安裝
1 Handler安裝
還記得在子產品指令的時候有設定handler的語句嗎?
clcf->handler = ngx_http_echo_handler;
這個語句就是handler的安裝
2 Handler編寫
Handler的執行有四部:
讀入子產品配置
處理功能業務
産生HTTP header
産生HTTP body
<code>static</code> <code>ngx_int_t</code>
<code>ngx_http_circle_gif_handler(ngx_http_request_t *r)</code>
<code>ngx_http_circle_gif_loc_conf_t *circle_gif_config;</code>
<code>circle_gif_config = ngx_http_get_module_loc_conf(r, ngx_http_circle_gif_module);</code>
<code>...</code>
就是使用nginx已經有的函數ngx_http_get_module_loc_conf,第一個參數是目前請求,第二個參數是前面寫好的子產品
這個部分是我們要子產品處理的實際部分
用需求舉例:
這個子產品有個指令是 getRedisInfo 192.168.0.1 //擷取redis的資訊
那麼這個功能業務就是(僞代碼):
case cmd->opcode
"getRedisInfo" :
擷取redis 的資訊
這裡應該把所有這個子產品設定的指令的業務邏輯都寫好
産生HTTP Header
r->headers_out.status = NGX_HTTP_OK;
r->headers_out.content_length_n = 100;
r->headers_out.content_type.len = sizeof("image/gif") - 1;
r->headers_out.content_type.data = (u_char *) "image/gif";
ngx_http_send_header(r);
産生HTTP Body
這個部分是最重要的一步

handler是可以一次産生出一個輸出,也可以産生出多個輸出使用ngx_chain_t的連結清單來進行連接配接
struct ngx_chain_s {
ngx_buf_t *buf;
ngx_chain_t *next;
buf中有pos和last來代表out資料在記憶體中的位置,next是代表下一個ngx_chain_t
下面來說一下隻有一個ngx_chain_t的設定
ngx_buf_t *b;
ngx_chain_t out
b = ngx_pcalloc(r->pool, sizeof(ngx_buf_t));
if (b == NULL) {
ngx_log_error(NGX_LOG_ERR, r->connection->log, 0,
"Failed to allocate response buffer.");
return NGX_HTTP_INTERNAL_SERVER_ERROR;
b->pos = some_bytes; /* first position in memory of the data */
b->last = some_bytes + some_bytes_length; /* last position */
b->memory = 1; /* content is in read-only memory */
/* (i.e., filters should copy it rather than rewrite in place) */
b->last_buf = 1; /* there will be no more buffers in the request */
out.buf = b;
out.next = NULL; //如果有下一個連結清單可以放到這裡
return ngx_http_output_filter(r, &out);
Filter作為過濾器又可以細分為兩個過濾器: Header filters 和 body filters
Filter的安裝
filter是在子產品内容設定的時候加上的
static ngx_http_module_t ngx_http_chunked_filter_module_ctx = {
ngx_http_chunked_filter_init, /* postconfiguration */
...
static ngx_int_t
ngx_http_chunked_filter_init(ngx_conf_t *cf)
ngx_http_next_header_filter = ngx_http_top_header_filter;
ngx_http_top_header_filter = ngx_http_chunked_header_filter;
ngx_http_next_body_filter = ngx_http_top_body_filter;
ngx_http_top_body_filter = ngx_http_chunked_body_filter;
return NGX_OK;
注1: ngx_http_top_hreader_filter是什麼意思呢?
當handler生成了response的時候,它調用了兩個方法:ngx_http_output_filter和ngx_http_send_header
ngx_http_output_filter會調用ngx_http_top_body_filter
ngx_http_send_header會調用ngx_top_header_filter
Filter的編寫
Header filters
分為三個部分:
是否操作這個handler的response
操作response
調用下一個filter
<code>static</code>
<code>ngx_int_t ngx_http_not_modified_header_filter(ngx_http_request_t *r)</code>
<code>time_t if_modified_since;</code>
<code>if_modified_since = ngx_http_parse_time(r->headers_in.if_modified_since->value.data,</code>
<code>r->headers_in.if_modified_since->value.len);</code>
<code>/* step 1: decide whether to operate */</code>
<code>if</code> <code>(if_modified_since != NGX_ERROR &&</code>
<code>if_modified_since == r->headers_out.last_modified_time) {</code>
<code>/* step 2: operate on the header */</code>
<code>r->headers_out.status = NGX_HTTP_NOT_MODIFIED;</code><code>//傳回304</code>
<code>r->headers_out.content_type.len = 0;</code><code>//長度設定為0</code>
<code>ngx_http_clear_content_length(r);</code><code>//清空</code>
<code>ngx_http_clear_accept_ranges(r);</code><code>//清空</code>
<code>/* step 3: call the next filter */</code>
<code>return</code> <code>ngx_http_next_header_filter(r);</code>
Body filters
假設有個需求:在每個request後面插入"<l!-- Served by Nginx -->"
1 要找出最後chain的最後一個buf
<code>ngx_chain_t *chain_link;</code>
<code>int</code> <code>chain_contains_last_buffer = 0;</code>
<code>for</code> <code>( chain_link =</code><code>in</code><code>; chain_link != NULL; chain_link = chain_link->next ) {</code>
<code>if</code> <code>(chain_link->buf->last_buf)</code>
<code>chain_contains_last_buffer = 1;</code>
2 建立一個新的buf
<code>ngx_buf_t *b;</code>
<code>b = ngx_calloc_buf(r->pool);</code>
<code>if</code> <code>(b == NULL) {</code>
<code>return</code> <code>NGX_ERROR;</code>
3 放資料在新buf上
<code>b->pos = (u_char *)</code><code>"<!-- Served by Nginx -->"</code><code>;</code>
<code>b->last = b->pos +</code><code>sizeof</code><code>(</code><code>"<!-- Served by Nginx -->"</code><code>) - 1;</code>
4 把新buf放入一個新chain_t
<code>ngx_chain_t *added_link;</code>
<code>added_link = ngx_alloc_chain_link(r->pool);</code>
<code>if</code> <code>(added_link == NULL)</code>
<code>added_link->buf = b;</code>
<code>added_link->next = NULL;</code>
5 把新的chain連結到原來的chain_link中
chain_link->next = added_link;
6 重新設定last_buf
chain_link->buf->last_buf = 0;
added_link->buf->last_buf = 1;
7 傳給下一個filter
return ngx_http_next_body_filter(r, in);
必須寫兩個檔案config和ngx_http_<your module>_module.c
其中config會被./configure包含
ngx_addon_name=ngx_http_<your module>_module
HTTP_MODULES="$HTTP_MODULES ngx_http_<your module>_module"
NGX_ADDON_SRCS="NGXADDONSRCSNGXADDONSRCSngx_addon_dir/ngx_http_<your module>_module.c"
幾乎都是填空
ngx_http_<your module>_module.c檔案就是你的所有子產品代碼
編譯nginx:
./configure --add-module=path/to/your/new/module/directory #這裡是config放置的地方
本文轉自軒脈刃部落格園部落格,原文連結:http://www.cnblogs.com/yjf512/archive/2012/04/01/2428385.html,如需轉載請自行聯系原作者