iOS開發UI篇—Modal簡單介紹
一、簡單介紹
除了push之外,還有另外一種控制器的切換方式,那就是Modal
任何控制器都能通過Modal的形式展⽰出來
Modal的預設效果:新控制器從螢幕的最底部往上鑽,直到蓋住之前的控制器為⽌
二、代碼說明
建立一個項目,在Application的代理中添加window和控制器。
YYAppDelegate.m檔案
1 //
 2 //  YYAppDelegate.m
 3 //  01-modal
 4 //
 5 //  Created by apple on 14-6-9.
 6 //  Copyright (c) 2014年 itcase. All rights reserved.
 7 //
 8
 9 #import "YYAppDelegate.h"
10 #import "YYViewController.h"
11
12 @implementation YYAppDelegate
13
14 - (BOOL)application:(UIApplication *)application didFinishLaunchingWithOptions:(NSDictionary *)launchOptions
15 {
16     //1.建立window,并設定window的frame
17     self.window=[[UIWindow alloc]initWithFrame:[[UIScreen mainScreen] bounds]];
18     //2.設定window的背景顔色為黑色
19     self.window.backgroundColor=[UIColor blackColor];
20
21
22     //建立一個導航控制器作為子控制器
23     YYViewController *one=[[YYViewController alloc]init];
24     self.window.rootViewController=one;
25
26     //3.設定window為主視窗,并顯示
27     [self.window makeKeyAndVisible];
28     return YES;
29 }
30
31
32 @end
打開modal視窗
YYViewController.m檔案
1 //
 2 //  YYViewController.m
 3 //  01-modal
 4 //
 5 //  Created by apple on 14-6-9.
 6 //  Copyright (c) 2014年 itcase. All rights reserved.
 7 //
 8
 9 #import "YYViewController.h"
10 #import "YYtwoViewController.h"
11
12 @interface YYViewController ()
13 //當點選的時候,跳轉到第二個界面
14 - (IBAction)jump2two:(UIButton *)sender;
15
16 @end
17
18 @implementation YYViewController
19
20 - (void)viewDidLoad
21 {
22     [super viewDidLoad];
23     // Do any additional setup after loading the view from its nib.
24 }
25
26
27 - (IBAction)jump2two:(UIButton *)sender {
28     //建立一個新的modal并彈出
29     YYtwoViewController *two=[[YYtwoViewController alloc]init];
30     //在two上用導航控制器包裝,讓彈出的模态視窗有一個導航欄可以放傳回按鈕
31     UINavigationController *nvc=[[UINavigationController alloc]initWithRootViewController:two
32                                  ];
33     [self presentViewController:nvc animated:YES completion:^{
34         NSLog(@"彈出一個模态視窗");
35     }];
36
37 }
38 @end
移除modal視圖
YYtwoViewController.m檔案
1 //
 2 //  YYtwoViewController.m
 3 //  01-modal
 4 //
 5 //  Created by apple on 14-6-9.
 6 //  Copyright (c) 2014年 itcase. All rights reserved.
 7 //
 8
 9 #import "YYtwoViewController.h"
10
11 @interface YYtwoViewController ()
12
13 @end
14
15 @implementation YYtwoViewController
16
17 - (void)viewDidLoad
18 {
19     [super viewDidLoad];
20
21     //給導覽列添加一個傳回按鈕
22     self.navigationItem.leftBarButtonItem=[[UIBarButtonItem alloc]initWithTitle:@"傳回" style:UIBarButtonItemStylePlain target:self action:@selector(change)];
23 }
24
25 -(void)change
26 {
27     //編寫點選傳回按鈕的點選事件
28     //點選傳回按鈕,移除目前模态視窗
29 //    [self.navigationController dismissViewControllerAnimated:YES completion:^{
30 //        NSLog(@"移除模态視窗");
31 //    }];
32
33 // 如果一個控制器是以模态的形式展現出來的, 可以調用該控制器以及該控制器的子控制器讓讓控制器消失
34     [self dismissViewControllerAnimated:YES completion:^{
35         NSLog(@"移除");
36     }];
37 }
38
39 @end
三、注意點
(1)modal的特點:當modal視窗彈出(從下往上)的時候,後面的視圖不可點
(2)彈出控制器的視圖(通過這種方式隻能彈出一個視圖)
//建立一個新的modal并彈出
    YYtwoViewController *two=[[YYtwoViewController alloc]init];
    //在two上用導航控制器包裝,讓彈出的模态視窗有一個導航欄可以放傳回按鈕
    UINavigationController *nvc=[[UINavigationController alloc]initWithRootViewController:two
                                 ];
    [self presentViewController:nvc animated:YES completion:^{
        NSLog(@"彈出一個模态視窗");
    }];
(3)移除控制器的視圖(兩種方式都可以)
//編寫點選傳回按鈕的點選事件
    //點選傳回按鈕,移除目前模态視窗
//    [self.navigationController dismissViewControllerAnimated:YES completion:^{
//        NSLog(@"移除模态視窗");
//    }];

// 如果一個控制器是以模态的形式展現出來的, 可以調用該控制器以及該控制器的子控制器讓讓控制器消失
    [self dismissViewControllerAnimated:YES completion:^{
        NSLog(@"移除");
    }];
(4)提示在實際的開發中,如果控制器之間的關系緊密一般用導航控制器,如果控制器之間的關系不是很緊密就用modal
四、内部機制
(1)彈出之後,window上面隻有一個子視圖。
(2)雖然目前界面上展示在我們眼前的時twoview,但是window的根控制器仍然是NJviewController,它并沒有切換window的根控制器,而僅僅隻是換了window上面顯示的視圖。
(3)移除的視圖并沒有銷毀,因為控制器并沒有銷毀,是以控制器對應的view也沒有銷毀。
(4)在模态彈出(完全顯示後),在方法中傳入two作為參數,預設就有一個控制器強引用着它。
(5)當向下移除之後,隻要調用了控制器的dismiss方法讓視窗關閉,modal就釋放了。
(6)通常彈出的模态視窗都會提供一個導覽列,讓界面擁有導覽列的最快的方式是給它包裝一個導航控制器。
(7)如果一個控制器是以模态的形式展現出來的。可以調用該控制器以及該控制器的子控制器,讓該控制器消失。
五、資料的傳遞
項目檔案結構和storyboard
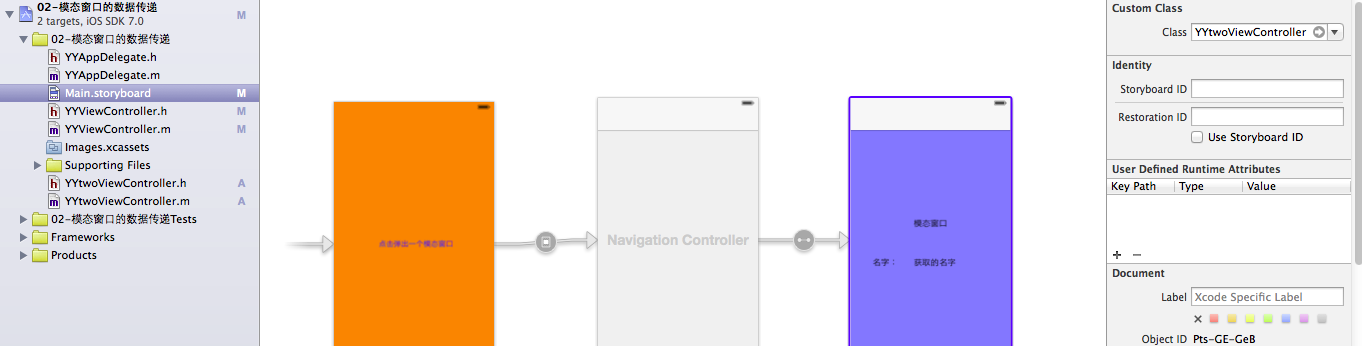
代碼示例:
1 //
 2 //  YYViewController.m
 3 //  02-模态視窗的資料傳遞
 4 //
 5 //  Created by apple on 14-6-9.
 6 //  Copyright (c) 2014年 itcase. All rights reserved.
 7 //
 8
 9 #import "YYViewController.h"
10 #import "YYtwoViewController.h"
11
12 @interface YYViewController ()
13
14 @end
15
16 @implementation YYViewController
17
18 - (void)viewDidLoad
19 {
20     [super viewDidLoad];
21 }
22
23 - (void)didReceiveMemoryWarning
24 {
25     [super didReceiveMemoryWarning];
26 }
27
28
29 /*
30  如果控制器之間的關系比較緊密一般用 UINavigationController
31  如果控制器之間的關系不是很緊密可以用Modal
32  */
33
34 //通過segue跳轉前,會調用這個方法,在這個方法中把資料傳遞給彈出來的模态視窗
35 -(void)prepareForSegue:(UIStoryboardSegue *)segue sender:(id)sender
36 {
37     //拿到目标控制器
38     UINavigationController *nav=segue.destinationViewController;
39     YYtwoViewController *two=(YYtwoViewController *)nav.topViewController;
40     //傳遞資料
41     two.name=@"文頂頂";
42 }
43 @end
YYtwoViewController.h檔案
1 //
 2 //  YYtwoViewController.h
 3 //  02-模态視窗的資料傳遞
 4 //
 5 //  Created by apple on 14-6-9.
 6 //  Copyright (c) 2014年 itcase. All rights reserved.
 7 //
 8
 9 #import <UIKit/UIKit.h>
10
11 @interface YYtwoViewController : UIViewController
12 @property(nonatomic,copy)NSString *name;
13 @end
1 //
2 // YYtwoViewController.m
3 // 02-模态視窗的資料傳遞
4 //
5 // Created by apple on 14-6-9.
6 // Copyright (c) 2014年 itcase. All rights reserved.
7 //
8
9 #import "YYtwoViewController.h"
10
11 @interface YYtwoViewController ()
12 @property (weak, nonatomic) IBOutlet UILabel *nametext;
13
14 @end
15
16 @implementation YYtwoViewController
17
18
19 - (void)viewDidLoad
20 {
21 [super viewDidLoad];
22 self.nametext.text=self.name;
23
24 //為導航欄添加一個傳回按鈕
25 self.navigationItem.leftBarButtonItem=[[UIBarButtonItem alloc]initWithTitle:@"傳回" style:UIBarButtonItemStylePlain target:self action:@selector(black)];
26 }
27
28 -(void)black
29 {
30 //移除模态視窗
31 [self dismissViewControllerAnimated:YES completion:^{
32 NSLog(@"成功移除!");
33 }];
34 }
35 @end ![iOS中UITableview實作跨區域拖動效果的實作[圖]](data:image/gif;base64,R0lGODlhAQABAIAAAP///wAAACwAAAAAAQABAAACAkQBADs=)