驗證碼功能一直以來是各種網站和APP使用的一種重要功能。實作的政策和方法也各種各樣,大部分是調用java.awt下的包進行畫圖,現在分享本人長期使用的一個驗證碼功能實作,希望對初學者的學習會有幫助。
1、code.jsp(實作驗證碼生成)
<%@ page
	import="java.awt.*,java.awt.image.*,java.util.*,javax.imageio.*"%>
<%@ page import="java.io.OutputStream"%>
<%@ page pageEncoding="UTF-8"%>
<%!Color getRandColor(int fc, int bc) {
		Random random = new Random();
		if (fc > 255)
			fc = 255;
		if (bc > 255)
			bc = 255;
		int r = fc + random.nextInt(bc - fc);
		int g = fc + random.nextInt(bc - fc);
		int b = fc + random.nextInt(bc - fc);
		return new Color(r, g, b);
	}%>
<%
		try {
		response.setHeader("Pragma", "No-cache");
		response.setHeader("Cache-Control", "no-cache");
		response.setDateHeader("Expires", 0);
		int width = 85, height = 20;
//畫圖,獲得畫圖區域的寬度和高度(具體的理論不再詳細闡述,網上搜驗證碼實作一大堆= =)
		BufferedImage image = new BufferedImage(width, height,
		BufferedImage.TYPE_INT_RGB);
		OutputStream os = response.getOutputStream();
		Graphics g = image.getGraphics();
		Random random = new Random();

		g.setColor(getRandColor(200, 250));
		g.fillRect(0, 0, width, height);

		g.setFont(new Font("Times New Roman", Font.PLAIN, 20));
		g.setColor(getRandColor(120, 200));
		for (int i = 0; i < 155; i++) {
			int x = random.nextInt(width);
			int y = random.nextInt(height);
			int xl = random.nextInt(5);
			int yl = random.nextInt(5);
			g.drawLine(x, y, x + xl, y + yl);
		}
		String sRand = "";
		for (int i = 0; i < 5; i++) {
			String chose = "0123456789ABCDEFGHIJKLMNOPQRSTUVWXYZ";
			String rand = String.valueOf(chose.charAt(random
			.nextInt(chose.length())));
			sRand += rand;
			g.setColor(new Color(20 + random.nextInt(110), 20 + random
			.nextInt(110), 20 + random.nextInt(110)));
			g.drawString(rand, 15 * i + 6, 16);
		}
		session.setAttribute("code", sRand);
		g.dispose();

		ImageIO.write(image, "JPEG", os);
		os.flush();
		os.close();
		os = null;
		response.flushBuffer();
		out.clear();
		out = pageContext.pushBody();
	} catch (IllegalStateException e) {
		System.out.println(e.getMessage());
		e.printStackTrace();
	}
%>
2、login.jsp(部分實作代碼)
js部分
<script type="text/javascript">
	function reload() {
		document.getElementById("code").setAttribute("src",
				"code.jsp?a=" + new Date().getTime());
	}
	function correctPNG() {
		var arVersion = navigator.appVersion.split("MSIE")
		var version = parseFloat(arVersion[1])
		if ((version >= 5.5) && (document.body.filters)) {
			for ( var j = 0; j < document.images.length; j++) {
				var img = document.images[j]
				var imgName = img.src.toUpperCase()
				if (imgName.substring(imgName.length - 3, imgName.length) == "PNG") {
					var imgID = (img.id) ? "id='" + img.id + "' " : ""
					var imgClass = (img.className) ? "class='" + img.className
							+ "' " : ""
					var imgTitle = (img.title) ? "title='" + img.title + "' "
							: "title='" + img.alt + "' "
					var imgStyle = "display:inline-block;" + img.style.cssText
					if (img.align == "left")
						imgStyle = "float:left;" + imgStyle
					if (img.align == "right")
						imgStyle = "float:right;" + imgStyle
					if (img.parentElement.href)
						imgStyle = "cursor:hand;" + imgStyle
					var strNewHTML = "<span "
							+ imgID
							+ imgClass
							+ imgTitle
							+ " style=\""
							+ "width:"
							+ img.width
							+ "px; height:"
							+ img.height
							+ "px;"
							+ imgStyle
							+ ";"
							+ "filter:progid:DXImageTransform.Microsoft.AlphaImageLoader"
							+ "(src=\'" + img.src
							+ "\', sizingMethod='scale');\">__tag_40$67_"
					img.outerHTML = strNewHTML
					j = j - 1
				}
			}
		}
	}
	window.attachEvent("onload", correctPNG);
表單部分
<tr>
<td>
驗證碼:
</td>
<td>
<INPUT
style="BORDER-RIGHT: #000000 1px solid; BORDER-TOP: #000000 1px solid; BORDER-LEFT: #000000 1px solid; BORDER-BOTTOM: #000000 1px solid"
type=text maxLength=10 size=10 name="validateCode" />
<img id="code" style="CURSOR: pointer" οnclick=
reload();;;
src="code.jsp" alt="點選重新整理驗證碼">
</td>
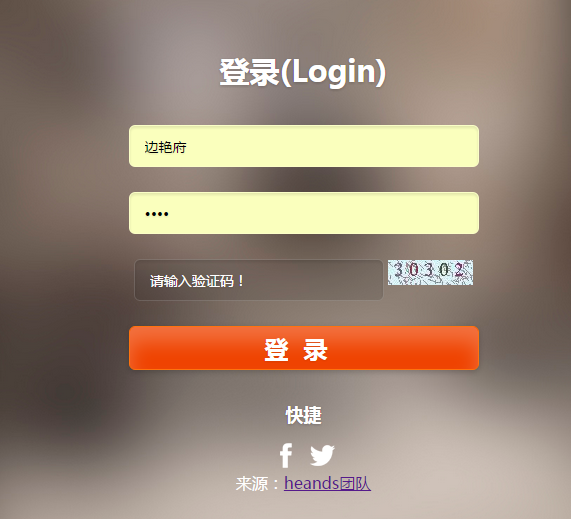
</tr> 實作後效果
![css超連結之新聞清單[圖]](data:image/gif;base64,R0lGODlhAQABAIAAAP///wAAACwAAAAAAQABAAACAkQBADs=)