随着伺服器的處理能力越來越強,業務需求量的不斷累積,越來越多的公司開始從單一伺服器,單一業務承載變成了多伺服器,多業務承載的快速擴充的過程中。傳統的方法很難滿足和應付這種業務量的增長和部署方式的改變。是以RESTful service作為一種分布式服務的最佳實踐,應運而生。
說到RESTful Service,我們這裡首先來明白一下他的基本概念:它是用于建立分布式超文本媒體的一種架構方式,我們可以通過标準的HTTP(GET,POST,PUT,DELETE)操作來建構基于面向資源的軟體架構方式(Resource-Oriented Architecture (ROA))。它是獨立于任何技術或者平台的,是以人們經常将符合這種操作規範的服務稱為“RESTful services”。說白了,就是通過标準的HTTP操作,通過規定的通路路徑,來擷取資源的一種方式。RESTful Service在不同的程式設計平台中,有不同的程式設計接口提供支援。比如說在.NET中,可以通過WCF或者是WebAPI來建立标準的REST fulservice。而在JAVA中,可以通過JAX-RS和Jersey來建立這種RESTful Service。那麼說道這裡,JAX-RS和Jersey都是什麼東東呢?
JAX-RS:專門為RESTful Service提供的Java API接口,屬于Java EE6的一部分。我們可以用這些豐富的接口來實作自己想要的RESTful風格的分布式服務。
Jersey:屬于開源軟體,是對JAX-RS(JSR 311)的擴充,它提供了更加豐富的API接口,可以讓開發者建立RESTful服務更加的友善。
下面我們将開始我們的建立之旅。
步驟一:
在STS中,依次點選 File->New-> Dynamic Web Project 來建立一個MyRESTfulServiceDaemon的項目:
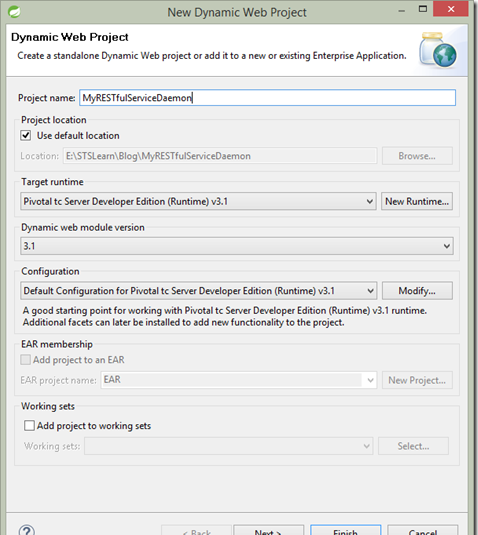
建立完畢以後,點選Finish按鈕。
步驟二:
然後當項目加載以後,去\WebContent\WEB-INF\路徑下面檢查是否有web.xml檔案,如果沒有的話,你需要在目前項目上右擊,然後選擇Java EE Tools –> Generate Deployment Descriptor Stub , 點選完畢後,你會發現web.xml檔案已經被生成了:

步驟三:
現在,在項目上右擊,依次點選Configure -> Convert to Maven Project将項目轉變成Maven Project。在彈出的Create new POM對話框中,我們填寫上相關的資訊,然後确定即可:
步驟四:
打開pom.xml檔案,添加如下的依賴項,他們分别是: asm.jar, jersey-bundle.jar, json.jar, jersey-server.jar, jersey-core.jar。
這些包你可以通過編輯pom.xml進行手動添加,也可以通過對話框自動添加,這裡我們采用自動添加方式。輕按兩下pom.xml,然後切換到Dependencies頁籤,分别将上述的包進行添加:
添加完畢以後界面是這樣的:
pom.xml檔案的内容是這樣的:
<project xmlns="http://maven.apache.org/POM/4.0.0" xmlns:xsi="http://www.w3.org/2001/XMLSchema-instance" xsi:schemaLocation="http://maven.apache.org/POM/4.0.0 http://maven.apache.org/xsd/maven-4.0.0.xsd">
  <modelVersion>4.0.0</modelVersion>
  <groupId>MyRESTfulServiceDaemon</groupId>
  <artifactId>MyRESTfulServiceDaemon</artifactId>
  <version>0.0.1-SNAPSHOT</version>
  <packaging>war</packaging>
  <build>
    <sourceDirectory>src</sourceDirectory>
    <plugins>
      <plugin>
        <artifactId>maven-compiler-plugin</artifactId>
        <version>3.3</version>
        <configuration>
          <source>1.8</source>
          <target>1.8</target>
        </configuration>
      </plugin>
      <plugin>
        <artifactId>maven-war-plugin</artifactId>
        <version>2.6</version>
        <configuration>
          <warSourceDirectory>WebContent</warSourceDirectory>
          <failOnMissingWebXml>false</failOnMissingWebXml>
        </configuration>
      </plugin>
    </plugins>
  </build>
  <dependencies>
  	<dependency>
  		<groupId>org.json</groupId>
  		<artifactId>json</artifactId>
  		<version>20140107</version>
  	</dependency>
  	<dependency>
  		<groupId>com.sun.jersey</groupId>
  		<artifactId>jersey-server</artifactId>
  		<version>1.19</version>
  	</dependency>
  	<dependency>
  		<groupId>com.sun.jersey</groupId>
  		<artifactId>jersey-core</artifactId>
  		<version>1.19</version>
  	</dependency>
  	<dependency>
  		<groupId>asm</groupId>
  		<artifactId>asm</artifactId>
  		<version>3.3.1</version>
  	</dependency>
  	<dependency>
  		<groupId>com.sun.jersey</groupId>
  		<artifactId>jersey-bundle</artifactId>
  		<version>1.19</version>
  	</dependency>
  </dependencies>
</project>
步驟五:
配置好pom.xml,就意味着maven這塊暫時配置完畢,到時候運作 maven install指令,就可以将這些包自動下載下傳到本地來。
現在,我們打開web.xml,然後按照下面xml示例,将不存在的servlet節點和servlet-mapping節點拷貝過去:
<?xml version="1.0" encoding="UTF-8"?>
<web-app xmlns:xsi="http://www.w3.org/2001/XMLSchema-instance" xmlns="http://xmlns.jcp.org/xml/ns/javaee" xsi:schemaLocation="http://xmlns.jcp.org/xml/ns/javaee http://xmlns.jcp.org/xml/ns/javaee/web-app_3_1.xsd" version="3.1">
  <display-name>MyRESTfulServiceDaemon</display-name>
  <welcome-file-list>
    <welcome-file>index.html</welcome-file>
    <welcome-file>index.htm</welcome-file>
    <welcome-file>index.jsp</welcome-file>
    <welcome-file>default.html</welcome-file>
    <welcome-file>default.htm</welcome-file>
    <welcome-file>default.jsp</welcome-file>
  </welcome-file-list>

  <servlet>
		<servlet-name>Jersey Web Application</servlet-name>
		<servlet-class>com.sun.jersey.spi.container.servlet.ServletContainer</servlet-class>
		<load-on-startup>1</load-on-startup>
	</servlet>
	<servlet-mapping>
		<servlet-name>Jersey Web Application</servlet-name>
		<url-pattern>/api/*</url-pattern>
	</servlet-mapping>

</web-app>
步驟六:
配置完畢後,我們現在來編碼,在Java Resources/src/目錄下建立一個MyService.java的類,然後輸入如下代碼:
import javax.ws.rs.GET;
import javax.ws.rs.Path;
import javax.ws.rs.PathParam;
import javax.ws.rs.Produces;

@Path("/myservice")
public class MyService {
	@GET
	@Produces("application/xml")
	public String convertCtoF() {

		Double fahrenheit;
		Double celsius = 36.8;
		fahrenheit = ((celsius * 9) / 5) + 32;

		String result = "@Produces(\"application/xml\") Output: \n\nC to F Converter Output: \n\n" + fahrenheit;
		return "<ctofservice>" + "<celsius>" + celsius + "</celsius>" + "<ctofoutput>" + result + "</ctofoutput>" + "</ctofservice>";
	}

	@Path("{c}")
	@GET
	@Produces("application/xml")
	public String convertCtoFfromInput(@PathParam("c") Double c) {
		Double fahrenheit;
		Double celsius = c;
		fahrenheit = ((celsius * 9) / 5) + 32;

		String result = "@Produces(\"application/xml\") Output: \n\nC to F Converter Output: \n\n" + fahrenheit;
		return "<ctofservice>" + "<celsius>" + celsius + "</celsius>" + "<ctofoutput>" + result + "</ctofoutput>" + "</ctofservice>";
	}
}
輸入完畢後,再建立一個 MyServicex.java的類,輸入如下代碼:
import javax.ws.rs.GET;
import javax.ws.rs.Path;
import javax.ws.rs.PathParam;
import javax.ws.rs.Produces;
import javax.ws.rs.core.Response;
import org.json.JSONException;
import org.json.JSONObject;

@Path("/myservicex")
public class MyServicex {

	  @GET
	  @Produces("application/json")
	  public Response convertFtoC() throws JSONException {

		JSONObject jsonObject = new JSONObject();
		Double fahrenheit = 98.24;
		Double celsius;
		celsius = (fahrenheit - 32)*5/9;
		jsonObject.put("F Value", fahrenheit);
		jsonObject.put("C Value", celsius);

		String result = "@Produces(\"application/json\") Output: \n\nF to C Converter Output: \n\n" + jsonObject;
		return Response.status(200).entity(result).build();
	  }

	  @Path("{f}")
	  @GET
	  @Produces("application/json")
	  public Response convertFtoCfromInput(@PathParam("f") float f) throws JSONException {

		JSONObject jsonObject = new JSONObject();
		float celsius;
		celsius =  (f - 32)*5/9;
		jsonObject.put("F Value", f);
		jsonObject.put("C Value", celsius);

		String result = "@Produces(\"application/json\") Output: \n\nF to C Converter Output: \n\n" + jsonObject;
		return Response.status(200).entity(result).build();
	  }
}
代碼編寫完畢後,我們會看到很多錯誤,是因為jar包都還沒下載下傳下來。依次運作如下兩個指令:
右擊項目->Maven->Update Project.

右擊項目->Run As->Maven Build
指令運作完畢後,我們就可以看到代碼沒有錯誤提示了。同時在日志資訊裡面,你可以看到我們的項目build成功了。
步驟七:
現在來開始運作我們的項目,在項目上右擊,然後選擇Run As->Run On Server,在彈出的對話框中,點選Finish按鈕即可打開網址http://localhost:8080/MyRESTfulServiceDaemon/,但是頁面會顯示404錯誤,是因為我們如果想調用頁面,需要按照如下的方式輸入:
通路myservice頁面:
http://localhost:8080/MyRESTfulServiceDaemon/api/myservice,我們看到的結果如下:
然後我們為其輸入參數http://localhost:8080/MyRESTfulServiceDaemon/api/myservice/35,可以看到内容的更改:
最後我們測試myservicex:http://localhost:8080/MyRESTfulServiceDaemon/api/myservicex/35,可以看到提示下載下傳json檔案的指令,說明我們的json資料請求也是成功的:
完結:
到這裡,我們的示例就完結了,是不是很簡單呢? 不得不說maven确實挺好用的。需要更多的參考知識,大家可以移步到下面的連結去尋找。
How to build RESTful Service with Java using JAX-RS and Jersey (Example)