RecyclerView 概要
RecyclerView是Android 5.0開始提供一個可回收容器,它比 ListView更先進靈活更具擴充性,可高效重用和滾動,能友善定制各種布局和互動效果。它繼承自 ViewGroup,那麼它展示和互動也離不開 measure , layout , draw , touch ,adapter 五步。後面将以這五步來抽絲剝繭分析其工作原理,其中 LayoutManager 以最簡單的 LinearLayoutManager為例。更多經典自定義 ViewGroup集合
RecyclerView 的輔助類非常多,相聯緊密的類都作為其内部類存在,如下圖:
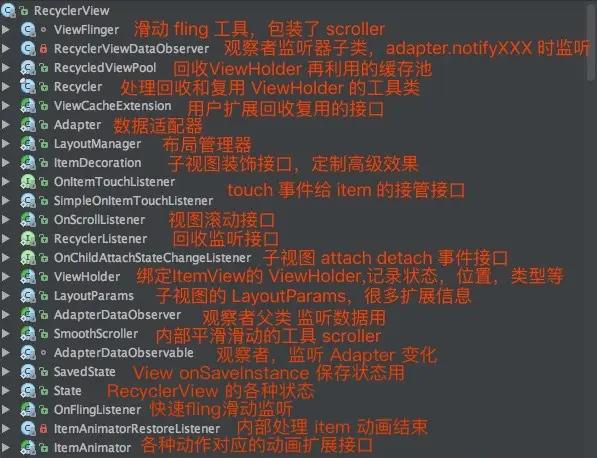
在這個類之外還有比較重要的三個類:AdapterHelper,ChildHelper,ViewInfoStore 。AdapterHelper負責處理 Adapter 裡的資料集發生變化時的預處理;ChildHelper負責管理和通路 RecyclerView 的子視圖;ViewInfoStore 記錄 pre-layout 和 post-layout 階段的 ViewHolder 狀态資訊,友善分析差異做相應的動畫。
RecyclerView 的使用
首先需要引入 recyclerview-v7 的包,在 build.gradle的 dependencies 塊中添加
compile 'com.android.support:recyclerview-v7:[email protected]'
或
compile(name: 'recyclerview-v7-25.2.0', ext: 'aar') //直接引用 aar 檔案,需要flatDir中添加 aar 目錄dirs。
使用時自已的 YourAdapter 需要繼承自 RecyclerView.Adapter,YourViewHolder 要繼承RecyclerView.ViewHolder.
除此對 RecyclerView 還需要設定 LayoutManager,SDK提供了常用的三種布局管理器LinearLayoutManager,GridLayoutManager,StaggeredGridLayoutManager。要設定divider或其它修飾可通過RecyclerView的addItemDecoration來定制。而事件可以在 Adapter 的onBindViewHolder裡去綁定。總的來說 RecyclerView 的定制性是相當高的,用法就不多講,下面重點講解其工作原理。
RecyclerView(25.2.0) 原理分析(五個次元深入)。
1.measure 過程,因為RecyclerView 的預設三大布局管理器的 mAutoMeasure 預設都是true,是以measure過程實際被LayoutManager接管。關鍵源碼如下:
protected void onMeasure(int widthSpec, int heightSpec) {
    ......
    if (mLayout.mAutoMeasure) {
        final int widthMode = MeasureSpec.getMode(widthSpec);
        final int heightMode = MeasureSpec.getMode(heightSpec);
        final boolean skipMeasure = widthMode == MeasureSpec.EXACTLY
                && heightMode == MeasureSpec.EXACTLY;
        mLayout.onMeasure(mRecycler, mState, widthSpec, heightSpec);
        if (skipMeasure || mAdapter == null) {
            return;
        }
        if (mState.mLayoutStep == State.STEP_START) {
            dispatchLayoutStep1();
        }
        ......
        dispatchLayoutStep2();
        mLayout.setMeasuredDimensionFromChildren(widthSpec, heightSpec);
        ......
    }else{
        ......
    }
首先調用了LayoutManager的onMeasure,内部隻是調用了RecyclerView的defaultOnMeasure,這一步實質是在忽略子視圖情況下測繪容器大小。當RecyclerView本身的寬和高都是精确值即沒有
wrap_content
時skipMeasure為true 此時子視圖的測繪将會延遲到 onLayout 過程,後續會講到。skipMeasure 為 true 或 adapter 為空時都是沒有必要測繪子視圖來決定自身大小的。不确定自身大小(
存在wrap_content
)才會走後續的 dispatchLayoutStep1()和 dispatchLayoutStep2()方法。而測繪和布局子視圖就是在
dispatchLayoutStep2
這一步完成的。當調用
mLayout.setMeasuredDimensionFromChildren
,内部會調用 RecyclerView.setMeasuredDimension方法進而定格了 RecyclerView 自身容器的大小。
注:dispatchLayoutStep2在onLayout 中也有調用稍後會講到其具體實作。
2.layout 過程調用了dispatchLayout,它會根據 mState.mLayoutStep
mState.mLayoutStep
void dispatchLayout() {
    ......
    mState.mIsMeasuring = false;
    if (mState.mLayoutStep == State.STEP_START) {
        dispatchLayoutStep1();
        mLayout.setExactMeasureSpecsFrom(this);
        dispatchLayoutStep2();
    } else if (mAdapterHelper.hasUpdates() || mLayout.getWidth() != getWidth() ||
            mLayout.getHeight() != getHeight()) {
        // First 2 steps are done in onMeasure but looks like we have to run again due to
        // changed size.
        mLayout.setExactMeasureSpecsFrom(this);
        dispatchLayoutStep2();
    } else {
        // always make sure we sync them (to ensure mode is exact)
        mLayout.setExactMeasureSpecsFrom(this);
    }
    dispatchLayoutStep3();
可以發現 layout 過程也像 onMeasure 裡有類似調用 即dispatchLayoutStep1和dispatchLayoutStep2. 這是因為RecyclerView對子視圖的 measure 和 layout 都是通過dispatchLayoutStep2這個方法一起完成的。當然我們不必擔心它會重複調用了,因為還有一個
mState.mLayoutStep
來控制測繪步驟呢。當值為
STEP_START
時會調用dispatchLayoutStep1之後指派
mLayoutStep = State.STEP_LAYOUT
,當值為
STEP_LAYOUT
時才會調用dispatchLayoutStep2然後再指派
mLayoutStep = State.STEP_ANIMATIONS
,而當值為
STEP_ANIMATIONS
時才會調用dispatchLayoutStep3然後重新指派為
STEP_START
。確定 onMeasure 到 onLayout 中各步驟隻會有一次。
3.重點分析dispatchLayoutStep三個方法和 Recycler 類。
每一次資料集變化或是調用了 requestLayout 都會走dispatchLayoutStep這幾個方法。這個方法也是 RecyclerView 對子視圖填充布局和做動畫的核心所在。上面在 onMeasure 和 onLayout 時也多次出現,以下就講綜合講述它們各階段的作用 。
(
回顧 measure
和
回顧 layout
)
其中最重要的是實作了子視圖測量和填充的方法是dispatchLayoutStep2,它是,下面我們先講
dispatchLayoutStep1和dispatchLayoutStep3,這兩個方法都是與執行不同操作的動畫緊密相關且相對簡單些(動作如 Adapter 的 add、remove、insert 等)。
(1).dispatchLayoutStep1 布局預處理,step3 做動畫的基礎。
private void dispatchLayoutStep1() {
      ......
      mViewInfoStore.clear();
      if (mState.mRunSimpleAnimations) {
          // Step 0: Find out where all non-removed items are, pre-layout
          int count = mChildHelper.getChildCount();
          for (int i = ; i < count; ++i) {
              final ViewHolder holder = getChildViewHolderInt(mChildHelper.getChildAt(i));
              if (holder.shouldIgnore() || (holder.isInvalid() && !mAdapter.hasStableIds())) {
                  continue;
              }
              ......
              mViewInfoStore.addToPreLayout(holder, animationInfo);
              if (mState.mTrackOldChangeHolders && holder.isUpdated() && !holder.isRemoved()
                      && !holder.shouldIgnore() && !holder.isInvalid()) {
                  long key = getChangedHolderKey(holder);
                  ......
                  mViewInfoStore.addToOldChangeHolders(key, holder);
              }
          }
      }
      if (mState.mRunPredictiveAnimations) {
        ......
      }
      ......
      mState.mLayoutStep = State.STEP_LAYOUT;
}
這部分主要是對已經存在容器裡的 View 的 ViewHolder預處理資訊分類暫時存放到
mViewInfoStore
中,為後面做動畫有個差異分析提供基礎。
(2). dispatchLayoutStep3 布局 post 處理,執行相應動作的動畫。
private void dispatchLayoutStep3() {
    ......
    mState.mLayoutStep = State.STEP_START;
    if (mState.mRunSimpleAnimations) {
            for (int i = mChildHelper.getChildCount() - ; i >= ; i--) {
                ViewHolder holder = getChildViewHolderInt(mChildHelper.getChildAt(i));
                ......
                long key = getChangedHolderKey(holder);
                final ItemHolderInfo animationInfo = mItemAnimator
                        .recordPostLayoutInformation(mState, holder);
                ViewHolder oldChangeViewHolder = mViewInfoStore.getFromOldChangeHolders(key);
                if (oldChangeViewHolder != null && !oldChangeViewHolder.shouldIgnore()) {
                    final boolean oldDisappearing = mViewInfoStore.isDisappearing(
                            oldChangeViewHolder);
                    final boolean newDisappearing = mViewInfoStore.isDisappearing(holder);
                    if (oldDisappearing && oldChangeViewHolder == holder) {
                        mViewInfoStore.addToPostLayout(holder, animationInfo);
                    } else {
                        final ItemHolderInfo preInfo = mViewInfoStore.popFromPreLayout(
                                oldChangeViewHolder);
                        mViewInfoStore.addToPostLayout(holder, animationInfo);
                        ItemHolderInfo postInfo = mViewInfoStore.popFromPostLayout(holder);
                        animateChange(oldChangeViewHolder, holder, preInfo, postInfo,
                                                        oldDisappearing, newDisappearing);
                    }
                } else {
                    mViewInfoStore.addToPostLayout(holder, animationInfo);
                }
            }
            mViewInfoStore.process(mViewInfoProcessCallback);
    }
    .....
}
經過dispatchLayoutStep2重新填充後視圖會更新或多或少,通過對比 dispatchLayoutStep1 階段暫存在mViewInfoStore中的 pre-layout 資訊,做一些處理後将目前ViewHolder和動畫資訊添加到mViewInfoStore的 post-layout 中。這兩個階段 addToPreLayout 和 addToPostLayout 都會添加相應的标記,最後調用
mViewInfoStore.process(mViewInfoProcessCallback)
在内部進行處理後并回調才執行相應操作的動畫。見下面動畫預處理後的回調處源碼:
private final ViewInfoStore.ProcessCallback mViewInfoProcessCallback =
            new ViewInfoStore.ProcessCallback() {
        @Override
        public void processDisappeared(ViewHolder viewHolder, @NonNull ItemHolderInfo info,
                @Nullable ItemHolderInfo postInfo) {
            mRecycler.unscrapView(viewHolder);
            animateDisappearance(viewHolder, info, postInfo);
        }
        @Override
        public void processAppeared(ViewHolder viewHolder,
                ItemHolderInfo preInfo, ItemHolderInfo info) {
            animateAppearance(viewHolder, preInfo, info);
        }
        ......
}
(3). dispatchLayoutStep2 正真的測量和填充子視圖。
RecyclerView 的子視圖測量和布局,最終還是委托給了 LayoutManager 來處理見源碼:
private void dispatchLayoutStep2() {
    ......
    mLayout.onLayoutChildren(mRecycler, mState);
    ......
}

//LinearLayoutManager 的onLayoutChildren方法
public void onLayoutChildren(RecyclerView.Recycler recycler, RecyclerView.State state) {
    ......
    updateAnchorInfoForLayoutExpose(state, mAnchorInfo);
    ......
    detachAndScrapAttachedViews(recycler);
    if (mAnchorInfo.mLayoutFromEnd) {
        // fill towards start 和下面的邏輯分支是反過來的,僅看下面的邏輯為講解。
        ......
    } else {
        // fill towards end
        updateLayoutStateToFillEndExpose(mAnchorInfo);
        mLayoutState.mExtra = extraForEnd;
        fill(recycler, mLayoutState, state, false);
        endOffset = mLayoutState.mOffset;
        if (mLayoutState.mAvailable > ) {
            extraForStart += mLayoutState.mAvailable;
        }
        // fill towards start
        updateLayoutStateToFillStartExpose(mAnchorInfo);
        mLayoutState.mExtra = extraForStart;
        mLayoutState.mCurrentPosition += mLayoutState.mItemDirection;
        fill(recycler, mLayoutState, state, false);
        startOffset = mLayoutState.mOffset;
    }
    ......
}
-
- 第一步找錨點和位置确定相對坐标和 item 位置;
- 對容器上的 View 做detach 和回收處理見調用
detachAndScrapAttachedViews
- 填充 View 到可用空間,以錨點為界,在布局方向以相反的兩個方向擴張來填充可用空間,單向填充算法.
以描點為界向兩個方向填充的算法示意圖如下,其中紅色點為描點位置:

初始化時無描點的 itemView 此時按 (1)或(2)進行,當長視圖滑動時填充就會出現(3)示意的填充。LinearLayoutManager單一方向的填充算法源碼如下:
protected int fill(RecyclerView.Recycler recycler, LayoutState layoutState,
                       RecyclerView.State state, boolean stopOnFocusable) {
    ......
    if (layoutState.mScrollingOffset != LayoutState.SCOLLING_OFFSET_NaN) {
        ......
        recycleByLayoutStateExpose(recycler, layoutState);
    }
    int remainingSpace = layoutState.mAvailable + layoutState.mExtra;
    while (remainingSpace >  && layoutState.hasMore(state)) {
        layoutChunkResultCache.resetInternal();
        layoutChunk(recycler, state, layoutState, layoutChunkResultCache);
        if (layoutChunkResultCache.mFinished) {
            break;
        }
        layoutState.mOffset += layoutChunkResultCache.mConsumed * layoutState.mLayoutDirection;
        if (!layoutChunkResultCache.mIgnoreConsumed || mLayoutState.mScrapList != null
           || !state.isPreLayout()) {
            layoutState.mAvailable -= layoutChunkResultCache.mConsumed;
            // we keep a separate remaining space because mAvailable is important for recycling
            remainingSpace -= layoutChunkResultCache.mConsumed;
        }         ......
    }
    if (DEBUG) {
        validateChildOrderExpose();
    }
    return start - layoutState.mAvailable;
}
首先會通過
recycleByLayoutStateExpose
方法移除已經滑出螢幕以外的子視圖,然後通過一個循環的朝着一個布局方向每次調用
layoutChunk
添加 View,并适時調節剩餘空間和下次 layout 的 offset,直到剩下的空間不足循環結束。而子視圖逐個的測量和布局就是在layoutChunk這個方法裡進行的,看下面部分源碼:
protected void layoutChunk(RecyclerView.Recycler recycler, RecyclerView.State state,
                               LayoutState layoutState, LayoutChunkResult result) {
    View view = layoutState.next(recycler);
    ......
    RecyclerView.LayoutParams params = (RecyclerView.LayoutParams) view.getLayoutParams();
    if (layoutState.mScrapList == null) {
        // can not find in scrapList
        if (mShouldReverseLayoutExpose == (layoutState.mLayoutDirection
                == LayoutState.LAYOUT_START)) {
            addView(view);
        } else {
            addView(view, );
        }
    }
    ......
    measureChildWithMargins(view, , );
    result.mConsumed = mOrientationHelper.getDecoratedMeasurement(view);
    int left, top, right, bottom;
    if (getOrientation() == VERTICAL) {
        if (isLayoutRTL()) {
            right = getWidth() - getPaddingRight();
            left = right - mOrientationHelper.getDecoratedMeasurementInOther(view);
        } else {
            left = getPaddingLeft();
            right = left + mOrientationHelper.getDecoratedMeasurementInOther(view);
        }
        if (layoutState.mLayoutDirection == LayoutState.LAYOUT_START) {
            bottom = layoutState.mOffset;
            top = layoutState.mOffset - result.mConsumed;
        } else {
            top = layoutState.mOffset;
            bottom = layoutState.mOffset + result.mConsumed;
        }
    } else {
    ......
    }
    // We calculate everything with View's bounding box (which includes decor and margins)
    // To calculate correct layout position, we subtract margins.
    layoutDecorated(view, left + params.leftMargin, top + params.topMargin,
            right - params.rightMargin, bottom - params.bottomMargin);
    ......
    result.mFocusable = view.isFocusable();
}
此方法通過layoutState.next(recycler)複用機制擷取下一個需要布局的 View, 将它通過 ViewGroup 的 addView 方法添加到 RecyclerView 裡面來,然後通過
measureChildWithMargins(view, 0, 0)
測量它的大小,最後通過
layoutDecorated
方法實際上調用了 child.layout(left,top,right,bottom)來把子視圖布局到相應的位置。
(4).複用回收過程是Recycler負責的,涉及 ViewHolder 的建立和回收,它是 RecyclerView的内部類,具有三級的緩存結構外加一個擴充緩存接口:
public final class Recycler {
    final ArrayList<ViewHolder> mAttachedScrap = new ArrayList<>();
    ArrayList<ViewHolder> mChangedScrap = null;

    final ArrayList<ViewHolder> mCachedViews = new ArrayList<ViewHolder>();

    private final List<ViewHolder>
            mUnmodifiableAttachedScrap = Collections.unmodifiableList(mAttachedScrap);

    private int mRequestedCacheMax = DEFAULT_CACHE_SIZE;
    int mViewCacheMax = DEFAULT_CACHE_SIZE;

    RecycledViewPool mRecyclerPool;

    private ViewCacheExtension mViewCacheExtension;
    ......
}
先講View和ViewHolder 的建立。接上文,layoutChunk 添加View時調用了layoutState.next(recycler)來擷取下個 View,實際調用了 Recycler的getViewForPosition方法。
public View next(RecyclerView.Recycler recycler) {
    if (mScrapList != null) {
        return nextFromLimitedList();
    }
    final View view = recycler.getViewForPosition(mCurrentPosition);
    mCurrentPosition += mItemDirection;
    return view;
}
//以下 next 會調用下面方法。
View getViewForPosition(int position, boolean dryRun) {
    return tryGetViewHolderForPositionByDeadline(position, dryRun, FOREVER_NS).itemView;
}
最終是調用Recycler的tryGetViewHolderForPositionByDeadline 這個方法分以下幾步:
(1)檢查mChangedScrap,若比對到則傳回相應holder
(2)檢查mAttachedScrap,若比對到且holder有效則傳回相應holder
(3)檢查mViewCacheExtension,若比對到則傳回相應holder
(4)檢查mRecyclerPool,若比對到則傳回相應holder
(5)否則執行Adapter.createViewHolder(),建立holder執行個體
(6)傳回holder再通過 holder.itemView 得到了要添加的 View.
此方法比較長,看下面關鍵源碼:
ViewHolder tryGetViewHolderForPositionByDeadline(int position,
                boolean dryRun, long deadlineNs) {
    ......
    ViewHolder holder = null;
    // 0) If there is a changed scrap, try to find from there
    if (mState.isPreLayout()) {
        holder = getChangedScrapViewForPosition(position);
        fromScrapOrHiddenOrCache = holder != null;
    }
    // 1) Find by position from scrap/hidden list/cache
    if (holder == null) {
        holder = getScrapOrHiddenOrCachedHolderForPosition(position, dryRun);
        ......
    }
    if (holder == null) {
        ......
        final int type = mAdapter.getItemViewType(offsetPosition);
        // 2) Find from scrap/cache via stable ids, if exists
        if (mAdapter.hasStableIds()) {
            holder = getScrapOrCachedViewForId(mAdapter.getItemId(offsetPosition),
                    type, dryRun);
            ......
        }
        if (holder == null && mViewCacheExtension != null) {
            // We are NOT sending the offsetPosition because LayoutManager does not
            // know it.
            final View view = mViewCacheExtension
                    .getViewForPositionAndType(this, position, type);
            if (view != null) {
                holder = getChildViewHolder(view);
                ......
            }
        }
        if (holder == null) { // fallback to pool
            holder = getRecycledViewPool().getRecycledView(type);
            ......
        }
        if (holder == null) {
            ......
            holder = mAdapter.createViewHolder(RecyclerView.this, type);
            ......
        }
    }
    ......
    boolean bound = false;
    if (!holder.isBound() || holder.needsUpdate() || holder.isInvalid()) {
        if (DEBUG && holder.isRemoved()) {
            throw new IllegalStateException("Removed holder should be bound and it should"
                    + " come here only in pre-layout. Holder: " + holder);
        }
        final int offsetPosition = mAdapterHelper.findPositionOffset(position);
        bound = tryBindViewHolderByDeadline(holder, offsetPosition, position, deadlineNs);
    }
    ......
    return holder;
}
基本上就是通過各級緩存擷取 ViewHolder,擷取不到就調用mAdapter.createViewHolder 建立 。最終的 ViewHolder 如果需要綁定就會調用tryBindViewHolderByDeadline來綁定資料,其内部調用了mAdapter.bindViewHolder。
下面我們再看看 Recycler 的回收過程,
- 在重新設定 Adapter 或通知某個item 變法時,相應的 ViewHolder 會加上标志位如UPDATE,REMOVE 等,待onLayoutChildren時就會先調用detachAndScrapAttachedViews其最終也是調用了Recycler 的的recycleViewHolderInternal方法。
- 滑動過程中不斷回收不可見的 ViewHolder,見fill 方法中的recycleByLayoutStateExpose,最終是調用了LayoutManager 的 removeAndRecycleViewAt。
//先移除再回收,
    public void removeAndRecycleViewAt(int index, Recycler recycler) {
        final View view = getChildAt(index);
        removeViewAt(index);
        recycler.recycleView(view);
    }
而 removeViewAt 是通過幫助類ChildHelper來移除的,最終回收仍是調用了Recycler 的recycleViewHolderInternal
回收關鍵方法recycleViewHolderInternal很長,關鍵源碼如下:
void recycleViewHolderInternal(ViewHolder holder) {
    ......
    if (forceRecycle || holder.isRecyclable()) {
        if (mViewCacheMax >
                && !holder.hasAnyOfTheFlags(ViewHolder.FLAG_INVALID
                        | ViewHolder.FLAG_REMOVED
                        | ViewHolder.FLAG_UPDATE
                        | ViewHolder.FLAG_ADAPTER_POSITION_UNKNOWN)) {
            ......
            mCachedViews.add(targetCacheIndex, holder);
            cached = true;
        }
        if (!cached) {
            addViewHolderToRecycledViewPool(holder, true);
            recycled = true;
        }
    }
    ......
    mViewInfoStore.removeViewHolder(holder);
 }
對于移除的 View 如果是有效的無update 或remove 動作就添加到mCachedViews中,否則失效的 ViewHolder 會添加到RecycledViewPool中。
在 Recycler的各級緩存中,隻有RecycledViewPool是按照 viewType 去存儲和擷取緩存的 ViewHolder 來達到複用,其它緩存需要比對 layoutPosition 或 getItemId再加上 viewType 。緩存級别最高的是mChangedScrap它是預處理layout時添加的,對應方法 dispatchLayoutStep1;mAttachedScrap是其次,它是attach到容器未移除的緩存複用很适用頻繁抖動滑動;mCachedViews再次,它是 detach 的 ViewHolder 緩存,mViewCacheExtension是使用者擴充的緩存池一般使用者是沒有實作的,最後才是 RecyclerViewPool它隻需要按viewType 傳回。
4.draw 過程比較簡單,隻是簡單循環調用了ItemDecoration去繪制背景和前景視圖,
(1).以下是ItemDecoration接口的設定和内部使用的代碼。
public void addItemDecoration(ItemDecoration decor) {
    addItemDecoration(decor, -);
}

public void onDraw(Canvas c) {
    super.onDraw(c);
    final int count = mItemDecorations.size();
    for (int i = ; i < count; i++) {
        mItemDecorations.get(i).onDraw(c, this, mState);
    }
}
    @Override
public void draw(Canvas c) {
    super.draw(c);
    final int count = mItemDecorations.size();
    for (int i = ; i < count; i++) {
        mItemDecorations.get(i).onDrawOver(c, this, mState);
    }
    ......
 }
(2). ItemDecoration 的靈活性比較高,主要需要使用者實作 onDraw,onDrawOver 和 getItemOffset三個方法,且都不是必須的。
public static abstract class ItemDecoration {
    public void onDraw(Canvas c, RecyclerView parent, State state){ }
    public void onDrawOver(Canvas c, RecyclerView parent, State state){}
    public void getItemOffsets(Rect outRect, View view, RecyclerView parent, State state) {}
 }
在對 itemView 畫裝飾時候,為了實作 Item 之間的間隔或是避免畫的内容覆寫到 itemView 上,就需要通過getItemOffsets傳回,itemView 的需要預留出的四邊内間距,如下視圖。
整個 item 所占的空間也就是最外面虛線的邊界,在 measure 過程中這部分其實也是考慮進去了。
5.手勢滑動,RecyclerView 的手勢滑動和大多數滑動控件類似處理了onInterceptTouchEvent 和 onTouchEvent事件。
fling平滑滑動過程是借助ViewFlinger不斷postOnAnimation 内部調用ScrollerCompat工具進行計算,每次滑動 dx,dy,這就和ACTION_MOVE 時的滑動一緻了。
最終手勢滑動或 fling 滑動都會回調給 LayoutManager的scrollHorizontallyBy(dx…)或scrollVerticallyBy(dy…)内部又會調用 scrollBy 如下
int scrollBy(int dy, RecyclerView.Recycler recycler, RecyclerView.State state) {
    ......
    final int consumed = mLayoutState.mScrollingOffset
            + fill(recycler, mLayoutState, state, false);
    ......
    mLayoutState.mLastScrollDelta = scrolled;
    return scrolled;
}
可見滑動過程也會調用 LinearLayoutManager 的 fill 方法,上面講過,内部會回收移除螢幕的 View和 ViewHolder,并填充新的View 和 ViewHolder.
6.進階 Adapter和資料集的更新過程.
每次重新設定不同的 Adapter 或是更改 Adapter 裡的資料集合并調用 notifyItemXXX 時,最終都會觸發目前存在的 ViewHolder裡的标記位發生變化。加上FLAG_UPDATE, FLAG_REMOVE等不同操作的标記位。然後再 requestLayout 後會重新走 上面講到的 dispatchLayoutStep 的三個流程。界面的變化更新也主要是在第dispatchLayoutStep2 後完成。
(1).Adapter 發生變化時
Adapter 改變後比較簡單,直接重置所有無效。清除所有的緩存 ViewHolder 調用了
removeAndRecycleViews();
并且調用
markKnownViewsInvalid
标記了容器中的所有 View 無效(FLAG_UPDATE)。
(2).Adapter 資料合集操作并調用相應的notifyItemXXX 方法。
在設定 Adapter 給 RecyclerView 時就會綁定一個資料變化時的觀察者DataObserver。當更改資料集後使用者需要調用
notifyItemChanged,notifyItemRemoved,notifyItemInsert 等方法,然後DataObserver就會接收到相應的 onItemChaged,onItemRemoved,onItemInsert 等回調并由AdapterHelper對應的onItemXXX來接管。在AdapterHelper内每個操作都對應一個UpdateOp
static class UpdateOp {
        static final int ADD = ;
        static final int REMOVE =  << ;
        static final int UPDATE =  << ;
        static final int MOVE =  << ;
        static final int POOL_SIZE = ;

        int cmd;
        int positionStart;
        ......
    }
AdapterHelper的onItemXXX 方法是有有bool型的傳回值,為true表示需要處理觸發
triggerUpdateProcessor
調用,實際post 執行以下 Runnable:
final Runnable mUpdateChildViewsRunnable = new Runnable() {
        @Override
        public void run() {
            if (!mFirstLayoutComplete || isLayoutRequested()) {
                // a layout request will happen, we should not do layout here.
                return;
            }
            if (!mIsAttached) {
                requestLayout();
                // if we are not attached yet, mark us as requiring layout and skip
                return;
            }
            if (mLayoutFrozen) {
                mLayoutRequestEaten = true;
                return; //we'll process updates when ice age ends.
            }
            consumePendingUpdateOperations();
        }
    };
沒有首次layout 過,或是layout 後續即将觸發時直接return ,這裡就防止了頻繁操作會多次執行操作。
consumePendingUpdateOperations
方法,調用AdapterHelper的
preProcess
進行預處理内部預處理暫存的一系列 UpdateOp 對象後再通過callback 回調給RecyclerView,而RecyclerView 再傳給了 Recycler 處理,即對 ViewHolder 添加不同的标記。
最後調用了dispatchLayout 進行重新執行 dispatchLayoutStep 三步來更新視圖。在dispatchLayoutStep1 中也會調用
processAdapterUpdatesAndSetAnimationFlags
來處理mAdapterHelper 中的UpdateOp.
隻要 ViewHolder 有了标記後在下一個requestLayout 期間會調用到onMeasure,onLayout最終會觸發dispatchLayoutStep三步,在dispatchLayoutStep2 裡會更新視圖,而在dispatchLayoutStep 3 裡會播放相應操作的動畫 。
總結
至此 RecyclerView 工作的源碼分析基本完成,其相關輔助類比較多,源碼很長,不對或不詳盡之處請大家多提意見,後續再分享 VLayout,歡迎拍磚.更多經典自定義 ViewGroup集合