windows2008R2下CA(CS)服務遷移
說到CA(CS)服務相信很多人運維人員都比較熟悉的一個服務,CA(Certificate Authority),CS(Certificate Service)不僅在windows服務存在,同樣也在linux下存在,主要目的是提高安全性的,CA 也擁有一個證書(内含公鑰和私鑰)。網上的公衆使用者通過驗證 CA 的簽字進而信任 CA ,任何人都可以得到 CA 的證書(含公鑰),用以驗證它所簽發的證書。如果使用者想得到一份屬于自己的證書,他應先向 CA 提出申請。在 CA 判明申請者的身份後,便為他配置設定一個公鑰,并且 CA 将該公鑰與申請者的身份資訊綁在一起,并為之簽字後,便形成證書發給申請者。如果一個使用者想鑒别另一個證書的真僞,他就用 CA 的公鑰對那個證書上的簽字進行驗證,一旦驗證通過,該證書就被認為是有效的。證書實際是由證書簽證機關(CA)簽發的對使用者的公鑰的認證。證書的内容包括:電子簽證機關的資訊、公鑰使用者資訊、公鑰、權威機構的簽字和有效期等等。目前,證書的格式和驗證方法普遍遵循X.509 國際标準。證書的工作原理是:加密和解密;加密就是将文字轉換成不能直接閱讀的形式(即密文)的過程稱為加密。即把我們平時看到的“http”加密成“https”來傳輸,這樣保證了資訊在傳輸的過程中不被竊聽;而解密就是:我們将密文轉換成能夠直接閱讀的文字(即明文)的過程稱為解密。具體就不多說了,如果有不明白的可以在網上找找相關的文檔查閱,接下來說說我的環境;
公司環境不是太複雜,多個站點部署了多個DC來提高通路效率,在北京的站點中有三台DC,其中有一台DC上運作着ADCS服務,對于CA的部署架構微軟建議獨立運作,不建議和ADDS在在同一台伺服器上運作,近期由于公司做了AD的健康檢查, 檢測出運作CA服務的DC資料庫損壞,導緻整個環境非常危險,之前的想法是直接降級DC隻儲存CA服務運作,可在實施的時候發現在解除安裝ADDS服務的時候提示運作這個CA服務,必須在解除安裝CS服務後才能對DC降級,是以被迫無奈對整個CA服務進行遷移,然後對DC降級,最後對整個CA的遷移做了一個筆記,以緻給大家分享出來。需要注意的是,此次做遷移的時候我的CA舊服務名稱和CA新伺服器名稱不一樣,是以在遷移的時候我們需要注意一下。具體見下:
Active Directory Certificate Services Migration Guide
http://technet.microsoft.com/en-us/library/ee126170(v=ws.10).aspx
Here is a detailed steps that I summarized, please check:
https://technet.microsoft.com/zh-cn/library/9aa53be9-0497-49fa-9ff6-09b72cb69444(v=ws.10)#BKMK_AddCA
https://technet.microsoft.com/zh-cn/library/ee126170(v=ws.10).aspx
===Enterprise Root CA Migration Steps===
1. First we need to do a full CA database backup using the following command:
CERTUTIL -f -p <password> -backup <backup path like C:\CABackup>
Note: Please remember that <password> you specify in the command above, it will be used when install the CA later.
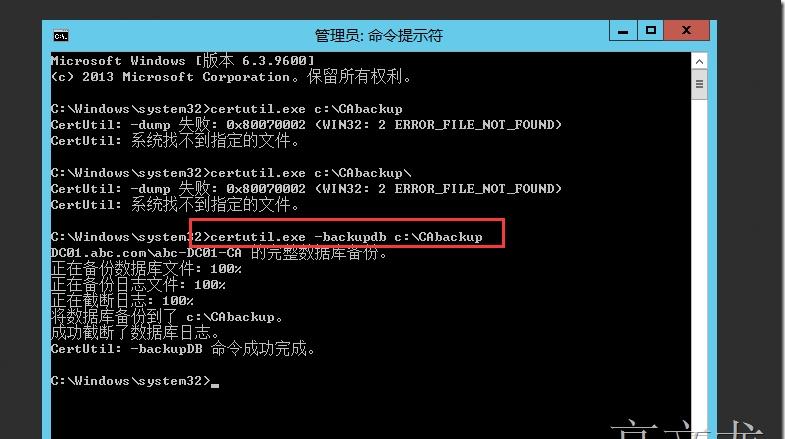
備份完成

或者使用手動的方式備份
使用“證書頒發機構”管理單元備份 CA 資料庫和私鑰
- 選擇備份位置并附加媒體(如有必要)。
- 登入到源 CA。
- 打開“證書頒發機構”管理單元。
- 右鍵單擊包含 CA 名稱的節點,指向“所有任務”,然後單擊“備份 CA”。
- 在 CA 備份向導的“歡迎”頁上,單擊“下一步”。
- 在“要備份的項目”頁上,選中“私鑰和 CA 證書”以及“證書資料庫和證書資料庫日志”複選框,指定備份位置,然後單擊“下一步”。
- 在“選擇密碼”頁上,鍵入用于保護 CA 私鑰的密碼,并單擊“下一步”。
備份完成
- 在“正在完成備份向導”頁上,單擊“完成”。
- 備份完成後,驗證所指定的位置中的以下檔案:
- 包含 CA 證書和私鑰的 CA 名稱.p12
- 包含檔案 certbkxp.dat、edb#####.log 和 CA 名稱.edb 的 Database 檔案夾
打開指令提示符視窗,并鍵入 net stop certsvc 以停止“Active Directory 證書服務”服務
2. Back The CA service registry key:
備份 CA 系統資料庫設定
REG export HKLM\SYSTEM\CurrentControlSet\Services\CertSvc\Configuration C:\CABackup\RegBak.reg
使用 Regedit.exe 備份 CA 系統資料庫設定
- 單擊“開始”,指向“運作”,并鍵入 regedit 以打開系統資料庫編輯器。
- 在 HKEY_LOCAL_MACHINE\SYSTEM\CurrentControlSet\Services\CertSvc 中,右鍵單擊“Configuration”,然後單擊“導出”。
- 指定位置和檔案名,然後單擊“儲存”。這将建立一個包含源 CA 中的 CA 配置資料的系統資料庫檔案。
- 将該系統資料庫檔案複制到可從目标伺服器中通路的位置;例如,共享檔案夾或可移動媒體。
備份完成
或者使用以下方式備份
使用 Reg.exe 備份 CA 系統資料庫設定
- 打開指令提示符視窗。
- 鍵入 reg export HKLM\SYSTEM\CurrentControlSet\Services\CertSvc\Configuration <輸出檔案.reg>,并按 Enter。
- 将該系統資料庫檔案複制到可從目标伺服器中通路的位置;例如,共享檔案夾或可移動媒體。
3. Publishing a CRL with an extended validity period:
a. In the CA console, right click on the Revoked Certificates->All Tasks->Publish->New CRL
b. Then you will have additional week CRL(default value is 1 week) for the current certificate to use during the migration.
c. <Manually publish the certificate revocation list>
http://technet.microsoft.com/en-us/library/cc778151(WS.10).aspx
我們看見rpc伺服器不可用,我們需要net start certsvc 啟動後就正常了
windows\system32\certsrv\CertEnroll
4. Backup CAPolicy.inf: (因為沒有定義,是以我們忽略該步驟)
If your source CA is using a custom CAPolicy.inf file, you should copy the file to the same location on the destination server as the source CA backup files. The CAPolicy.inf file is located in the %SystemRoot% directory, which is usually C:\Windows.
5. Backup CA templates list: (也可以忽略該步驟)
a. Open a Command Prompt window.
b. Run
certutil.exe -catemplates > catemplates.txt
then Verify that the catemplates.txt file contains the templates list.
6. Remove the CA service on the server, use the Remove Roles Wizard in Server Manager.
提示我們需要先解除安裝WEB服務iis才能解除安裝
繼續解除安裝AD證書服務
7. Copy the CA backup folder to the new CA server.
8. Import the CA certificates:
a. Start the Certificates MMC snap-in for the local computer account.
b. In the console tree, double-click Certificates (Local Computer), and click Personal.
c. On the Action menu, click All Tasks, and then click Import to open the Certificate Import Wizard. Click Next.
d. Locate the <CAName>.p12 file created by the CA certificate and private key backup on the source CA, and click Open.
e. Type the password in the first step, and click OK.
f. Click Place all certificates in the following store.
g. Verify Personal is displayed in Certificate store. If it is not, click Browse, click Personal, and click OK.
9. Adding the CA role service by using Server Manager on the new installed server:
a. Start Server Manager.
b. In the console tree, click Roles.
c. On the Action menu, click Add Roles.
d. If the Before you Begin page appears, click Next.
e. On the Select Server Roles page, select the Active Directory Certificate Services check box, and click Next.
f. On the Introduction to AD CS page, click Next.
g. On the Role Services page, click the Certification Authority check box, and click Next.
Note: If you plan to install other role services on the destination server, you should complete the CA installation first, and then install other role services separately. Installation procedures for other AD CS role services are not described in this guide.
8. On the Specify Setup Type page, specify either Enterprise or Standalone, to match the source CA, and click Next.
9. On the Specify CA Type page, specify either Root CA or Subordinate CA, to match the source CA, and click Next.
10.On the Set Up Private Key page, select Use existing private key and Select a certificate and use its associated private key.
11.In the Certificates list, click the imported CA certificate, and then click Next.
12.On the Configure Certificate Database page, specify the locations for the CA database and log files.
13.On the Confirm Installation Selections page, review the messages, and then click Install.
10.Restore the CA database from the backup:
a. Use CA administrator to log on to the destination server by using an account that is a CA administrator.
b. Start the Certification Authority snap-in.
c. Right-click the node with the CA name, point to All Tasks, and then click Restore CA. If prompted, click OK to stop the CA service.
d. On the Welcome page, click Next.
e. On the Items to Restore page, select Certificate database and certificate database log.
f. Click Browse, and locate the Database directory that contains the CA database files created during the CA database backup.
NOTE: Do not select the Database directory. Select its parent directory.
7. Type the password that you used to back up the CA database on the source CA.
8. Click Finish, and then click Yes to restart the CA service
https://technet.microsoft.com/zh-cn/library/ee126140(v=ws.10)#BKMK_RestoreReg
11.Since we are migrating the CA from one server to another using the different server name, before we import the registry exported from the old server, we first use text editor to change the CA servername from old one to the new one:
net stop certsvc
a. Right-click the .reg file created by exporting the settings from the source CA.
b. Click Edit to open the file in a text editor.
c. If the target CA's computer name is different from the source CA's computer name, search the file for the host name of the source CA computer. For each instance of the host name found, ensure that it is the appropriate value for the target environment. Change the host name, if necessary. Update the CAServerName value.
Do not change Active value within the Configuration key and the CommonName value within the CAName key. The CA name must not be changed as part of the migration.
This means the new target CA must have the old CA's name, even if part of that name is the old CA's host name.
4. Check any registry values that indicate local file paths, such as the following, to ensure drive letter names and paths are correct for the target CA. If there is a mismatch between the source and the target CA, either update the values in the file or remove them from the file so that the default settings are preserved on the target CA.
5. These storage location settings are elected during CA setup. They exist under the Configuration registry key:
a. DBDirectory
b. DBLogDirectory
c. DBSystemDirectory
d. DBTempDirectory
6. The following settings under the Configuration\{CA Name} registry key contain, in their default values, a local path. (Alternatively, you can update these values after importing them by using the Certification Authority snap-in. The values are located on the CA properties Extensions tab.)
a. CACertPublicationURLs
b. CRLPublicationURLs
7. Any values not listed can retain the value data installed by default with the target CA. You can remove any registry values that you do not want to import into the target CA. Once the text file is edited, it can be imported into the target CA. By importing the source server registry settings backup into the destination server, the source CA configuration is migrated to the destination server.
12.After modifying the registry, we can import it into the new CA server.(以下操作均為确認操作,可以忽略)
a. Stop the Certificate service: net stop certsvc.
b. Locate the registry file that you just modified in the backup folder, and then double-click it to import the registry settings.
c. Open Regedit, in the console tree, locate the key HKEY_LOCAL_MACHINE\SYSTEM\CurrentControlSet\services\CertSvc\Configuration, and click Configuration.
d. In the details pane, double-click DBSessionCount.
e. Click Hexadecimal. In Value data, type 64, and then click OK.
f. Verify the locations specified in the following settings are correct for your destination server, and change them as needed to indicate the location of the CA database and log files.
a. DBDirectory
b. DBLogDirectory
c. DBSystemDirectory
d. DBTempDirectory
13.Restore the Certificate Template list:
a. Open a command prompt window.
b. Run
certutil -setcatemplates +<templatelist>
NOTE: Replace <templatelist> with a comma-separated list of the template names that are listed in the catemplates.txt file created during Step 6.
For example,
certutil -setcatemplates +Administrator,User,DomainController
14.Start the CA service. After CA service startup, please do the following things to mapping the CDP to old location for existing certifications:
a. Open CA console, right click on the CA name and Properties.
b. In the Extensions tab, check the CDP, add the old CDP into the list:
添加以下内容,但是需要修改OLDservername
ldap:///CN=<CATruncatedName><CRLNameSuffix>,CN=OldServerName,CN=CDP,CN=Public Key Services,CN=Services,<ConfigurationContainer><CDPObjectClass>
Check all the options below:
1. Publish CRLs to this location
2. Include in all CRLs. Specifies where to publish in the Active Directory when publishing manually.
3. Include in CRLs. Clients use this to find Delta CRL locations.
4. Publish Delta CRLs to this location
修改舊的Caname
注意勾選以下内容
提示會重新開機CA服務
15.Assign permission on the AIA and CDP containers:
a. Log on as a member of the Enterprise Admins group to a computer on which the Active Directory Sites and Services snap-in is installed.
b. Click Start, point to Run, type dssite.msc, and then click OK.
c. In the console tree, click the top node.
d. On the View menu, click Show services node.
e. In the console tree, expand Services, expand Public Key Services, and then click AIA.
f. In the details pane, right-click the name of the CA, and then click Properties.
g. Click the Security tab, and then click Add.
h. Click Object Types, click Computers, and then click OK.
i. Type the name of the NewServer$, and click OK.
j. In the Allow column, click Full Control, and click Apply.
k. If the source server object is displayed in Group or user names, click the name of the source server, then click Remove, and then click OK.
l. In the console tree, expand CDP, and then click the name of the old server.
m. In the details pane, right-click the cRLDistributionPoint item at the top of the list, and then click Properties.
n. Click the Security tab, and then click Add.
o. Click Object Types, click Computers, and then click OK.
p. Type the name of the NewServer$, and click OK.
q. In the Allow column, click Full Control, and click Apply.
r. If the old server object is displayed in Group or user names, click the name of the source server, then click Remove, and then click OK.
s. Repeat steps for each cRLDistributionPoint item in old server CDP.
After all the steps above, every time the new CA publish CRL, it will publish to both its own CDP and old CDP in AD. So the new issued certificates can find the new CDP to check the CRL, and the existing certificates will still be able to find the old CDP to check latest CRL.
最後我們隻需要通過申請辦法證書測試即可;同時運作
pkiview.msc檢視狀态
轉載于:https://blog.51cto.com/gaowenlong/1701013