源碼:https://github.com/GiraffePeng/spring-cloud-scaffolding
授權伺服器
- 用戶端資訊以及使用者資訊按照生産環境模拟,将其儲存在了資料庫中。
- 自定義了Token增強器,在其負荷部分加入自定義内容
- 使用JWT來實作token的生成
- 自定義根據手機号驗證碼和手機号密碼的形式授權的grant_type,可基本滿足于移動端的開發
1、oauth2介紹
OAuth2.0是一套授權體系的開放标準,定義了四大角色:
- 資源擁有者,也就是使用者,由用于授予三方應用權限
- 用戶端,也就是三方應用程式,在通路使用者資源之前需要使用者授權
- 資源提供者,或者說資源伺服器,提供資源,需要實作Token和ClientID的校驗,以及做好相應的權限控制
- 授權伺服器,驗證使用者身份,為用戶端頒發Token,并且維護管理ClientID、Token以及使用者
其中後三項都可以是獨立的程式。OAuth2.0标準同時定義了四種授權模式,這裡介紹常用的三種(授權碼、密碼模式、用戶端模式)
1、不管是哪種模式,通用流程如下:
- 三方網站(或者說用戶端)需要先向授權伺服器去申請一套接入的ClientID+ClientSecret
- 用任意一種模式拿到通路Token(流程見下)
- 拿着通路Token去資源伺服器請求資源
- 資源伺服器根據Token查詢到Token對應的權限進行權限控制
2、授權碼模式,最标準最安全的模式,适合和外部互動,流程是:
- 三方網站用戶端轉到授權伺服器,上送ClientID,授權範圍Scope、重定向位址RedirectUri等資訊
- 使用者在授權伺服器進行登入并且進行授權準許(授權準許這步可以配置為自動完成)
- 授權完成後重定向回到之前用戶端提供的重定向位址,附上授權碼
- 三方網站服務端通過授權碼+ClientID+ClientSecret去授權伺服器換取Token(Token含通路Token和重新整理Token,通路Token過去後用重新整理Token去獲得新的通路Token)
- 你可能會問這個模式為什麼這麼複雜,為什麼安全呢?因為我們不會對外暴露ClientSecret,不會對外暴露通路Token,使用授權碼換取Token的過程是服務端進行,用戶端拿到的隻是一次性的授權碼
3、密碼憑證模式,适合内部系統之間使用的模式(用戶端是自己人,用戶端需要拿到使用者帳号密碼),流程是:
- 使用者提供帳号密碼給用戶端
- 用戶端憑着使用者的帳号密碼,以及用戶端自己的ClientID+ClientSecret去授權伺服器換取Token
4、用戶端模式,适合内部服務端之間使用的模式:
- 和使用者沒有關系,不是基于使用者的授權
- 用戶端憑着自己的ClientID+ClientSecret去授權伺服器換取Token
2、JWT
通過 JWT 配合 Spring Security OAuth2 使用的方式,可以避免每次請求都遠端排程認證授權服務。資源伺服器隻需要從授權伺服器 驗證一次,傳回 JWT。傳回的 JWT 包含了 使用者 的所有資訊,包括 權限資訊
2.1、什麼是JWT
JSON Web Token(JWT)是一種開放的标準(RFC 7519),JWT 定義了一種 緊湊 且 自包含 的标準,旨在将各個主體的資訊包裝為 JSON 對象。主體資訊 是通過 數字簽名 進行 加密 和 驗證 的。經常使用 HMAC 算法或 RSA(公鑰/私鑰 的 非對稱性加密)算法對 JWT 進行簽名,安全性很高。
- 緊湊型:資料體積小,可通過 POST 請求參數 或 HTTP 請求頭 發送。
- 自包含:JWT 包含了主體的所有資訊,避免了 每個請求 都需要向 Uaa 服務驗證身份,降低了 伺服器的負載。
2.2、JWT結構
JWT 的結構由三部分組成:Header(頭)、Payload(有效負荷)和 Signature(簽名)。是以 JWT 通常的格式是 xxxxx.yyyyy.zzzzz
2.2.1、Header
Header通常是由兩部分組成:令牌的類型(即 JWT)和使用的 算法類型,如 HMAC、SHA256 和 RSA。例如:
{
    "typ": "JWT",
    "alg": "HS256"
}
将 Header 用 Base64 編碼作為 JWT的第一部分,不建議在 JWT 的 Header 中放置 敏感資訊。
2.2.2、Payload
第二部分 Payload 是 JWT 的 主體内容部分,它包含 聲明 資訊。聲明是關于 使用者 和 其他資料 的聲明。
聲明有三種類型: registered、public 和 private。
- Registered claimsJWT 提供了一組 預定義 的聲明,它們不是 強制的,但是推薦使用。JWT 指定 七個預設 字段供選擇:
| 注冊聲明 | 字段含義 |
|---|---|
| iss | 發行人 |
| exp | 到期時間 |
| sub | 主題 |
| aud | 使用者 |
| nbf | 在此之前不可用 |
| iat | 釋出時間 |
| jti | 用于辨別JWT的ID |
- Public claims:可以随意定義
-
Private claims:用于在同意使用它們的各方之間共享資訊,并且不是注冊的或公開的聲明。
下面是 Payload 部分的一個示例:
{
    "sub": "123456789",
    "name": "John Doe",
    "admin": true
}
将 Payload 用 Base64 編碼作為 JWT 的 第二部分,不建議在 JWT 的 Payload 中放置 敏感資訊。
2.2.3、Signature
要建立簽名部分,需要利用 秘鑰 對 Base64 編碼後的 Header 和 Payload 進行 加密,加密算法的公式如下:
HMACSHA256(
    base64UrlEncode(header) + '.' +
    base64UrlEncode(payload),
    secret
)
簽名可以用于驗證消息在傳遞過程中有沒有被更改。對于使用私鑰簽名的token,它還可以驗證JWT的發送方是否為它所稱的發送方。
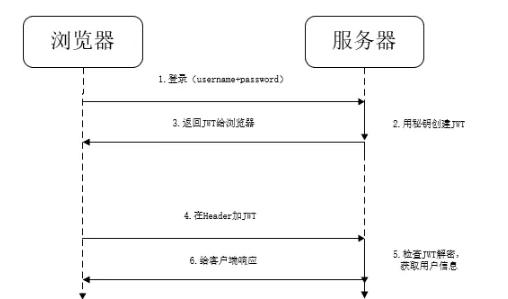
2.3、JWT的工作方式
用戶端 擷取 JWT 後,對于以後的 每次請求,都不需要再通過 授權服務 來判斷該請求的 使用者 以及該 使用者的權限。在微服務系統中,可以利用 JWT 實作 單點登入。認證流程圖如下:
3、授權伺服器的搭建
父級pom.xml這裡省略,基于父級工程spring-cloud-scaffolding即可。
3.1、授權伺服器引入依賴:
<dependencies>
    <!-- oauth2.0依賴 -->
    <dependency>
        <groupId>org.springframework.cloud</groupId>
        <artifactId>spring-cloud-starter-oauth2</artifactId>
    </dependency>
    <!-- web相關依賴 -->
    <dependency>
        <groupId>org.springframework.boot</groupId>
        <artifactId>spring-boot-starter-web</artifactId>
    </dependency>
    <!--reids -->
    <dependency>
        <groupId>org.springframework.boot</groupId>
        <artifactId>spring-boot-starter-data-redis</artifactId>
    </dependency>
    <!--jpa資料通路 -->
    <dependency>
        <groupId>org.springframework.boot</groupId>
        <artifactId>spring-boot-starter-data-jpa</artifactId>
    </dependency>
    <!--mysql連接配接 -->
    <dependency>
        <groupId>mysql</groupId>
        <artifactId>mysql-connector-java</artifactId>
    </dependency>
    <!-- 斷路器-->
    <dependency>
        <groupId>org.springframework.cloud</groupId>
        <artifactId>spring-cloud-starter-netflix-hystrix</artifactId>
    </dependency>
    <!-- 健康監控-->
    <dependency>
        <groupId>org.springframework.boot</groupId>
        <artifactId>spring-boot-starter-actuator</artifactId>
    </dependency>
    <!-- 鍊路跟蹤-->
    <dependency>
        <groupId>org.springframework.cloud</groupId>
        <artifactId>spring-cloud-starter-zipkin</artifactId>
    </dependency>
    <!-- 鍊路跟蹤-->
    <dependency>
        <groupId>com.github.gavlyukovskiy</groupId>
        <artifactId>p6spy-spring-boot-starter</artifactId>
        <version>1.4.3</version>
    </dependency>
    <!-- 注冊中心注冊-->
    <dependency>
        <groupId>org.springframework.cloud</groupId>
        <artifactId>spring-cloud-starter-netflix-eureka-client</artifactId>
    </dependency>
</dependencies>
3.2、建立application.yml檔案:
spring:
  application:
    name: auth-service
  datasource:
    driver-class-name: com.mysql.jdbc.Driver
    url: jdbc:mysql://localhost:3306/ceshi?useUnicode=true&characterEncoding=utf8&characterSetResults=utf8
    username: huaxin
    password: Koreyoshih527
  jpa:
    hibernate:
      ddl-auto: update
    show-sql: true
  redis:
    host: localhost
    database: 0
    port: 6379

hystrix:
    command:
        default:
            execution:
                isolation:
                    thread:
                        timeout-in-milliseconds: 3000

server:
  port: 8599
eureka:
  client:
    service-url:
      defaultZone: http://localhost:8865/eureka/
會使用到mysql資料庫,授權伺服器的端口是8599。
3.3、建立表
因為授權伺服器的用戶端資訊以及使用者資訊要放入資料庫中,我們需要初始化一些表:
- user_auth表用于oauth2的使用者資訊記錄。
- member_auth表用于移動端oauth2的會員資訊記錄。
- role_auth表,存放了使用者的權限資訊
- oauth_approvals授權準許表,存放了使用者授權第三方伺服器的準許情況
- oauth_client_details,用戶端資訊表,存放用戶端的ID、密碼、權限、允許通路的資源伺服器ID以及允許使用的授權模式等資訊
- oauth_code授權碼表,存放了授權碼。
表結構如下:
CREATE TABLE `user_auth` (
  `id` bigint(20) NOT NULL AUTO_INCREMENT,
  `password` varchar(255) DEFAULT NULL,
  `username` varchar(255) NOT NULL,
  PRIMARY KEY (`id`),
  UNIQUE KEY `UK_sb8bbouer5wak8vyiiy4pf2bx` (`username`)
) ENGINE=InnoDB AUTO_INCREMENT=1 DEFAULT CHARSET=utf8 COMMENT='使用者表';

CREATE TABLE `member_auth` (
  `id` bigint(20) NOT NULL AUTO_INCREMENT,
  `password` varchar(255) DEFAULT NULL,
  `username` varchar(255) NOT NULL,
  PRIMARY KEY (`id`),
  UNIQUE KEY `UK_sb8bbouer5wak8vyiiy4pf2bx` (`username`)
) ENGINE=InnoDB AUTO_INCREMENT=83 DEFAULT CHARSET=utf8 COMMENT='會員表';

CREATE TABLE `role_auth` (
  `id` bigint(20) NOT NULL AUTO_INCREMENT,
  `authority` varchar(255) NOT NULL,
  `user_id` bigint(20) NOT NULL,
  PRIMARY KEY (`id`),
  UNIQUE KEY `UK_sb8bbouer5wak8vyiiy4pf2bx` (`authority`)
) ENGINE=InnoDB AUTO_INCREMENT=82 DEFAULT CHARSET=utf8 COMMENT='使用者角色表';

CREATE TABLE `oauth_approvals` (
  `userId` varchar(256) DEFAULT NULL,
  `clientId` varchar(256) DEFAULT NULL,
  `partnerKey` varchar(32) DEFAULT NULL,
  `scope` varchar(256) DEFAULT NULL,
  `status` varchar(10) DEFAULT NULL,
  `expiresAt` datetime DEFAULT NULL,
  `lastModifiedAt` datetime DEFAULT NULL
) ENGINE=InnoDB DEFAULT CHARSET=utf8;

CREATE TABLE `oauth_client_details` (
  `client_id` varchar(64) NOT NULL,
  `resource_ids` varchar(255) DEFAULT NULL,
  `client_secret` varchar(255) DEFAULT NULL,
  `scope` varchar(255) DEFAULT NULL,
  `authorized_grant_types` varchar(255) DEFAULT NULL,
  `web_server_redirect_uri` varchar(255) DEFAULT NULL,
  `authorities` varchar(255) DEFAULT NULL,
  `access_token_validity` int(11) DEFAULT NULL,
  `refresh_token_validity` int(11) DEFAULT NULL,
  `additional_information` varchar(1000) DEFAULT NULL,
  `autoapprove` varchar(255) DEFAULT NULL,
  PRIMARY KEY (`client_id`)
) ENGINE=InnoDB DEFAULT CHARSET=utf8mb4;

CREATE TABLE `oauth_code` (
  `code` varchar(255) DEFAULT NULL,
  `authentication` blob
) ENGINE=InnoDB DEFAULT CHARSET=utf8mb4;
因為用戶端存入資料庫中,需要初始化下用戶端的資訊
沒有在資料庫中建立相應的表來存放通路令牌、重新整理令牌,這是因為令牌資訊會使用JWT來傳輸,不會存放到資料庫中。
3.4、配置授權伺服器
package com.peng.auth.server.config;

import java.util.ArrayList;
import java.util.Arrays;
import java.util.List;
import java.util.concurrent.TimeUnit;

import javax.sql.DataSource;

import org.springframework.beans.factory.annotation.Autowired;
import org.springframework.beans.factory.annotation.Qualifier;
import org.springframework.context.annotation.Bean;
import org.springframework.context.annotation.Configuration;
import org.springframework.core.io.ClassPathResource;
import org.springframework.data.redis.connection.RedisConnectionFactory;
import org.springframework.http.HttpMethod;
import org.springframework.security.authentication.AuthenticationManager;
import org.springframework.security.crypto.bcrypt.BCryptPasswordEncoder;
import org.springframework.security.oauth2.config.annotation.configurers.ClientDetailsServiceConfigurer;
import org.springframework.security.oauth2.config.annotation.web.configuration.AuthorizationServerConfigurerAdapter;
import org.springframework.security.oauth2.config.annotation.web.configuration.EnableAuthorizationServer;
import org.springframework.security.oauth2.config.annotation.web.configurers.AuthorizationServerEndpointsConfigurer;
import org.springframework.security.oauth2.config.annotation.web.configurers.AuthorizationServerSecurityConfigurer;
import org.springframework.security.oauth2.provider.ClientDetailsService;
import org.springframework.security.oauth2.provider.CompositeTokenGranter;
import org.springframework.security.oauth2.provider.OAuth2RequestFactory;
import org.springframework.security.oauth2.provider.TokenGranter;
import org.springframework.security.oauth2.provider.approval.JdbcApprovalStore;
import org.springframework.security.oauth2.provider.client.JdbcClientDetailsService;
import org.springframework.security.oauth2.provider.code.AuthorizationCodeServices;
import org.springframework.security.oauth2.provider.code.JdbcAuthorizationCodeServices;
import org.springframework.security.oauth2.provider.token.AuthorizationServerTokenServices;
import org.springframework.security.oauth2.provider.token.DefaultTokenServices;
import org.springframework.security.oauth2.provider.token.TokenEnhancer;
import org.springframework.security.oauth2.provider.token.TokenEnhancerChain;
import org.springframework.security.oauth2.provider.token.TokenStore;
import org.springframework.security.oauth2.provider.token.store.JwtAccessTokenConverter;
import org.springframework.security.oauth2.provider.token.store.JwtTokenStore;
import org.springframework.security.oauth2.provider.token.store.KeyStoreKeyFactory;
import org.springframework.security.oauth2.provider.token.store.redis.RedisTokenStore;

import com.peng.auth.server.mobile.CustomUserDetailsService;
import com.peng.auth.server.mobile.PhonePasswordCustomTokenGranter;
import com.peng.auth.server.mobile.PhoneSmsCustomTokenGranter;


/**
 * 授權伺服器(authorization server):成功驗證資源擁有者并擷取授權之後,授權伺服器頒發授權令牌(Access Token)給用戶端。
[/oauth/authorize] 用于授權碼模式下擷取code
[/oauth/token]  用于授權,擷取token
[/oauth/check_token]  用于校驗token的有效性
[/oauth/confirm_access]  用于使用者确認授權送出
[/oauth/token_key] 提供公有密匙的端點,如果你使用JWT令牌的話
[/oauth/error] 授權服務錯誤資訊
 */
@EnableAuthorizationServer //通過注解@EnableAuthorizationServer來開啟授權伺服器
@Configuration
public class OAuth2AuthorizationConfig extends AuthorizationServerConfigurerAdapter{

    @Autowired
    private DataSource dataSource;
	@Autowired
	@Qualifier("authenticationManagerBean")
    private AuthenticationManager authenticationManager;

    @Autowired
    public CustomUserDetailsService customUserDetailsService;

    /**
     * 配置了使用資料庫來維護用戶端資訊,下面注釋的為将用戶端資訊存儲在記憶體中,通過配置直接寫死在這裡(生産環境還是推薦使用資料庫來存儲)
     * 對于實際的應用我們一般都會用資料庫來維護這個資訊。
     */
    @Override
    public void configure(ClientDetailsServiceConfigurer clients) throws Exception {
    	// 将用戶端的資訊存儲在資料庫中
    	clients.jdbc(dataSource);
    	// 将用戶端的資訊存儲在記憶體中
        /*clients.inMemory()
                // 配置一個用戶端
                .withClient("userservice")
                .secret(new BCryptPasswordEncoder().encode("123456"))
                // 配置用戶端的域
                .scopes("service")
                 // 配置驗證類型為refresh_token和password
                .authorizedGrantTypes("refresh_token", "password","client_credentials")
                // 配置token的過期時間為1h
                .accessTokenValiditySeconds(3600 * 1000);*/
    }

    /**
     * 配置我們的Token存放方式不是記憶體方式、不是資料庫方式、不是Redis方式而是JWT方式,
     * JWT是Json Web Token縮寫也就是使用JSON資料格式包裝的Token,由.句号把整個JWT分隔為頭、資料體、簽名三部分,JWT儲存Token雖然易于使用但是不是那麼安全,一般用于内部,并且需要走HTTPS+配置比較短的失效時間
	 * 配置了JWT Token的非對稱加密來進行簽名
	 * 配置了一個自定義的Token增強器,把更多資訊放入Token中
	 * 配置了使用JDBC資料庫方式來儲存使用者的授權準許記錄
	 * 配置自定義grant,滿足移動端的授權條件
     */
    @Override
    public void configure(AuthorizationServerEndpointsConfigurer endpoints) throws Exception {
    	TokenEnhancerChain tokenEnhancerChain = new TokenEnhancerChain();
        tokenEnhancerChain.setTokenEnhancers(
                Arrays.asList(tokenEnhancer(), jwtTokenEnhancer()));//配置了JWT Token的非對稱加密來進行簽名

        List<TokenGranter> tokenGranters = getTokenGranters(endpoints.getTokenServices(), endpoints.getClientDetailsService(), endpoints.getOAuth2RequestFactory());
        tokenGranters.add(endpoints.getTokenGranter());

        endpoints.setClientDetailsService(clientDetailsService()); //配置從JDBC中擷取用戶端配置資訊
        endpoints.approvalStore(approvalStore())//配置了使用JDBC資料庫方式來儲存使用者的授權準許記錄
                .authorizationCodeServices(authorizationCodeServices())
                .tokenStore(tokenStore())	//配置我們的Token存放方式不是記憶體方式、不是資料庫方式、不是Redis方式而是JWT方式
                .tokenEnhancer(tokenEnhancerChain)//配置了一個自定義的Token增強器,把更多資訊放入Token中
                .authenticationManager(authenticationManager)
                .tokenGranter(new CompositeTokenGranter(tokenGranters)); //配置自定義的granter  這裡有通過手機号密碼的形式以及手機号短信驗證碼的形式  對應grant_type為custom_phone_pwd custom_phone_sms
    }

    private List<TokenGranter> getTokenGranters(AuthorizationServerTokenServices tokenServices, ClientDetailsService clientDetailsService, OAuth2RequestFactory requestFactory) {
        return new ArrayList<TokenGranter>(Arrays.asList(
                new PhoneSmsCustomTokenGranter(tokenServices, clientDetailsService, requestFactory, customUserDetailsService),
                new PhonePasswordCustomTokenGranter(tokenServices, clientDetailsService, requestFactory, customUserDetailsService)
        ));
    }

    @Bean
    public ClientDetailsService clientDetailsService() {
        return new JdbcClientDetailsService(dataSource);
    }

    @Bean
    public TokenEnhancer tokenEnhancer() {
        return new CustomTokenEnhancer();
    }

    @Bean
    public JdbcApprovalStore approvalStore() {
        return new JdbcApprovalStore(dataSource);
    }

    @Bean
    public AuthorizationCodeServices authorizationCodeServices() {
        return new JdbcAuthorizationCodeServices(dataSource);
    }

    @Bean
    public TokenStore tokenStore() {
        return new JwtTokenStore(jwtTokenEnhancer());
    }

    @Override
    public void configure(AuthorizationServerSecurityConfigurer oauthServer) {
        oauthServer.tokenKeyAccess("permitAll()")
                   .checkTokenAccess("isAuthenticated()")
                   .allowFormAuthenticationForClients();
    }


    @Bean
    protected JwtAccessTokenConverter jwtTokenEnhancer() {
        // 配置jks檔案  該檔案可以使用keytool生成
        KeyStoreKeyFactory keyStoreKeyFactory = new KeyStoreKeyFactory(new ClassPathResource("test-jwt.jks"), "test123".toCharArray());
        JwtAccessTokenConverter converter = new JwtAccessTokenConverter();
        converter.setKeyPair(keyStoreKeyFactory.getKeyPair("test-jwt"));
        return converter;
    }

}
解釋都在上述代碼的注釋中,這裡不多闡述。
大體步驟:
- 1、繼承AuthorizationServerConfigurerAdapter,重寫其中的三個方法。
- 2、通過注解@EnableAuthorizationServer來開啟授權伺服器
- 3、重寫第一個方法,聲明用戶端資訊
- 4、重寫第二個方法,聲明token的存儲方式以及一些自定義資訊
- 5、重寫第三個方法,聲明驗證Token的通路權限以及是否允許表單送出等等
- 6、如果使用jwt傳輸token,還需要聲明jks檔案的相關名稱以及密碼。
自定義token負荷部分的資訊,來豐富token的内容:CustomTokenEnhancer類,
/**
 * 這段代碼非常簡單,就是把使用者資訊以userDetails這個Key存放到Token中去(如果授權模式是用戶端模式這段代碼無效,因為和使用者沒關系)
 * 這是一個常見需求,預設情況下Token中隻會有使用者名這樣的基本資訊,
 * 我們往往需要把有關使用者的更多資訊傳回給用戶端(在實際應用中你可能會從資料庫或外部服務查詢更多的使用者資訊加入到JWT Token中去),
 * 這個時候就可以自定義增強器來豐富Token的内容。
 */
public class CustomTokenEnhancer implements TokenEnhancer {

    @Override
    public OAuth2AccessToken enhance(OAuth2AccessToken accessToken, OAuth2Authentication authentication) {
        Authentication userAuthentication = authentication.getUserAuthentication();
        if (userAuthentication != null) {
            Object principal = authentication.getUserAuthentication().getPrincipal();
            Map<String, Object> additionalInfo = new HashMap<>();
            additionalInfo.put("userDetails", principal);
            ((DefaultOAuth2AccessToken) accessToken).setAdditionalInformation(additionalInfo);
        }
        return accessToken;
    }
}
針對移動端常用的手機号+密碼登陸或者手機号+短信驗證碼登陸的場景,自定義grant_type類型,加入custom_phone_pwd和custom_phone_sms類型。
建立使用者細節服務
package com.peng.auth.server.mobile;

import org.apache.commons.lang3.StringUtils;
import org.springframework.beans.factory.annotation.Autowired;
import org.springframework.security.core.authority.AuthorityUtils;
import org.springframework.security.core.userdetails.UserDetails;
import org.springframework.security.oauth2.common.exceptions.InvalidGrantException;
import org.springframework.stereotype.Service;

import com.peng.auth.server.repository.Member;
import com.peng.auth.server.repository.MemberRepository;


//建立使用者細節服務
@Service
public class CustomUserDetailsService {

	@Autowired
	private MemberRepository memberRepository;

	public UserDetails loadUserByPhoneAndPassword(String phone, String password) {
        if (StringUtils.isEmpty(phone) || StringUtils.isEmpty(password)) {
            throw new InvalidGrantException("無效的手機号或密碼");
        }
        Member member = memberRepository.findByUsername(phone);
        member.setAuthorities(AuthorityUtils.commaSeparatedStringToAuthorityList("USER"));
        // 判斷成功後傳回使用者細節
        return member;
    }

    public UserDetails loadUserByPhoneAndSmsCode(String phone, String smsCode) {
        if (StringUtils.isEmpty(phone) || StringUtils.isEmpty(smsCode)) {
            throw new InvalidGrantException("無效的手機号或短信驗證碼");
        }
        Member member = memberRepository.findByUsername(phone);
        //判斷短信是否正确
        member.setAuthorities(AuthorityUtils.commaSeparatedStringToAuthorityList("USER"));
        return member;
    }
}
身份驗證令牌
package com.peng.auth.server.mobile;

import java.util.Collection;

import org.springframework.security.authentication.AbstractAuthenticationToken;
import org.springframework.security.core.GrantedAuthority;

//身份驗證令牌
public class AuthenticationToken extends AbstractAuthenticationToken{
	/**
	 *
	 */
	private static final long serialVersionUID = 1L;

	private final Object principal;

	private Object credentials;

	public AuthenticationToken(Collection<? extends GrantedAuthority> authorities, Object principal, Object credentials) {
		super(authorities);
        this.principal = principal;
        this.credentials = credentials;
	}

	@Override
	public Object getCredentials() {
		return credentials;
	}

	@Override
	public Object getPrincipal() {
		return principal;
	}

}
建立自定義抽象令牌授予者
package com.peng.auth.server.mobile;

import java.util.LinkedHashMap;
import java.util.Map;

import org.springframework.security.core.userdetails.UserDetails;
import org.springframework.security.oauth2.common.exceptions.InvalidGrantException;
import org.springframework.security.oauth2.provider.ClientDetails;
import org.springframework.security.oauth2.provider.ClientDetailsService;
import org.springframework.security.oauth2.provider.OAuth2Authentication;
import org.springframework.security.oauth2.provider.OAuth2Request;
import org.springframework.security.oauth2.provider.OAuth2RequestFactory;
import org.springframework.security.oauth2.provider.TokenRequest;
import org.springframework.security.oauth2.provider.token.AbstractTokenGranter;
import org.springframework.security.oauth2.provider.token.AuthorizationServerTokenServices;

//建立自定義抽象令牌授予者
public abstract class AbstractCustomTokenGranter extends AbstractTokenGranter {

	protected AbstractCustomTokenGranter(AuthorizationServerTokenServices tokenServices,
			ClientDetailsService clientDetailsService, OAuth2RequestFactory requestFactory, String grantType) {
		super(tokenServices, clientDetailsService, requestFactory, grantType);
	}

	@Override
    protected OAuth2Authentication getOAuth2Authentication(ClientDetails client, TokenRequest tokenRequest) {
        Map<String, String> parameters = new LinkedHashMap(tokenRequest.getRequestParameters());
        UserDetails details = getUserDetails(parameters);
        if (details == null) {
            throw new InvalidGrantException("無法擷取使用者資訊");
        }
        AuthenticationToken authentication = new AuthenticationToken(details.getAuthorities(),parameters, details);
        authentication.setAuthenticated(true);
        authentication.setDetails(details);
        OAuth2Request storedOAuth2Request = this.getRequestFactory().createOAuth2Request(client, tokenRequest);
        return new OAuth2Authentication(storedOAuth2Request, authentication);
    }

    protected abstract UserDetails getUserDetails(Map<String, String> parameters);
}
手機号密碼登入令牌授予者
package com.peng.auth.server.mobile;

import java.util.Map;

import org.springframework.security.core.userdetails.UserDetails;
import org.springframework.security.oauth2.provider.ClientDetailsService;
import org.springframework.security.oauth2.provider.OAuth2RequestFactory;
import org.springframework.security.oauth2.provider.token.AuthorizationServerTokenServices;


//手機号密碼登入令牌授予者
public class PhonePasswordCustomTokenGranter extends AbstractCustomTokenGranter {

    private CustomUserDetailsService userDetailsService;

    public PhonePasswordCustomTokenGranter(AuthorizationServerTokenServices tokenServices, ClientDetailsService clientDetailsService, OAuth2RequestFactory requestFactory, CustomUserDetailsService userDetailsService) {
        super(tokenServices, clientDetailsService, requestFactory,"custom_phone_pwd");
        this.userDetailsService = userDetailsService;
    }

    @Override
    protected UserDetails getUserDetails(Map<String, String> parameters) {
        String phone = parameters.get("phone");
        String password = parameters.get("password");
        parameters.remove("password");
        return userDetailsService.loadUserByPhoneAndPassword(phone, password);
    }
}
短信驗證碼登入令牌授予者
package com.peng.auth.server.mobile;

import java.util.Map;

import org.springframework.security.core.userdetails.UserDetails;
import org.springframework.security.oauth2.provider.ClientDetailsService;
import org.springframework.security.oauth2.provider.OAuth2RequestFactory;
import org.springframework.security.oauth2.provider.token.AuthorizationServerTokenServices;


public class PhoneSmsCustomTokenGranter extends AbstractCustomTokenGranter{

    private CustomUserDetailsService userDetailsService;

    public PhoneSmsCustomTokenGranter(AuthorizationServerTokenServices tokenServices, ClientDetailsService clientDetailsService, OAuth2RequestFactory requestFactory, CustomUserDetailsService userDetailsService) {
        super(tokenServices, clientDetailsService, requestFactory,"custom_phone_sms");
        this.userDetailsService = userDetailsService;
    }

    @Override
    protected UserDetails getUserDetails(Map<String, String> parameters) {
        String phone = parameters.get("phone");
        String smsCode = parameters.get("sms_code");
        return userDetailsService.loadUserByPhoneAndSmsCode(phone, smsCode);
    }
}
3.5 生成密鑰
我們需要使用keytool工具生成密鑰,把密鑰檔案jks儲存到目錄下,然後還要導出一個公鑰留作以後使用。
3.5.1 安裝keytool工具
這裡使用openSSL來生成密鑰,下載下傳位址:openSSL,然後手動把安裝的 openssl.exe 所在目錄配置到環境變量。
3.5.2 生成密鑰
jks 檔案的生成需要使用 Java keytool 工具,保證 Java 環境變量沒問題,輸入指令如下:
keytool   -genkeypair -alias test-jwt
          -validity 3650
          -keyalg RSA
          -dname "CN=jwt,OU=jtw,O=jwt,L=zurich,S=zurich, C=CH"
          -keypass test123
          -keystore test-jwt.jks
          -storepass test123
其中,-alias 選項為 别名,-keyalg 為 加密算法,-keypass 和 -storepass 為 密碼選項,-keystore 為 jks 的 檔案名稱,-validity 為配置 jks 檔案 過期時間(機關:天)。
生成的 jks 檔案作為 私鑰,隻允許 授權服務 所持有,用作 加密生成 JWT。把生成的 jks 檔案放到 授權工程的 src/main/resource 目錄下即可。
3.5.3 生成公鑰
對于 資源服務,需要使用 jks的公鑰對JWT進行解密。擷取 jks檔案的 公鑰 的指令如下:
keytool   -list -rfc
          --keystore test-jwt.jks | openssl x509
          -inform pem
          -pubkey
輸入密碼 test123 後,顯示的資訊很多,隻需要提取 PUBLIC KEY,即如下所示:
-----BEGIN PUBLIC KEY-----
MIIBIjANBgkqhkiG9w0BAQEFAAOCAQ8AMIIBCgKCAQEAl+jT1KAbFsQQf9eAwi4r
1O7UEHIjbMTmC9Llm9whSrkyiyOMHYKKePCWqCOMRkT3ugOSj9dJXw/8PsQpuMgD
XROQjzE0tVvAt5U7M1jv1FZpVy7eikYvXM7CxtihpctztGQp20TpSxPlkJw8wCBS
nl2CzMQmvETBGfUc09rwTc8f4oQfL8jwz+aGK69tlt47GMwcNFyOJPbD8CX67n+P
+/pJzysoov6f9msIhWO/+cEHJgejaRf4RmlI2bgc+o00u4GI+p8lheOlBsnNCDGM
YcaZdz6UyaQelT9pLuBlE638UefhLfOh+rw4QPgG8XAhAuaS/4bEBqy79FHA/ggI
oQIDAQAB
-----END PUBLIC KEY-----
注意這裡的-----BEGIN PUBLIC KEY-----以及-----END PUBLIC KEY-----也需要提取出來。
建立一個 public.cert 檔案,将上面的公鑰資訊複制到 public.cert 檔案中并儲存。并将檔案放到資源服務(本項目的為spring-cloud-zuul-server)的src/main/resources 目錄下。至此授權伺服器的核心配置已經完成。
3.6 安全配置
再來實作一下安全方面的配置,用于保護 token 發放和驗證的資源接口。:
/**
 * 由于 auth-service 需要對外暴露檢查 Token 的 API 接口,是以 auth-service
 * 其實也是一個 資源服務,
 * 需要在 auth-service 中引入 Spring Security,并完成相關配置,進而對 auth-service 的 資源 進行保護。
 */
@Configuration
@EnableWebSecurity
public class WebSecurityConfig extends WebSecurityConfigurerAdapter{

	@Autowired
    private UserServiceDetail userServiceDetail;

	 @Override
	 protected void configure(HttpSecurity http) throws Exception {
		 http.csrf().disable() //關閉CSRF
         .authorizeRequests()
         .antMatchers("/oauth/authorize")//開放/oauth/authorize路徑的匿名通路,後者用于換授權碼,這個端點通路的時候在登入之前
         .permitAll()
         .anyRequest() //其他所有路徑通路,進行驗證
         .authenticated()
     .and()
         .httpBasic();
	 }

	 @Bean
	 public BCryptPasswordEncoder passwordEncoder(){
		 return new BCryptPasswordEncoder();
	 }

	 //我們把使用者存在了資料庫中希望配置JDBC的方式
	 //此外,我們還配置了使用BCryptPasswordEncoder加密來儲存使用者的密碼(生産環境的使用者密碼肯定不能是明文儲存)
	 @Override
	 protected void configure(AuthenticationManagerBuilder auth) throws Exception {
		 auth.userDetailsService(userServiceDetail).passwordEncoder(passwordEncoder());
	 }

	 @Override
	 public @Bean AuthenticationManager authenticationManagerBean() throws Exception {
	     return super.authenticationManagerBean();
	 }

}
這裡通過實作UserDetailsService接口,來重寫使用者資訊的擷取方式
@Service
public class UserServiceDetail implements UserDetailsService{

	@Autowired
	private UserRepository userRepository;
	@Autowired
	private RoleRepository roleRepository;
	@Override
	public UserDetails loadUserByUsername(String username) throws UsernameNotFoundException {
		User user = userRepository.findByUsername(username);
		List<Role> roles = roleRepository.findByUserId(user.getId());
		user.setAuthorities(roles);
		return user;
	}
}
配置表的關系映射類 User,需要實作 UserDetails 接口:
@Entity
@Table(name = "user_auth")
@EntityListeners(AuditingEntityListener.class)
public class User implements UserDetails,Serializable{

    private static final long serialVersionUID = 1L;

    @Id
    @GeneratedValue
    private Long id;

    private String username;

    private String password;

    @ManyToMany(cascade = CascadeType.ALL, fetch = FetchType.EAGER)
    private List<Role> authorities;

    @Override
    public Collection<? extends GrantedAuthority> getAuthorities() {
    	return authorities;
    }

    public void setAuthorities(List<Role> authorities) {
    	this.authorities = authorities;
    }

    public Long getId() {
    	return id;
    }

    @Override
    public String getPassword() {
    	return password;
    }

    @Override
    public String getUsername() {
    	return username;
    }

    @Override
    public boolean isAccountNonExpired() {
    	return true;
    }

    @Override
    public boolean isAccountNonLocked() {
    	return true;
    }

    @Override
    public boolean isCredentialsNonExpired() {
    	return true;
    }


    public void setId(Long id) {
    	this.id = id;
    }

    public void setUsername(String username) {
    	this.username = username;
    }

    public void setPassword(String password) {
    	this.password = password;
    }

    @Override
    public boolean isEnabled() {
    	return true;
    }

}
配置表的關系映射類 Role,需要實作 GrantedAuthority 接口:
@Entity
@Table(name = "role_auth")
public class Role implements GrantedAuthority{


    private static final long serialVersionUID = 1L;

    @Id
    @GeneratedValue
    private Long id;

    @Column(nullable = false)
    private String authority;

    @Column(nullable = false)
    private Long userId;


    public void setId(Long id) {
    	this.id = id;
    }

    public void setAuthority(String authority) {
    	this.authority = authority;
    }

    public void setUserId(Long userId) {
    	this.userId = userId;
    }

    @Override
    public String getAuthority() {
    	return authority;
    }

    @Override
    public String toString() {
    	return authority;
    }

}
使用JPA查詢user_auth以及role_auth表的資料
@Repository
public interface UserRepository extends JpaRepository<User, Long>{

	User findByUsername(String username);

}
@Repository
public interface RoleRepository extends JpaRepository<Role, Long>{

	List<Role> findByUserId(Long userId);

}
3.7 啟動類配置
最後配置該服務的啟動類即可
@SpringCloudApplication
@EnableHystrix
@Configuration
public class AuthServerApplicaiton {

	public static void main(String[] args) {
		SpringApplication.run(AuthServerApplicaiton.class, args);
	}
}
至此授權伺服器配置完成,大體步驟如下:
- 引入oauth2.0依賴。
- 配置application.yml。
- 初始化資料庫中的表。
- 繼承AuthorizationServerConfigurerAdapter來實作授權服務的配置。
- 引入Spring Security,并完成相關配置,對資源進行保護。
- 生成密鑰以及公鑰,并放在相應的資源檔案夾下。
- 啟動類的配置。
4、資源伺服器的搭建
本項目結構中使用了網關zuul,故将網關服務當做資源伺服器來使用,好處在于如果有多個業務子產品服務,不用在每個業務子產品上進行資源服務的配置,統一在網關處理即可。
4.1 配置資源服務
@Configuration
@EnableResourceServer//@EnableResourceServer啟用資源伺服器
public class ResourceServerConfig extends ResourceServerConfigurerAdapter{

    @Autowired
    private CustomAccessDeniedHandler customAccessDeniedHandler;

    @Autowired
    private AuthExceptionEntryPoint authExceptionEntryPoint;

    @Autowired
    private FilterIgnorePropertiesConfig filterIgnorePropertiesConfig;

    @Override
    public void configure(HttpSecurity http) throws Exception {
        http
        .csrf().disable();
        ExpressionUrlAuthorizationConfigurer<HttpSecurity>.ExpressionInterceptUrlRegistry hasAuthority = http.authorizeRequests();
        //從yml配置檔案中擷取不需要認證的url(即匿名能通路的url)
        filterIgnorePropertiesConfig.getUrls().forEach(url -> hasAuthority.antMatchers(url).permitAll());
        hasAuthority.antMatchers("/**").hasAuthority("USER");//除上述url,其他url必須攜帶權限有USER的token才可以通路
    }

    @Override
    public void configure(ResourceServerSecurityConfigurer resources) throws Exception {
        resources.tokenStore(tokenStore());//聲明了資源伺服器的TokenStore是JWT以及公鑰

        resources.authenticationEntryPoint(authExceptionEntryPoint)//無效token 或token不存在異常類重寫
                .accessDeniedHandler(customAccessDeniedHandler);//權限不足異常類重寫
    }

    @Bean
    public JwtAccessTokenConverter accessTokenConverter() {
    	// 用作JWT轉換器  擷取resource目錄下的public.cert檔案
        JwtAccessTokenConverter converter =  new JwtAccessTokenConverter();
        Resource resource = new ClassPathResource("public.cert");
        String publicKey;
        try {
            publicKey = new String(FileCopyUtils.copyToByteArray(resource.getInputStream()));
        } catch (IOException e) {
            throw new RuntimeException(e);
        }
        //設定公鑰
        converter.setVerifierKey(publicKey);
        return converter;
    }

    @Bean
    public TokenStore tokenStore() {
        return new JwtTokenStore(accessTokenConverter());
    }
}
解釋同樣在代碼的注解中,大體步驟如下:
- @EnableResourceServer啟用資源伺服器
- 繼承ResourceServerConfigurerAdapter類,重寫兩個方法
- 第一個方法用于聲明資源伺服器的哪些資源需要被保護,哪些可以匿名通路。
- 第二個方法用于聲明token的類型以及存儲地方和可以重寫一些oauth2.0報出的異常,友善進行格式統一的資料傳回格式。
4.2 配置公鑰
将3.5.3節點中生成的公鑰放在資源服務(spring-cloud-zuul-server)下的/src/main/resources即可。
4.3 配置yml檔案
同樣在的/src/main/resources目錄下建立 application.yml檔案。内容如下:
logging:
  level:
    org.springframework: DEBUG
server:
  port: 8866

ribbon:
  ReadTimeout: 3000
  ConnectTimeout: 2000

spring:
  application:
    name: zuulserver
  main:
    allow-bean-definition-overriding: true
  zipkin:
      base-url: http://localhost:9411
  sleuth:
    feign:
      enabled: true
    sampler:
      probability: 1.0
  redis:
    host: localhost
    database: 0
    port: 6379
eureka:
  client:
    serviceUrl:
      defaultZone: http://localhost:8865/eureka/
    registry-fetch-interval-seconds: 5

zuul:
# 內建限流,打開注釋 為所有服務進行限流,3秒内隻能請求1次,并且請求時間總數不能超過5秒
#  ratelimit:
#    enabled: true
#    repository: REDIS
#    default-policy:
#      limit: 1
#      quota: 5
#      refresh-interval: 3
  host:
    connect-timeout-millis: 10000
    socket-timeout-millis: 60000
  routes:
    invest:
      path: /invest/**
      serviceId: investservice
    user:
      path: /user/**
      serviceId: userservice
    project:
      path: /project/**
      serviceId: projectservice
    auth:
      path: /auth/**
      serviceId: auth-service
  add-proxy-headers: true
  sensitive-headers:
  retryable: true

management:
  endpoints:
    web:
      exposure:
        include: "*"
        exclude: env
  endpoint:
    health:
      show-details: always
feign:
  hystrix:
    enabled: true
hystrix:
  command:
    default:
      execution:
        timeout:
          enabled: true
        isolation:
          thread:
            timeoutInMilliseconds: 10000
#---------------此處以下為資源伺服器的配置
security:
  basic:
    enabled: false
  oauth2:
    client:
      access-token-uri: http://localhost:8866/auth/oauth/token
      user-authorization-uri: http://localhost:8866/auth/oauth/authorize
      client-id: userservice
    resource:
      user-info-uri: http://localhost:8866/auth/user
      prefer-token-info: false
      jwt:
        key-value: test123
        key-uri: http://localhost:8599/oauth/token_key
ignore:
  urls[0]: /auth/**
  urls[1]: /user/user/register
  urls[2]: /user/user/login
  urls[3]: /swagger-resources/**
  urls[4]: /swagger-ui.html
  urls[5]: /*/v2/api-docs
  urls[6]: /swagger/api-docs
  urls[7]: /webjars/**
  urls[8]: /zuulRoute/refresh
4.4 将可以匿名通路的url進行配置在yml中(拓展)
擷取需要匿名通路的url類:
@Data
@Configuration
@RefreshScope
@ConditionalOnExpression("!'${ignore}'.isEmpty()")
@ConfigurationProperties(prefix = "ignore")
public class FilterIgnorePropertiesConfig {
    private List<String> urls = new ArrayList<>();
}
4.5 自定義異常格式(拓展)
/**
 * 無效token 或token不存在異常類重寫
 */
@Component
public class AuthExceptionEntryPoint implements AuthenticationEntryPoint{
    @Override
    public void commence(HttpServletRequest request, HttpServletResponse response,
                         AuthenticationException authException) throws ServletException {
        Throwable cause = authException.getCause();
        JSONObject jsonObject = new JSONObject();
        jsonObject.put("code", "401");
        jsonObject.put("data", "");
        response.setStatus(HttpStatus.OK.value());
        response.setHeader("Content-Type", "application/json;charset=UTF-8");
        try {
            if(cause instanceof InvalidTokenException) {
            	jsonObject.put("msg", "token格式非法或失效");
                response.getWriter().write(jsonObject.toJSONString());
            }else{
            	jsonObject.put("msg", "token缺失");
                response.getWriter().write(jsonObject.toJSONString());
            }
        } catch (IOException e) {
            e.printStackTrace();
        }
    }
}
/**
 * 權限不足異常類重寫
 */
@Component("customAccessDeniedHandler")
public class CustomAccessDeniedHandler implements AccessDeniedHandler {

    @Override
    public void handle(HttpServletRequest request, HttpServletResponse response,
                       AccessDeniedException accessDeniedException)
            throws IOException, ServletException {
        response.setStatus(HttpStatus.OK.value());
        response.setHeader("Content-Type", "application/json;charset=UTF-8");
        try {
        	JSONObject jsonObject = new JSONObject();
        	jsonObject.put("data", null);
        	jsonObject.put("code", "401");
        	jsonObject.put("msg", "權限不足");
            response.getWriter().write(jsonObject.toJSONString());
        } catch (IOException e) {
            e.printStackTrace();
        }
    }
}
5、示範
啟動spring-cloud-eureka-server、spring-cloud-zuul-server、spring-cloud-auth-server、spring-cloud-userservice-server。
/user/user/login與/user/user/register接口沒有做認證處理,可直接通路

/user/user/foo 需要進行攜帶令牌認證後才可以通路:
令牌為空的情況下通路:
令牌為錯誤的情況下通路:
令牌為正确的情況下通路: