前言
在微服務大行其道的今天,分布式系統越來越重要,實作服務化首先就要考慮服務之間的通信問題。這裡面涉及序列化、反序列化、尋址、連接配接等等問題。。不過,有了RPC架構,我們就無需苦惱。
一、什麼是RPC?
RPC(Remote Procedure Call)— 遠端過程調用,是一個計算機通信協定。該協定允許運作于一台計算機的程式調用另一台計算機的子程式,而程式員無需額外地為這個互動作用程式設計。
值得注意是,兩個或多個應用程式都分布在不同的伺服器上,它們之間的調用都像是本地方法調用一樣。
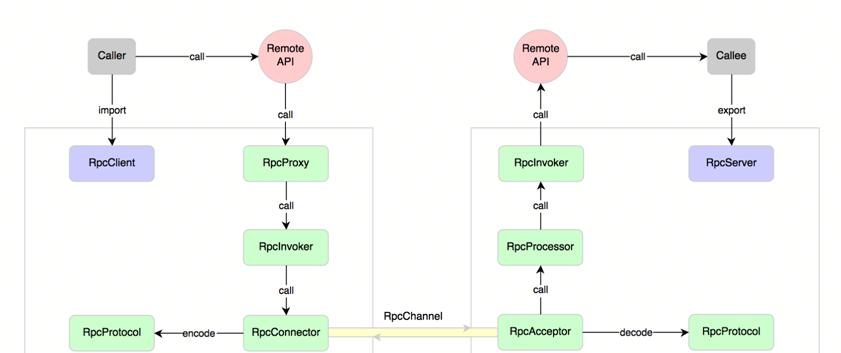
RPC架構有很多,比較知名的如阿裡的Dubbo、google的gRPC、Go語言的rpcx、Apache的thrift。當然了,還有Spring Cloud,不過對于Spring Cloud來說,RPC隻是它的一個功能子產品。
複雜的先不講,如果要實作一個基本功能、簡單的RPC,要涉及哪些東西呢?
- 動态代理
- 反射
- 序列化、反序列化
- 網絡通信
- 編解碼
- 服務發現和注冊
- 心跳與鍊路檢測
- …
下面我們一起通過代碼來分析,怎麼把這些技術點串到一起,實作我們自己的RPC。
二、環境準備
在開始之前,筆者先介紹一下所用到的軟體環境。
SpringBoot、Netty、zookeeper、zkclient、fastjson
-
SpringBoot
項目的基礎架構,友善打成JAR包,便于測試。
-
Netty
通信伺服器
-
zookeeper
服務的發現與注冊
-
zkclient
zookeeper用戶端
-
fastjson
序列化、反序列化
三、RPC生産者
1、服務接口API
整個RPC,我們分為生産者和消費者。首先它們有一個共同的服務接口API。在這裡,我們搞一個操作使用者資訊的service接口。
public interface InfoUserService {
    List<InfoUser> insertInfoUser(InfoUser infoUser);
    InfoUser getInfoUserById(String id);
    void deleteInfoUserById(String id);
    String getNameById(String id);
    Map<String,InfoUser> getAllUser();
}
2、服務類實作
作為生産者,它當然要有實作類,我們建立InfoUserServiceImpl實作類,并用注解把它标注為RPC的服務,然後注冊到Spring的Bean容器中。在這裡,我們把infoUserMap當做資料庫,存儲使用者資訊。
package com.viewscenes.netsupervisor.service.impl;

@RpcService
public class InfoUserServiceImpl implements InfoUserService {

    Logger logger = LoggerFactory.getLogger(this.getClass());
	//當做資料庫,存儲使用者資訊
    Map<String,InfoUser> infoUserMap = new HashMap<>();

    public List<InfoUser> insertInfoUser(InfoUser infoUser) {
        logger.info("新增使用者資訊:{}", JSONObject.toJSONString(infoUser));
        infoUserMap.put(infoUser.getId(),infoUser);
        return getInfoUserList();
    }
    public InfoUser getInfoUserById(String id) {
        InfoUser infoUser = infoUserMap.get(id);
        logger.info("查詢使用者ID:{}",id);
        return infoUser;
    }

    public List<InfoUser> getInfoUserList() {
        List<InfoUser> userList = new ArrayList<>();
        Iterator<Map.Entry<String, InfoUser>> iterator = infoUserMap.entrySet().iterator();
        while (iterator.hasNext()){
            Map.Entry<String, InfoUser> next = iterator.next();
            userList.add(next.getValue());
        }
        logger.info("傳回使用者資訊記錄數:{}",userList.size());
        return userList;
    }
    public void deleteInfoUserById(String id) {
        logger.info("删除使用者資訊:{}",JSONObject.toJSONString(infoUserMap.remove(id)));
    }
    public String getNameById(String id){
        logger.info("根據ID查詢使用者名稱:{}",id);
        return infoUserMap.get(id).getName();
    }
    public Map<String,InfoUser> getAllUser(){
        logger.info("查詢所有使用者資訊{}",infoUserMap.keySet().size());
        return infoUserMap;
    }
}
元注解定義如下:
package com.viewscenes.netsupervisor.annotation;

@Target({ElementType.TYPE})
@Retention(RetentionPolicy.RUNTIME)
@Component
public @interface RpcService {}
3、請求資訊和傳回資訊
所有的請求資訊和傳回資訊,我們用兩個JavaBean來表示。其中的重點是,傳回資訊要帶有請求資訊的ID。
package com.viewscenes.netsupervisor.entity;
public class Request {
	private String id;
	private String className;// 類名
	private String methodName;// 函數名稱
	private Class<?>[] parameterTypes;// 參數類型
	private Object[] parameters;// 參數清單
	get/set ...
}
package com.viewscenes.netsupervisor.entity;
public class Response {
	private String requestId;
	private int code;
	private String error_msg;
	private Object data;
	get/set ...
}
4、Netty服務端
Netty作為高性能的NIO通信架構,在很多RPC架構中都有它的身影。我們也采用它當做通信伺服器。說到這,我們先看個配置檔案,重點有兩個,zookeeper的注冊位址和Netty通信伺服器的位址。
TOMCAT端口
server.port=8001
#zookeeper注冊位址
registry.address=192.168.245.131:2181,192.168.245.131:2182,192.168.245.131:2183
#RPC服務提供者位址
rpc.server.address=192.168.197.1:18868
為了友善管理,我們把它也注冊成Bean,同時實作ApplicationContextAware接口,把上面@RpcService注解的服務類撈出來,緩存起來,供消費者調用。同時,作為伺服器,還要對用戶端的鍊路進行心跳檢測,超過60秒未讀寫資料,關閉此連接配接。
package com.viewscenes.netsupervisor.netty.server;
@Component
public class NettyServer implements ApplicationContextAware,InitializingBean{

    private static final Logger logger = LoggerFactory.getLogger(NettyServer.class);
    private static final EventLoopGroup bossGroup = new NioEventLoopGroup(1);
    private static final EventLoopGroup workerGroup = new NioEventLoopGroup(4);

    private Map<String, Object> serviceMap = new HashMap<>();

    @Value("${rpc.server.address}")
    private String serverAddress;

    @Autowired
    ServiceRegistry registry;

    public void setApplicationContext(ApplicationContext applicationContext) throws BeansException {
        Map<String, Object> beans = applicationContext.getBeansWithAnnotation(RpcService.class);
        for(Object serviceBean:beans.values()){
            Class<?> clazz = serviceBean.getClass();
            Class<?>[] interfaces = clazz.getInterfaces();
            for (Class<?> inter : interfaces){
                String interfaceName = inter.getName();
                logger.info("加載服務類: {}", interfaceName);
                serviceMap.put(interfaceName, serviceBean);
            }
        }
        logger.info("已加載全部服務接口:{}", serviceMap);
    }
    public void afterPropertiesSet() throws Exception {
        start();
    }
    public void start(){
        final NettyServerHandler handler = new NettyServerHandler(serviceMap);
        new Thread(() -> {
            try {
                ServerBootstrap bootstrap = new ServerBootstrap();
                bootstrap.group(bossGroup,workerGroup).
                        channel(NioServerSocketChannel.class).
                        option(ChannelOption.SO_BACKLOG,1024).
                        childOption(ChannelOption.SO_KEEPALIVE,true).
                        childOption(ChannelOption.TCP_NODELAY,true).
                        childHandler(new ChannelInitializer<SocketChannel>() {
                            //建立NIOSocketChannel成功後,在進行初始化時,将它的ChannelHandler設定到ChannelPipeline中,用于處理網絡IO事件
                            protected void initChannel(SocketChannel channel) throws Exception {
                                ChannelPipeline pipeline = channel.pipeline();
                                pipeline.addLast(new IdleStateHandler(0, 0, 60));
                                pipeline.addLast(new JSONEncoder());
                                pipeline.addLast(new JSONDecoder());
                                pipeline.addLast(handler);
                            }
                        });
                String[] array = serverAddress.split(":");
                String host = array[0];
                int port = Integer.parseInt(array[1]);
                ChannelFuture cf = bootstrap.bind(host,port).sync();
                logger.info("RPC 伺服器啟動.監聽端口:"+port);
                registry.register(serverAddress);
                //等待服務端監聽端口關閉
                cf.channel().closeFuture().sync();
            } catch (Exception e) {
                e.printStackTrace();
                bossGroup.shutdownGracefully();
                workerGroup.shutdownGracefully();
            }
        }).start();
    }
}
上面的代碼就把Netty伺服器啟動了,在處理器中的構造函數中,我們先把服務Bean的Map傳進來,所有的處理要基于這個Map才能找到對應的實作類。在channelRead中,擷取請求方法的資訊,然後通過反射調用方法擷取傳回值。
package com.viewscenes.netsupervisor.netty.server;
@ChannelHandler.Sharable
public class NettyServerHandler extends ChannelInboundHandlerAdapter {

    private final Logger logger = LoggerFactory.getLogger(NettyServerHandler.class);
    private final Map<String, Object> serviceMap;

    public NettyServerHandler(Map<String, Object> serviceMap) {
        this.serviceMap = serviceMap;
    }
    public void channelActive(ChannelHandlerContext ctx)   {
        logger.info("用戶端連接配接成功!"+ctx.channel().remoteAddress());
    }
    public void channelInactive(ChannelHandlerContext ctx)   {
        logger.info("用戶端斷開連接配接!{}",ctx.channel().remoteAddress());
        ctx.channel().close();
    }
    public void channelRead(ChannelHandlerContext ctx, Object msg)   {
        Request request = JSON.parseObject(msg.toString(),Request.class);

        if ("heartBeat".equals(request.getMethodName())) {
            logger.info("用戶端心跳資訊..."+ctx.channel().remoteAddress());
        }else{
            logger.info("RPC用戶端請求接口:"+request.getClassName()+"   方法名:"+request.getMethodName());
            Response response = new Response();
            response.setRequestId(request.getId());
            try {
                Object result = this.handler(request);
                response.setData(result);
            } catch (Throwable e) {
                e.printStackTrace();
                response.setCode(1);
                response.setError_msg(e.toString());
                logger.error("RPC Server handle request error",e);
            }
            ctx.writeAndFlush(response);
        }
    }
    /**
     * 通過反射,執行本地方法
     * @param request
     * @return
     * @throws Throwable
     */
    private Object handler(Request request) throws Throwable{
        String className = request.getClassName();
        Object serviceBean = serviceMap.get(className);

        if (serviceBean!=null){
            Class<?> serviceClass = serviceBean.getClass();
            String methodName = request.getMethodName();
            Class<?>[] parameterTypes = request.getParameterTypes();
            Object[] parameters = request.getParameters();

            Method method = serviceClass.getMethod(methodName, parameterTypes);
            method.setAccessible(true);
            return method.invoke(serviceBean, getParameters(parameterTypes,parameters));
        }else{
            throw new Exception("未找到服務接口,請檢查配置!:"+className+"#"+request.getMethodName());
        }
    }
    /**
     * 擷取參數清單
     * @param parameterTypes
     * @param parameters
     * @return
     */
    private Object[] getParameters(Class<?>[] parameterTypes,Object[] parameters){
        if (parameters==null || parameters.length==0){
            return parameters;
        }else{
            Object[] new_parameters = new Object[parameters.length];
            for(int i=0;i<parameters.length;i++){
                new_parameters[i] = JSON.parseObject(parameters[i].toString(),parameterTypes[i]);
            }
            return new_parameters;
        }
    }
    public void userEventTriggered(ChannelHandlerContext ctx, Object evt)throws Exception {
        if (evt instanceof IdleStateEvent){
            IdleStateEvent event = (IdleStateEvent)evt;
            if (event.state()== IdleState.ALL_IDLE){
                logger.info("用戶端已超過60秒未讀寫資料,關閉連接配接.{}",ctx.channel().remoteAddress());
                ctx.channel().close();
            }
        }else{
            super.userEventTriggered(ctx,evt);
        }
    }
    public void exceptionCaught(ChannelHandlerContext ctx, Throwable cause)   {
        logger.info(cause.getMessage());
        ctx.close();
    }
}
4、服務注冊
我們啟動了Netty通信伺服器,并且把服務實作類加載到緩存,等待請求時調用。這一步,我們要進行服務注冊。為了簡單化處理,我們隻注冊通信伺服器的監聽位址即可。
在上面代碼中,bind之後我們執行了
registry.register(serverAddress);
它的作用就是,将Netty監聽的IP端口注冊到zookeeper。
package com.viewscenes.netsupervisor.registry;
@Component
public class ServiceRegistry {
    Logger logger = LoggerFactory.getLogger(this.getClass());
    @Value("${registry.address}")
    private String registryAddress;
    private static final String ZK_REGISTRY_PATH = "/rpc";

    public void register(String data) {
        if (data != null) {
            ZkClient client = connectServer();
            if (client != null) {
                AddRootNode(client);
                createNode(client, data);
            }
        }
    }
	//連接配接zookeeper
    private ZkClient connectServer() {
        ZkClient client = new ZkClient(registryAddress,20000,20000);
        return client;
    }
	//建立根目錄/rpc
    private void AddRootNode(ZkClient client){
        boolean exists = client.exists(ZK_REGISTRY_PATH);
        if (!exists){
            client.createPersistent(ZK_REGISTRY_PATH);
            logger.info("建立zookeeper主節點 {}",ZK_REGISTRY_PATH);
        }
    }
	//在/rpc根目錄下,建立臨時順序子節點
    private void createNode(ZkClient client, String data) {
        String path = client.create(ZK_REGISTRY_PATH + "/provider", data, ZooDefs.Ids.OPEN_ACL_UNSAFE, CreateMode.EPHEMERAL_SEQUENTIAL);
        logger.info("建立zookeeper資料節點 ({} => {})", path, data);
    }
}
有一點需要注意,子節點必須是臨時節點。這樣,生産者端停掉之後,才能通知到消費者,把此服務從服務清單中剔除。到此為止,生産者端已經完成。我們看一下它的啟動日志:
加載服務類: com.viewscenes.netsupervisor.service.InfoUserService
已加載全部服務接口:{com.viewscenes.netsupervisor.service.InfoUserService=com.viewscenes.netsupervisor.service.impl.InfoUserServiceImpl@46cc127b}
Initializing ExecutorService 'applicationTaskExecutor'
Tomcat started on port(s): 8001 (http) with context path ''
Started RpcProviderApplication in 2.003 seconds (JVM running for 3.1)
RPC 伺服器啟動.監聽端口:18868
Starting ZkClient event thread.
Socket connection established to 192.168.245.131/192.168.245.131:2183, initiating session
Session establishment complete on server 192.168.245.131/192.168.245.131:2183, sessionid = 0x367835b48970010, negotiated timeout = 4000
zookeeper state changed (SyncConnected)
建立zookeeper主節點 /rpc
建立zookeeper資料節點 (/rpc/provider0000000000 => 192.168.197.1:28868)
四、RPC消費者
首先,我們需要把生産者端的服務接口API,即InfoUserService。以相同的目錄放到消費者端。路徑不同,調用會找不到的哦。
1、代理
RPC的目标其中有一條,《程式員無需額外地為這個互動作用程式設計。》是以,我們在調用的時候,就像調用本地方法一樣。就像下面這樣:
@Controller
public class IndexController {
	@Autowired
    InfoUserService userService;

	@RequestMapping("getById")
    @ResponseBody
    public InfoUser getById(String id){
        logger.info("根據ID查詢使用者資訊:{}",id);
        return userService.getInfoUserById(id);
    }
}
那麼,問題來了。消費者端并沒有此接口的實作,怎麼調用到的呢?這裡,首先就是代理。筆者這裡用的是Spring的工廠Bean機制建立的代理對象,涉及的代碼較多,就不在文章中展現了,如果有不懂的同學,請想象一下,MyBatis中的Mapper接口怎麼被調用的。可以參考筆者文章:Mybatis源碼分析(四)mapper接口方法是怎樣被調用到的
總之,在調用userService方法的時候,會調用到代理對象的invoke方法。在這裡,封裝請求資訊,然後調用Netty的用戶端方法發送消息。然後根據方法傳回值類型,轉成相應的對象傳回。
package com.viewscenes.netsupervisor.configurer.rpc;

@Component
public class RpcFactory<T> implements InvocationHandler {

    @Autowired
    NettyClient client;

    Logger logger = LoggerFactory.getLogger(this.getClass());
    public Object invoke(Object proxy, Method method, Object[] args) throws Throwable {
        Request request = new Request();
        request.setClassName(method.getDeclaringClass().getName());
        request.setMethodName(method.getName());
        request.setParameters(args);
        request.setParameterTypes(method.getParameterTypes());
        request.setId(IdUtil.getId());

        Object result = client.send(request);
        Class<?> returnType = method.getReturnType();

        Response response = JSON.parseObject(result.toString(), Response.class);
        if (response.getCode()==1){
            throw new Exception(response.getError_msg());
        }
        if (returnType.isPrimitive() || String.class.isAssignableFrom(returnType)){
            return response.getData();
        }else if (Collection.class.isAssignableFrom(returnType)){
            return JSONArray.parseArray(response.getData().toString(),Object.class);
        }else if(Map.class.isAssignableFrom(returnType)){
            return JSON.parseObject(response.getData().toString(),Map.class);
        }else{
            Object data = response.getData();
            return JSONObject.parseObject(data.toString(), returnType);
        }
    }
}
2、服務發現
在生産者端,我們把服務IP端口都注冊到zookeeper中,是以這裡,我們要去拿到服務位址,然後通過Netty連接配接。重要的是,還要對根目錄進行監聽子節點變化,這樣随着生産者的上線和下線,消費者端可以及時感覺。
package com.viewscenes.netsupervisor.connection;

@Component
public class ServiceDiscovery {

    @Value("${registry.address}")
    private String registryAddress;
    @Autowired
    ConnectManage connectManage;

    // 服務位址清單
    private volatile List<String> addressList = new ArrayList<>();
    private static final String ZK_REGISTRY_PATH = "/rpc";
    private ZkClient client;

    Logger logger = LoggerFactory.getLogger(this.getClass());

    @PostConstruct
    public void init(){
        client = connectServer();
        if (client != null) {
            watchNode(client);
        }
    }

	//連接配接zookeeper
    private ZkClient connectServer() {
        ZkClient client = new ZkClient(registryAddress,30000,30000);
        return client;
    }
	//監聽子節點資料變化
    private void watchNode(final ZkClient client) {
        List<String> nodeList = client.subscribeChildChanges(ZK_REGISTRY_PATH, (s, nodes) -> {
            logger.info("監聽到子節點資料變化{}",JSONObject.toJSONString(nodes));
            addressList.clear();
            getNodeData(nodes);
            updateConnectedServer();
        });
        getNodeData(nodeList);
        logger.info("已發現服務清單...{}", JSONObject.toJSONString(addressList));
        updateConnectedServer();
    }
	//連接配接生産者端服務
    private void updateConnectedServer(){
        connectManage.updateConnectServer(addressList);
    }

    private void getNodeData(List<String> nodes){
        logger.info("/rpc子節點資料為:{}", JSONObject.toJSONString(nodes));
        for(String node:nodes){
            String address = client.readData(ZK_REGISTRY_PATH+"/"+node);
            addressList.add(address);
        }
    }
}
其中,
connectManage.updateConnectServer(addressList);
就是根據服務位址,去連接配接生産者端的Netty服務。然後建立一個Channel清單,在發送消息的時候,從中選取一個Channel和生産者端進行通信。
3、Netty用戶端
Netty用戶端有兩個方法比較重要,一個是根據IP端口連接配接伺服器,傳回Channel,加入到連接配接管理器;一個是用Channel發送請求資料。同時,作為用戶端,空閑的時候還要往服務端發送心跳資訊。
package com.viewscenes.netsupervisor.netty.client;

@Component
public class NettyClient {
    Logger logger = LoggerFactory.getLogger(this.getClass());
    private EventLoopGroup group = new NioEventLoopGroup(1);
    private Bootstrap bootstrap = new Bootstrap();
    @Autowired
    NettyClientHandler clientHandler;
    @Autowired
    ConnectManage connectManage;

    public Object send(Request request) throws InterruptedException{

        Channel channel = connectManage.chooseChannel();
        if (channel!=null && channel.isActive()) {
            SynchronousQueue<Object> queue = clientHandler.sendRequest(request,channel);
            Object result = queue.take();
            return JSONArray.toJSONString(result);
        }else{
            Response res = new Response();
            res.setCode(1);
            res.setError_msg("未正确連接配接到伺服器.請檢查相關配置資訊!");
            return JSONArray.toJSONString(res);
        }
    }
    public Channel doConnect(SocketAddress address) throws InterruptedException {
        ChannelFuture future = bootstrap.connect(address);
        Channel channel = future.sync().channel();
        return channel;
    }
	....其他方法略
}
我們必須重點關注send方法,它是在代理對象invoke方法調用到的。首先從連接配接器中輪詢選擇一個Channel,然後發送資料。但是,Netty是異步操作,我們還要轉為同步,就是說要等待生産者端傳回資料才往下執行。筆者在這裡用的是同步隊列SynchronousQueue,它的take方法會阻塞在這裡,直到裡面有資料可讀。然後在處理器中,拿到傳回資訊寫到隊列中,take方法傳回。
package com.viewscenes.netsupervisor.netty.client;
@Component
@ChannelHandler.Sharable
public class NettyClientHandler extends ChannelInboundHandlerAdapter {

    @Autowired
    NettyClient client;
    @Autowired
    ConnectManage connectManage;
    Logger logger = LoggerFactory.getLogger(this.getClass());
    private ConcurrentHashMap<String,SynchronousQueue<Object>> queueMap = new ConcurrentHashMap<>();

    public void channelActive(ChannelHandlerContext ctx)   {
        logger.info("已連接配接到RPC伺服器.{}",ctx.channel().remoteAddress());
    }
    public void channelInactive(ChannelHandlerContext ctx)   {
        InetSocketAddress address =(InetSocketAddress) ctx.channel().remoteAddress();
        logger.info("與RPC伺服器斷開連接配接."+address);
        ctx.channel().close();
        connectManage.removeChannel(ctx.channel());
    }
    public void channelRead(ChannelHandlerContext ctx, Object msg)throws Exception {
        Response response = JSON.parseObject(msg.toString(),Response.class);
        String requestId = response.getRequestId();
        SynchronousQueue<Object> queue = queueMap.get(requestId);
        queue.put(response);
        queueMap.remove(requestId);
    }
    public SynchronousQueue<Object> sendRequest(Request request,Channel channel) {
        SynchronousQueue<Object> queue = new SynchronousQueue<>();
        queueMap.put(request.getId(), queue);
        channel.writeAndFlush(request);
        return queue;
    }
    public void userEventTriggered(ChannelHandlerContext ctx, Object evt)throws Exception {
        logger.info("已超過30秒未與RPC伺服器進行讀寫操作!将發送心跳消息...");
        if (evt instanceof IdleStateEvent){
            IdleStateEvent event = (IdleStateEvent)evt;
            if (event.state()== IdleState.ALL_IDLE){
                Request request = new Request();
                request.setMethodName("heartBeat");
                ctx.channel().writeAndFlush(request);
            }
        }else{
            super.userEventTriggered(ctx,evt);
        }
    }
    public void exceptionCaught(ChannelHandlerContext ctx, Throwable cause){
        logger.info("RPC通信伺服器發生異常.{}",cause);
        ctx.channel().close();
    }
}
至此,消費者端也基本完成。同樣的,我們先看一下啟動日志:
Waiting for keeper state SyncConnected
Opening socket connection to server 192.168.139.129/192.168.139.129:2181. Will not attempt to authenticate using SASL (unknown error)
Socket connection established to 192.168.139.129/192.168.139.129:2181, initiating session
Session establishment complete on server 192.168.139.129/192.168.139.129:2181, sessionid = 0x100000273ba002c, negotiated timeout = 20000
zookeeper state changed (SyncConnected)
/rpc子節點資料為:["provider0000000015"]
已發現服務清單...["192.168.100.74:18868"]
加入Channel到連接配接管理器./192.168.100.74:18868
已連接配接到RPC伺服器./192.168.100.74:18868
Initializing ExecutorService 'applicationTaskExecutor'
Tomcat started on port(s): 7002 (http) with context path ''
Started RpcConsumerApplication in 4.218 seconds (JVM running for 5.569)
五、測試
我們以Controller裡面的兩個方法為例,先開啟100個線程調用insertInfoUser方法,然後開啟1000個線程調用查詢方法getAllUser。
public class IndexController {

    Logger logger = LoggerFactory.getLogger(this.getClass());
    @Autowired
    InfoUserService userService;

    @RequestMapping("insert")
    @ResponseBody
    public List<InfoUser> getUserList() throws InterruptedException {
        long start = System.currentTimeMillis();
        int thread_count = 100;
        CountDownLatch countDownLatch = new CountDownLatch(thread_count);
        for (int i=0;i<thread_count;i++){
            new Thread(() -> {
                InfoUser infoUser = new InfoUser(IdUtil.getId(),"Jeen","BeiJing");
                List<InfoUser> users = userService.insertInfoUser(infoUser);
                logger.info("傳回使用者資訊記錄:{}", JSON.toJSONString(users));
                countDownLatch.countDown();
            }).start();
        }
        countDownLatch.await();
        long end = System.currentTimeMillis();
        logger.info("線程數:{},執行時間:{}",thread_count,(end-start));
        return null;
    }
	@RequestMapping("getAllUser")
    @ResponseBody
    public Map<String,InfoUser> getAllUser() throws InterruptedException {

        long start = System.currentTimeMillis();
        int thread_count = 1000;
        CountDownLatch countDownLatch = new CountDownLatch(thread_count);
        for (int i=0;i<thread_count;i++){
            new Thread(() -> {
                Map<String, InfoUser> allUser = userService.getAllUser();
                logger.info("查詢所有使用者資訊:{}",JSONObject.toJSONString(allUser));
                countDownLatch.countDown();
            }).start();
        }
        countDownLatch.await();
        long end = System.currentTimeMillis();
        logger.info("線程數:{},執行時間:{}",thread_count,(end-start));

        return null;
    }
}
結果如下:

六、總結
本文簡單介紹了RPC的整個流程,如果你正在學習RPC的相關知識,可以根據文中的例子,自己實作一遍。相信寫完之後,你會對RPC會有更深一些的認識。
生産者端流程:
- 加載服務,并緩存
- 啟動通訊伺服器(Netty)
- 服務注冊(把通訊位址放入zookeeper,也可以把加載到的服務也放進去)
- 反射,本地調用
消費者端流程:
- 代理服務接口
- 服務發現(連接配接zookeeper,拿到服務位址清單)
- 遠端調用(輪詢生産者服務清單,發送消息)
限于篇幅,本文代碼并不完整,如有需要,通路:https://github.com/taoxun/simple_rpc 或者添加筆者微信公衆号:<清幽之地的部落格>),擷取完整項目。