在查找NavMesh資料的時候看到這篇blog寫的不錯,從原理到實作,很詳細。另外也可以參考:基于導航網格的A星尋路,這篇blog的參考文獻有詳細介紹導航網格。以下内容轉自http://blianchen.blog.163.com/ by 竹石
NAV導航網格尋路(1) -- 介紹
譯自 http://www.ai-blog.net/archives/2008_07.html
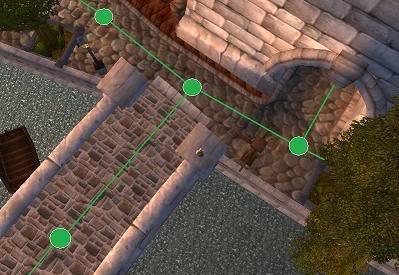
WayPoint尋路
下圖是一個典型的路點尋路
另一種方法是使用多邊形來記錄路徑資訊,它可以提供更多的資訊給ai角色使用。下圖就是一個navigation mesh。

以下列出幾個WayPoint的不足之處:
- 一些複雜的遊戲地圖需要的WayPoint數量過于龐大
- 有時會使角色走“Z”型路徑
如下圖A點和B點之間的路徑
NAV尋路如下圖
下圖是路點尋路,如黃線,會産生“Z”字形
下圖為文章開始時展示的地圖的比較,紅線是wayPoint尋路,藍線是nav。
3. 不能進行動态修正,如果地圖中有動态障礙,處理起來會很困難
如要實作即時戰略遊戲中,一輛在路上行走的坦克會擋住你軍隊的去路,這個移動的坦克就是一個動态障礙。
4. 不能根據角色的特性(不同寬度、高度等)改變路徑
如一個狹窄的通道,普通的人能夠通過,而一輛馬車的寬度超過通道寬度,應該不能通過。
5. 不能儲存地形的附加資訊,如地表高度、地面特征(水面、沙地等)
比如一個遊戲中的角色在走到沙地上時會降低移動速度,或走在一個斜坡上時人物會發生傾斜等。
NAV導航網格尋路(2) -- 尋路方法
nav尋路一般包含兩部分,首先是使用工具根據地圖資訊生成尋路用的nav mesh,接下來就是在遊戲中根據生成的nav mesh來自動尋路。
一般人首先關心的就是尋路方法,是以這裡把順序颠倒下,先說尋路。
一. 使用A*尋找所經過網格路徑
下圖為一個已經生成nav網格的地圖,深紅色區域為不可行走區域,淺紅色區域為可以行走的區域。
如下圖,現在如果要尋找從A點到B點的路徑,首先要從所有可行走的網格中找到一條最優的網格路徑(圖中紫色的網格),然後再根據這些網格生成所需要的路徑點。
計算最優網格路徑的方法可以使用流行的A*,也可以使用其它方法。A*算法網上很多就不說了,至于三角網格的A*實作因為涉及網格的資料結構會在系列的最後給出。
二. 生成路徑點
nav尋路最常用的就是光照射線法了,這個在neoragex2002的blog上有講,這裡就不說了
另一種方法就是拐角點法,如下圖
下圖的5個凸多邊形是已經生成的導航網格,多邊形外部的區域為不可行走區域,current為起點,goal為終點,從圖中就可以看出最短路徑為圖中紅線,藍色圈出的點為我們需要找出的點。所有多邊形頂點均按逆時針方向存儲(這些均在生成導航網格時處理,以後會講到)。
(1)下圖顯示出各區域之間的入口,即多邊形的臨邊。由圖中可以看出每個臨邊均為起點穿出該多邊形區域的邊,故以下稱該邊為穿出邊。
(2)首先找到起始點所在的多邊形和穿出邊的兩個端點,由起點連接配接兩個端點,形成兩個線段lineLeft 和lineRight。如下圖。綠色圈表示左點,紅色表示右點(左點、右點是根據多邊形頂點儲存順序而來)。
(3)繼續找到下一個穿出邊的兩個端點,判斷新的左點是否在lineLeft 和lineRigh之間,如果在,則更新lineLeft為起點到新左點的線段。
同樣處理新穿出邊的右點,如下圖
該步最後得到兩個新的線段,如下圖。
(4) 繼續判斷下一個穿出邊的兩個端點,如下圖,新的左點在lineLeft和lineRight的外面,則不更新線段。
下圖說明新的右點在兩條直線之間,更新lineRight。
該步最後得到兩個新的線段,如下圖。
(5) 繼續循環判斷下一個穿出邊的兩個端點,該穿出邊的兩個端點都在lineRight的右側,表示lineRight的終點即為路徑的一個拐角點。
(6) 循環以上步驟都可以找到從起點到終點的一條完整路徑。
NAV導航網格尋路(3) -- 一些必要的計算幾何知識
在繼續下面的nav網格生成算法之前,先介紹一下涉及到的計算幾何知識。這裡隻羅列出結論,要詳細了解參考相關書籍。
-
矢量加減法:
設二維矢量P = ( x1, y1 ),Q = ( x2 , y2 ),則矢量加法定義為: P + Q = ( x1 + x2 , y1 + y2 ),同樣的,矢量減法定義為: P - Q = ( x1 - x2 , y1 - y2 )。顯然有性質 P + Q = Q + P,P - Q = - ( Q - P )。
-
矢量叉積
設矢量P = ( x1, y1 ),Q = ( x2, y2 ),則矢量叉積定義為由(0,0)、p1、p2和p1+p2所組成的平行四邊形的帶符号的面積,即:P × Q = x1*y2 - x2*y1,其結果是一個标量。顯然有性質 P × Q = - ( Q × P ) 和 P × ( - Q ) = - ( P × Q )。
-
折線段的拐向判斷:
折線段的拐向判斷方法可以直接由矢量叉積的性質推出。對于有公共端點的線段p0p1和p1p2,通過計算(p2 - p0) × (p1 - p0)的符号便可以确定折線段的拐向:
若(p2 - p0) × (p1 - p0) > 0,則p0p1在p1點拐向右側後得到p1p2。
若(p2 - p0) × (p1 - p0) < 0,則p0p1在p1點拐向左側後得到p1p2。
若(p2 - p0) × (p1 - p0) = 0,則p0、p1、p2三點共線。
-
判斷兩線段是否相交:
我們分兩步确定兩條線段是否相交:
(1)快速排斥試驗
設以線段 P1P2 為對角線的矩形為R, 設以線段 Q1Q2 為對角線的矩形為T,如果R和T不相交,顯然兩線段不會相交。
(2)跨立試驗
如果兩線段相交,則兩線段必然互相跨立對方。若P1P2跨立Q1Q2 ,則矢量 ( P1 - Q1 ) 和( P2 - Q1 )位于矢量( Q2 - Q1 ) 的兩側,即( P1 - Q1 ) × ( Q2 - Q1 ) * ( P2 - Q1 ) × ( Q2 - Q1 ) < 0。上式可改寫成( P1 - Q1 ) × ( Q2 - Q1 ) * ( Q2 - Q1 ) × ( P2 - Q1 ) > 0。當 ( P1 - Q1 ) × ( Q2 - Q1 ) = 0 時,說明 ( P1 - Q1 ) 和 ( Q2 - Q1 )共線,但是因為已經通過快速排斥試驗,是以 P1 一定線上段 Q1Q2上;同理,( Q2 - Q1 ) ×(P2 - Q1 ) = 0 說明 P2 一定線上段 Q1Q2上。是以判斷P1P2跨立Q1Q2的依據是:( P1 - Q1 ) × ( Q2 - Q1 ) * ( Q2 - Q1 ) × ( P2 - Q1 ) >= 0。同理判斷Q1Q2跨立P1P2的依據是:( Q1 - P1 ) × ( P2 - P1 ) * ( P2 - P1 ) × ( Q2 - P1 ) >= 0。
Nav導航網格尋路 -
凸多邊形
假設我們在一個多邊形上(包括多邊形的邊界及邊界圍封的範圍)任意取兩點并以一條線段連結該兩點,如果線段上的每一點均在該多邊形上,那麼我們便說這個多邊形是凸的。
-
凸包
給定平面上的一個(有限)點集(即一組點),這個點集的凸包就是包含點集中所有點的最小面積的凸多邊形。
Nav導航網格尋路 -
點在凸多邊形中的判斷
假設多邊形是凸的,而且頂點p0,p1,...,pn按順時針方向排列,則點在多邊形任意一邊 pi-1, pi 的右面。
- Voronoi圖及對偶圖
Nav導航網格尋路 - Delaunay三角剖分(Voronoi對偶圖)
Nav導航網格尋路 在實際中運用的最多的三角剖分是Delaunay三角剖分,它是一種特殊的三角剖分。先從Delaunay邊說起:
【定義】Delaunay邊:假設E中的一條邊e(兩個端點為a,b),e若滿足下列條件,則稱之為Delaunay邊:存在一個圓經過a,b兩點,圓内(注意是圓内,圓上最多三點共圓)不含點集V中任何其他的點,這一特性又稱空圓特性。
【定義】Delaunay三角剖分:如果點集V的一個三角剖分T隻包含Delaunay邊,那麼該三角剖分稱為Delaunay三角剖分。
以下是Delaunay剖分所具備的優異特性:
1.最接近:以最近臨的三點形成三角形,且各線段(三角形的邊)皆不相交。
2.唯一性:不論從區域何處開始建構,最終都将得到一緻的結果。
3.最優性:任意兩個相鄰三角形形成的凸四邊形的對角線如果可以互換的話,那麼兩個三角形六個内角中最小的角度不會變大。
4.最規則:如果将三角網中的每個三角形的最小角進行升序排列,則Delaunay三角網的排列得到的數值最大。
5.區域性:新增、删除、移動某一個頂點時隻會影響臨近的三角形。
6.具有凸多邊形的外殼:三角網最外層的邊界形成一個凸多邊形的外殼。
- 多邊形裁剪 Weiler-Athenton算法
Nav導航網格尋路
–主多邊形:被裁剪多邊形,記為A
–裁剪多邊形:裁剪視窗,記為B
多邊形頂點的排列順序(使多邊形區域位于有向邊的左側 )外環:逆時針 ;内環:順時針
主多邊形和裁剪多邊形把二維平面分成兩部分。
内裁剪:A∩B
外裁剪:A-B
裁剪結果區域的邊界由A的部分邊界和B的部分邊界兩部分構成,并且在交點處邊界發生交替,即由A的邊界轉至B的邊界,或由B的邊界轉至A的邊界。
如果主多邊形與裁剪多邊形有交點,則交點成對出現,它們被分為如下兩類:
進點:主多邊形邊界由此進入裁剪多邊形内 如,I1,I3, I5, I7, I9, I11
出點:主多邊形邊界由此離開裁剪多邊形區域. 如, I0,I2, I4, I6, I8, I10
算法步驟
(1)建立空的裁剪結果多邊形的頂點表.
(2)選取任一沒有被跟蹤過的交點為始點,将其輸出到結果多邊形頂點表中.
(3)如果該交點為進點,跟蹤主多邊形邊邊界;否則跟蹤裁剪多邊形邊界.
(4) 跟蹤多邊形邊界,每遇到多邊形頂點,将其輸出到結果多邊形頂點表中,直至遇到新的交點.
(5)将該交點輸出到結果多邊形頂點表中,并通過連接配接該交點的雙向指針改變跟蹤方向(如果上一步跟蹤的是主多邊形邊界,現在改為跟蹤裁剪多邊形邊界;如果上一步跟蹤裁剪多邊形邊界,現在改為跟蹤主多邊形邊界).
(6)重複(4)、(5)直至回到起點
NAV導航網格尋路(4) -- 生成nav網格
假設上圖是一個遊戲地圖,紅色的區域是不可行走的區域,淺灰色區域是可行走區域,要想在遊戲中實作nav尋路,必須将可行走區域轉化為nav網格并儲存為一種固定形式的資料,如下圖淺紅色的三角形。
nav網格必須是凸多邊形,這裡使用三角型,當然也可以使用4邊形。下面介紹一種任意多邊形的三角化算法。算法來自論文《平面多邊形域的快速限制Delaunay三角化》作者:曾薇 孟祥旭 楊承磊 楊義軍。詳細内容請參考該論文。
先來看幾個定義:
A. 我們稱點 p3 為直線 p1p2 的可見點,其必須滿足下面三個條件:
(1) p3 在邊 p1p2 的右側 (頂點順序為順時針);
(2) p3 與 p1 可見,即 p1p3 不與任何一個限制邊相交;
(3) p3 與 p2 可見
B. DT點
在一個限制Delaunay三角形中,其中與一條邊相對的頂點稱為該邊的DT點。
确定 DT 點的過程如下:
Step1. 構造 Δp1p2p3 的外接圓 C(p1,p2,p3)及其網格包圍盒 B(C(p1,p2,p3))
Step2. 依次通路網格包圍盒内的每個網格單元:
對未作目前趟數标記的網格單元進行搜尋,并将其标記為目前趟數
若某個網格單元中存在可見點 p, 并且 ∠p1pp2 > ∠p1p3p2,則令 p3=p1,轉Step1;否則,轉Step3.
Step3. 若目前網格包圍盒内所有網格單元都已被标記為目前趟數,也即C(p1,p2,p3)内無可見點,則 p3 為的 p1p2 的 DT 點
生成Delaunay三角網格算法如下:
Step2. 取任意一條外邊界邊 p1p2 .
Step3. 計算 DT 點 p3,構成限制 Delaunay 三角形 Δp1p2p3 .
Step4. 如果新生成的邊 p1p3 不是限制邊,若已經在堆棧中,則将其從中删除;否則,将其放入堆棧;類似地,可處理 p3p2 .
Step5. 若堆棧不空,則從中取出一條邊,轉Step3;否則,算法停止 .
程式實作該算法(AS3語言)
1。資料結構
不難看出,要想實作該算法首先要确定一些基礎對象,如點、線、三角型和多邊形等對象。(才發現這個blog中竟然沒有代碼的格式
)
二維點的定義 public class Vector2f {} 包括矢量加減、叉積等方法。
線的定義 public class Line2D {} 包括下面方法:
classifyPoint(point:Vector2f, epsilon:Number = 0.000001):int
判斷點與直線的關系,假設你站在a點朝向b點, 則輸入點與直線的關系分為:Left, Right or Centered on the line
equals(line:Line2D):Boolean
線段是否相等 (忽略方向)
getDirection():Vector2f
直線方向
intersection(other:Line2D, pIntersectPoint:Vector2f = null):int
判斷兩個直線關系 this line A = x0, y0 and B = x1, y1 other is A = x2, y2 and B = x3, y3
length():Number
直線長度
signedDistance(point:Vector2f):Number
給定點到直線的帶符号距離,從a點朝向b點,右向為正,左向為負
三角型定義 public class Triangle:
getSide(sideIndex:int):Line2D
取得指定索引的邊(從0開始,順時針)
getVertex(i:int):Vector2f
根據i傳回頂點
isPointIn(testPoint:Vector2f):Boolean
測試給定點是否在三角型中
setVertex(i:int, point:Vector2f):void
根據i指定的索引設定三角形的頂點
多邊形定義 public class Polygon:
public vertexV : Vector.<Vector2f> //頂點清單,按順時針方向排序
cw():void
将多邊形的頂點按逆時針排序
isCW():Boolean
将多邊形的頂點按順時針排序
isSimplicity():Boolean
是否是簡單多邊形
rectangle():Rectangle
傳回矩形包圍盒 Polygon
union(polygon:Polygon):Vector.<Polygon>
合并兩個多邊形(Weiler-Athenton算法)
三角化的完整代碼,注釋比較全,就不再詳細解釋了
<span style="background-color: rgb(255, 255, 255);">/*
* @author 白連忱
* date Jan 22, 2010
*/
package org.blch.geom
{
    import flash.display.Sprite;
    import flash.geom.Rectangle;
    import flash.text.TextField;
    import flash.text.TextFieldAutoSize;
    import flash.text.TextFormat;

    /**
     * Delaunay
     * @langversion ActionScript 3.0
     * @playerversion Flash 10.0
     */
    public class Delaunay
    {
        public function Delaunay()
        {
        }

        private static const EPSILON:Number = 0.000001;    //精度

        private var polygonV:Vector.<Polygon>;        //所有多邊形,第0個元素為區域外邊界 (輸入資料)

        private var vertexV:Vector.<Vector2f>;        //所有頂點清單, 前outEdgeVecNmu個為外邊界頂點
        private var edgeV:Vector.<Line2D>;            //所有限制邊

        private var outEdgeVecNmu:int;            //區域外邊界頂點數

        private  var lineV:Vector.<Line2D>;    //線段堆棧

        private var triangleV:Vector.<Triangle>;     //生成的Delaunay三角形

        public function createDelaunay(polyV:Vector.<Polygon>):Vector.<Triangle> {
            //Step1.     建立單元大小為 E*E 的均勻網格,并将多邊形的頂點和邊放入其中.
            //            其中 E=sqrt(w*h/n),w 和 h 分别為多邊形域包圍盒的寬度、高度,n 為多邊形域的頂點數 .
            initData(polyV);

            //Step2.    取任意一條外邊界邊 p1p2 .
            var initEdge:Line2D = getInitOutEdge();
            lineV.push(initEdge);

            var edge:Line2D;
            do {
                //Step3.     計算 DT 點 p3,構成限制 Delaunay 三角形 Δp1p2p3 .
                edge = lineV.pop();
//                trace("開始處理edge###########:", edge);
                var p3:Vector2f = findDT(edge);
                if (p3 == null) continue;
                var line13:Line2D = new Line2D(edge.getPointA(), p3);
                var line32:Line2D = new Line2D(p3, edge.getPointB());

                //Delaunay三角形放入輸出數組
                var trg:Triangle = new Triangle(edge.getPointA(), edge.getPointB(), p3);

//                trace("DT 點p3", p3);
//                trace("Triangle", trg);
                triangleV.push(trg);

                //Step4.    如果新生成的邊 p1p3 不是限制邊,若已經在堆棧中,
                //            則将其從中删除;否則,将其放入堆棧;類似地,可處理 p3p2 .
                var index:int;
                if (indexOfVector(line13, this.edgeV) < 0) {
                    index = indexOfVector(line13, lineV);
                    if (index > -1) {
                        lineV.splice(index, 1);
                    } else {
                        lineV.push(line13);
                    }
                }
                if (indexOfVector(line32, this.edgeV) < 0) {
                    index = indexOfVector(line32, lineV);
                    if (index > -1) {
                        lineV.splice(index, 1);
                    } else {
                        lineV.push(line32);
                    }
                }

            //Step5.    若堆棧不空,則從中取出一條邊,轉Step3;否則,算法停止 .
//                trace("處理結束edge###########\n");
            } while (lineV.length > 0);

            return triangleV;
        }

        /**
         * 初始化資料
         * @param polyV
         */
        private function initData(polyV:Vector.<Polygon>):void {
            //填充頂點和線清單
            vertexV = new Vector.<Vector2f>();
            edgeV = new Vector.<Line2D>();
            var poly:Polygon;
            for (var i:int=0; i<polyV.length; i++) {
                poly = polyV[i];
                putVertex(vertexV, poly.vertexV);
                putEdge(edgeV, poly.vertexV);
            }

            outEdgeVecNmu = polyV[0].vertexNmu;

            lineV = new Vector.<Line2D>();
            triangleV = new Vector.<Triangle>();
        }

        /**
         * 擷取初始外邊界
         * @return
         */
        private function getInitOutEdge():Line2D {
            var initEdge:Line2D = edgeV[0];
            //檢查是否有頂點p在該邊上,如果有則換一個外邊界
            var loopSign:Boolean;
            var loopIdx:int = 0;
            do {
                loopSign = false;
                loopIdx++;
                for each (var testV:Vector2f in this.vertexV) {
                    if ( testV.equals(initEdge.getPointA()) || testV.equals(initEdge.getPointB()) ) continue;
                    if (initEdge.classifyPoint(testV, EPSILON) == PointClassification.ON_LINE) {
                        loopSign = true;
                        initEdge = edgeV[loopIdx];
                        break;
                    }
                }
            } while (loopSign && loopIdx<outEdgeVecNmu-1);    //隻取外邊界
            return initEdge;
        }

        /**
         * 将srcV中的點放入dstV
         * @param dstV
         * @param srcV
         */
        private function putVertex(dstV:Vector.<Vector2f>, srcV:Vector.<Vector2f>):void {
            for each (var item:Vector2f in srcV) {
                dstV.push(item);
            }
        }

        /**
         * 根據srcV中的點生成多邊形線段,并放入dstV
         * @param dstV
         * @param srcV
         */
        private function putEdge(dstV:Vector.<Line2D>, srcV:Vector.<Vector2f>):void {
            if (srcV.length < 3) return;    //不是一個多邊形

            var p1:Vector2f = srcV[0];
            var p2:Vector2f;
            for (var i:int=1; i<srcV.length; i++) {
                p2 = srcV[i];
                dstV.push(new Line2D(p1, p2));
                p1 = p2;
            }
            p2 = srcV[0];
            dstV.push(new Line2D(p1, p2));
        }

        /**
         * 判斷線段是否是限制邊
         * @param line
         * @return 線段的索引,如果沒有找到,傳回-1
         */
        private function indexOfVector(line:Line2D, vector:Vector.<Line2D>):int {
            var lt:Line2D;
            for (var i:int=0; i<vector.length; i++) {
                lt = vector[i];
                if (lt.equals(line)) return i;
            }
            return -1;
        }

        /**
         * 計算 DT 點
         * @param line
         * @return
         */
        private function findDT(line:Line2D):Vector2f {
            var p1:Vector2f = line.getPointA();
            var p2:Vector2f = line.getPointB();

            //搜尋所有可見點             TODO 按y方向搜尋距線段終點最近的點
            var allVPoint:Vector.<Vector2f> = new Vector.<Vector2f>();        // line的所有可見點
            for each (var vt:Vector2f in this.vertexV) {
                if (isVisiblePointOfLine(vt, line)) {
                    allVPoint.push(vt);
                }
            }

            if (allVPoint.length == 0) return null;

            var p3:Vector2f = allVPoint[0];

            var loopSign:Boolean = false;
            do {
                loopSign = false;

                //Step1. 構造 Δp1p2p3 的外接圓 C(p1,p2,p3)及其網格包圍盒 B(C(p1,p2,p3))
                var circle:Circle = this.circumCircle(p1, p2, p3);
                var boundsBox:Rectangle = this.circleBounds(circle);

                //Step2. 依次通路網格包圍盒内的每個網格單元:
                //         若某個網格單元中存在可見點 p, 并且 ∠p1pp2 > ∠p1p3p2,則令 p3=p,轉Step1;否則,轉Step3.
                var angle132:Number = Math.abs(lineAngle(p1, p3, p2));    // ∠p1p3p2
                for each (var vec:Vector2f in allVPoint) {
                    if ( vec.equals(p1) || vec.equals(p2) || vec.equals(p3) ) {
                        continue;
                    }
                    //不在包圍盒中
                    if (boundsBox.contains(vec.x, vec.y) == false) {
                        continue;
                    }

                    //夾角
                    var a1:Number = Math.abs(lineAngle(p1, vec, p2));
                    if (a1 > angle132) {
                        /轉Step1
                        p3 = vec;
                        loopSign = true;
                        break;
                    }
                }
                ///轉Step3
            } while (loopSign);

            //Step3. 若目前網格包圍盒内所有網格單元都已被處理完,
            //         也即C(p1,p2,p3)内無可見點,則 p3 為的 p1p2 的 DT 點
            return p3;
        }

        /**
         * 傳回頂角在o點,起始邊為os,終止邊為oe的夾角, 即∠soe (機關:弧度)
         * 角度小于pi,傳回正值;   角度大于pi,傳回負值
         */
        private function lineAngle(s:Vector2f, o:Vector2f, e:Vector2f):Number
        {
            var cosfi:Number, fi:Number, norm:Number;
            var dsx:Number = s.x - o.x;
            var dsy:Number = s.y - o.y;
            var dex:Number = e.x - o.x;
            var dey:Number = e.y - o.y;

            cosfi = dsx*dex + dsy*dey;
            norm = (dsx*dsx + dsy*dsy) * (dex*dex + dey*dey);
            cosfi /= Math.sqrt( norm );

            if (cosfi >=  1.0 ) return 0;
            if (cosfi <= -1.0 ) return -Math.PI;

            fi = Math.acos(cosfi);
            if (dsx*dey - dsy*dex > 0) return fi;      // 說明矢量os 在矢量 oe的順時針方向
            return -fi;
        }

        /**
         * 傳回圓的包圍盒
         * @param c
         * @return
         */
        private function circleBounds(c:Circle):Rectangle {
            return new Rectangle(c.center.x-c.r, c.center.y-c.r, c.r*2, c.r*2);
        }

        /**
         * 傳回三角形的外接圓
         * @param p1
         * @param p2
         * @param p3
         * @return
         */
        private function circumCircle(p1:Vector2f, p2:Vector2f, p3:Vector2f):Circle {
            var m1:Number,m2:Number,mx1:Number,mx2:Number,my1:Number,my2:Number;
            var dx:Number,dy:Number,rsqr:Number,drsqr:Number;
            var xc:Number, yc:Number, r:Number;

            /* Check for coincident points */

            if ( Math.abs(p1.y-p2.y) < EPSILON && Math.abs(p2.y-p3.y) < EPSILON )
            {
                trace("CircumCircle: Points are coincident.");
                return null;
            }

            m1 = - (p2.x - p1.x) / (p2.y - p1.y);
            m2 = - (p3.x-p2.x) / (p3.y-p2.y);
            mx1 = (p1.x + p2.x) / 2.0;
            mx2 = (p2.x + p3.x) / 2.0;
            my1 = (p1.y + p2.y) / 2.0;
            my2 = (p2.y + p3.y) / 2.0;

            if ( Math.abs(p2.y-p1.y) < EPSILON ) {
                xc = (p2.x + p1.x) / 2.0;
                yc = m2 * (xc - mx2) + my2;
            } else if ( Math.abs(p3.y - p2.y) < EPSILON ) {
                xc = (p3.x + p2.x) / 2.0;
                yc = m1 * (xc - mx1) + my1;
            } else {
                xc = (m1 * mx1 - m2 * mx2 + my2 - my1) / (m1 - m2);
                yc = m1 * (xc - mx1) + my1;
            }

            dx = p2.x - xc;
            dy = p2.y - yc;
            rsqr = dx*dx + dy*dy;
            r = Math.sqrt(rsqr);

            return new Circle(new Vector2f(xc, yc), r);
        }

        /**
         * 判斷點vec是否為line的可見點
         * @param vec
         * @param line
         * @return true:vec是line的可見點
         */
        private function isVisiblePointOfLine(vec:Vector2f, line:Line2D):Boolean {
            if (vec.equals(line.getPointA()) || vec.equals(line.getPointB())) {
                return false;
            }

            //(1) p3 在邊 p1p2 的右側 (多邊形頂點順序為順時針);
            if (line.classifyPoint(vec, EPSILON) != PointClassification.RIGHT_SIDE)
            {
                return false;
            }

            //(2) p3 與 p1 可見,即 p1p3 不與任何一個限制邊相交;
            if (isVisibleIn2Point(line.getPointA(), vec) == false) {
                return false;
            }

            //(3) p3 與 p2 可見
            if (isVisibleIn2Point(line.getPointB(), vec) == false) {
                return false;
            }

            return true;
        }

        /**
         * 點pa和pb是否可見(pa和pb構成的線段不與任何限制邊相交,不包括頂點)
         * @param pa
         * @param pb
         * @return
         */
        private function isVisibleIn2Point(pa:Vector2f, pb:Vector2f):Boolean {
            var linepapb:Line2D = new Line2D(pa, pb);
            var interscetVector:Vector2f = new Vector2f();        //線段交點
            for each (var lineTmp:Line2D in this.edgeV) {
                //兩線段相交
                if (linepapb.intersection(lineTmp, interscetVector) == LineClassification.SEGMENTS_INTERSECT) {
                    //交點是不是端點
                    if ( !pa.equals(interscetVector) && !pb.equals(interscetVector) ) {
                        return false;
                    }
                }
            }
            return true;
        }

    }
}

import org.blch.geom.Vector2f;
/**
 * 圓
 * @author blc
 */
class Circle {
    public var center:Vector2f;        //圓心
    public var r:Number;            //半徑

    public function Circle(cen:Vector2f, r:Number) {
        this.center = cen;
        this.r = r;
    }
}</span>
NAV導航網格尋路(5) -- 生成網格的一些補充
如果你也實作了上一章提到的代碼,不難發現對下圖的兩種情況會出現問題
左面的是兩個區域有相交的情況,右面的是多邊形本身有自交,在這兩種情況下,前面給出的代碼均會産生錯誤的結果。
對于兩個多邊形相交,可以在生成網格之前先合并多邊形,合并後如圖
合并算法在前面多邊形剪裁處已給出一個,這裡隻貼上代碼:
<span style="background-color: rgb(255, 255, 255);">         /**
         * 合并兩個多邊形(Weiler-Athenton算法)
         * @param polygon
         * @return
         *             null--兩個多邊形不相交,合并前後兩個多邊形不變
         *             Polygon--一個新的多邊形
         */
        public function union(polygon:Polygon):Vector.<Polygon> {
            //包圍盒不相交
            if (rectangle().intersection(polygon.rectangle()) == false) {
                return null;
            }

            //所有頂點和交點
            var cv0:Vector.<Node> = new Vector.<Node>();//主多邊形
            var cv1:Vector.<Node> = new Vector.<Node>();//合并多邊形
            //初始化
            var node:Node;
            for (var i:int=0; i<this.vertexV.length; i++) {
                node = new Node(this.vertexV[i], false, true);
                if (i > 0) {
                    cv0[i-1].next = node;
                }
                cv0.push(node);
            }
            for (var j:int=0; j<polygon.vertexV.length; j++) {
                node = new Node(polygon.vertexV[j], false, false);
                if (j > 0) {
                    cv1[j-1].next = node;
                }
                cv1.push(node);
            }

            //插入交點
            var insCnt:int = this.intersectPoint(cv0, cv1);

            //生成多邊形
            if (insCnt > 0) {
                //順時針序
                return linkToPolygon(cv0, cv1);
            } else {
                return null;
            }

            return null;
        }

        /**
         * 生成多邊形,順時針序; 生成的内部孔洞多邊形為逆時針序
         * @param cv0
         * @param cv1
         * @return 合并後的結果多邊形數組(可能有多個多邊形)
         */
        private function linkToPolygon(cv0:Vector.<Node>, cv1:Vector.<Node>):Vector.<Polygon> {
            trace("linkToPolygon***linkToPolygon");
            //儲存合并後的多邊形數組
            var rtV:Vector.<Polygon> = new Vector.<Polygon>();

            //1. 選取任一沒有被跟蹤過的交點為始點,将其輸出到結果多邊形頂點表中.
            for each (var testNode:Node in cv0) {
                if (testNode.i == true && testNode.p == false) {
                    var rcNodes:Vector.<Vector2f> = new Vector.<Vector2f>();
                    while (testNode != null) {

                        testNode.p = true;

                        // 如果是交點
                        if (testNode.i == true) {
                            testNode.other.p = true;

                            if (testNode.o == false) {        //該交點為進點(跟蹤裁剪多邊形邊界)
                                if (testNode.isMain == true) {        //目前點在主多邊形中
                                    testNode = testNode.other;        //切換到裁剪多邊形中
                                }
                            } else {                    //該交點為出點(跟蹤主多邊形邊界)
                                if (testNode.isMain == false) {        //目前點在裁剪多邊形中
                                    testNode = testNode.other;        //切換到主多邊形中
                                }
                            }
                        }

                        rcNodes.push(testNode.v);          // 如果是多邊形頂點,将其輸出到結果多邊形頂點表中

                        if (testNode.next == null) {    //末尾點傳回到開始點
                            if (testNode.isMain) {
                                testNode = cv0[0];
                            } else {
                                testNode = cv1[0];
                            }
                        } else {
                            testNode = testNode.next;
                        }

                        //與首點相同,生成一個多邊形
                        if (testNode.v.equals(rcNodes[0])) break;
                    }
                    //提取
                    rtV.push(new Polygon(rcNodes.length, rcNodes));
                }
            }

            trace("rtV", rtV);
            return rtV;
        }

        /**
         * 生成交點,并按順時針序插入到頂點表中
         * @param cv0 (in/out)主多邊形頂點表,并傳回插入交點後的頂點表
         * @param cv1 (in/out)合并多邊形頂點表,并傳回插入交點後的頂點表
         * @return 交點數
         */
        private function intersectPoint(cv0:Vector.<Node>, cv1:Vector.<Node>):int {
            var insCnt:int = 0;        //交點數

            var findEnd:Boolean = false;
            var startNode0:Node = cv0[0];
            var startNode1:Node;
            var line0:Line2D;
            var line1:Line2D;
            var ins:Vector2f;
            var hasIns:Boolean;
            var result:int;        //進出點判斷結果
            while (startNode0 != null) {        //主多邊形
                if (startNode0.next == null) {  //最後一個點,跟首點相連
                    line0 = new Line2D(startNode0.v, cv0[0].v);
                } else {
                    line0 = new Line2D(startNode0.v, startNode0.next.v);
                }

                startNode1 = cv1[0];
                hasIns = false;

                while (startNode1 != null) {        //合并多邊形
                    if (startNode1.next == null) {
                        line1 = new Line2D(startNode1.v, cv1[0].v);
                    } else {
                        line1 = new Line2D(startNode1.v, startNode1.next.v);
                    }
                    ins = new Vector2f();    //接受傳回的交點
                    //有交點
                    if (line0.intersection(line1, ins) == LineClassification.SEGMENTS_INTERSECT) {
                        //忽略交點已在頂點清單中的
                        if (this.getNodeIndex(cv0, ins) == -1) {
                            insCnt++;

                            / 插入交點
                            var node0:Node = new Node(ins, true, true);
                            var node1:Node = new Node(ins, true, false);
                            cv0.push(node0);
                            cv1.push(node1);
                            //雙向引用
                            node0.other = node1;
                            node1.other = node0;
                            //插入
                            node0.next = startNode0.next;
                            startNode0.next = node0;
                            node1.next = startNode1.next;
                            startNode1.next = node1;
                            //出點
                            if (line0.classifyPoint(line1.getPointB()) == PointClassification.RIGHT_SIDE) {
                                node0.o = true;
                                node1.o = true;
                            }
                            //TODO 線段重合
//                            trace("交點****", node0);

                            hasIns = true;        //有交點

                            //有交點,傳回重新處理
                            break;
                        }
                    }
                    startNode1 = startNode1.next;
                }
                //如果沒有交點繼續處理下一個邊,否則重新處理該點與插入的交點所形成的線段
                if (hasIns == false) {
                    startNode0 = startNode0.next;
                }
            }
            return insCnt;
        }

        /**
         * 取得節點的索引(合并多邊形用)
         * @param cv
         * @param node
         * @return
         */
        private function getNodeIndex(cv:Vector.<Node>, node:Vector2f):int {
            for (var i:int=0; i<cv.length; i++) {
                if (cv[i].v.equals(node)) {
                    return i;
                }
            }
            return -1;
        }

對于一個給定的多邊形數組polygonV,可以象下面這樣在三角化以前做預處理

        /**
         * 合并
         */
        private function unionAll():void {
            for (var n:int=1; n<polygonV.length; n++) {
                var p0:Polygon = polygonV[n];
                for (var m:int=1; m<polygonV.length; m++) {
                    var p1:Polygon = polygonV[m];
                    if (p0 != p1 && p0.isCW() && p1.isCW()) {
                        var v:Vector.<Polygon> = p0.union(p1);    //合并

                        if (v != null && v.length > 0) {
                            trace("delete");
                            polygonV.splice(polygonV.indexOf(p0), 1);
                            polygonV.splice(polygonV.indexOf(p1), 1);

                            for each (var pv:Polygon in v) {
                                polygonV.push(pv);
                            }

                            n = 1;    //重新開始
                            break;
                        }
                    }
                }
            }
        }</span>
對于多邊形自交,可以采用類似多邊形剪裁的方法将一個多邊形拆分成多個,也可以直接禁止使用者繪制這種多邊形。我是采用後一種方法是以這裡沒有代碼。
多邊形的頂點順序,上面多處代碼都要求多邊形頂點按順時針或逆時針方向儲存,但是我們不可能要求使用者按哪個固定方向繪制圖形,那麼怎麼判斷多邊形的頂點順序。方法的基本思路就是取一個多邊形的凸點,然後判斷這個點的下一個點的方向,代碼如下:
<span style="background-color: rgb(255, 255, 255);">        /**
         * 将多邊形的頂點按順時針排序
         */
        public function cw():void {
            if (this.isCW() == false) {    //如果為逆時針順序, 反轉為順時針
                this.vertexV.reverse();    //反轉數組
            }
        }

        /**
         * clockwise
         * @return true -- clockwise; false -- counter-clockwise
         */
        public function isCW():Boolean {
            if (vertexV == null || vertexV.length < 0) return false;

            //最上(y最小)最左(x最小)點, 肯定是一個凸點
            //尋找最上點
            var topPt:Vector2f = this.vertexV[0];
            var topPtId:int = 0;    //點的索引
            for (var i:int=1; i<vertexV.length; i++) {
                if (topPt.y > vertexV[i].y) {
                    topPt = vertexV[i];
                    topPtId = i;
                } else if (topPt.y == vertexV[i].y) { //y相等時取x最小
                    if (topPt.x > vertexV[i].x) {
                        topPt = vertexV[i];
                        topPtId = i;
                    }
                }
            }

            //凸點的鄰點
            var lastId:int = topPtId-1>=0 ? topPtId-1 : vertexV.length-1;
            var nextId:int = topPtId+1>=vertexV.length ? 0 : topPtId+1;
            var last:Vector2f = vertexV[lastId];
            var next:Vector2f = vertexV[nextId];

            //判斷
            var r:Number = multiply(last, next, topPt);
            if (r < 0) {
                return true;
            //三點共線情況不存在,若三點共線則說明必有一點的y(斜線)或x(水準線)小于topPt
            }

            return false;
        }

        /**
         * r=multiply(sp,ep,op),得到(sp-op)*(ep-op)的叉積
         * r>0:ep在矢量opsp的逆時針方向;
         * r=0:opspep三點共線;
         * r<0:ep在矢量opsp的順時針方向
         * @param sp
         * @param ep
         * @param op
         * @return
         */
        private function multiply(sp:Vector2f, ep:Vector2f, op:Vector2f):Number {
            return((sp.x-op.x)*(ep.y-op.y)-(ep.x-op.x)*(sp.y-op.y));
        }</span>
到此生成網格的關鍵代碼都發出來了,下一章放上尋路的代碼
NAV導航網格尋路(6) -- 尋路實作
前面已經介紹了尋路的方法,現在給出我的一個實作。
A*尋找網格路徑
A*算法就不說了,網上很多,這裡隻說下三角形網格如何使用A*算法,如下圖,綠色直線代表最終路徑和方向,路徑線進入三角形的邊稱為穿入邊,路徑線出去的邊稱為穿出邊。每個三角形的花費(g值)采用穿入邊和穿出邊的中點的距離(圖中紅線),至于估價函數(h值)使用該三角形的中心點(3個頂點的平均值)到路徑終點的x和y方向的距離。
下面隻貼出關鍵代碼
<span style="background-color: rgb(255, 255, 255);">private var m_CellVector:Vector.<Cell>;

         private var openList:Heap;     //二叉堆
         private var closeList:Array;

 /**
         * 建構網格路徑,該方法生成closeList
         * @param startCell 起始點所在網格
         * @param startPos 起始點坐标
         * @param endCell 終點所在網格
         * @param endPos 終點坐标
         * @return
         */

 public function buildPath(startCell:Cell, startPos:Vector2f,
                                  endCell:Cell, endPos:Vector2f):void{
            openList.clear();
            closeList.length = 0;

            openList.put(endCell);
            endCell.f = 0;
            endCell.h = 0;
            endCell.isOpen = false;
            endCell.parent = null;
            endCell.sessionId = pathSessionId;

            var foundPath:Boolean = false;        //是否找到路徑
            var currNode:Cell;                //目前節點
            var adjacentTmp:Cell = null;    //目前節點的鄰接三角型
            while (openList.size > 0) {
                // 1. 把目前節點從開放清單删除, 加入到封閉清單
                currNode = openList.pop();
                closeList.push(currNode);

                //路徑是在同一個三角形内
                if (currNode == startCell) {
                    foundPath = true;
                    break;
                }

                // 2. 對目前節點相鄰的每一個節點依次執行以下步驟:
                //所有鄰接三角型
                var adjacentId:int;
                for (var i:int=0; i<3; i++) {
                    adjacentId = currNode.links[i];
                    // 3. 如果該相鄰節點不可通行或者該相鄰節點已經在封閉清單中,
                    //    則什麼操作也不執行,繼續檢驗下一個節點;
                    if (adjacentId < 0) {                        //不能通過
                        continue;
                    } else {
                        adjacentTmp = m_CellVector[adjacentId];            //m_CellVector 儲存所有網格的數組
                    }

                    if (adjacentTmp != null) {
                        if (adjacentTmp.sessionId != pathSessionId) {
                            // 4. 如果該相鄰節點不在開放清單中,則将該節點添加到開放清單中,
                            //    并将該相鄰節點的父節點設為目前節點,同時儲存該相鄰節點的G和F值;
                            adjacentTmp.sessionId = pathSessionId;
                            adjacentTmp.parent = currNode;
                            adjacentTmp.isOpen = true;

                            //H和F值
                            adjacentTmp.computeHeuristic(startPos);

                     //m_WallDistance 是儲存三角形各邊中點連線的距離,共3個
                            adjacentTmp.f = currNode.f + adjacentTmp.m_WallDistance[Math.abs(i - currNode.m_ArrivalWall)];

                            //放入開放清單并排序
                            openList.put(adjacentTmp);

                            // remember the side this caller is entering from
                            adjacentTmp.setAndGetArrivalWall(currNode.index);
                        } else {
                            // 5. 如果該相鄰節點在開放清單中,
                            //    則判斷若經由目前節點到達該相鄰節點的G值是否小于原來儲存的G值,
                            //    若小于,則将該相鄰節點的父節點設為目前節點,并重新設定該相鄰節點的G和F值
                            if (adjacentTmp.isOpen) {//已經在openList中
                                if (currNode.f + adjacentTmp.m_WallDistance[Math.abs(i - currNode.m_ArrivalWall)] < adjacentTmp.f) {
                                    adjacentTmp.f = currNode.f;
                                    adjacentTmp.parent = currNode;

                                    // remember the side this caller is entering from
                                    adjacentTmp.setAndGetArrivalWall(currNode.index);
                                }
                            } else {//已在closeList中
                                adjacentTmp = null;
                                continue;
                            }
                        }
                    }
                }
            }

}


由close list取出網格路徑

/**
         * 路徑經過的網格
         * @return
         */
        private function getCellPath():Vector.<Cell> {
            var pth:Vector.<Cell> = new Vector.<Cell>();

            var st:Cell = closeList[closeList.length-1];
            pth.push(st);

            while (st.parent != null) {
                pth.push(st.parent);
                st = st.parent;
            }
            return pth;
        }


根據網格路徑計算路徑點

算法前面已經詳細說明,以下是代碼

 /**
         * 根據經過的三角形傳回路徑點(下一個拐角點法)
         * @param start
         * @param end
         * @return Point數組
         */
        private function getPath(start:Vector2f, end:Vector2f):Array {
            //經過的三角形
            var cellPath:Vector.<Cell> = getCellPath();
            //沒有路徑
            if (cellPath == null || cellPath.length == 0) {
                return null;
            }

            //儲存最終的路徑(Point數組)
            var pathArr:Array = new Array();

            //開始點
            pathArr.push(start.toPoint());
            //起點與終點在同一三角形中
            if (cellPath.length == 1) {
                pathArr.push(end.toPoint());    //結束點
                return pathArr;
            }

            //擷取路點
            var wayPoint:WayPoint = new WayPoint(cellPath[0], start);
            while (!wayPoint.position.equals(end)) {
                wayPoint = this.getFurthestWayPoint(wayPoint, cellPath, end);
                pathArr.push(wayPoint.position);
            }

            return pathArr;
        }

        /**
         * 下一個拐點
         * @param wayPoint 目前所在路點
         * @param cellPath 網格路徑
         * @param end 終點
         * @return
         */
        private function getFurthestWayPoint(wayPoint:WayPoint, cellPath:Vector.<Cell>, end:Vector2f):WayPoint {
            var startPt:Vector2f = wayPoint.position;    //目前所在路徑點
            var cell:Cell = wayPoint.cell;
            var lastCell:Cell = cell;
            var startIndex:int = cellPath.indexOf(cell);    //開始路點所在的網格索引
            var outSide:Line2D = cell.sides[cell.m_ArrivalWall];    //路徑線在網格中的穿出邊
            var lastPtA:Vector2f = outSide.getPointA();
            var lastPtB:Vector2f = outSide.getPointB();
            var lastLineA:Line2D = new Line2D(startPt, lastPtA);
            var lastLineB:Line2D = new Line2D(startPt, lastPtB);
            var testPtA:Vector2f, testPtB:Vector2f;        //要測試的點
            for (var i:int=startIndex+1; i<cellPath.length; i++) {
                cell = cellPath[i];
                outSide = cell.sides[cell.m_ArrivalWall];
                if (i == cellPath.length-1) {
                    testPtA = end;
                    testPtB = end;
                } else {
                    testPtA = outSide.getPointA();
                    testPtB = outSide.getPointB();
                }

                if (!lastPtA.equals(testPtA)) {
                    if (lastLineB.classifyPoint(testPtA, EPSILON) == PointClassification.RIGHT_SIDE) {
                        //路點
                        return new WayPoint(lastCell, lastPtB);
                    } else {
                        if (lastLineA.classifyPoint(testPtA, EPSILON) != PointClassification.LEFT_SIDE) {
                            lastPtA = testPtA;
                            lastCell = cell;
                            //重設直線
                            lastLineA.setPointB(lastPtA);
                        }
                    }
                }

                if (!lastPtB.equals(testPtB)) {
                    if (lastLineA.classifyPoint(testPtB, EPSILON) == PointClassification.LEFT_SIDE) {
                        //路徑點
                        return new WayPoint(lastCell, lastPtA);
                    } else {
                        if (lastLineB.classifyPoint(testPtB, EPSILON) != PointClassification.RIGHT_SIDE) {
                            lastPtB = testPtB;
                            lastCell = cell;
                            //重設直線
                            lastLineB.setPointB(lastPtB);
                        }
                    }
                }
            }
            return new WayPoint(cellPath[cellPath.length-1], end);    //終點
        }</span>
NAV導航網格尋路(7) -- 代碼和一些優化
這裡發不了源碼,本系列完整源碼可以到http://bbs.9ria.com/thread-49841-1-1.html下。
看下圖,最優路徑應該是從上面繞過中間阻擋區,而實際尋路産生的路徑确是下面。這是由于,在網格面積過大或有某邊長度過長時,由于a*中的花費是計算網格的兩邊中點距離而不實際的路徑長度,是以産生的路徑偏差較大。是以在一般的網格生成算法中都會加入網格最小面積和最大面積的限制,如果生成的網格小于最小面積時則抛棄,如果大于最大面積則拆分。
一般地圖中都會産生孤島,如下圖,兩個阻擋區域交叉,合并後在中間深紅色區域産生孤島。按照上面介紹的剪裁算法,中間孤島多邊形會以逆時針方向存儲(其他順時針),是以在這一步能夠判斷出是否生成孤島。對于生成的孤島,如果遊戲允許人物可以通過瞬移等方式進入孤島,那麼孤島也需要生成nav網格,不過孤島的nav網格和其他區域的網格最好能分成不同區域,這樣在尋路時就可以優化(起點和終點不在同區域,可直接确定為不能通過)。