一、前言
開篇陳述:OkHttp作為一個優秀的網絡請求庫,陪我們這些Android開發佬走過了許多風風雨雨的夜晚,是以今天特寫一篇深入了解作文。整個系列篇中,在okhttp3.14.0版本上,依照OkHttp的使用為引線,做結構如下剖析:
- 同步請求的實作流程。
- 異步請求的實作流程
- 重要攔截器:CacheInterceptor 的解析。
- 重要攔截器:ConnectInterceptor 的解析。
- 重要攔截器:CallServerInterceptor 的解析。
二、同步/異步請求的實作流程
【2.1】 同步請求
public static final MediaType JSON
    = MediaType.get("application/json; charset=utf-8");

OkHttpClient client = new OkHttpClient();

String post(String url, String json) throws IOException {
  RequestBody body = RequestBody.create(json, JSON);
  Request request = new Request.Builder()
      .url(url)
      .post(body)
      .build();
      //見【2.2】client.newCall()
      //見【2.3】RealCall.execute()
  try (Response response = client.newCall(request).execute()) {
    return response.body().string();
  }
}
如上是一次同步的網絡請求,主要做如下事情:
- 通過Builder模式建構Request。
- 調用client.newCall(),通過request生成一個Call對象。他的實作類是RealCall。
- 随後調用RealCall.execute(),進行同步請求。
【2.2】OkHttpClient.newCall()
OkHttpClient.java
 @Override public Call newCall(Request request) {
    //直接調用Realcall的方法,建立了一個RealCall對象。
    return RealCall.newRealCall(this, request, false /* for web socket */);
  }

  RealCall.java
  static RealCall newRealCall(OkHttpClient client, Request originalRequest, boolean forWebSocket) {
    RealCall call = new RealCall(client, originalRequest, forWebSocket);
    call.transmitter = new Transmitter(client, call);
    return call;
  }

 private RealCall(OkHttpClient client, Request originalRequest, boolean forWebSocket) {
    //這裡需要特别注意OkHttpClient對象被Call持有。
    this.client = client;
    this.originalRequest = originalRequest;
    this.forWebSocket = forWebSocket;
  }
如上所示,OkHttpClient.newCall() 的調用鍊最終建構了一個 RealCall 對象,并且把client作為 RealCall 的成員變量,友善後續請求從 client 擷取配置。
【2.3】RealCall.execute()
RealCall.java
@Override public Response execute() throws IOException {
    synchronized (this) {
      // 如果該請求已經執行過,報錯。
      if (executed) throw new IllegalStateException("Already Executed");
      executed = true;
    }
    transmitter.timeoutEnter();
    transmitter.callStart();
    try {
      //見【2.4】擷取 client 裡面的排程器 Dispatcher 并記錄這個請求。
      client.dispatcher().executed(this);
      //見【2.5】通過責任鍊的方式将發起請求并傳回結果。這裡是同步動作,會阻塞。
      return getResponseWithInterceptorChain();
    } finally {
      //請求完後需要把這個請求從排程器中移走
      client.dispatcher().finished(this);
    }
  }
Call在被執行時做如下事情:
- 判斷Call的合法性。
- 将RealCall傳進Client裡面的Dispatcher.executed()裡,而Dispatcher是在 OkHttpClient 被的建構函數裡被建立并作為成員變量的。
- 開啟責任鍊模式,進行請求相關邏輯。
- 執行完成後,排程器對這個請求進行收尾工作。
【2.4】Dispatcher.executed()
Dispatcher.java
 /** Running asynchronous calls. Includes canceled calls that haven't finished yet. */
  private final Deque<AsyncCall> runningAsyncCalls = new ArrayDeque<>();

  synchronized void executed(RealCall call) {
    runningSyncCalls.add(call);
  }
就是将此次請求加入到一個雙端隊列資料集合中。
【2.5】RealCall.getResponseWithInterceptorChain()
Response getResponseWithInterceptorChain() throws IOException {
    // 将請求的具體邏輯進行分層,并采用責任鍊的方式進行構造。
    List<Interceptor> interceptors = new ArrayList<>();
    // 使用者自已的請求攔截器
    interceptors.addAll(client.interceptors());
    //重試和重定向攔截器
    interceptors.add(new RetryAndFollowUpInterceptor(client));
    //橋攔截器
    interceptors.add(new BridgeInterceptor(client.cookieJar()));
    //緩存邏輯攔截器
    interceptors.add(new CacheInterceptor(client.internalCache()));
    //網絡連接配接邏輯攔截器
    interceptors.add(new ConnectInterceptor(client));
    if (!forWebSocket) {
      interceptors.addAll(client.networkInterceptors());
    }
    // 網絡請求攔截器,真正網絡通行的地方,這個攔截器處理過後會生成一個Response
    interceptors.add(new CallServerInterceptor(forWebSocket));

    //依照如上配置,建構出一個請求的處理邏輯責任鍊,特别注意:這條鍊開始于下标位置為的0攔截器。
    Interceptor.Chain chain = new RealInterceptorChain(interceptors, transmitter, null, 0,
        originalRequest, this, client.connectTimeoutMillis(),
        client.readTimeoutMillis(), client.writeTimeoutMillis());

    boolean calledNoMoreExchanges = false;
    try {
      //詳見【2.6】,按下處理邏輯鍊條的開關。
      Response response = chain.proceed(originalRequest);
      if (transmitter.isCanceled()) {
        closeQuietly(response);
        throw new IOException("Canceled");
      }
      //傳回請求結果
      return response;
    } catch (IOException e) {
      calledNoMoreExchanges = true;
      throw transmitter.noMoreExchanges(e);
    } finally {
      if (!calledNoMoreExchanges) {
        transmitter.noMoreExchanges(null);
      }
    }
  }
通過該方法的名字我們也可以知道,這個方法就是通過攔截器鍊來獲得Response的過程。他做了如下事情:
- 将使用者自定義的攔截器先加入集合中。
- 加入一次請求中需要用的攔截器,這些攔截器代表一次完整的網絡請求邏輯被分了幾層以及他們的先後順序。從代碼中我們不難看出他們的流程是:重試/重定向邏輯->網絡橋邏輯->緩存邏輯->建立網絡連接配接邏輯->網絡通行邏輯。
- 用以上攔截器集合建構出一條邏輯處理的攔截鍊,并将這條鍊需要使用的攔截器下标指派為0,從第一個開始。
-
調用chain.proceed()啟動這條鍊的處理流程。
使用責任鍊的設計模式來處理一次網絡請求中的邏輯可以有效的劃分邏輯層。而前一個攔截器可以根據實際的處理情況來決定下一攔截器是否應該繼續處理。
【2.6】RealInterceptorChain.proceed()
RealInterceptorChain.java
public Response proceed(Request request, Transmitter transmitter, @Nullable Exchange exchange)
      throws IOException {
    if (index >= interceptors.size()) throw new AssertionError();

    calls++;

    ...

    /**
    * index+1:建構出新的攔截鍊,不過新的攔截鍊的處理攔截器是下标為index+1的
    * 實作了責任鍊中,處理邏輯的流轉。
    */
    RealInterceptorChain next = new RealInterceptorChain(interceptors, transmitter, exchange,
        index + 1, request, call, connectTimeout, readTimeout, writeTimeout);
    //此時index = 0;是以拿到了第一個攔截器,并且調用他的intercept 方法進行具體邏輯處理。
    Interceptor interceptor = interceptors.get(index);
    //目前攔截器對網絡請求進行處理。
    Response response = interceptor.intercept(next);

    // Confirm that the next interceptor made its required call to chain.proceed().
    if (exchange != null && index + 1 < interceptors.size() && next.calls != 1) {
      throw new IllegalStateException("network interceptor " + interceptor
          + " must call proceed() exactly once");
    }

    // 省略對response合法性的檢查代碼
    ...

    return response;
  }
總結:
- 先index+1,建構index指向下一個攔截器的責任鍊。
- 在鍊中取出下标目前index(此時為0)的攔截器,并調用intercept(next)進行此次攔截器邏輯的真正處理。這裡注意,傳遞進去的參數正是1中建構出來的next責任鍊。在Interceptor.intercept()方法内部進行自身的邏輯處理以後,會調用next.proceed()進行一次傳遞,由下一個攔截器進行處理。而此次請求也是這樣在各個攔截器中被 處理->傳遞->處理->…->傳回結果
三、異步請求實作流程
3.1
public static final MediaType JSON
    = MediaType.get("application/json; charset=utf-8");

OkHttpClient client = new OkHttpClient();

String post(String url, String json) throws IOException {
  RequestBody body = RequestBody.create(json, JSON);
  Request request = new Request.Builder()
      .url(url)
      .post(body)
      .build();
      //client.newCall():同【2.2】
      //詳見【3.2】RealCall.enqueue()
  try (Response response = client.newCall(request).enqueue(new Callback() {
            @Override
            public void onFailure(Call call, IOException e) {

            }

            @Override
            public void onResponse(Call call, Response response) throws IOException {

            }
        }) {
    return response.body().string();
  }
}
如上是一次OkHttp的異步請求使用方法,基本于【2.1】的同步請求一緻,唯一不同的是,call的異步調用是通過RealCall.enqueue()實作的。而請求結果通過Callback回調到主線程。
【3.3】RealCall.enqueue()
@Override public void enqueue(Callback responseCallback) {
    synchronized (this) {
      if (executed) throw new IllegalStateException("Already Executed");
      executed = true;
    }
    transmitter.callStart();
    //詳見【3.4】:AsyncCall()
    //詳見【3.5】:Dispatcher.enqueue()
    client.dispatcher().enqueue(new AsyncCall(responseCallback));
  }
将使用者建立的callback作為參數傳入AsyncCall()構造函數。AsyncCall 繼承于Runnable.
【3.4】AsyncCall;
AsyncCall.java
final class AsyncCall extends NamedRunnable {

    private volatile AtomicInteger callsPerHost = new AtomicInteger(0);

    ...
    /**
     * 該方法是在dispather需要執行此請求的時候,配置設定給它線程池,此異步請求便在這個線程池中執行網絡請求。
     */
    void executeOn(ExecutorService executorService) {
      ...
      boolean success = false;
      try {
        //異步的關鍵:将請求放到線程池中執行。
        executorService.execute(this);
        success = true;
      } catch (RejectedExecutionException e) {
       ...
       success = false;
      } finally {
        if (!success) {
          client.dispatcher().finished(this); // 執行失敗會通過Dispatcher進行finished,以後再也不會用此AsyncCall。
        }
      }
    }

    @Override protected void execute() {
      boolean signalledCallback = false;
      transmitter.timeoutEnter();
      try {
        //此處同【2.5】
        Response response = getResponseWithInterceptorChain();
        signalledCallback = true;
        //請求成功時,回調Response給到使用者
        responseCallback.onResponse(RealCall.this, response);
      } catch (IOException e) {
        ...
        //請求錯誤時,回調錯誤接口給到使用者
          responseCallback.onFailure(RealCall.this, e);

      } finally {
       //詳見【3.6】,結束一次請求。
        client.dispatcher().finished(this);
      }
    }
  }
從上面可以看出,AsyncCall繼承于Runnable,它提供了将Call放到線程池執行的能力,實作了請求的異步流程。
【3.5】Dispatcher.enqueue();
Dispatcher.java
//準備進行異步調用的請求。
private final Deque<AsyncCall> readyAsyncCalls = new ArrayDeque<>();
 //正在執行的異步請求。
private final Deque<AsyncCall> runningAsyncCalls = new ArrayDeque<>();

void enqueue(AsyncCall call) {
    synchronized (this) {
      //将異步請求加入到雙端隊列中
      readyAsyncCalls.add(call);

      // 尋找是否有同Host的請求,如果有進行複用
      if (!call.get().forWebSocket) {
        AsyncCall existingCall = findExistingCallWithHost(call.host());
        if (existingCall != null) call.reuseCallsPerHostFrom(existingCall);
      }
    }
    //【詳見3.7】将符合條件的Ready的異步請求轉入runningAsyncCalls,并執行
    promoteAndExecute();
  }
總結:
- 将此請求登記到Dispatcher的預備雙端隊列中。
- 以此次的請求的Host來查找可服用的異步請求,如果存在,進行複用。
- 嘗試将剛剛加入預備隊的請求執行。
【3.6】Dipatcher.finish()
Dipatcher.java
private <T> void finished(Deque<T> calls, T call) {
    Runnable idleCallback;
    synchronized (this) {
    ...
    //【詳見3.7】一個請求完成後,檢查此時是否有在等待執行的請求,并處理。
    boolean isRunning = promoteAndExecute();
    if (!isRunning && idleCallback != null) {
      //通知此時已經沒有異步請求任務
      idleCallback.run();
    }
  }
總結:排程器結束一次請求
- 當一個異步任務完成後,排程器會觸發一次預備任務執行流程。讓之前因為最大請求數等限制而不能執行的請求有機會得到執行。
- 通過idleCallback.run()通知此時的排程器空閑狀态。
【3.7】Dipatcher.promoteAndExecute()
private boolean promoteAndExecute() {
...
List<AsyncCall> executableCalls = new ArrayList<>();
boolean isRunning;
synchronized (this) {
for (Iterator<AsyncCall> i = readyAsyncCalls.iterator(); i.hasNext(); ) {
AsyncCall asyncCall = i.next();
//檢查最大請求數限制和
if (runningAsyncCalls.size() >= maxRequests) break;
if (asyncCall.callsPerHost().get() >= maxRequestsPerHost) continue;
//滿足條件,便把預備隊的請求提升到執行隊列。
i.remove();
asyncCall.callsPerHost().incrementAndGet();
executableCalls.add(asyncCall);
runningAsyncCalls.add(asyncCall);
}
isRunning = runningCallsCount() > 0;
}
//将可執行的異步請求放進線程池執行
for (int i = 0, size = executableCalls.size(); i < size; i++) {
AsyncCall asyncCall = executableCalls.get(i);
//【詳見3.4】
asyncCall.executeOn(executorService());
}
return isRunning;
}
總結 :該方法是對預備隊列裡的請求提升至執行隊列并執行的一次嘗試。如果不能執行,他啟動時機将會延後到其他請求結束(如【3.6】邏輯)。
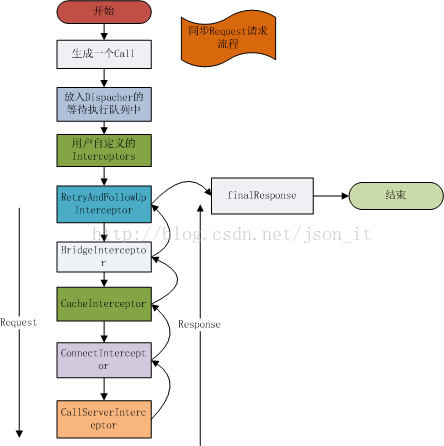
小篇結:本篇中以Okhttp的用法為主線,探究了它的同步請求、異步請求的代碼邏輯。而OkHttp最主要的設計模式:責任鍊模式也在其中有涉及到。最後,我們通過2張圖檔來了解同步和異步的整個請求流程(圖檔不是本人畫的):

同步請求

異步請求流程
本文轉自 [https://juejin.cn/post/6844903974110248974],如有侵權,請聯系删除。