上一篇 - 消息機制 Handler 使用 文章講了 Handler 的一個概述和基本的使用方法,這裡還有一點需要強調一下:對于初學者一定要将你建立的子線程區分開,Handler 是你在子線程執行完,準備進行線程切換執行其他操作時才開始使用 Handler
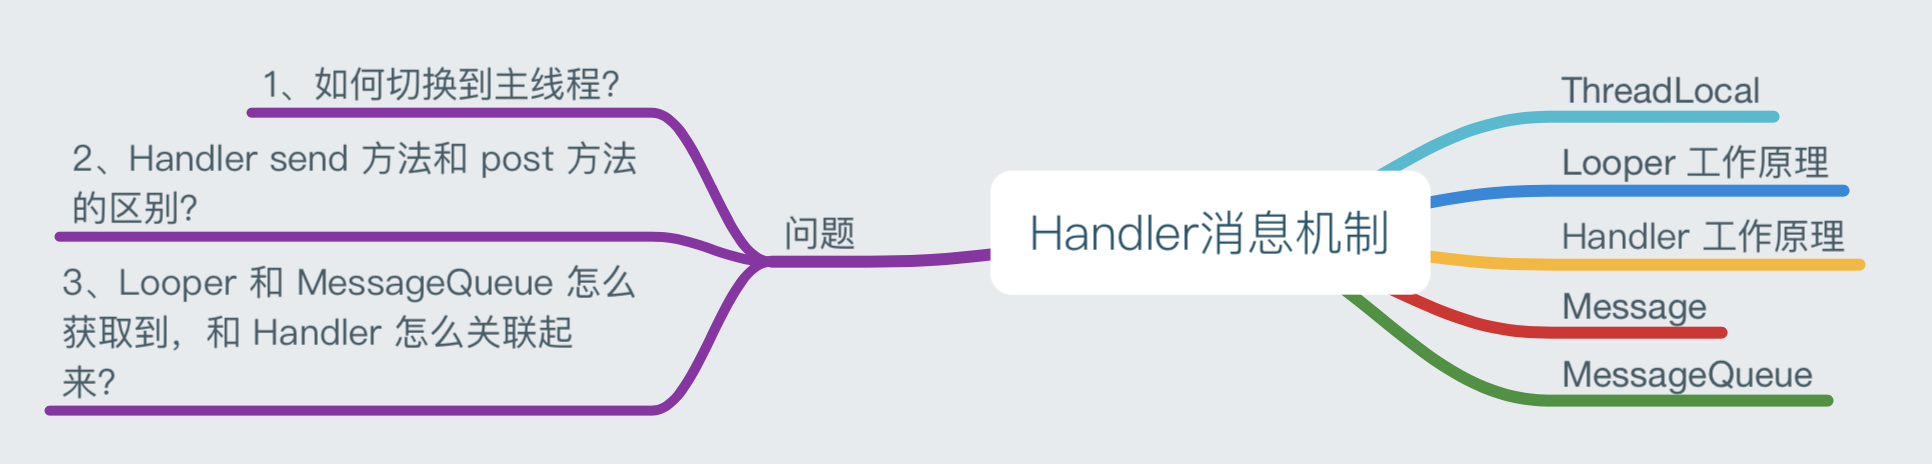
本篇主要對 Handler 的工作原理進行分析,即 Handler、Looper、MessageQueue 三者是如何工作的,從源碼層面來分析下,本篇的主要内容如下:
Looper
首先來說 Looper,實際上 Handler 最開始是和 Looper 關聯起來的,上一篇中對 Handler 的構造函數進行了介紹,無論有參構造還是無參構造,其實都是需要有 Looper的。
public Handler(Looper looper) {
        this(looper, null, false);
    }

public Handler(Looper looper, Callback callback) {
    this(looper, callback, false);
}
這兩個好了解,構造中直接需要有 Looper,可以使主線程的 Looper,也可以是你自己建立的線程所屬的 Looper。
主線程 Looper 擷取方法:
public static Looper getMainLooper() {
        synchronized (Looper.class) {
            return sMainLooper;
        }
}
如果是你自己建立的子線程,那麼如果建立子線程的 Looper 呢?
// 在目前線程中建立 Looper,但是隻能建立一次,重複建立(即重複調用這個方法,或報錯)
public static void prepare() {
        prepare(true);
}

// 建立之後,還需要将 Looper運轉起來,才能執行消息隊列中的消息
public static void loop() {
    ...
}
就像下面這個小例子,就是在子線程中使用 Handler,其他線程就可以使用這個 Handler,發送消息後,消息會在這個 new Thread 線程中執行。
private Handler handler;

new Thread()
		{
			public void run()
			{

				Looper.prepare();

				handler = new Handler()
				{
					public void handleMessage(android.os.Message msg)
					{
						Log.e("TAG",Thread.currentThread().getName());
					};
				};
                 Looper.loop();

			}

		}
好,回到 Looper 分析中來,那麼無參數構造的 Handler 呢?最終是調用這個構造方法。
public Handler(Callback callback, boolean async) {

        ...

        mLooper = Looper.myLooper();
        if (mLooper == null) {
            throw new RuntimeException(
                "Can't create handler inside thread " + Thread.currentThread()
                        + " that has not called Looper.prepare()");
        }
        mQueue = mLooper.mQueue;
        mCallback = callback;
        mAsynchronous = async;
    }
這個方法中有一個 Looper.myLooper() 方法,通過這個方法就是擷取到了 Looper,具體是怎麼擷取?分下這個方法。
public static @Nullable Looper myLooper() {
        return sThreadLocal.get();
}
看到是通過 ThreadLocal 來擷取的,ThreadLocal 是線程内部維護資料的一個變量,能夠存儲目前線程的一些資料,隻有在目前線程才能夠擷取目前線程中的資料, Looper 屬于線程的資料,是以可以通過 ThreadLocal 可以擷取,主要的過程就是通過 ThreadLocal 的 put 和 get 方法,以 key-value 的形式來完成的,key 就是目前線程。那麼什麼時候将線程的 Looper 存儲到 ThreadLocal 中的呢?就是建立 Looper 的時候。
public static void prepare() {
        prepare(true);
}

private static void prepare(boolean quitAllowed) {
    if (sThreadLocal.get() != null) {
        throw new RuntimeException("Only one Looper may be created per thread");
    }
    sThreadLocal.set(new Looper(quitAllowed));
}
看到這段代碼是不是就了解了。
好,接着往下走,擷取到 Looper 的目的是什麼呢?mQueue = mLooper.mQueue, 答案是為了擷取到 MessageQueue。
權限是包内權限,可以知道 Handler 和 Looper 類處于同一個包下 .../android/os
final MessageQueue mQueue;
擷取目前線程的 MessageQueue,有這幾種方法,都是通過 Looper 來擷取的
// (1)同一個包内,直接使用
mQueue = mLooper.mQueue;

// (2)已經擷取了 Looper
public @NonNull MessageQueue getQueue() {
    return mQueue;
}

// (3)沒有擷取looper ,不在同一個保内,當時在目前線程
public static @NonNull MessageQueue myQueue() {
    return myLooper().mQueue;
}
Looper 持有 MessageQueue,MessageQueue 是在什麼時候建立的呢?看下 Looper 的構造函數
public static void prepare() {
        prepare(true);
}

private static void prepare(boolean quitAllowed) {
    if (sThreadLocal.get() != null) {
        throw new RuntimeException("Only one Looper may be created per thread");
    }
    sThreadLocal.set(new Looper(quitAllowed));
}

private Looper(boolean quitAllowed) {
        mQueue = new MessageQueue(quitAllowed);
        mThread = Thread.currentThread();
}

// MessageQueue.java
MessageQueue(boolean quitAllowed) {
        mQuitAllowed = quitAllowed;
        mPtr = nativeInit();
}
代碼比較清晰,就是在建立 Looper 時建立 MessageQueue,既然 一個線程的 Looper 隻能有一個,同理,MessageQueue 也是隻能有一個。本文最開始的的問題,如何切換到主線程?,Looper 和 MessageQueue 是在主線程,那麼通過 Handler 發送的消息自然就在主線程中了。
對于 Looper 來講,剩下就是一個最重要的方法,loop()
/**
     * Run the message queue in this thread. Be sure to call
     * {@link #quit()} to end the loop.
     */
    public static void loop() {
        final Looper me = myLooper();
        if (me == null) {
            throw new RuntimeException("No Looper; Looper.prepare() wasn't called on this thread.");
        }
        final MessageQueue queue = me.mQueue;

        // Make sure the identity of this thread is that of the local process,
        // and keep track of what that identity token actually is.
        Binder.clearCallingIdentity();
        final long ident = Binder.clearCallingIdentity();
        ...

        boolean slowDeliveryDetected = false;

        for (;;) {
            Message msg = queue.next(); // might block
            if (msg == null) {
                // No message indicates that the message queue is quitting.
                return;
            }
            ...

            try {
                msg.target.dispatchMessage(msg);
                dispatchEnd = needEndTime ? SystemClock.uptimeMillis() : 0;
            } finally {
                if (traceTag != 0) {
                    Trace.traceEnd(traceTag);
                }
            }

            ...

            msg.recycleUnchecked();
        }
}
首先是擷取 MessageQueue,然後 Looper 中通過一個無限循環,不斷從消息隊列中取出消息,然後通過調用 msg.target.dispatchMessage(msg); 來執行消息,雖然我們可能不知道 msg 中的 target 是啥?但是可以猜想一下,是不是應該是 Handler 呢?因為我們通過 Handler 來執行我們在主線程(準确說是 Handler 線程,這裡隻是以主線程為例)想幹事的事情,即 handleMessage 或者是 Runnable 的 run 方法,下面再去驗證想法。
到這裡會有一些疑問?
- 為什麼是無限循環,這樣的話,CPU 滿載,手機豈不是一直滿負荷在跑,變得燙手。。。
- 什麼時候 msg 為 null,這時候 return 之後會怎麼樣?
- Message msg = queue.next(); // might block 可能會阻塞,含義是什麼?
這幾個問題中,到這裡暫時隻能解釋第二個,如果 msg 為空,傳回之後 loop() 方法結束。這裡以 應用程式的主線程為例,在主線程,主要是更新 UI,也就是在 Looper 中取出來的消息是用來更新 UI 的操作,既然都不能更新 UI,那麼也隻有應用程式死掉了,主線程退出的情況。
對于其他的子線程,也是消息隊列中沒有消息了,消息隊列退出,目前子線程也就結束了。
現在我們知道 Handler 擷取了 Loopper,Looper 中有消息隊列,也能夠擷取到,即 Handler 持有 Looper 和 MessageQueue,對于 Handler 來說,有了這些,能夠做些什麼,下面就來看看 Handler。
Handler
Handler 的主要原理,可以看一下下圖:

實際上,Handler 做的主要就是兩件事,發送消息,然後等到消息處理時進行執行。先來看發送消息,在上一篇文章中提到,發消息有兩種方式,send 和 post 方式,最終都是調用 sendMessageAtTime 方法。
public boolean sendMessageAtTime(Message msg, long uptimeMillis) {
        MessageQueue queue = mQueue;
        if (queue == null) {
            RuntimeException e = new RuntimeException(
                    this + " sendMessageAtTime() called with no mQueue");
            Log.w("Looper", e.getMessage(), e);
            return false;
        }
        return enqueueMessage(queue, msg, uptimeMillis);

}
sendMessageAtTime 方法中 uptimeMillis 參數指定消息執行的絕對時間,接着将消息加入到消息隊列中,MessageQueue 就是上面提到的,通過 Looper 擷取的消息隊列。
private boolean enqueueMessage(MessageQueue queue, Message msg, long uptimeMillis) {
        msg.target = this;
        if (mAsynchronous) {
            msg.setAsynchronous(true);
        }
        return queue.enqueueMessage(msg, uptimeMillis);
}
(1)msg.target = this 這一句驗證了我們上面的猜想,target 就是 Handler 本身,在 Looper 中 loop() 方法中執行的 msg.target.dispatchMessage(msg),就是回調 Handler 的 dispatchMessage () 方法。
(2)中間部分代碼,如果設定的是異步執行,需要将消息打上異步的标記。預設情況下,消息隊列中都是同步執行的,但是會根據設定的時間來區分消息執行的先後順序。
将消息加入到消息隊列中的具體操作在下文介紹 MessageQueue 時再詳細分析。接下來看一下,消息的執行,即 dispatchMessage。
/**
 * Handle system messages here.
 */
public void dispatchMessage(Message msg) {
    // 通過 post 方法發送的消息
    if (msg.callback != null) {
        handleCallback(msg);
    } else {
        // 通過 send 方法發送的消息
        if (mCallback != null) {
            if (mCallback.handleMessage(msg)) {
                return;
            }
        }
        // handler 的預設方法,空方法
        handleMessage(msg);
    }
}
這個方法就比較簡單,分為 3 種情況:
(1) 第 1 種,通過 post 方法發送的消息,post(Runnable r),是一個 Runnable 對象,然後指派到 Message 的 callback 變量,執行時也就是調用 callback 的 run 方法,注意這裡雖然是 Runnable 對象,但是跟 Thread 中的 Runnable 是不一樣的,這裡僅僅是為了執行 run 方法而已。
private static void handleCallback(Message message) {
        message.callback.run();
}
(2) 第 2 種, 通過 send 方法發送的消息,這個就是我們構造 public Handler(Callback callback) 這樣一個 Handler,執行時就會通過 Callback 對象來執行消息。Callback 是一個接口,方法就是我們熟悉的 handleMessage 方法,是以 mCallback.handleMessage(msg) 就是調用這個接口的方法了。
public interface Callback {
        public boolean handleMessage(Message msg);
}
(3) 第 3 種,在 Handler 中 handleMessage 是一個空方法
public void handleMessage(Message msg) {
    }
也可以進行重寫,但是一般情況下,我們使用前兩種方式較多。
MessageQueue
Message
介紹消息隊列之前,先介紹下 Message。主要看下 Message 中的參數
public int what;

    public int arg1;

    public int arg2;

    public Object obj;

    /*package*/ long when;

    /*package*/ Bundle data;

    /*package*/ Handler target;

    /*package*/ Runnable callback;

    // sometimes we store linked lists of these things
    /*package*/ Message next;
以上是 Message 中能夠攜帶的參數:
- 一般我們使用 what 來作為辨別,表明是哪種消息
- arg1 和 arg2 是 int 類型參數
- obj 是對象類型參數,
- 當然也可以使用 Bundle
- when 是指定的消息執行的時刻
- target 就是我們上面猜測得 Handler 對象
- callback 使用 post 方法發送消息的 Runnable 對象
- next 指向下一個消息,可以得知,消息隊列中是單連結清單形式的
MessageQueue
先來看一下消息隊列的構造,還記得上面在建立 Looper 時就是建立 MessageQueue 的時刻。
MessageQueue(boolean quitAllowed) {
        mQuitAllowed = quitAllowed;
        mPtr = nativeInit();
}
mQuitAllowed 為 true 時表明消息隊列可以退出,意味着為 false 是不能退出,具體這個有什麼影響,這裡不去探究了。
mPtr = nativeInit() 是一個 native 方法,下面一段話是引自老羅Android應用程式消息處理機制(Looper、Handler)分析這篇文章
(1)在 Java 層,建立了一個 Looper 對象,這個 Looper 對象是用來進入消息循環的,它的内部有一個消息隊列 MessageQueue 對象 mQueue;
(2)在 JNI 層,建立了一個 NativeMessageQueue 對象,這個 NativeMessageQueue 對象儲存在 Java 層的消息隊列對象 mQueue 的成員變量 mPtr 中;
(3)在 C++ 層,建立了一個 Looper 對象,儲存在 JNI 層的 NativeMessageQueue 對象的成員變量 mLooper 中,這個對象的作用是,當 Java 層的消息隊列中沒有消息時,就使 Android 應用程式主線程進入等待狀态,而當 Java 層的消息隊列中來了新的消息後,就喚醒 Android 應用程式的主線程來處理這個消息。
實際上,java 層 Looper 在底層都能對應到底層,因為是涉及到線程操作,包括等待、喚醒,這些操作需要在底層來完成。
添加消息
消息隊列的構造分析之後,接下來看一下如何把消息加入到消息隊列當中的。
boolean enqueueMessage(Message msg, long when) {
        if (msg.target == null) {
            throw new IllegalArgumentException("Message must have a target.");
        }
        if (msg.isInUse()) {
            throw new IllegalStateException(msg + " This message is already in use.");
        }

        synchronized (this) {
            if (mQuitting) {
                IllegalStateException e = new IllegalStateException(
                        msg.target + " sending message to a Handler on a dead thread");
                Log.w(TAG, e.getMessage(), e);
                msg.recycle();
                return false;
            }

            msg.markInUse();
            msg.when = when;
            Message p = mMessages;
            boolean needWake;
            // 情況一:直接将消息加入到消息隊列頭部(單連結清單頭部)
            if (p == null || when == 0 || when < p.when) {
                // New head, wake up the event queue if blocked.
                msg.next = p;
                mMessages = msg;
                needWake = mBlocked;
            } else {
                // Inserted within the middle of the queue.  Usually we don't have to wake
                // up the event queue unless there is a barrier at the head of the queue
                // and the message is the earliest asynchronous message in the queue.

                // 情況二:根據時間點比較将消息插入到連結清單中
                needWake = mBlocked && p.target == null && msg.isAsynchronous();
                Message prev;
                for (;;) {
                    prev = p;
                    p = p.next;
                    if (p == null || when < p.when) {
                        break;
                    }
                    if (needWake && p.isAsynchronous()) {
                        needWake = false;
                    }
                }
                msg.next = p; // invariant: p == prev.next
                prev.next = msg;
            }

            // We can assume mPtr != 0 because mQuitting is false.
            if (needWake) {
                // 通過底層操作來喚醒
                nativeWake(mPtr);
            }
        }
        return true;
    }
分析:将消息加入到消息隊列中,實際上就是操作單連結清單的過程,分為兩種情況:
(1)情況一:直接将消息加入到消息隊列頭部(單連結清單頭部)這種情況的條件是下列條件中的一個:
- p == null 消息隊列為空
- when == 0 目前需要加入的消息的時間點為0,意味着需要立即執行的消息,是以需要加入到隊列頭部
- when < p.when 目前需要加入的消息的時間點比消息隊列頭部的消息的時間小早,也就是說需要先執行的消息,但不一定立即執行
(2) 情況二:根據時間點比較将消息插入到連結清單中
典型的單連結清單插入操作,首先找到根據消息的時間點來找到插入的位置,然後将消息插入到連結清單中。
取出消息
取出消息是通過 next() 取出消息的,該方法在 Looper 的 loop() 方法中被調用,用來擷取需要執行的消息
Message next() {

        ...

        final long ptr = mPtr;
        if (ptr == 0) {
            return null;
        }

        int pendingIdleHandlerCount = -1; // -1 only during first iteration
        int nextPollTimeoutMillis = 0;
        for (;;) {

            // 線程等待狀态
            if (nextPollTimeoutMillis != 0) {
                Binder.flushPendingCommands();
            }
            nativePollOnce(ptr, nextPollTimeoutMillis);

            synchronized (this) {
                // Try to retrieve the next message.  Return if found.
                final long now = SystemClock.uptimeMillis();
                Message prevMsg = null;
                Message msg = mMessages;
                if (msg != null && msg.target == null) {
                    // Stalled by a barrier.  Find the next asynchronous message in the queue.
                    do {
                        prevMsg = msg;
                        msg = msg.next;
                    } while (msg != null && !msg.isAsynchronous());
                }
                if (msg != null) {
                    if (now < msg.when) {
                        // Next message is not ready.  Set a timeout to wake up when it is ready.
                        nextPollTimeoutMillis = (int) Math.min(msg.when - now, Integer.MAX_VALUE);
                    } else {
                        // Got a message.
                        mBlocked = false;
                        if (prevMsg != null) {
                            prevMsg.next = msg.next;
                        } else {
                            mMessages = msg.next;
                        }
                        msg.next = null;
                        if (DEBUG) Log.v(TAG, "Returning message: " + msg);
                        msg.markInUse();
                        return msg;
                    }
                } else {
                    // No more messages.
                    nextPollTimeoutMillis = -1;
                }

                // Process the quit message now that all pending messages have been handled.
                if (mQuitting) {
                    dispose();
                    return null;
                }


            }

            ...

            // While calling an idle handler, a new message could have been delivered
            // so go back and look again for a pending message without waiting.
            nextPollTimeoutMillis = 0;
        }
    }
将代碼簡化了一下,for 循環中主要執行取出消息的操作,首先是找到一個消息,這個消息是最先執行的。找到之後,先看這個消息的時間點,如果到了執行的時間就傳回消息,并從連結清單中删除,傳回給 Looper;如果時間還沒到就等待,nativePollOnce(ptr, nextPollTimeoutMillis);
什麼情況下線程會進入等待狀态?兩種情況,一是當消息隊列中沒有消息時,它會使線程進入等待狀态;二是消息隊列中有消息,但是消息指定了執行的時間,而現在還沒有到這個時間,線程也會進入等待狀态。消息隊列中的消息是按時間先後來排序的。
下面回答下上面的未給出答案的兩個問題:
(1)為什麼是無限循環,手機不燙手?
(2)Message msg = queue.next(); // might block 可能會阻塞,含義是什麼?
線程的等待喚醒底層采用的是管道機制,管道就是一個檔案,在管道的兩端,分别是兩個打開檔案檔案描述符,這兩個打開檔案描述符都是對應同一個檔案,其中一個是用來讀的,别一個是用來寫的,一般的使用方式就是,一個線程通過讀檔案描述符中來讀管道的内容,當管道沒有内容時,這個線程就會進入等待狀态,而另外一個線程通過寫檔案描述符來向管道中寫入内容,寫入内容的時候,如果另一端正有線程正在等待管道中的内容,那麼這個線程就會被喚醒。
是以阻塞時,線程處于等待狀态,這時候 Linux 系統中的 epoll 機制,并不會占用很高的 CPU 使用率,是以即使是無限循環,也不會導緻手機發燙啦…
總結
Handler 中持有 Looper,并通過 Looer 擷取 MessageQueue,然後發送消息就是将消息加入到 MessageQueue 中,并且在 Message 中将 Handler 本身攜帶過去,在 Looper 的 loop 循環中 通過 MessageQueue 的 next 方法 得到消息後,在 Message 中取出 target,即 Handler,然後回調 dispatchMessage,執行我們自定義的方法。
本篇對 Handler 的分析就到這裡,如果文中有錯誤的地方,希望在評論區給出指正!另外如果對 Handler 的底層想進行研究的話,建議看看老羅的文章。
參考
《安卓開發藝術探索》
Android應用程式消息處理機制(Looper、Handler)分析
Android 異步消息處理機制 讓你深入了解 Looper、Handler、Message三者關系