openwrt 學習記錄
第一次 openwrt源碼下載下傳編譯
MT7620開發闆
安裝虛拟機VMware
安裝Ubnutu
先進入root賬戶
[email protected]:~$ su
輸入密碼
1、搭建編譯環境 參考:https://blog.csdn.net/fyh2003/article/details/44564219
打開安裝好的ubnutu界面
調出終端輸入
sudo apt-get install g++
sudo apt-get install libncurses5-dev
sudo apt-get install zlib1g-dev
sudo apt-get install bison
sudo apt-get install flex
sudo apt-get install unzip
sudo apt-get install autoconf
sudo apt-get install gawk
sudo apt-get install make
sudo apt-get install gettext
sudo apt-get install gcc
sudo apt-get install binutils
sudo apt-get install patch
sudo apt-get install bzip2
sudo apt-get install libz-dev
sudo apt-get install asciidoc
sudo apt-get install subversion
sudo apt-get install sphinxsearch
sudo apt-get install libtool
sudo apt-get install sphinx-common
sudo apt-get install libssl-dev
環境搭建完成
2、openwrt源碼下載下傳(參考:https://blog.csdn.net/mojie_babyno1/article/details/81135039
建立目錄
git 目錄用來存放openwrt
mkdir git
   cd git
建立openwrt目錄
mkdir openwrt
下載下傳源代碼
cd  openwrt
 git clone git://github.com/openwrt/chaos_calmer.git
下載下傳源碼的路徑和以前的不一樣了,我找好多都不能下載下傳
添加軟體擴充包
(1)、将feeds.conf.default 複制到feeds.conf
cd  chaos_calmer
cp feeds.conf.default feeds.conf
(2)、更新擴充包
./scripts/feeds update -a
(3)、 安裝擴充包
./scripts/feeds install -a
3、編譯openwrt源代碼
測試編譯環境
make defconfig
進入配置界面
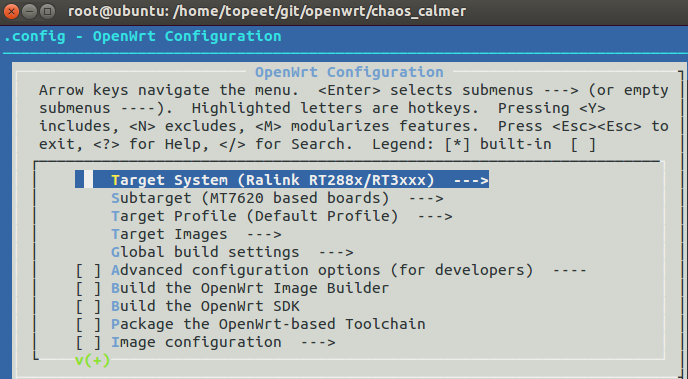
make menuconfig
當執行完上面的指令會出現下圖所示的界面,我們可以通過方向鍵來選擇配置選項,通過空格鍵來選擇配置狀态
這裡選用的是MT7620A
1)CUP選型
target system (Ralink RT288x/RT3xxx)
CPU子型号
subtarget(MT7620 based boards)
儲存退出簡單的配型就完成了
編譯
make V=99
第一次編譯時間較長,
注意V一定要大寫
編譯成功後進入如下目錄
r[email protected]:/home/topeet/git/openwrt/chaos_calmer/bin/ramips# ls
找到
openwrt-ramips-mt7620-mt7620a-squashfs-sysupgrade.bin
這個檔案就是我們 mt7620a 的固件了
![法理學學習筆記Day4——法律規則重點知識點法的微觀結構★★★★★(考察40次)(二級考點)法律規則(二級考點)1.法律[圖]](data:image/gif;base64,R0lGODlhAQABAIAAAP///wAAACwAAAAAAQABAAACAkQBADs=)