一、security原理
security是通過一系列filter完成認證和授權的
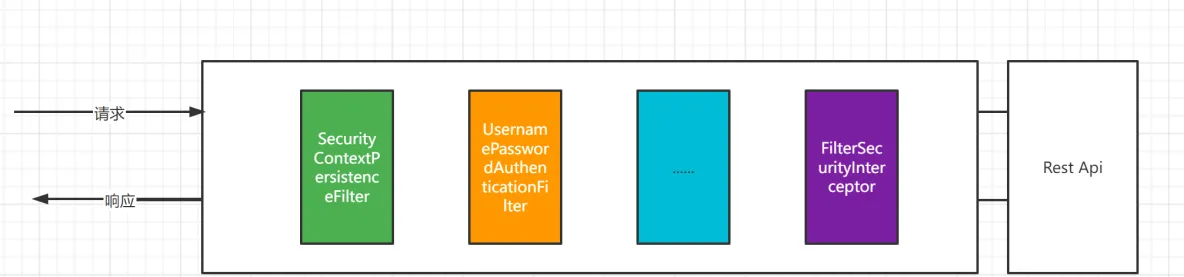
security預設提供了30多個過濾器,spring boot在對security進行自動化配置時,會建立一個名為springsecuritychian過濾鍊并注入到spring容器中,filterchianproxy做為頂層管理者統一管理springsecuritychian,filterchianproxy本身通過DelegatinFilterProxy整合到原生web過濾鍊中
過濾器清單
| 過濾器 | 作用 | 預設開啟 |
| ChannelProcessingFilter 過濾請求協定 https http 預設no | 過濾請求協定 https http | no |
| WebAsyncManagerIntegrationFilter | 将WebAsyncManager和security上下文結合 | yes |
| SecurityContextPersistenceFilter | 處理請求前将安全新加載到securitycontextholder | yes |
| HeaderWriterFilter | 處理頭資訊加入到響應中 | yes |
| CorsFilter | 處理跨域問題 | no |
| CsrfFilter | 處理csrf攻擊 | yes |
| LogoutFilter | 處理登出登入 | yes |
| OAuth2AuthorizationRequestRedirectFilter | 處理outh2認證重定向 | no |
| Saml2WebSsoAuthenticationRequestFilter | 處理saml認證 | no |
| X509AuthenticationFilter | 處理x509認證 | no |
| AbstractPreAuthenticatedProcessingFilter | 處理預認證問題 | no |
| CasAuthenticationFilter | 處理cas認證 | no |
| OAuth2LoginAuthenticationFilter | 處理oauth2認證 | no |
| Saml2WebSsoAuthenticationFilter | 處理saml認證 | no |
| UsernamePasswordAuthenticationFilter | 處理表單認證 | yes |
| OpenIDAuthenticationFilter | 處理openid認證 | no |
| DefaultLoginPageGeneratingFilter | 配置預設登入界面 | yes |
| DefaultLogoutPageGeneratingFilter | 預設登出頁面 | yes |
| ConcurrentSessionFilter | 處理session有效期 | no |
| DigestAuthenticationFilter | 處理http摘要認證 | no |
| BearerTokenAuthenticationFilter | 處理oauth2的accesstoken | no |
| BasicAuthenticationFilter | 處理httpbasic認證 | yes |
| RequestCacheAwareFilter | 處理請求緩存 | yes |
| SecurityContextHolderAwareRequestFilter | 包裝原始請求 | yes |
| JaasApiIntegrationFilter | 處理jaas認證 | no |
| RememberMeAuthenticationFilter | 處理rememberme登入 | no |
| AnonymousAuthenticationFilter | 配置匿名認證 | yes |
| OAuth2AuthorizationCodeGrantFilter | 處理oauth2認證授權碼 | no |
| SessionManagementFilter | 處理session并發問題 | yes |
| ExceptionTranslationFilter | 處理認證授權中的異常 | yes |
| FilterSecurityInterceptor | 處理授權相關 | yes |
| SwitchUserFilter | 處理賬戶切換 | no |
二、認證流程分析
1、前端輸入完使用者名密碼之後,會進入UsernamePasswordAuthenticationFilter類中去擷取使用者名和密碼,然後去建構一個UsernamePasswordAuthenticationToken對象。
UsernamePasswordAuthenticationToken這個類是實作了Authentication接口,在調用UsernamePasswordAuthenticationToken的構造函數的時候先調用父類AbstractAuthenticationToken的構造方法,傳遞一個null,因為在認證的時候并不知道這個使用者有什麼權限,之後去給使用者名密碼指派,最後有一個setAuthenticated(false)方法,代表未認證,源碼如下:

執行個體化UsernamePasswordAuthenticationToken之後調用了setDetails(request,authRequest)将請求的資訊設到UsernamePasswordAuthenticationToken中去,包括ip、session等内容
2、然後執行
this.getAuthenticationManager().authenticate(authRequest) AuthenticationManager本身不包含驗證的邏輯,它的作用是管理AuthenticationProvider。
3、authenticate這個方法是在ProviderManager類上的,這個類實作了AuthenticationManager接口,在authenticate方法中有一個for循環,拿到所有的AuthenticationProvider,真正校驗的邏輯是寫在AuthenticationProvider中的,為什麼是一個集合去進行循環?是因為不同的登陸方式認證邏輯是不一樣的,可能是微信等社交平台登陸,也可能是使用者名密碼登陸。AuthenticationManager其實是将AuthenticationProvider收集起來,然後登陸的時候挨個去AuthenticationProvider中問你這種驗證邏輯支不支援此次登陸的方式,根據傳進來的Authentication類型會挑出一個适合的provider來進行校驗處理。
然後去調用provider的驗證方法authenticate方法,authenticate是DaoAuthenticationProvider類中的一個方法,DaoAuthenticationProvider繼承了AbstractUserDetailsAuthenticationProvider。實際上authenticate的校驗邏輯寫在了AbstractUserDetailsAuthenticationProvider抽象類中,首先執行個體化UserDetails對象,調用了retrieveUser方法擷取到了一個user對象,retrieveUser是一個抽象方法。
AbstractUserDetailsAuthenticationProvider的 authenticate 方法的一部分:
注意:如果自己自定義了一個MyAuthenticationProvider繼承了AuthenticationProvider,這裡就會走自己的認證類。
4、DaoAuthenticationProvider實作了 retrieveUser 方法,在實作的方法中執行個體化了UserDetails對象
注意:如果自己自定義了UserDetailsServiceImpl 實作了 UserDetailsService就會走自己的方法。
5、也就是相當于自定義驗證邏輯的那個類,去實作UserDetailService類,這個傳回結果就是我們自己在資料庫中根據username查詢出來的使用者資訊。在AbstractUserDetailsAuthenticationProvider中如果沒拿到資訊就會抛出異常,如果查到了就會去調用preAuthenticationChecks的check方法去進行預檢查。
AbstractUserDetailsAuthenticationProvider的 authenticate 方法的一部分:
在預檢查中進行了三個檢查,因為UserDetail類中有四個布爾類型,去檢查其中的三個,使用者是否鎖定、使用者是否過期,使用者是否可用。
預檢查之後緊接着去調用了additionalAuthenticationChecks方法去進行附加檢查,這個方法也是一個抽象方法,在DaoAuthenticationProvider中去具體實作,在裡面進行了加密解密去校驗目前的密碼是否比對。比對密碼的過程,用到了PasswordEncoder和SaltSource,密碼加密和鹽的概念。
如果通過了預檢查和附加檢查,還會進行厚檢查,檢查4個布爾中的最後一個。
所有的檢查都通過,則認為使用者認證是成功的。使用者認證成功之後,會将這些認證資訊和user傳遞進去,調用createSuccessAuthentication方法。
createSuccessAuthentication方法中同樣會執行個體化一個user,但是這個方法不會調用之前傳兩個參數的函數,而是會調用三個參數的構造函數。這個時候,在調super的構造函數中不會再傳null,會将authorities權限設進去,之後将使用者密碼設進去,最後setAuthenticated(true),代表驗證已經通過。
最後建立一個authentication會沿着驗證的這條線傳回回去。如果驗證成功,則在這條路中調用我們系統的業務邏輯。如果在任何一處發生問題,就會抛出異常,調用我們自己定義的認證失敗的處理器。
三、總結
1、UserDetails與UserDetailsService差別
UserDetails這個接口,它代表了最詳細的使用者資訊,這個接口涵蓋了一些必要的使用者資訊字段,具體的實作類對它進行了擴充。
public interface UserDetails extends Serializable {

   Collection<? extends GrantedAuthority> getAuthorities();

   String getPassword();

   String getUsername();

   boolean isAccountNonExpired();

   boolean isAccountNonLocked();

   boolean isCredentialsNonExpired();

   boolean isEnabled();
}
它和Authentication接口很類似,比如它們都擁有username,authorities,區分他們也是本文的重點内容之一。Authentication的getCredentials()與UserDetails中的getPassword()需要被區分對待,前者是使用者送出的密碼憑證,後者是使用者正确的密碼,認證器其實就是對這兩者的比對。Authentication中的getAuthorities()實際是由UserDetails的getAuthorities()傳遞而形成的。還記得Authentication接口中的getUserDetails()方法嗎?其中的UserDetails使用者詳細資訊便是經過了AuthenticationProvider之後被填充的。!UserDetailsService隻負責從特定的地方(通常是資料庫)加載使用者資訊,僅此而已,記住這一點,可以避免走很多彎路
public interface UserDetailsService {
   UserDetails loadUserByUsername(String username) throws UsernameNotFoundException;
}
2、authenticationmanager ,providermanager, authenticationprovider關系
security中支援多種不同的認證方式,比如使用者名和密碼認證、手機号驗證碼認證等,不同的認證方式對應了不同authenticationprovider是以一個完整的流程可能由多個authenticationprovider提供,多個authenticationprovider組成一個清單,這個清單将由providermanager代理,換句話說providermanager中存在一個清單,在providermanager中周遊清單中每一個authenticationprovider去執行身份認證,最終得到認證結果。
providermanager本身也可以再配置一個authenticationmanager作為parent,這樣當providermanager認證失敗就可以進入到parent中再次認證,理論上providermanager的parent可以是任意類型的authenticationmanager,但是通常由providermanager來扮演parent角色,也就是providermanager是providermanager的parent。
providermanager本身也可以有多個,多個providermanager共用一個parent,有時一個應用程式有受保護資源的邏輯組,比如所有符合路徑模式的資源/api/**.每個組可以有自己專用的authenticationmanager,通常每個組都是一個providermanager,他們共享一個父級,然後父級是一種全局資源,作為所有提供者的後備資源,由此三者關系如圖
3、使用者資訊擷取
3.1、業務代碼中擷取
security會将登入的使用者資訊資料儲存在session中,security在此基礎上做了改進,通過一個線程将登陸成的資訊儲存到SecurityContextHolder中,
SecurityContextHolder中資料儲存預設是通過Theadlocal實作的,使用Theadlocal建立的變量隻能通過目前線程通路,不能被其他線程或者 目前線程的子線程通路,就是使用者資料和請求線程是綁定在一起的,請求完成後,security會将在session中登入資訊清空,以後有請求時security會從session資訊儲存到SecurityContextHolder友善該請求後續處理
實際上SecurityContextHolder存儲的是SecurityContext ,在SecurityContext存儲的是Authentication
SecurityContextHolder源碼如下
public class SecurityContextHolder {
    //存儲政策是隻有目前請求線程才能擷取使用者資訊 開啟子線程也是無法拿到使用者資訊
    public static final String MODE_THREADLOCAL = "MODE_THREADLOCAL";
    //多線程存儲政策 如果業務子線程中也可以擷取使用者資訊 使用這個
    public static final String MODE_INHERITABLETHREADLOCAL = "MODE_INHERITABLETHREADLOCAL";
    //是将資料儲存到一個靜态變量中
    public static final String MODE_GLOBAL = "MODE_GLOBAL";
    private static final String MODE_PRE_INITIALIZED = "MODE_PRE_INITIALIZED";
    public static final String SYSTEM_PROPERTY = "spring.security.strategy";
    private static String strategyName = System.getProperty("spring.security.strategy");
    private static SecurityContextHolderStrategy strategy;
    private static int initializeCount = 0;
}
SecurityContentHolderStrategy源碼如下
public interface SecurityContextHolderStrategy {

  /**
   * 清除存儲的securityContext
   */
  void clearContext();

  /**
   * 擷取存儲的securityContext
   */
  SecurityContext getContext();

  /**
   *設定存儲的securityContext
   */
  void setContext(SecurityContext context);

  /**
   * 建立一個空的存儲的securityContext
   */
  SecurityContext createEmptyContext();

}
代碼中擷取
@GetMapping("/index")
    public String index(){
       Authentication authentication =  SecurityContextHolder.getContext().getAuthentication();
       User user =  (User)authentication.getPrincipal();
       //身份資訊
        user.getUsername();
        //權限資訊
        user.getAuthorities();
        return "index";
    }
其他方式
方法二:
 @GetMapping("/me")
    public Object getCurrentUser(Authentication authentication){
        return authentication;
    }

方法三:
@GetMapping("/me")
    public Object getCurrentUser(@AuthenticationPrincipal UserDetails userDetails){
        return userDetails;
    }
3.2、頁面中擷取
<!--thymeleaf與security整合包-->
        <dependency>
            <groupId>org.thymeleaf.extras</groupId>
            <artifactId>thymeleaf-extras-springsecurity5</artifactId>
            <version>3.0.4.RELEASE</version>
        </dependency>
        <!--thymeleaf啟動器-->
        <dependency>
            <groupId>org.springframework.boot</groupId>
            <artifactId>spring-boot-starter-thymeleaf</artifactId>
        </dependency>
<!DOCTYPE html>
<html xmlns="http://www.w3.org/1999/xhtml"
xmlns:th="http://www.thymeleaf.org"
xmlns:sec="http://www.thymeleaf.org/thymeleaf-extras-springsecurity5">
<head>
<meta charset="UTF-8">
<title>Title</title>
</head>
<body>
登入賬号:<span sec:authentication="name">123</span><br/>
登入賬号:<span sec:authentication="principal.username">456</span><br/>
憑證:<span sec:authentication="credentials">456</span><br/>
權限和角色:<span sec:authentication="authorities">456</span><br/>
用戶端位址:<span sec:authentication="details.remoteAddress">456</span><br/>
sessionId:<span sec:authentication="details.sessionId">456</span><br/>
</body>
</html>