從LeNet-5 CNN模型入門PyTorch
- 1. PyTorch 準備
-
- 1.1 PyTorch特點
- 1.2 PyTorch安裝測試
- 2. 完整代碼
-
- 2.1 LeNet模型
- 2.2 訓練
- 2.2 測試
- 3. 解讀PyTorch
-
- 3.1 CNN Api
-
- 3.1.1 二維卷積Conv2d
- 3.1.2 激活函數ReLU
- 3.1.3 池化層函數MaxPool2d
- 3.1.4 全連接配接層Linear
- 3.1.5 Module父類
- 3.2 Basic Api
-
- 3.2.1 改變Tensor shape的view
- 3.2.2 torch.optim.SGD
- 3.2.3 torch.nn.CrossEntropyLoss
- 3.2.4 儲存模型torch.save
- 3.2.5 torch.Tensor.detach
1. PyTorch 準備
最好安裝PyTorch獨立環境,和其他深度學習架構的環境分開。具體安裝細節,官方網站最全。
https://pytorch.org/get-started/previous-versions/
注:安裝的時候,将torchvision包也一起安裝了。
1.1 PyTorch特點
- 支援強大的GPU計算;
- 支援動态定義計算圖;
- 提供強大的靈活性和速度。
1.2 PyTorch安裝測試
安裝,請參考pytorch官網的指導。
測試:
import torch
torch.cuda.is_available()
torch.cuda.get_device_name(0)
torch.rand(3,3).cuda()
2. 完整代碼
完整代碼,從兩處分享而來,感謝兩位作者:
-
模型和訓練
github連結–https://github.com/ChawDoe/LeNet5-MNIST-PyTorch
-
測試
https://blog.csdn.net/u014453898/article/details/90707987
2.1 LeNet模型
前向傳播,預測分類結果
#model.py
from torch.nn import Module
from torch import nn


class Model(Module):
    def __init__(self):
        super(Model, self).__init__()
        self.conv1 = nn.Conv2d(1, 6, 5)
        self.relu1 = nn.ReLU()
        self.pool1 = nn.MaxPool2d(2)
        self.conv2 = nn.Conv2d(6, 16, 5)
        self.relu2 = nn.ReLU()
        self.pool2 = nn.MaxPool2d(2)
        self.fc1 = nn.Linear(256, 120)
        self.relu3 = nn.ReLU()
        self.fc2 = nn.Linear(120, 84)
        self.relu4 = nn.ReLU()
        self.fc3 = nn.Linear(84, 10)
        self.relu5 = nn.ReLU()

    def forward(self, x):
        y = self.conv1(x)
        y = self.relu1(y)
        y = self.pool1(y)
        y = self.conv2(y)
        y = self.relu2(y)
        y = self.pool2(y)
        y = y.view(y.shape[0], -1)
        y = self.fc1(y)
        y = self.relu3(y)
        y = self.fc2(y)
        y = self.relu4(y)
        y = self.fc3(y)
        y = self.relu5(y)
        return y
2.2 訓練
- 反向傳播,疊代更新更優參數
- 測試集驗證每批處理下的參數 準确率
- 将此準确率下的模型儲存到pt檔案中
#train.py
from model import Model
import numpy as np
import torch
import os
import stat
from torchvision.datasets import mnist
from torch.nn import CrossEntropyLoss
from torch.optim import SGD
from torch.utils.data import DataLoader
from torchvision.transforms import ToTensor

if __name__ == '__main__':
    batch_size = 256
    train_dataset = mnist.MNIST(root="../src/pytorch/LeNet5-MNIST-PyTorch-master/train",
                                train=True,
                                transform=ToTensor(),
                                download=True)
    test_dataset = mnist.MNIST(root='../src/pytorch/LeNet5-MNIST-PyTorch-master/test',
                               train=False,
                               transform=ToTensor(),
                               download=True)
    train_loader = DataLoader(train_dataset, batch_size=batch_size)
    test_loader = DataLoader(test_dataset, batch_size=batch_size)
    model = Model()
    sgd = SGD(model.parameters(), lr=1e-1)
    cross_error = CrossEntropyLoss()
    epoch = 100

    for _epoch in range(epoch):
        #反向傳播,疊代更新更優參數
        for idx, (train_x, train_label) in enumerate(train_loader):
            label_np = np.zeros((train_label.shape[0], 10))
            sgd.zero_grad()
            predict_y = model(train_x.float())
            _error = cross_error(predict_y, train_label.long())
            if idx % 10 == 0:
                print('idx: {}, _error: {}'.format(idx, _error))
            _error.backward()
            sgd.step()

        correct = 0
        _sum = 0
        #測試集驗證每批處理下的參數 準确率
        for idx, (test_x, test_label) in enumerate(test_loader):
            predict_y = model(test_x.float()).detach()
            predict_ys = np.argmax(predict_y, axis=-1)
            label_np = test_label.numpy()
            _ = predict_ys == test_label
            correct += np.sum(_.numpy(), axis=-1)
            _sum += _.shape[0]

            print('accuracy: {:.2f}'.format(correct / _sum))
            #将此準确率下的模型儲存到pt檔案中
            torch.save(model, '../src/pytorch/LeNet5-MNIST-PyTorch-master/models/mnist_{:.2f}.pt'.format(correct / _sum))
2.2 測試
-
加載模型檔案(可選:指定CPU or GPU,device() to())
model = torch.load(’…/src/pytorch/LeNet5-MNIST-PyTorch-master/models/mnist_0.90.pt’)
可選:
device = torch.device(‘cuda’ if torch.cuda.is_available() else ‘cpu’)
model = model.to(device)
-
測試圖像的處理
需要将圖檔處理成模型要求的圖像資料。pytorch有專門的類接口實作。例如 torchvision.transforms.ToSensor、torchvision.transforms.Normalize等。
(1) ToSensor,是将PIL圖像資料轉換為PyTorch的Tensor格式。
(2) Normalize,标準化PIL圖像資料,通過均值和标準差。
另外,在次元上需要和模型一緻。此處使用unsqueeze接口。原PIL圖是(1,28,28),需要帶batch_size的次元擴充(1, 1, 28, 28)
-
處理後的圖像資料,帶入訓練好的模型中,得到分類結果
模型得出的結果格式是pytorch的,可以轉換為numpy。可選操作:
(1) torch.nn.functional.softmax
(2) torch.autograd.Variable
(3) torch.Tensor.numpy
#test.py
import torch
import cv2
from PIL import Image
import os
import torch.nn.functional as F
from torch.autograd import Variable
from torchvision import datasets, transforms
import numpy as np

if __name__ =='__main__':
    test_path = "../datasets/MNIST_PNG_Data/test/"
    for num in range(0,10):
        file_path = os.path.join(test_path, str(num))
        print('file_path: ', file_path)
        acc_count = 0
        sample_count = 0
        for file in os.listdir(file_path):
            file_name = os.path.join(file_path, file)
            device = torch.device('cuda' if torch.cuda.is_available() else 'cpu')
            model = torch.load('../src/pytorch/LeNet5-MNIST-PyTorch-master/models/mnist_0.99.pt') #加載模型
            model = model.to(device)
            model.eval()    #把模型轉為test模式

            # img = cv2.imread("00030.png")  #讀取要預測的圖檔
            img = Image.open(file_name)
            trans = transforms.Compose(
                [
                    transforms.ToTensor(),
                    transforms.Normalize((0.1307,), (0.3081,))
                ])

            # img = cv2.cvtColor(img, cv2.COLOR_BGR2GRAY)#圖檔轉為灰階圖,因為mnist資料集都是灰階圖
            img = trans(img)
            img = img.to(device)
            img = img.unsqueeze(0)  #圖檔擴充多一維,因為輸入到儲存的模型中是4維的[batch_size,通道,長,寬],而普通圖檔隻有三維,[通道,長,寬]
            #擴充後,為[1,1,28,28]
            output = model(img)
            #output:  tensor([[ 0.0000, 32.1585, 41.3743,  0.0000,  0.0000,  2.3812,  0.0000,  7.8895,
            #   0.0000,  0.0000]], grad_fn=<ReluBackward0>)
            prob = F.softmax(output, dim=1)
            #prob after output softmax:  tensor([[1.0748e-18, 9.9439e-05, 9.9990e-01, 1.0748e-18, 1.0748e-18, 1.1626e-
            #   17,1.0748e-18, 2.8688e-15, 1.0748e-18, 1.0748e-18]],grad_fn=<SoftmaxBackward>)
            prob = Variable(prob)
            #prob after variable prob:  tensor([[1.0748e-18, 9.9439e-05, 9.9990e-01, 1.0748e-18, 1.0748e-18, 1.1626e-
            #   17,1.0748e-18, 2.8688e-15, 1.0748e-18, 1.0748e-18]])
            prob = prob.cpu().numpy()  #用GPU的資料訓練的模型儲存的參數都是gpu形式的,要顯示則先要轉回cpu,再轉回numpy模式
            # print(prob)  #prob是10個分類的機率
            pred = np.argmax(prob) #選出機率最大的一個
            sample_count += 1
            if pred.item() == num:
                acc_count += 1
        print("{} count: {}, classify error count: {}, accuracy: {:.6f}".format(num, sample_count,acc_count, acc_count/sample_count))
測試結果列印:測試過程速度很快,見證了強大速度的特點。速度上和Tensorflow形成明顯對比。
file_path:  ../datasets/MNIST_PNG_Data/test/0
0 count: 100, classify error count: 100, accuracy: 1.000000
file_path:  ../datasets/MNIST_PNG_Data/test/1
1 count: 100, classify error count: 99, accuracy: 0.990000
file_path:  ../datasets/MNIST_PNG_Data/test/2
2 count: 1032, classify error count: 1028, accuracy: 0.996124
file_path:  ../datasets/MNIST_PNG_Data/test/3
3 count: 1010, classify error count: 997, accuracy: 0.987129
file_path:  ../datasets/MNIST_PNG_Data/test/4
4 count: 982, classify error count: 974, accuracy: 0.991853
file_path:  ../datasets/MNIST_PNG_Data/test/5
5 count: 892, classify error count: 881, accuracy: 0.987668
file_path:  ../datasets/MNIST_PNG_Data/test/6
6 count: 958, classify error count: 946, accuracy: 0.987474
file_path:  ../datasets/MNIST_PNG_Data/test/7
7 count: 1028, classify error count: 992, accuracy: 0.964981
file_path:  ../datasets/MNIST_PNG_Data/test/8
8 count: 974, classify error count: 963, accuracy: 0.988706
file_path:  ../datasets/MNIST_PNG_Data/test/9
9 count: 1009, classify error count: 984, accuracy: 0.975223
3. 解讀PyTorch
從上面的Mnist LeNet-5模型示例中,我們學習PyTorch的基本文法、相關API等。
神經網絡訓練時,Pytorch一般的步驟是:
>>> optimizer = torch.optim.SGD(model.parameters(), lr=0.1, momentum=0.9)
>>> optimizer.zero_grad()
>>> loss_fn(model(input), target).backward()
>>> optimizer.step()
- 模型梯度(包括清零)–zero_grad()
- 損失函數反向傳播–backward()
- 梯度疊代,更新模型參數值–step()
3.1 CNN Api
在本模型中,用到了二維卷積Conv2d、激活函數ReLU、池化層函數MaxPool2d、全連接配接層Linear等。另,Module Class is Base class for all neural network modules。
r"""Base class for all neural network modules.

    Your models should also subclass this class.

    Modules can also contain other Modules, allowing to nest them in
    a tree structure. You can assign the submodules as regular attributes::

        import torch.nn as nn
        import torch.nn.functional as F

        class Model(nn.Module):
            def __init__(self):
                super(Model, self).__init__()
                self.conv1 = nn.Conv2d(1, 20, 5)
                self.conv2 = nn.Conv2d(20, 20, 5)

            def forward(self, x):
                x = F.relu(self.conv1(x))
                return F.relu(self.conv2(x))

    Submodules assigned in this way will be registered, and will have their
    parameters converted too when you call :meth:`to`, etc.
    """
3.1.1 二維卷積Conv2d
PyTorch深度學習架構和Tensorflow,對于二維卷積api接口,不同之處在于:
PyTorch 源代碼中已為開發者自動生成權重weight和偏置項bias(随機生成),而Tensorflow中需要開發者自定義weight和bias。
- 示例
from __future__ import print_function
from torch import nn
import torch

x = torch.tensor([
    [1, 1, 3],
    [1, 1, 4],
    [1, -1, 0]
], dtype=torch.float)
print("x: \n", x)

x = x.reshape(1, 1, 3, 3)

conv = nn.Conv2d(1,1,2)

print(conv(x))
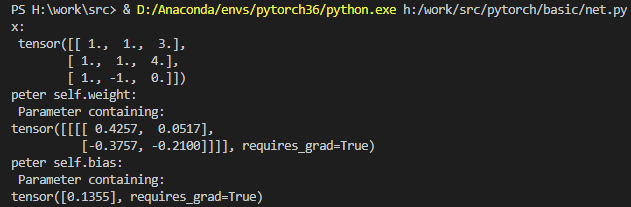
- 列印結果
x:
 tensor([[ 1.,  1.,  3.],
        [ 1.,  1.,  4.],
        [ 1., -1.,  0.]])
peter self.weight:
 Parameter containing:
tensor([[[[ 0.4257,  0.0517],
          [-0.3757, -0.2100]]]], requires_grad=True)
peter self.bias:
 Parameter containing:
tensor([0.1355], requires_grad=True)
tensor([[[[ 0.0272, -0.4993],
          [ 0.4472,  1.1438]]]], grad_fn=<MkldnnConvolutionBackward>)
列印中有weight和bias,這兩個列印是從source code中,print而來。驗證卷積的第一個元素是對的,0.4257+0.0517-0.3757-0.2100+偏置項0.1355 = 0.0272。
-
附source code修改
\lib\site-packages\torch\nn\modules\conv.py修改如下:
from __future__ import print_function #在檔案begin中導入這個包
#Conv2d Class如下兩個接口中列印weight和bias
def _conv_forward(self, input, weight):
        print("peter self.bias: \n", self.bias)
        if self.padding_mode != 'zeros':
            return F.conv2d(F.pad(input, self._reversed_padding_repeated_twice, mode=self.padding_mode),
                            weight, self.bias, self.stride,
                            _pair(0), self.dilation, self.groups)
        return F.conv2d(input, weight, self.bias, self.stride,
                        self.padding, self.dilation, self.groups)

    def forward(self, input):
        print("peter self.weight: \n", self.weight)
        return self._conv_forward(input, self.weight)
修改的緣由:追蹤到Conv2d Class繼承了_ConvNd Class,父類裡有屬性weight和bias,截取相關片段代碼
if transposed:
            self.weight = Parameter(torch.Tensor(
                in_channels, out_channels // groups, *kernel_size))
        else:
            self.weight = Parameter(torch.Tensor(
                out_channels, in_channels // groups, *kernel_size))
        if bias:
            self.bias = Parameter(torch.Tensor(out_channels))
        else:
            self.register_parameter('bias', None)
3.1.2 激活函數ReLU
就是max(0,x),這個就不多做介紹了。看source code的example即可。
m = nn.ReLU()
input = torch.randn(2)
print("input: \n", input)
output = m(input)
print("\n relu output: \n", output)
PS H:\work\src> & D:/Anaconda/envs/pytorch36/python.exe h:/work/src/pytorch/basic/net.py
input:
 tensor([ 0.2909, -1.8363])

 relu output:
 tensor([0.2909, 0.0000])
3.1.3 池化層函數MaxPool2d
示例kenel_size 2*2,步長1
x = torch.tensor([
    [1, 1, 3, 2],
    [1, 1, 4, 3],
    [1, -1, 0, -2],
    [2, -2, -1, 4]
], dtype=torch.float)
print("x: \n", x)
x = x.reshape(1, 1, 4, 4)
conv = nn.Conv2d(1,1,2)
convx = conv(x)
print(convx)
maxpool = nn.MaxPool2d(2, padding = 0, stride=1)
print("the maxpoll2d of input convx: \n", maxpool(convx))

3.1.4 全連接配接層Linear
輸入是x,輸出是y,權重weight是A,偏置項bias是b。嚴格意義上的矩陣運算。
# 3. Linear
x = torch.tensor([
    [1, 0, 0],
    [0, 1, 0],
    [0, 0, 1],

], dtype=torch.float)
x = x.reshape(1, 1, 3, 3)
print("x: \n", x)
linear = nn.Linear(3,2)
print("linear: \n",linear(x))
3.1.5 Module父類
其屬性變量和屬性方法有很多。
-
parameters方法
Returns an iterator over module parameters。yielding both the name of the parameter as well as the parameter itself。借助内置函數named_parameters。
3.2 Basic Api
改變Tensor shape的view、等。
3.2.1 改變Tensor shape的view
3.2.2 torch.optim.SGD
随機梯度下降(stochastic gradient descent)的接口;可選沖量式梯度下降。
屬性參數如下:必設參數為模型params疊代器和學習率。
Args:
        params (iterable): iterable of parameters to optimize or dicts defining
            parameter groups
        lr (float): learning rate
        momentum (float, optional): momentum factor (default: 0)
        weight_decay (float, optional): weight decay (L2 penalty) (default: 0)
        dampening (float, optional): dampening for momentum (default: 0)
        nesterov (bool, optional): enables Nesterov momentum (default: False)
基本用法示例:
>>> optimizer = torch.optim.SGD(model.parameters(), lr=0.1, momentum=0.9)
>>> optimizer.zero_grad()
>>> loss_fn(model(input), target).backward()
>>> optimizer.step()
model模型類的執行個體對象;optimizer是SGD類的對象;調用zero_grad清零方法;。。。;最後調用step方法疊代。
3.2.3 torch.nn.CrossEntropyLoss
原理:Softmax函數和交叉熵損失函數。即如下
損失函數對變量參數進行求偏導,最小損失下,的參數值(通過反向傳播backward)。
基本步驟示例:
>>> input = torch.randn(3, 5, requires_grad=True)
>>> target = torch.randint(5, (3,), dtype=torch.int64)
>>> loss = F.cross_entropy(input, target)
>>> loss.backward()
3.2.4 儲存模型torch.save
儲存包含模型參數等模型類對象object到一個檔案中,一般檔案格式為pt(protocol buffer)。
def save(obj, f, pickle_module=pickle, pickle_protocol=DEFAULT_PROTOCOL, _use_new_zipfile_serialization=False)
模型在訓練後,參數更新在模型類對象model中,然後save儲存。
torch.save(model, ‘…/src/pytorch/LeNet5-MNIST-PyTorch-master/models/mnist_{:.2f}.pt’.format(correct / _sum))
3.2.5 torch.Tensor.detach
官方解釋很形象:
Returns a new Tensor, detached from the current graph.The result will never require gradient.
在驗證模型的時候,最好從目前計算圖中分離開。
predict_y = model(test_x.float()).detach()