GitHub項目位址
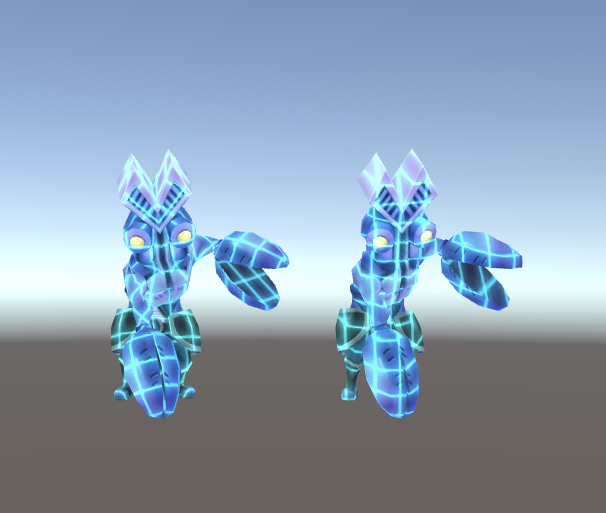
疊加網格效果,其實就是簡單的疊加一層網格紋理的效果,但是項目中需要把網格往視覺方向正面疊加,是以我這裡就實作了兩種疊加效果。

網格紋理的實作:
準備一張如上圖的網格紋理,黑色(0,0,0,1),白色(1,1,1,1),是以當顔色疊加時,就會出現白色的網格。
注意網格紋理隻有一個“十字”白色紋理,是以需要使用紋理的Tiling屬性。
通過屬性_GridType實作了兩個疊加效果
(1)按照原紋理的uv取樣,實作了無規則的疊加效果
(2)按照模型世界坐标的位置取樣,實作了正面疊加的效果
Shader "Custom/GridShader"
{
    Properties
    {
        _MainTex ("Main Tex", 2D) = "white" {}

        _GridTex ("Grid Tex", 2D) = "white" {}
        _GridColor ("Grid Color", COLOR) = (0,1,1,1)

        [MaterialToggle]_GridType ("Grid Type", float) = 0
        _USpeed ("USpeed", Range(0, 50)) = 0
        _VSpeed ("VSpeed", Range(0, 50)) = 20
    }
    SubShader
    {
        Tags { "RenderType"="Opaque" }
        LOD 100

        Pass
        {
            CGPROGRAM
            #pragma vertex vert
            #pragma fragment frag

            #include "UnityCG.cginc"

            struct appdata
            {
                float4 vertex : POSITION;
                float2 uv : TEXCOORD0;
            };

            struct v2f
            {
                float2 uv : TEXCOORD0;
                float2 gridUV : TEXCOORD1;
                float4 vertex : SV_POSITION;
            };

            sampler2D _MainTex;
            float4 _MainTex_ST;

            sampler2D _GridTex;
            float4 _GridTex_ST;

            float4 _GridColor;

            bool _GridType;

            float _USpeed;
            float _VSpeed;

            v2f vert (appdata v)
            {
                v2f o;
                o.vertex = UnityObjectToClipPos(v.vertex);
                o.uv = TRANSFORM_TEX(v.uv, _MainTex);

                fixed4 worldPos = mul(unity_ObjectToWorld, v.vertex);

                if(_GridType)
                {
                    float2 uv = float2(worldPos.x, worldPos.y - 0.5 * worldPos.z);
                    o.gridUV = TRANSFORM_TEX(uv, _GridTex);
                }
                else
                {
                    o.gridUV = TRANSFORM_TEX(v.uv, _GridTex);
                }
                o.gridUV.x += _USpeed * _Time.x;
                o.gridUV.y += _VSpeed * _Time.x;
                return o;
            }

            fixed4 frag (v2f i) : SV_Target
            {
                fixed4 col = tex2D(_MainTex, i.uv);
                fixed3 emissive = tex2D(_GridTex, i.gridUV) * _GridColor.rgb * _GridColor.a;
                col.rgb += emissive;
                return col;
            }
            ENDCG
        }
    }
}