首先明确一點,在Mina或者其他相似的架構中,心跳機制肯定都是和計時挂鈎的,隻要找到計時相關的代碼,其實就離真正的心跳邏輯不遠了。
Mina中的心跳逾時其實都是指會話空閑,即在一定時間段内未接收或未發送消息的狀态,此時會觸發sessionIdle,也就是IoFilter中的方法。
如何觸發sessionIdle
找到計時的地方,就很好了解了:
//AbstractPollingIoProcessor.java
    private static final long SELECT_TIMEOUT = 1000L;

    private class Processor implements Runnable {
        /**
         * {@inheritDoc}
         */
        @Override
        public void run() {
            assert processorRef.get() == this;

            lastIdleCheckTime = System.currentTimeMillis();
            int nbTries = 10;

            for (;;) {
                try {
					//略過部分代碼

                    // Write the pending requests
                    long currentTime = System.currentTimeMillis();
                    flush(currentTime);

                    // Last, not least, send Idle events to the idle sessions
                    notifyIdleSessions(currentTime);

                    // And manage removed sessions
                    removeSessions();

                   //略過部分代碼
                } catch (ClosedSelectorException cse) {
                    ExceptionMonitor.getInstance().exceptionCaught(cse);
                    break;
                } catch (Exception e) {
                    ExceptionMonitor.getInstance().exceptionCaught(e);
                    try {
                        Thread.sleep(1000);
                    } catch (InterruptedException e1) {
                        ExceptionMonitor.getInstance().exceptionCaught(e1);
                    }
                }
            }

           //略過部分代碼
        }

        private void notifyIdleSessions(long currentTime) throws Exception {
            // process idle sessions
            if (currentTime - lastIdleCheckTime >= SELECT_TIMEOUT) {
                lastIdleCheckTime = currentTime;
                AbstractIoSession.notifyIdleness(allSessions(), currentTime);
            }
        }

        //其他大量代碼略
    }
可以看到,這個Processor(AbstractPollingIoProcessor 内部類)自己作為Runable,線上程啟動後會不停地将目前時間傳進notifyIdleSessions方法,這也就是時間的來源。
然後會将目前時間與上一次記錄的時間進行比較,如果時間已經過去1000ms即1s,則更新記錄時間,并調用notifyIdleness方法,這就意味着這裡的計時機關,預設是1000ms,也就是以秒為機關。
接下來看這個notifyIdleness方法在幹什麼:
//AbstractIoSession.java
    public static void notifyIdleness(Iterator<? extends IoSession> sessions, long currentTime) {
        while (sessions.hasNext()) {
            IoSession session = sessions.next();

            if (!session.getCloseFuture().isClosed()) {
                notifyIdleSession(session, currentTime);
            }
        }
    }

    public static void notifyIdleSession(IoSession session, long currentTime) {
        notifyIdleSession0(session, currentTime, session.getConfig().getIdleTimeInMillis(IdleStatus.BOTH_IDLE), IdleStatus.BOTH_IDLE, Math.max(session.getLastIoTime(), session.getLastIdleTime(IdleStatus.BOTH_IDLE)));

        notifyIdleSession0(session, currentTime, session.getConfig().getIdleTimeInMillis(IdleStatus.READER_IDLE), IdleStatus.READER_IDLE, Math.max(session.getLastReadTime(), session.getLastIdleTime(IdleStatus.READER_IDLE)));

        notifyIdleSession0(session, currentTime, session.getConfig().getIdleTimeInMillis(IdleStatus.WRITER_IDLE), IdleStatus.WRITER_IDLE, Math.max(session.getLastWriteTime(), session.getLastIdleTime(IdleStatus.WRITER_IDLE)));

        notifyWriteTimeout(session, currentTime);
    }

    private static void notifyIdleSession0(IoSession session, long currentTime, long idleTime, IdleStatus status, long lastIoTime) {
        if ((idleTime > 0) && (lastIoTime != 0) && (currentTime - lastIoTime >= idleTime)) {
            session.getFilterChain().fireSessionIdle(status);
        }
    }
最終看到fireSessionIdle心裡就有數了。
不同的狀态有不同的觸發參數,都是以IdleStatus為基準的,有三種狀态,讀空閑、寫空閑、讀寫皆空閑:
public class IdleStatus {
    public static final IdleStatus READER_IDLE = new IdleStatus("reader idle");

    public static final IdleStatus WRITER_IDLE = new IdleStatus("writer idle");

    public static final IdleStatus BOTH_IDLE = new IdleStatus("both idle");

    private final String strValue;

    private IdleStatus(String strValue) {
        this.strValue = strValue;
    }

    @Override
    public String toString() {
        return strValue;
    }
}
至于最後的fireSessionIdle,順着IoFilter就調用了sessionIdle:
//DefaultIoFilterChain.java
    @Override
    public void fireSessionIdle(IdleStatus status) {
        session.increaseIdleCount(status, System.currentTimeMillis());
        callNextSessionIdle(head, session, status);
    }

    private void callNextSessionIdle(Entry entry, IoSession session, IdleStatus status) {
        try {
            IoFilter filter = entry.getFilter();
            NextFilter nextFilter = entry.getNextFilter();
            filter.sessionIdle(nextFilter, session, status);
        } catch (Exception e) {
            fireExceptionCaught(e);
        } catch (Error e) {
            fireExceptionCaught(e);
            throw e;
        }
    }
這樣自然就可以在各種實作IoFilter接口的類中觸發sessionIdle,比如各種IoFilterAdapter,也就是通過下列這種方式添加的過濾器:
然後…
Handler呢?
Mina中Filter和Handler是分屬兩個不同的接口(IoFilter與IoHandler)的,上面的filter.sessionIdle能讓IoFilter觸發sessionIdle,那Handler呢?
不要慌,其實在DefaultIoFilterChain中,建立session時預設都是使用的DefaultIoFilterChain,而Handler中幾乎所有的方法都是由DefaultIoFilterChain經過一定的處理傳遞到Handler的:
//DefaultIoFilterChain.java
    public DefaultIoFilterChain(AbstractIoSession session) {
        if (session == null) {
            throw new IllegalArgumentException("session");
        }

        this.session = session;
        head = new EntryImpl(null, null, "head", new HeadFilter());
        tail = new EntryImpl(head, null, "tail", new TailFilter());
        head.nextEntry = tail;
    }

    private static class TailFilter extends IoFilterAdapter {
        @Override
        public void sessionCreated(NextFilter nextFilter, IoSession session) throws Exception {
            try {
                session.getHandler().sessionCreated(session);
            } finally {
                // Notify the related future.
                ConnectFuture future = (ConnectFuture) session.removeAttribute(SESSION_CREATED_FUTURE);

                if (future != null) {
                    future.setSession(session);
                }
            }
        }

        @Override
        public void sessionOpened(NextFilter nextFilter, IoSession session) throws Exception {
            session.getHandler().sessionOpened(session);
        }

        @Override
        public void sessionClosed(NextFilter nextFilter, IoSession session) throws Exception {
            AbstractIoSession s = (AbstractIoSession) session;

            try {
                s.getHandler().sessionClosed(session);
            } finally {
                try {
                    s.getWriteRequestQueue().dispose(session);
                } finally {
                    try {
                        s.getAttributeMap().dispose(session);
                    } finally {
                        try {
                            // Remove all filters.
                            session.getFilterChain().clear();
                        } finally {
                            if (s.getConfig().isUseReadOperation()) {
                                s.offerClosedReadFuture();
                            }
                        }
                    }
                }
            }
        }

        @Override
        public void sessionIdle(NextFilter nextFilter, IoSession session, IdleStatus status) throws Exception {
            session.getHandler().sessionIdle(session, status);
        }

        @Override
        public void exceptionCaught(NextFilter nextFilter, IoSession session, Throwable cause) throws Exception {
            AbstractIoSession s = (AbstractIoSession) session;

            try {
                s.getHandler().exceptionCaught(s, cause);
            } finally {
                if (s.getConfig().isUseReadOperation()) {
                    s.offerFailedReadFuture(cause);
                }
            }
        }

        @Override
        public void inputClosed(NextFilter nextFilter, IoSession session) throws Exception {
            session.getHandler().inputClosed(session);
        }

        @Override
        public void messageReceived(NextFilter nextFilter, IoSession session, Object message) throws Exception {
            AbstractIoSession s = (AbstractIoSession) session;

            if (!(message instanceof IoBuffer) || !((IoBuffer) message).hasRemaining()) {
                s.increaseReadMessages(System.currentTimeMillis());
            }

            // Update the statistics
            if (session.getService() instanceof AbstractIoService) {
                ((AbstractIoService) session.getService()).getStatistics().updateThroughput(System.currentTimeMillis());
            }

            // Propagate the message
            try {
                session.getHandler().messageReceived(s, message);
            } finally {
                if (s.getConfig().isUseReadOperation()) {
                    s.offerReadFuture(message);
                }
            }
        }

        @Override
        public void messageSent(NextFilter nextFilter, IoSession session, WriteRequest writeRequest) throws Exception {
            ((AbstractIoSession) session).increaseWrittenMessages(writeRequest, System.currentTimeMillis());

            // Update the statistics
            if (session.getService() instanceof AbstractIoService) {
                ((AbstractIoService) session.getService()).getStatistics().updateThroughput(System.currentTimeMillis());
            }

            // Propagate the message
            session.getHandler().messageSent(session, writeRequest.getMessage());
        }

        @Override
        public void filterWrite(NextFilter nextFilter, IoSession session, WriteRequest writeRequest) throws Exception {
            nextFilter.filterWrite(session, writeRequest);
        }

        @Override
        public void filterClose(NextFilter nextFilter, IoSession session) throws Exception {
            nextFilter.filterClose(session);
        }
    }
可以看到,messageReceived、sessionIdle之類的方法都是在TailFilter中使用session.getHandler().xxx方式傳遞給Handler的。
至此,已經知道計時在Processor中開始的,那麼Processor是被誰啟動起來的呢?
要弄清楚這個問題,其實就要把整個連接配接建立的流程摸清。
Processor的建立
比如一個SocketConnector,開始連接配接時是這樣的:
SocketConnector mConnector = new NioSocketConnector();
    ConnectFuture future = connector.connect(socketAddress);
在開始看源碼之前,可以先看一下NioSocketConnector這個類的繼承關系,後面肯定會接連遇到圖中的一些類的:
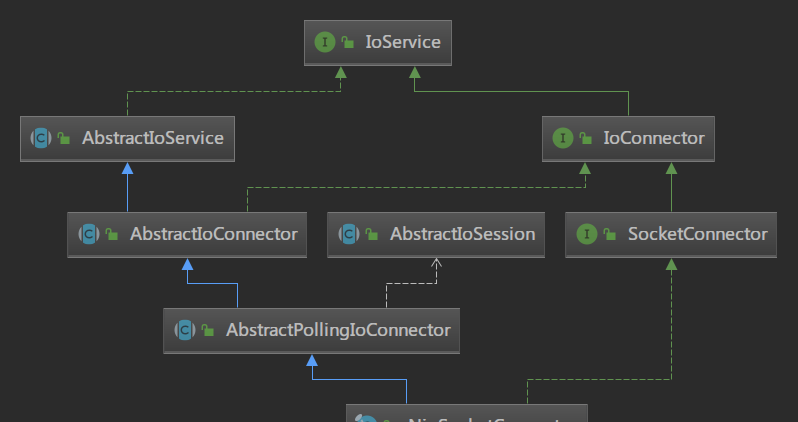
那麼現在就從這個connect開始,這裡調用的其實是AbstractIoConnector的方法:
//AbstractIoConnector.java
    @Override
    public final ConnectFuture connect(SocketAddress remoteAddress) {
        return connect(remoteAddress, null, null);
    }

    @Override
    public final ConnectFuture connect(SocketAddress remoteAddress, SocketAddress localAddress, IoSessionInitializer<? extends ConnectFuture> sessionInitializer) {
        //各種判斷,略過

        if (getHandler() == null) {
            if (getSessionConfig().isUseReadOperation()) {
                setHandler(new IoHandler() {
                    //各種實作的方法,這裡省略掉
                });
            } else {
                throw new IllegalStateException("handler is not set.");
            }
        }

        return connect0(remoteAddress, localAddress, sessionInitializer);
    }
而connect0卻又回到了AbstractPollingIoConnector:
//AbstractPollingIoConnector.java
    @Override
    @SuppressWarnings("unchecked")
    protected final ConnectFuture connect0(SocketAddress remoteAddress, SocketAddress localAddress, IoSessionInitializer<? extends ConnectFuture> sessionInitializer) {
        H handle = null;
        boolean success = false;
        try {
            handle = newHandle(localAddress);
            if (connect(handle, remoteAddress)) {
                ConnectFuture future = new DefaultConnectFuture();
                S session = newSession(processor, handle);
                initSession(session, future, sessionInitializer);
                // Forward the remaining process to the IoProcessor.
                session.getProcessor().add(session);
                success = true;
                return future;
            }

            success = true;
        } catch (Exception e) {
            return DefaultConnectFuture.newFailedFuture(e);
        } finally {
            if (!success && handle != null) {
                try {
                    close(handle);
                } catch (Exception e) {
                    ExceptionMonitor.getInstance().exceptionCaught(e);
                }
            }
        }

        ConnectionRequest request = new ConnectionRequest(handle, sessionInitializer);
        connectQueue.add(request);
        startupWorker();
        wakeup();

        return request;
    }
上面有一個connect的判斷,是在NioSocketConnector中實作的:
//NioSocketConnector.java
    @Override
    protected boolean connect(SocketChannel handle, SocketAddress remoteAddress) throws Exception {
        return handle.connect(remoteAddress);
    }
在AbstractPollingIoConnector中的connect0方法中,已經可以看到大量的邏輯細節了,如果連接配接成功,則會建立session、初始化session,以及使用到processor:
S session = newSession(processor, handle);
    initSession(session, future, sessionInitializer);
    // Forward the remaining process to the IoProcessor.
    session.getProcessor().add(session);
重點看一下這幾個方法的實作。
先看這個newSession,是在NioSocketConnector中實作的,當然少不了其父類的配合:
//NioSocketConnector.java
    @Override
    protected NioSession newSession(IoProcessor<NioSession> processor, SocketChannel handle) {
        return new NioSocketSession(this, processor, handle);
    }
//NioSocketSession.java
    public NioSocketSession(IoService service, IoProcessor<NioSession> processor, SocketChannel channel) {
        super(processor, service, channel);
        config = new SessionConfigImpl();
        config.setAll(service.getSessionConfig());
    }
//NioSession.java
    protected NioSession(IoProcessor<NioSession> processor, IoService service, Channel channel) {
        super(service);
        this.channel = channel;
        this.processor = processor;
        filterChain = new DefaultIoFilterChain(this);
    }
//AbstractIoSession.java
    protected AbstractIoSession(IoService service) {
        this.service = service;
        this.handler = service.getHandler();

        // Initialize all the Session counters to the current time
        long currentTime = System.currentTimeMillis();
        creationTime = currentTime;
        lastThroughputCalculationTime = currentTime;
        lastReadTime = currentTime;
        lastWriteTime = currentTime;
        lastIdleTimeForBoth = currentTime;
        lastIdleTimeForRead = currentTime;
        lastIdleTimeForWrite = currentTime;

        // TODO add documentation
        closeFuture.addListener(SCHEDULED_COUNTER_RESETTER);

        // Set a new ID for this session
        sessionId = idGenerator.incrementAndGet();
    }
幾個關于session的類關系都是繼承:

這幾個類把session的各種屬性和配置安排得明明白白的,沒什麼好說。
其中可以看到在NioSession的構造方法中,為session建立了預設的filterChain,這也與之前的TailFilter邏輯相呼應了。
另外可以看到AbstractIoSession的構造方法中,對各種時間的記錄進行了初始化。
接下來看initSession,這個方法是在AbstractIoService中實作的:
//AbstractIoService.java
    protected final void initSession(IoSession session, IoFuture future, IoSessionInitializer sessionInitializer) {
        // Update lastIoTime if needed.
        if (stats.getLastReadTime() == 0) {
            stats.setLastReadTime(getActivationTime());
        }

        if (stats.getLastWriteTime() == 0) {
            stats.setLastWriteTime(getActivationTime());
        }

        try {
            ((AbstractIoSession) session).setAttributeMap(session.getService().getSessionDataStructureFactory()
                    .getAttributeMap(session));
        } catch (IoSessionInitializationException e) {
            throw e;
        } catch (Exception e) {
            throw new IoSessionInitializationException("Failed to initialize an attributeMap.", e);
        }

        try {
            ((AbstractIoSession) session).setWriteRequestQueue(session.getService().getSessionDataStructureFactory()
                    .getWriteRequestQueue(session));
        } catch (IoSessionInitializationException e) {
            throw e;
        } catch (Exception e) {
            throw new IoSessionInitializationException("Failed to initialize a writeRequestQueue.", e);
        }

        if ((future != null) && (future instanceof ConnectFuture)) {
            // DefaultIoFilterChain will notify the future. (We support ConnectFuture only for now).
            session.setAttribute(DefaultIoFilterChain.SESSION_CREATED_FUTURE, future);
        }

        if (sessionInitializer != null) {
            sessionInitializer.initializeSession(session, future);
        }

        finishSessionInitialization0(session, future);
    }
…
好吧,其實這個方法沒做什麼事,隻是把session存儲的一些Attribute進行了初始化。
下一個是session.getProcessor().add(session),首先我們要注意到,在建立session時,已經把processor傳進來了,那麼sessoin調用的getProcessor會和傳進來的是同一個麼?
S session = newSession(processor, handle);
    initSession(session, future, sessionInitializer);
    // Forward the remaining process to the IoProcessor.
    session.getProcessor().add(session);
getProcessor()是在NioSession.java中實作的:
//NioSession.java
    protected final IoProcessor<NioSession> processor;

    protected NioSession(IoProcessor<NioSession> processor, IoService service, Channel channel) {
        super(service);
        this.channel = channel;
        this.processor = processor;
        filterChain = new DefaultIoFilterChain(this);
    }

    @Override
    public IoProcessor<NioSession> getProcessor() {
        return processor;
    }
是以答案是肯定是同一個。
那麼這個processor在哪裡建立的?或者說在AbstractPollingIoConnector出現的processor是在哪裡建立的?
其實在NioSocketConnector中就能發現苗頭:
//NioSocketConnector.java
    public NioSocketConnector() {
        super(new DefaultSocketSessionConfig(), NioProcessor.class);
        ((DefaultSocketSessionConfig) getSessionConfig()).init(this);
    }
super方法:
//AbstractPollingIoConnector.java
    protected AbstractPollingIoConnector(IoSessionConfig sessionConfig, Class<? extends IoProcessor<S>> processorClass) {
        this(sessionConfig, null, new SimpleIoProcessorPool<S>(processorClass), true);
    }
就是這個了—SimpleIoProcessorPool。
public SimpleIoProcessorPool(Class<? extends IoProcessor<S>> processorType) {
        this(processorType, null, DEFAULT_SIZE, null);
    }

    @SuppressWarnings("unchecked")
    public SimpleIoProcessorPool(Class<? extends IoProcessor<S>> processorType, Executor executor, int size,
            SelectorProvider selectorProvider) {
        if (processorType == null) {
            throw new IllegalArgumentException("processorType");
        }

        if (size <= 0) {
            throw new IllegalArgumentException("size: " + size + " (expected: positive integer)");
        }

        // Create the executor if none is provided
        createdExecutor = executor == null;

        if (createdExecutor) {
            this.executor = Executors.newCachedThreadPool();
            // Set a default reject handler
            ((ThreadPoolExecutor) this.executor).setRejectedExecutionHandler(new ThreadPoolExecutor.CallerRunsPolicy());
        } else {
            this.executor = executor;
        }

        pool = new IoProcessor[size];

        boolean success = false;
        Constructor<? extends IoProcessor<S>> processorConstructor = null;
        boolean usesExecutorArg = true;

        try {
            // We create at least one processor
            try {
                try {
                    processorConstructor = processorType.getConstructor(ExecutorService.class);
                    pool[0] = processorConstructor.newInstance(this.executor);
                } catch (NoSuchMethodException e1) {
                    // To the next step...
                    try {
                        if(selectorProvider==null) {
                            processorConstructor = processorType.getConstructor(Executor.class);
                            pool[0] = processorConstructor.newInstance(this.executor);
                        } else {
                            processorConstructor = processorType.getConstructor(Executor.class, SelectorProvider.class);
                            pool[0] = processorConstructor.newInstance(this.executor,selectorProvider);
                        }
                    } catch (NoSuchMethodException e2) {
                        // To the next step...
                        try {
                            processorConstructor = processorType.getConstructor();
                            usesExecutorArg = false;
                            pool[0] = processorConstructor.newInstance();
                        } catch (NoSuchMethodException e3) {
                            // To the next step...
                        }
                    }
                }
            } catch (RuntimeException re) {
                LOGGER.error("Cannot create an IoProcessor :{}", re.getMessage());
                throw re;
            } catch (Exception e) {
                String msg = "Failed to create a new instance of " + processorType.getName() + ":" + e.getMessage();
                LOGGER.error(msg, e);
                throw new RuntimeIoException(msg, e);
            }

            if (processorConstructor == null) {
                // Raise an exception if no proper constructor is found.
                String msg = String.valueOf(processorType) + " must have a public constructor with one "
                        + ExecutorService.class.getSimpleName() + " parameter, a public constructor with one "
                        + Executor.class.getSimpleName() + " parameter or a public default constructor.";
                LOGGER.error(msg);
                throw new IllegalArgumentException(msg);
            }

            // Constructor found now use it for all subsequent instantiations
            for (int i = 1; i < pool.length; i++) {
                try {
                    if (usesExecutorArg) {
                        if(selectorProvider==null) {
                            pool[i] = processorConstructor.newInstance(this.executor);
                        } else {
                            pool[i] = processorConstructor.newInstance(this.executor, selectorProvider);
                        }
                    } else {
                        pool[i] = processorConstructor.newInstance();
                    }
                } catch (Exception e) {
                    // Won't happen because it has been done previously
                }
            }

            success = true;
        } finally {
            if (!success) {
                dispose();
            }
        }
    }
中間這一大段是在利用反射,建立一個NioProcessor,因為從子類傳進來的就是NioProcessor.class。
是以這個processor真實身份是一個NioProcessor。
session.getProcessor().add(session);
而NioProcessor并沒有實作add方法,是由父類AbstractPollingIoProcessor來實作的:
@Override
    public final void add(S session) {
        if (disposed || disposing) {
            throw new IllegalStateException("Already disposed.");
        }

        // Adds the session to the newSession queue and starts the worker
        newSessions.add(session);
        startupProcessor();
    }

    private void startupProcessor() {
        Processor processor = processorRef.get();

        if (processor == null) {
            processor = new Processor();

            if (processorRef.compareAndSet(null, processor)) {
                executor.execute(new NamePreservingRunnable(processor, threadName));
            }
        }

        // Just stop the select() and start it again, so that the processor
        // can be activated immediately.
        wakeup();
    }
最後由startupProcessor将其啟動起來了。
用一句話概括就是:在建立SocketConnector的同時建立了Processor,并在Connector連接配接成功後,啟動了Processor。
這個NioProcessor的繼承關系是這樣的:
來一張整體時序圖,湊合看:
以上都是作為用戶端看到的,服務端與其大同小異。
//AbstractPollingIoAcceptor.java
    private class Acceptor implements Runnable {
        /**
         * {@inheritDoc}
         */
        @Override
        public void run() {
            assert acceptorRef.get() == this;

            int nHandles = 0;

            // Release the lock
            lock.release();

            while (selectable) {
                try {
                    nHandles += registerHandles();

                    int selected = select();

                    if (nHandles == 0) {
                        acceptorRef.set(null);

                        if (registerQueue.isEmpty() && cancelQueue.isEmpty()) {
                            assert acceptorRef.get() != this;
                            break;
                        }

                        if (!acceptorRef.compareAndSet(null, this)) {
                            assert acceptorRef.get() != this;
                            break;
                        }

                        assert acceptorRef.get() == this;
                    }

                    if (selected > 0) {
                        // We have some connection request, let's process
                        // them here.
                        processHandles(selectedHandles());
                    }

                    // check to see if any cancellation request has been made.
                    nHandles -= unregisterHandles();
                } catch (ClosedSelectorException cse) {
                    // If the selector has been closed, we can exit the loop
                    ExceptionMonitor.getInstance().exceptionCaught(cse);
                    break;
                } catch (Exception e) {
                    ExceptionMonitor.getInstance().exceptionCaught(e);

                    try {
                        Thread.sleep(1000);
                    } catch (InterruptedException e1) {
                        ExceptionMonitor.getInstance().exceptionCaught(e1);
                    }
                }
            }

            // Cleanup all the processors, and shutdown the acceptor.
            if (selectable && isDisposing()) {
                selectable = false;
                try {
                    if (createdProcessor) {
                        processor.dispose();
                    }
                } finally {
                    try {
                        synchronized (disposalLock) {
                            if (isDisposing()) {
                                destroy();
                            }
                        }
                    } catch (Exception e) {
                        ExceptionMonitor.getInstance().exceptionCaught(e);
                    } finally {
                        disposalFuture.setDone();
                    }
                }
            }
        }

        @SuppressWarnings("unchecked")
        private void processHandles(Iterator<H> handles) throws Exception {
            while (handles.hasNext()) {
                H handle = handles.next();
                handles.remove();

                // Associates a new created connection to a processor,
                // and get back a session
                S session = accept(processor, handle);

                if (session == null) {
                    continue;
                }

                initSession(session, null, null);

                // add the session to the SocketIoProcessor
                session.getProcessor().add(session);
            }
        }
		//其他大量方法
    }
可以看到,這裡的Acceptor是類似于用戶端Processor的存在,不同的是,作為服務端,Acceptor負責接收連接配接并建立session;最終會為每條連接配接的session調用到各自的processor,也就是進入之前用戶端的邏輯。
//NioSocketAcceptor.java
    public NioSocketAcceptor() {
        super(new DefaultSocketSessionConfig(), NioProcessor.class);
        ((DefaultSocketSessionConfig) getSessionConfig()).init(this);
    }
服務端SocketAcceptor構造方法幾乎與用戶端一樣,因為也需要NioProcessor維護session。
看時序圖:
從圖中也可以看出,服務端的不同主要在于Acceptor這一接收連接配接的角色,其他後續和用戶端基本相同。
以上。