本文正在參加星光計劃3.0–夏日挑戰賽
作者:曹昌言
在面向全場景、全連接配接、全智能時代背景下,OpenHarmony必然會受到越來越多開發者的支援,在不同場景下,會根據實際需求裁剪某些非必要的子系統或元件,也會增加新的子系統或者元件。如果你想添加子系統或者添加服務/元件的話,希望本文能夠給你帶來一些啟示。
1 基本概念
介紹自定義服務之前,先簡單介紹幾個概念:
①在鴻蒙系統中有三個基本概念,它們是子系統(
subsystems
),元件(
components
),功能(
features
).
OpenHarmony整體遵從分層設計,從下向上依次為:核心層、系統服務層、架構層和應用層。
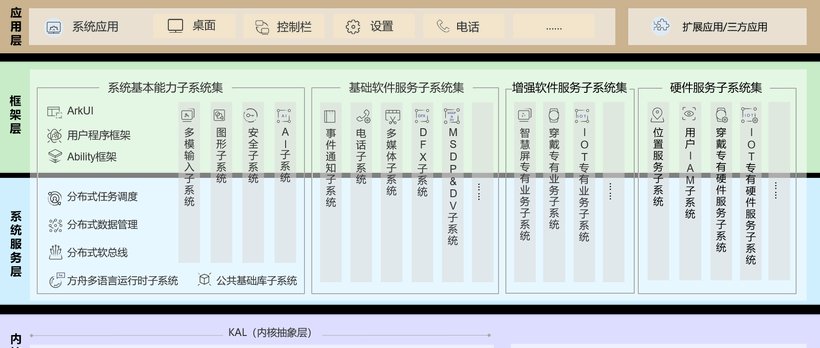
系統功能按照“系統 > 子系統 > 元件”逐級展開。子系統是一個邏輯概念,它具體由對應的元件構成。元件是對子系統的進一步拆分,可複用的軟體單元,它包含源碼、配置檔案、資源檔案和編譯腳本;能獨立建構,以二進制方式內建,是具備獨立驗證能力的二進制單元。
舉例來說,鴻蒙(系統) -->多媒體(子系統) -->音頻(元件)-->采集(功能)
②IPC(Inter-Process Communication)機制:使用Binder驅動,用于裝置内的跨程序通信。IPC通常采用用戶端-伺服器(Client-Server)模型,服務請求方(Client)可擷取提供服務提供方(Server)的代理 (Proxy),并通過此代理讀寫資料來實作程序間的資料通信。
通常,Server會先注冊系統能力(System Ability)到系統能力管理者(System Ability Manager,縮寫saMgr)中,saMgr負責管理這些SA并向Client提供相關的接口。Client要和某個具體的SA通信,必須先從saMgr中擷取該SA的代理,然後使用代理和SA通信。一般使用Proxy表示服務請求方,Stub表示服務提供方。

2 預期目标
- [x] 目标一:新服務如何配置,編譯
- [x] 目标二:如何整合一個新服務到OHOS中
- [x] 目标三:如何和新服務進行通信
3 實作效果
3.1.編譯成功
配置完成之後,代碼編譯成功
以産品rk3568-khdvk為例,img檔案生成,如下圖
3.2.新服務運作
燒錄img檔案到開發闆,新服務hello以獨立程序在開發闆背景運作,如下圖
3.3.和新服務進行通信
可以通過指令行方式或者應用程式啟動觸發方式和服務端進行通信。
3.3.1 指令行進行通信
用戶端操作:執行myhello可執行程式,輸入指令send,發送字元串"Hello,World"。
服務端響應:在service層收到了發送的字元串"Hello,World"。
3.3.2 應用程式觸發進行通信
應用程式啟動觸發:
服務端響應:傳回字元串列印到應用程式窗體内。
4 代碼實作目錄結構
整體位于目錄foundation下,即foundation/mytest/hello。
mytest
    └─hello
    │  ohos.build // 管理mytest子系統各層級BUILD.gn
    │
    ├─etc
    │      BUILD.gn  // 預編譯配置管理
    │      hello.cfg
    │      hello.rc
    │
    ├─interface
    │  │  BUILD.gn
    │  │
    │  ├─include
    │  │      hello_client.h
    │  │      hello_logs.h // 日志頭檔案
    │  │      hello_proxy.h
    │  │      ihello.h
    │  │
    │  ├─src
    │  │      hello_client.cpp // 接收應用層接口調用入口
    │  │      hello_proxy.cpp  // IPC通信代理
    │  │
    │  └─test
    │      │  BUILD.gn // 對cli工具進行管理
    │      │
    │      ├─include
    │      │      cli_tool.h
    │      │
    │      └─src
    │             cli_tool.cpp // 用戶端測試入口
    │
    ├─sa_profile
    │      9999.xml // 以sa ID命名
    │      BUILD.gn // 對xml進行管理
    │
    └─service
        │  BUILD.gn // 服務端功能管理
        │
        ├─include
        │      hello_service.h
        │      hello_stub.h
        │
        └─src
                hello_service.cpp  // 服務程式
                hello_stub.cpp     // IPC通信樁
5 實作過程
5.1 新服務如何配置及編譯
5.1.1 新服務如何配置
鴻蒙作業系統一個子系統的配置檔案主要有如下四個:
5.1.1.1 子產品目錄中BUILD.gn檔案
在子產品目錄下配置BUILD.gn,根據類型選擇對應的模闆。
支援的模闆類型:
ohos_executable // 指定 target 是個可執行檔案
ohos_shared_library // 聲明一個動态(win=.dll、linux=.so)
ohos_static_library // 靜态庫(win=.lib、linux=.a)
ohos_source_set // 定義源碼集,會逐一對應生成 .o 檔案,即尚未連結(link)的檔案

# 預編譯模闆:
ohos_prebuilt_executable // 拷貝可執行檔案
ohos_prebuilt_shared_library // 拷貝so檔案
ohos_prebuilt_etc // 拷貝其他格式的檔案
例子:
ohos_shared_library示例
import("//build/ohos.gni")

ohos_shared_library("hello_native") { // 動态庫,會生成libhello_native.z.so
    sources = [ // 使用的源檔案
        "src/hello_proxy.cpp",
        "src/hello_client.cpp"
    ]

    include_dirs = [ // 頭檔案包含位置
        "include",
        "//utils/native/base/include",
        "//utils/system/safwk/native/include",
        "//foundation/distributedschedule/samgr/interfaces/innerkits/samgr_proxy/include"
    ]

    deps = [ // 依賴子產品
        "//utils/native/base:utils",
    ]
  # 跨部件子產品依賴定義,
  # 定義格式為 "部件名:子產品名稱"
  # 這裡依賴的子產品必須是依賴的部件聲明在inner_kits中的子產品
    external_deps = [ // 外部依賴
        "hisysevent_native:libhisysevent",
        "hiviewdfx_hilog_native:libhilog",
        "ipc:ipc_core",
        "safwk:system_ability_fwk",
        "samgr_standard:samgr_proxy",
    ]

    part_name = "hello" // 部件名
    subsystem_name = "mytest" // 子系統名
}
ohos_executable示例:
ohos_executable模闆屬性和ohos_shared_library基本一緻
import("//build/ohos.gni")

ohos_executable("myhello") { // 生成可執行檔案myhello
  install_enable = true // true表示安裝的意思
  sources = [
    "src/cli_tool.cpp",
  ]

  include_dirs = [
    "//foundation/mytest/hello/interface/test/include",
    "//foundation/mytest/hello/interface/include",
  ]

  deps = [
    "//base/hiviewdfx/hilog/interfaces/native/innerkits:libhilog",
    "//foundation/mytest/hello/interface:hello_native",
    "//foundation/distributedschedule/safwk/interfaces/innerkits/safwk:system_ability_fwk",
    "//utils/native/base:utils",
  ]

  external_deps = [ "ipc:ipc_core" ]

  cflags_cc = [
    "-std=c++17",
  ]

  part_name = "hello"
  subsystem_name = "mytest"
}
說明:
可執行子產品(即ohos_executable模闆定義的)預設是不安裝的,如果要安裝,需要指定 install_enable = true
ohos_prebuilt_etc示例:
import("//build/ohos.gni")
ohos_prebuilt_etc("etc_file") {
  source = "file"
  deps = []  				# 部件内子產品依賴
  module_install_dir = "" 	# 可選,子產品安裝路徑,從system/,vendor/後開始指定
  relative_install_dir = "" # 可選,子產品安裝相對路徑,相對于system/etc;如果有module_install_dir配置時,該配置不生效
  part_name = "" 			# 必選,所屬部件名稱
}
import("//build/ohos.gni")

ohos_prebuilt_etc("hello_sa_rc") {
  source = "hello.cfg"
  relative_install_dir = "init"
  part_name = "hello"
  subsystem_name = "mytest"
}
說明:
要添加一個子產品到已有部件中去,隻需要在該部件的module_list中添加新加子產品的gn編譯目标;假如該子產品提供給其它子產品接口,需要在inner_kits中添加對應的配置;如果有該子產品的測試用例,需要添加到test_list中去。
5.1.1.2 建立ohos.build檔案
每個子系統有一個ohos.build配置檔案(或者有bundle.json配置檔案),在子系統的根目錄下。在建立的子系統目錄下每個部件對應的檔案夾下建立ohos.build檔案,定義部件資訊。
{
  "subsystem": "子系統名",
  "parts": {
    "建立部件名": {
      "module_list": [
        "部件包含子產品的gn目标"
      ],
      "inner_kits": [
      ],
      "test_list": [
        "測試用例",
      ]
    }
  }
}
說明:
subsystem定義了子系統的名稱;parts定義了子系統包含的部件。
一個部件包含部件名,部件包含的子產品module_list,部件提供給其它部件的接口inner_kits,部件的測試用例test_list。
{
  "subsystem": "mytest",
  "parts": {
    "hello": {
        "module_list": [
          "//mytest/hello/service:hello_service",
          "//mytest/hello/sa_profile:hello_sa_profiles",
          "//mytest/hello/etc:hello_sa_rc",
          "//mytest/hello/interface:hello_native"
        ],
        "test_list": [
        ]
    }
  }
}
在已有子系統中添加一個新的部件,有兩種方法:
a)在該子系統原有的ohos.build檔案中添加該部件
b)建立一個ohos.build檔案
**說明**:
無論哪種方式該ohos.build檔案均在對應子系統所在檔案夾下
ohos.build檔案包含兩個部分,第一部分subsystem說明了子系統的名稱,parts定義了該子系統包含的部件,要添加一個部件,需要把該部件對應的内容添加進parts中去。添加的時候需要指明該部件包含的子產品module_list,假如有提供給其它部件的接口,需要在inner_kits中說明,假如有測試用例,需要在test_list中說明,inner_kits與test_list沒有也可以不添加。
5.1.1.3 subsystem_config.json檔案
修改系統build目錄下的subsystem_config.json檔案
{
  "子系統名": {
    "path": "子系統目錄",
    "name": "子系統名",
    ...
  }
}
該檔案定義了有哪些子系統以及這些子系統所在檔案夾路徑,添加子系統時需要說明子系統path與name,分别表示子系統路徑和子系統名。
5.1.1.4 産品配置檔案{product_name}.json
在productdefine/common/products目錄下的産品配置如RK3568-KHDVK.json中添加對應的部件,直接添加到原有部件後面即可。
{
	...
    "parts":{
        "部件所屬子系統名:部件名":{}
    }
}
{
  "product_name": "RK3568-KHDVK",
  "product_company": "kaihong",
  "product_device": "rk3568-khdvk",
  "version": "2.0",
  "type": "standard",
  "product_build_path": "device/kaihong/build",
  "parts":{
  	......
    "multimedia:multimedia_histreamer":{},
    "multimedia:multimedia_media_standard":{},
    "multimedia:multimedia_audio_standard":{},
    "multimedia:multimedia_camera_standard":{},
    "multimedia:multimedia_image_standard":{},
    "multimedia:multimedia_media_library_standard":{},
    "mytest:hello":{}, // 添加自己的部件(注意前後逗号,保持檔案格式正确)
    ......
  }
}
指明了産品名,産品廠商,産品裝置,版本,要編譯的系統類型,以及産品包含的部件。
5.1.2 新服務如何編譯
編譯整個開源鴻蒙系統,指令如下:
./build.sh --product-name {product_name}
此處{product_name}在實際操作時變更為産品名,例如,rk3566,rk3568等。編譯所生成的檔案都歸檔在out/{device_name}/目錄下,結果鏡像輸出在 out/{device_name}/packages/phone/images/ 目錄下。
編譯之後,至于如何燒錄請參考官網或者其他文章。
5.2 整合新服務到ohos中
從代碼結構上可以看出,除了5.1配置之外,還需要:
5.2.1 建立sa_profile目錄及相關檔案
在子系統根目錄建立sa_profile目錄,建立服務ID為字首的xml檔案及BUILD.gn。
說明:
服務ID值定義在 foundation/distributedschedule/samgr/interfaces/innerkits/samgr_proxy/include/system_ability_definition.h 中,若沒有則建立一個。
sa_profile目錄示例:
9999.xml檔案示例:
<info>
    <process>hello</process>  // 程序名稱hello
    <systemability>
        <name>9999</name> <!-- Declare the id of system ability. Must be same with //utils/system/safwk/native/include/system_ability_definition.h -->
        <libpath>libhello_service.z.so</libpath> <!--加載路徑-->
        <run-on-create>true</run-on-create> <!--true: 程序啟動後即向samgr元件注冊該SystemAbility; false:按需啟動,即在其他子產品通路到該SystemAbility時啟動-->
        <distributed>false</distributed> <!--true:該SystemAbility為分布式,支援跨裝置通路; false:本地跨IPC通路-->
        <dump-level>1</dump-level>
    </systemability>
</info>
BUILD.gn示例:
import("//build/ohos/sa_profile/sa_profile.gni")

ohos_sa_profile("hello_sa_profiles") {
  sources = [ "9999.xml" ]
  part_name = "hello"
}
5.2.2 建立etc目錄及相關檔案
在子系統根目錄建立etc目錄,建立服務程序對應的.rc檔案。
etc目錄示例:
hello.cfg配置示例:
{
    "services" : [{
            "name" : "hello",
            "path" : ["/system/bin/sa_main", "/system/profile/hello.xml"], // 說明使用sa拉起來,配置檔案時hello.xml
            "uid" : "system",
            "gid" : ["system", "shell"]
        }
    ]
}
5.3 如何和新服務進行通信
5.3.1 通過指令行和server端進行通信
建立main函數進行測試,代碼如下:
int main()
{
    std::shared_ptr<CliTool> tool = getCliTool();

    if (tool == nullptr) {
        cerr << "Internal error!" << endl;
        return -1;
    }

    cout << tool->getName() << std::endl;

    while (true) {
        char cmd[MAX_LINE_SIZE] = "";
        cin.getline(cmd, MAX_LINE_SIZE - 1);
        cout << "Input is " << cmd << endl;

        if (strcasecmp("quit", cmd) == 0) {
            cout << "Quit" << endl;
            break;
        }

        if (strcasecmp("help", cmd) == 0) {
            tool->usage();
            continue;
        }

        string scmd(cmd);
        tool->execute(scmd);
    }

    return 0;
}
定義AbilityCliTool類,使用send綁定了函數cmdSendMessage,通過main中execute函數調用AbilityCliTool::cmdSendMessage,代碼如下:
class AbilityCliTool: public std::enable_shared_from_this<AbilityCliTool>, public CliTool {
public:
    AbilityCliTool() {
        std::function<void(std::vector<std::string>&)> f;

        f = std::bind(&AbilityCliTool::cmdSendMessage, this, std::placeholders::_1);
        commands_.emplace("send", f); // 這裡使用send綁定了函數cmdSendMessage

        spProxy_ = std::make_shared<HelloClient>(); // 執行個體化HelloClient對象spProxy_
        if (spProxy_) {
            spProxy_->InitService();
        }
    }

    virtual void usage() {
        std::cout << "AbilityCliTool usage" << std::endl;
    }

    virtual std::string getName() {
        return "AbilityCliTool";
    }

    virtual void execute(std::string &cmd) {
        std::cout << "AbilityCliTool::execute(" << cmd << ")" << std::endl;
        auto args = StringSplit(cmd, " ");
        auto func = commands_[args[0]];
        if (func) {
            func(args);
        }
    }

    virtual ~AbilityCliTool() {
        std::cout << "~AbilityCliTool()" << std::endl;
    }

private:
    void cmdSendMessage(std::vector<std::string> &args) {
        std::cout << "cmdSendMessage args:";
        for (auto &arg: args) {
            std::cout << " " << arg;
        }
        std::cout << std::endl;
        if (spProxy_) {
            spProxy_->SendMessage("Hello,World\n"); //
        }
    }

    std::map<std::string, std::function<void(std::vector<std::string>&)>> commands_;

    std::shared_ptr<HelloClient> spProxy_;
};
HelloClient類實作代碼如下:
namespace {
    constexpr int32_t MAX_RETYE_COUNT = 30;
    constexpr uint32_t WAIT_MS = 200;
}

int32_t HelloClient::InitService()
{
    if (helloServer_ != nullptr) {
        HELLO_LOGI(HELLO_NATIVE, "[InitService]Already init");
        return ERR_OK;
    }

    auto systemAbilityManager = SystemAbilityManagerClient::GetInstance().GetSystemAbilityManager(); // 通過SystemAbilityManager的GetSystemAbility方法可擷取到對應SA的代理IRemoteObject
    if (systemAbilityManager == nullptr)  {
        HELLO_LOGE(HELLO_NATIVE, "[InitService]GetSystemAbilityManager failed");
        return ERR_NO_INIT;
    }

    int retryCount = 0;
    do {
        helloServer_ = iface_cast<IHello>(systemAbilityManager->GetSystemAbility(HELLO_SERVICE_ID)); // 相當于生成一個proxy對象,said唯一辨別SA,我們這裡使用HELLO_SERVICE_ID。 這裡使用iface_cast宏轉換成具體類型
        if (helloServer_ != nullptr) {
            HELLO_LOGI(HELLO_NATIVE, "[InitService]InitService success.");
            return ERR_OK;
        }
        HELLO_LOGI(HELLO_NATIVE, "[InitService]Get service failed, retry again ....");
        std::this_thread::sleep_for(std::chrono::milliseconds(WAIT_MS));
        retryCount++;
    } while (retryCount < MAX_RETYE_COUNT);
    HELLO_LOGE(HELLO_NATIVE, "[InitService]InitService timeout.");
    return ERR_TIMED_OUT;
}

int32_t HelloClient::SendMessage(const std::string& msg)
{
    std::lock_guard<std::mutex> lock(mutex_);
    if (helloServer_ != nullptr) {
        return helloServer_->SendMessage(msg);
    }

    if (InitService() != ERR_OK) {
        return ERR_NO_INIT;
    }
    HELLO_LOGI(HELLO_NATIVE, "[SendMessage]Call SendMessage");
    return helloServer_->SendMessage(msg);
}
這裡會走到HelloProxy對象中的SendMessage函數,具體代碼如下:
int32_t HelloProxy::SendMessage(const std::string& msg)
{
    MessageParcel helloData;
    MessageParcel helloReply;
    MessageOption helloOption(MessageOption::TF_SYNC);

    if (!helloData.WriteString(msg)) {
        return ERR_INVALID_VALUE;
    }

    int32_t helloRet = Remote()->SendRequest(CMD_HELLO_SEND_MESSAGE, helloData, helloReply, helloOption);
    if (helloRet != ERR_OK) {
        return helloRet;
    }

    return ERR_OK;
}
HelloProxy類是Proxy端實作,繼承IRemoteProxy<IHello>,調用SendRequest接口向Stub端發送請求,對外暴露服務端提供的能力。HelloStub類具體代碼如下:
int32_t HelloStub::OnRemoteRequest(uint32_t code, MessageParcel& data, MessageParcel& reply, MessageOption& option)
{
    switch (code) {
        case CMD_HELLO_SEND_MESSAGE:
            return HelloStubSendMessage(data, reply, option);
        case CMD_HELLO_GET_VERSION:
        default: {
            HELLO_LOGD(HELLO_SERVICE, "%{public}s: not support cmd %{public}d", __func__, code);
            return IPCObjectStub::OnRemoteRequest(code, data, reply, option);
        }
    }
}

int32_t HelloStub::HelloStubSendMessage(MessageParcel& helloData, MessageParcel& helloReply, MessageOption& helloOption)
{
    std::string msg = helloData.ReadString();

    int32_t helloRet = SendMessage(msg);
    if (helloRet != ERR_OK) {
        HELLO_LOGD(HELLO_SERVICE, "%{public}s failed, error code is %d", __func__, helloRet);
        return helloRet;
    }

    return ERR_OK;
}
說明:
該類是和IPC架構相關的實作,需要繼承 IRemoteStub<ITestAbility>。Stub端作為接收請求的一端,需重寫OnRemoteRequest方法用于接收用戶端調用。
接下來通過HelloStubSendMessage調用了服務端業務函數具體實作類HelloService中SendMessage函數,其具體代碼如下:
REGISTER_SYSTEM_ABILITY_BY_ID(HelloService, HELLO_SERVICE_ID, true);

HelloService::HelloService(int32_t sysAbilityId, bool runOnCreate) : SystemAbility(sysAbilityId, runOnCreate)
{
    HELLO_LOGI(HELLO_SERVICE, "[HelloService]%{public}p", this);
}

int32_t HelloService::SendMessage(const std::string& msg)
{
    HELLO_LOGI(HELLO_SERVICE, "[SendMessage]This is just for test. %{public}s", msg.c_str()); // 日志驗證點,到此結束
    return ERR_OK;
}

void HelloService::OnStart()
{
    HELLO_LOGI(HELLO_SERVICE, "[OnStart]%{public}s start.", __func__);
    bool isPublished = SystemAbility::Publish(this); // 将自身服務釋出到saMgr中
    if (!isPublished) {
        HELLO_LOGD(HELLO_SERVICE, "[OnStart]publish LocationService error");
        return;
    }
}

void HelloService::OnStop()
{
    HELLO_LOGI(HELLO_SERVICE, "[OnStop]]%{public}s stop.", __func__);
}
5.3.2 通過應用層觸發和server端進行通信
在工具DevEcoStudio中建立工程,在index.js檔案中具體代碼如下:
import hello_native from '@ohos.hello'

export default {
    data: {
        title: ""
    },
    onInit() {
        hello_native.hello();
    }
}
進行編譯之後生成的hap包,在開發闆上進行安裝,執行指令如下:
.\hdc_std.exe install -r .\entry-default-signed.hap
除了在應用層修改之外,還需要在架構層進行如下修改:
#include <assert.h>
#include "napi/native_api.h"
#include "napi/native_common.h"
constexpr uint32_t STR_LEN = 13
static napi_value Method(napi_env env, napi_callback_info info) {
    HELLO_LOGI(HELLO_NATIVE, "[Method]Call SendMessage");
    napi_status status;
    napi_value world;
    status = napi_create_string_utf8(env, "Hello, world!", STR_LEN, &world);
    HelloClient::SendMessage(world);
    assert(status == napi_ok);
    return world;
}

static napi_value Init(napi_env env, napi_value exports) {
    HELLO_LOGI(HELLO_NATIVE, "[Method]Call Init");
    napi_status status;
    napi_property_descriptor desc[] = {
        DECLARE_NAPI_FUNCTION("hello", Method),
    };
    status = napi_define_properties(env, exports, sizeof(desc) / sizeof(desc[0]), desc);
    assert(status == napi_ok);
    return exports;
}
/*
 * Module register function
 */
NAPI_MODULE(hello_native, Init)
至此,就能夠從應用層在初始化應用程式時觸發調用hello即SendMessage函數,同時傳回字元串“Hello,World"在應用程式中顯示。
6 總結
通過以上步驟,在ohos系統中自定義子系統或者服務,通過配置編譯并燒錄到整體系統中,然後通過cli指令行或者應用程式啟動觸發的方式進行了功能驗證,達到了預期制定的三個目标,掌握建構自定義服務的流程及架構。
更多原創内容請關注:深開鴻技術團隊
入門到精通、技巧到案例,系統化分享HarmonyOS開發技術,歡迎投稿和訂閱,讓我們一起攜手前行共建鴻蒙生态。