什麼是讀寫分離
讀寫分離,基本的原理是讓主資料庫處理事務性增、改、删操作,而從資料庫處理SELECT查詢操作,讓兩者分工明确達到提高資料庫整體讀寫性能。當然,主資料庫另外一個功能就是負責将事務性查詢導緻的資料變更同步到從庫中,也就是寫操作。即主從複制和讀寫分離是離不開的。
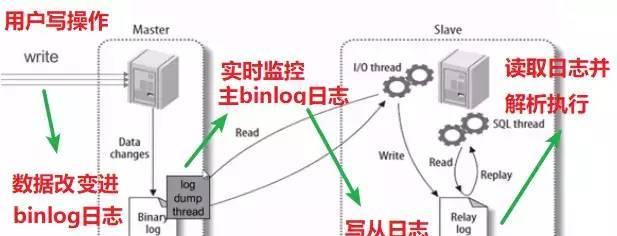
mysql主從複制原理
ps:mysql的主從複制配置,不在本文讨論範圍之内。不過如果對mysql主從如何配置感興趣的朋友,可以檢視這篇文章
https://www.jianshu.com/p/1ac435a6510e
什麼時候需要讀寫分離
- 1、在高并發情況,當業務量非常大時,一台伺服器的性能無法滿足需求,就可以通過配置主從複制實作寫分離來分攤負載,避免因負載太高而造成無法及時響應請求。
- 2、讀遠比寫多的場景
當有出現上述場景時,可以考慮用讀寫分離,但也并非一上來就采用讀寫分離,我們可以優先考慮優化我們的代碼邏輯,根據慢查詢日志來優化sql語句,引入緩存層如redis,甚至可以引入全文搜尋引擎等
讀寫分離類型
基于程式代碼内部實作
在代碼中根據select,insert進行路由分類,這類方法也是目前生産環境應用最廣泛的,優點是性能好,因為在程式代碼中已經将讀寫的資料源拆分至兩個,是以不需要額外的mysql proxy解析sql封包,在進行路由至不同資料庫節點。缺點是通常該架構較複雜,運維成本相對較高。
基于中間代理層實作
代理層一般位于用戶端和伺服器之間,代理伺服器接到用戶端請求後通過解析sql文本再将sql路由至可用的資料庫節點中。優點是程式不需要改造可以實作無縫遷移,可移植性較好。缺點是性能相對前者略微遜色一些,并且并不是所有的讀操作都能夠被路由至從節點中。
本文主要介紹基于程式代碼的實作,下邊進行代碼層面整合介紹
讀寫分離實作
這邊介紹三種代碼層讀寫分離實作
- 第一種方法基于spring提供原生的AbstractRoutingDataSource搭配AOP進行實作
- 第二種方法使用mybatis-plus提供的dynamic-datasource-spring-boot-starter進行實作
- 第三種方法使用Sharding-JDBC進行實作
1、采用AbstractRoutingDataSource搭配AOP
該方案在之前文章spring多資料源實作一文就有介紹,之前是以xml檔案配置,本文是改成javaconfig配置,其實作原理一樣。是以就不再論述,其實作具體可以檢視連結
http://1t.click/azCR
2、mybatis-plus提供的dynamic-datasource-spring-boot-starter
a、pom.xml
<dependency>
      <groupId>com.baomidou</groupId>
      <artifactId>dynamic-datasource-spring-boot-starter</artifactId>
    </dependency>
複制
b、application.yml配置
spring:
  datasource:
    dynamic:
      primary: leader
      datasource:
        leader:
          username: root
          password: 123456
          driver-class-name: com.mysql.cj.jdbc.Driver
          url: jdbc:mysql://localhost:3306/boot-learning?allowMultiQueries=true&useUnicode=true&characterEncoding=UTF-8&useSSL=false&autoReconnect=true&serverTimezone=UTC
          druid: #以下均為預設值
            initial-size: 3
            max-active: 8
            min-idle: 2
            max-wait: -1
            min-evictable-idle-time-millis: 30000
            max-evictable-idle-time-millis: 30000
            time-between-eviction-runs-millis: 0
            validation-query: select 1
            validation-query-timeout: -1
            test-on-borrow: false
            test-on-return: false
            test-while-idle: true
            pool-prepared-statements: true
            max-open-prepared-statements: 100
            filters: stat,wall
            share-prepared-statements: true
        follow:
          username: root
          password: 123456
          driver-class-name: com.mysql.cj.jdbc.Driver
          url: jdbc:mysql://localhost:3306/springboot-learning?allowMultiQueries=true&useUnicode=true&characterEncoding=UTF-8&useSSL=false&autoReconnect=true&serverTimezone=UTC
          druid: #以下均為預設值
            initial-size: 3
            max-active: 8
            min-idle: 2
            max-wait: -1
            min-evictable-idle-time-millis: 30000
            max-evictable-idle-time-millis: 30000
            time-between-eviction-runs-millis: 0
            validation-query: select 1
            validation-query-timeout: -1
            test-on-borrow: false
            test-on-return: false
            test-while-idle: true
            pool-prepared-statements: true
            max-open-prepared-statements: 100
            filters: stat,wall
            share-prepared-statements: true
            #DruidDataSourceAutoConfigure會注入一個DataSourceWrapper,其會在原生的spring.datasource下找url,username,password等。而我們動态資料源的配置路徑是變化的。
  autoconfigure:
    exclude: com.alibaba.druid.spring.boot.autoconfigure.DruidDataSourceAutoConfigure,io.shardingsphere.shardingjdbc.spring.boot.SpringBootConfiguration
複制
3、在service層加上 @DS注解,通過@DS制定要操作的資料庫
@Override
  @Transactional
  @DS("follow")
  public BookDTO addBook(BookDTO bookDTO) {
    Book book = dozerMapper.map(bookDTO,Book.class);
    boolean isExitBookByName = ObjectUtils.isNotEmpty(getBookByName(bookDTO.getBookName()));
    if(isExitBookByName){
      throw new BizException("書名已經存在");
    }
    book.setCreateDate(new Date());
    book.setUpdateDate(new Date());
    baseMapper.insert(book);

    bookDTO = dozerMapper.map(book,BookDTO.class);

    return bookDTO;
  }
複制
通過上面3步就可以實作讀寫分離,更多實作細節可以檢視如下連結
https://mp.baomidou.com/guide/dynamic-datasource.html
3、通過Sharding-JDBC實作
架構圖

a、pom.xml
<dependency>
      <groupId>io.shardingsphere</groupId>
      <artifactId>sharding-jdbc-spring-boot-starter</artifactId>
    </dependency>
複制
b、application.yml配置
sharding:
  jdbc:
    datasource:
      #Canonical names should be kebab-case ('-' separated), lowercase alpha-numeric characters and must start with a letter
      names: master-ds,slave-ds
      master-ds:
        type: com.alibaba.druid.pool.DruidDataSource
        driver-class-name: com.mysql.cj.jdbc.Driver
        url: jdbc:mysql://localhost:3306/boot-learning?allowMultiQueries=true&useUnicode=true&characterEncoding=UTF-8&useSSL=false&autoReconnect=true&serverTimezone=UTC
        username: root
        password: 123456
      slave-ds:
        type: com.alibaba.druid.pool.DruidDataSource
        driver-class-name: com.mysql.cj.jdbc.Driver
        url: jdbc:mysql://localhost:3306/springboot-learning?allowMultiQueries=true&useUnicode=true&characterEncoding=UTF-8&useSSL=false&autoReconnect=true&serverTimezone=UTC
        username: root
        password: 123456
    config:
      sharding:
        props:
          sql.show: true
      masterslave:
        load-balance-algorithm-type: round_robin
        name: dataSource
        master-data-source-name: master-ds
        slave-data-source-names: slave-ds
spring:
  main:
    allow-bean-definition-overriding: true
複制
僅需上面2步,就可以實作讀寫分離。更多詳細配置可以檢視如下連結
https://shardingsphere.apache.org/document/current/cn/manual/sharding-jdbc/configuration/config-spring-boot/
總結
以上就是代碼層讀寫分離的幾種方案,實作都挺簡單的,那這幾種方案,到底選哪一種呢,如果你業務是采用mybaits-plus來做dao層,很顯然就可以使用上面所述的第二種。如果不是,推薦使用sharding-jdbc來實作。其實本文也就簡單介紹下讀寫分離,推薦大家可以看下這篇博文淺談高性能資料庫叢集 —— 讀寫分離
參考文檔
【mysql 讀寫分離】10分鐘了解讀寫分離的作用
https://blog.csdn.net/u013421629/article/details/78793966
MySQL讀寫分離最佳實踐
https://www.jianshu.com/p/1ac435a6510e
demo連結
https://github.com/lyb-geek/springboot-learning/tree/master/springboot-dynamic-datasource