簡介
想看看你最近一年都在幹嘛?看看你平時上網是在摸魚還是認真工作?想寫年度彙報總結,但是苦于沒有資料?現在,它來了。
這是一個能讓你了解自己的浏覽曆史的Chrome浏覽曆史記錄分析程式,當然了,他僅适用于Chrome浏覽器或者以Chrome為核心的浏覽器。
在該頁面中你将可以檢視有關自己在過去的時間裡所通路浏覽的域名、URL以及忙碌天數的前十排名以及相關的資料圖表。

代碼思路
1. 目錄結構
首先,我們先看一下整體目錄結構
Code
├─ app_callback.py                          回調函數,實作背景功能
├─ app_configuration.py                     web伺服器配置
├─ app_layout.py                            web前端頁面配置
├─ app_plot.py                              web圖表繪制
├─ app.py                                   web伺服器的啟動
├─ assets                                   web所需的一些靜态資源檔案
│  ├─ css                                   web前端元素布局檔案
│  │  ├─ custum-styles_phyloapp.css
│  │  └─ stylesheet.css
│  ├─ image                                 web前端logo圖示
│  │  ├─ GitHub-Mark-Light.png
│  └─ static                                web前端幫助頁面
│  │  ├─ help.html
│  │  └─ help.md
├─ history_data.py                          解析chrome曆史記錄檔案
└─ requirement.txt                          程式所需依賴庫
複制
-
app_callback.py
該程式基于python,使用dash web輕量級架構進行部署。
app_callback.py
-
app_configuration.py
顧名思義,對web伺服器的一些配置操作。
-
app_layout..py
web前端頁面配置,包含html, css元素。
-
app_plot.py
這個主要是為實作一些web前端的圖表資料。
-
app.py
web伺服器的啟動。
-
assets
靜态資源目錄,用于存儲一些我們所需要的靜态資源資料。
-
history_data.py
通過連接配接sqlite資料庫,并解析Chrome曆史記錄檔案。
-
requirement.txt
運作本程式所需要的依賴庫。
2. 解析曆史記錄檔案資料
與解析曆史記錄檔案資料有關的檔案為
history_data.py
檔案。我們一一分析。
# 查詢資料庫内容
def query_sqlite_db(history_db, query):

    # 查詢sqlite資料庫
    # 注意,History是一個檔案,沒有字尾名。它不是一個目錄。
    conn = sqlite3.connect(history_db)
    cursor = conn.cursor()

    # 使用sqlite檢視軟體,可清晰看到表visits的字段url=表urls的字段id
    # 連接配接表urls和visits,并擷取指定資料
    select_statement = query

    # 執行資料庫查詢語句
    cursor.execute(select_statement)

    # 擷取資料,資料格式為元組(tuple)
    results = cursor.fetchall()

    # 關閉
    cursor.close()
    conn.close()

    return results
複制
該函數的代碼流程為:
連接配接sqlite資料庫,執行查詢語句,傳回查詢結構,最終關閉資料庫連接配接。
# 擷取排序後的曆史資料
def get_history_data(history_file_path):

    try:

        # 擷取資料庫内容
        # 資料格式為元組(tuple)
        select_statement = "SELECT urls.id, urls.url, urls.title, urls.last_visit_time, urls.visit_count, visits.visit_time, visits.from_visit, visits.transition, visits.visit_duration FROM urls, visits WHERE urls.id = visits.url;"
        result = query_sqlite_db(history_file_path, select_statement)

        # 将結果按第1個元素進行排序
        # sort和sorted内建函數會優先排序第1個元素,然後再排序第2個元素,依此類推
        result_sort = sorted(result, key=lambda x: (x[0], x[1], x[2], x[3], x[4], x[5], x[6], x[7], x[8]))

        # 傳回排序後的資料
        return result_sort
    except:
        # print( 讀取出錯! )
        return  error
複制
該函數的代碼流程為:
設定資料庫查詢語句
select_statement
,調用
query_sqlite_db()
函數,擷取解析後的曆史記錄檔案資料。并對傳回後的曆史記錄資料檔案按照不同元素規則進行排序。至此,經過排序的解析後的曆史記錄資料檔案擷取成功。
3. web伺服器基本配置
與web伺服器基本配置有關的檔案為
app_configuration.py
和
app.py
檔案。包括設定web伺服器的端口号,通路權限,靜态資源目錄等。
4. 前端頁面部署
與前端部署有關的檔案為
app_layout.py
和
app_plot.py
以及
assets
目錄。
前端布局主要包括以下幾個元素:
- 上傳曆史記錄檔案元件
- 繪制頁面通路次數元件
- 繪制頁面通路停留總時間排名元件
- 每日頁面通路次數散點圖元件
- 某日不同時刻通路次數散點圖元件
- 通路次數最多的10個URL元件
- 搜尋關鍵詞排名元件
- 搜尋引擎使用情況元件
在
app_layout.py
中,這些元件的配置大多一樣,和平常的html, css配置一樣,是以我們僅僅以配置
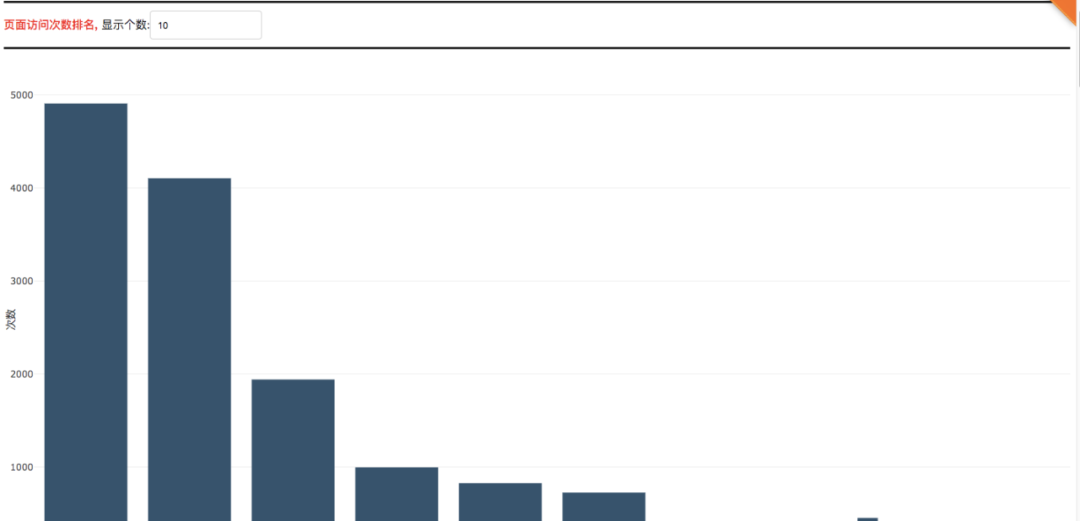
頁面通路次數排名元件
為例子。
# 頁面通路次數排名
html.Div(
    style={ margin-bottom : 150px },
    children=[
        html.Div(
            style={ border-top-style : solid , border-bottom-style : solid },
            className= row ,
            children=[
                html.Span(
                    children= 頁面通路次數排名,  ,
                    style={ font-weight :  bold ,  color : red }
                ),

                html.Span(
                    children= 顯示個數: ,
                ),
                dcc.Input(
                    id= input_website_count_rank ,
                    type= text ,
                    value=10,
                    style={ margin-top : 10px ,  margin-bottom : 10px }
                ),
            ]
        ),

        html.Div(
            style={ position :  relative ,  margin :  0 auto ,  width :  100% ,  padding-bottom :  50% , },
            children=[
                dcc.Loading(
                    children=[
                        dcc.Graph(
                            id= graph_website_count_rank ,
                            style={ position :  absolute ,  width :  100% ,  height :  100% ,  top :  0 ,
                                    left :  0 ,  bottom :  0 ,  right :  0 },
                            config={ displayModeBar : False},
                        ),
                    ],
                    type= dot ,
                    style={ position :  absolute ,  top :  50% ,  left :  50% ,  transform :  translate(-50%,-50%) }
                ),
            ],
        )
    ]
)
複制
可以看到,雖然是python編寫的,但是隻要具備前端經驗的人,都可以輕而易舉地在此基礎上新增或者删除一些元素,是以我們就不詳細講如何使用html和css了。
在
app_plot.py
中,主要是以繪制圖表相關的。使用的是
plotly
庫,這是一個用于具有web互動的畫圖元件庫。
這裡以繪制
頁面通路頻率排名 柱狀圖
為例子,講講如何使用
plotly
庫進行繪制。
# 繪制 頁面通路頻率排名 柱狀圖
def plot_bar_website_count_rank(value, history_data):

    # 頻率字典
    dict_data = {}

    # 對曆史記錄檔案進行周遊
    for data in history_data:
        url = data[1]
        # 簡化url
        key = url_simplification(url)

        if (key in dict_data.keys()):
            dict_data[key] += 1
        else:
            dict_data[key] = 0

    # 篩選出前k個頻率最高的資料
    k = convert_to_number(value)
    top_10_dict = get_top_k_from_dict(dict_data, k)

    figure = go.Figure(
        data=[
            go.Bar(
                x=[i for i in top_10_dict.keys()],
                y=[i for i in top_10_dict.values()],
                name= bar ,
                marker=go.bar.Marker(
                    color= rgb(55, 83, 109)
                )
            )
        ],
        layout=go.Layout(
            showlegend=False,
            margin=go.layout.Margin(l=40, r=0, t=40, b=30),
            paper_bgcolor= rgba(0,0,0,0) ,
            plot_bgcolor= rgba(0,0,0,0) ,
            xaxis=dict(title= 網站 ),
            yaxis=dict(title= 次數 )
        )
    )

    return figure
複制
該函數的代碼流程為:
- 首先,對解析完資料庫檔案後傳回的
history_data
url
url_simplification(url)
簡化後的url
- 調用
get_top_k_from_dict(dict_data, k)
dict_data
k
- 接着,開始繪制柱狀圖了。使用
go.Bar()
x
y
list
。
和
- 傳回一個
figure
而
assets
目錄下包含的資料為
image
和
css
,都是用于前端布局。
5. 背景部署
與背景部署有關的檔案為
app_callback.py
檔案。這個檔案使用回調的方式對前端頁面布局進行更新。
首先,我們看看關于
頁面通路頻率排名
的回調函數:
# 頁面通路頻率排名
@app.callback(
    dash.dependencies.Output( graph_website_count_rank ,  figure ),
    [
        dash.dependencies.Input( input_website_count_rank ,  value ),
        dash.dependencies.Input( store_memory_history_data ,  data )
    ]
)
def update(value, store_memory_history_data):

    # 正确擷取到曆史記錄檔案
    if store_memory_history_data:
        history_data = store_memory_history_data[ history_data ]
        figure = plot_bar_website_count_rank(value, history_data)
        return figure
    else:
        # 取消更新頁面資料
        raise dash.exceptions.PreventUpdate("cancel the callback")
複制
該函數的代碼流程為:
- 首先确定好輸入是什麼(觸發回調的資料),輸出是什麼(回調輸出的資料),需要帶上什麼資料。
dash.dependencies.Input
dash.dependencies.Input( input_website_count_rank , value )
id
input_website_count_rank
value
update(value, store_memory_history_data)
id
graph_website_count_rank
value
- 對于
def update(value, store_memory_history_data)
store_memory_history_data
history_data
app_plot.py
plot_bar_website_count_rank()
figure
頁面通路頻率排名
還有一個需要說的就是關于上次檔案的過程,這裡我們先貼出代碼:
# 上傳檔案回調
@app.callback(

    dash.dependencies.Output( store_memory_history_data ,  data ),
    [
        dash.dependencies.Input( dcc_upload_file ,  contents )
    ]
)
def update(contents):

    if contents is not None:

        # 接收base64編碼的資料
        content_type, content_string = contents.split( , )

        # 将用戶端上傳的檔案進行base64解碼
        decoded = base64.b64decode(content_string)

        # 為用戶端上傳的檔案添加字尾,防止檔案重複覆寫
        # 以下方式確定檔案名不重複
        suffix = [str(random.randint(0,100)) for i in range(10)]
        suffix = "".join(suffix)
        suffix = suffix + str(int(time.time()))

        # 最終的檔案名
        file_name =  History_  + suffix
        # print(file_name)

        # 建立存放檔案的目錄
        if (not (exists( data ))):
            makedirs( data )

        # 欲寫入的檔案路徑
        path =  data  +  /  + file_name

        # 寫入本地磁盤檔案
        with open(file=path, mode= wb+ ) as f:
            f.write(decoded)

        # 使用sqlite讀取本地磁盤檔案
        # 擷取曆史記錄資料
        history_data = get_history_data(path)

        # 擷取搜尋關鍵詞資料
        search_word = get_search_word(path)

        # 判斷讀取到的資料是否正确
        if (history_data !=  error ):
            # 找到
            date_time = time.strftime( %Y-%m-%d %H:%M:%S , time.localtime(time.time()))
            print( 新接收到一條用戶端的資料, 資料正确, 時間:{} .format(date_time))
            store_data = { history_data : history_data,  search_word : search_word}
            return store_data
        else:
            # 沒找到
            date_time = time.strftime( %Y-%m-%d %H:%M:%S , time.localtime(time.time()))
            print( 新接收到一條用戶端的資料, 資料錯誤, 時間:{} .format(date_time))
            return  None

    return None
複制
該函數的代碼流程為:
- 首先判斷使用者上傳的資料
contents
- 寫入完畢後,使用sqlite讀取本地磁盤檔案,若讀取正确,則傳回解析後的資料,否則傳回
None
接下來,就是我們資料提取最核心的部分了,即從Chrome曆史記錄檔案中提取出我們想要的資料。由于Chrome曆史記錄檔案是一個sqlite資料庫,是以我們需要使用資料庫文法提取出我們想要的内容。
# 擷取排序後的曆史資料
def get_history_data(history_file_path):

    try:

        # 擷取資料庫内容
        # 資料格式為元組(tuple)
        select_statement = "SELECT urls.id, urls.url, urls.title, urls.last_visit_time, urls.visit_count, visits.visit_time, visits.from_visit, visits.transition, visits.visit_duration FROM urls, visits WHERE urls.id = visits.url;"
        result = query_sqlite_db(history_file_path, select_statement)

        # 将結果按第1個元素進行排序
        # sort和sorted内建函數會優先排序第1個元素,然後再排序第2個元素,依此類推
        result_sort = sorted(result, key=lambda x: (x[0], x[1], x[2], x[3], x[4], x[5], x[6], x[7], x[8]))

        # 傳回排序後的資料
        return result_sort
    except:
        # print( 讀取出錯! )
        return  error
複制
上面
select_statement
指的是查詢資料庫的規則,規則如下:
- 從(FROM)表
urls
urls.id
urls.url
urls.title
urls.last_visit_time
urls.visit_count
URL的ID
URL的位址
URL的标題
URL最後的通路時間
URL的通路次數
- 接着,從(FROM)表
visits
visits.visit_time
visits.from_visit
visits.transition
visits.visit_duration
通路時間
從哪個連結跳轉過來的
通路跳轉
通路停留的時間
- 對
步驟1
步驟2
urls.id = visits.url
urls
id
id
visits
url
id
- 使用排序函數
sorted
x[0]
x[1]
x[2]
x[3]
x[4]
x[5]
x[6]
x[7]
x[8]
urls.id
urls.url
urls.title
urls.last_visit_time
urls.visit_count
visits.visit_time
visits.from_visit
visits.transition
visits.visit_duration
- 傳回一個排序好的資料
這裡我們列出每個字段代表的意思:
| urls.id | url的編号 |
| urls.url | url的位址 |
| urls.title | url的标題 |
| urls.last_visit_time | url的最後通路時間 |
| urls.visit_count | url的通路次數 |
| urls.visit_time | url的通路時間 |
| urls.from_visit | 從哪裡通路到這個url |
| urls.transition | url的跳轉 |
| urls.visit_duration | url的停留時間 |
6. 如何擷取Chrome曆史記錄檔案
Windows Vista, Windows 7, Windows 8, Windows 10
- 曆史記錄檔案位置:
C:Users%USERNAME%AppDataLocalGoogleChromeUser DataDefaultHistory
- 拷貝曆史記錄檔案到桌面:
bash # 打開指令行cmd,輸入以下指令, 自動将History檔案複制到桌面, 檔案名為History, 沒有字尾名 copy "C:Users%USERNAME%AppDataLocalGoogleChromeUser DataDefaultHistory" "C:Users%USERNAME%DesktopHistory"
- 注意說明:
%USERNAME%
Windows XP
- 曆史記錄檔案位置:
C:Documents and Settings%USERNAME%Local SettingsApplication DataGoogleChromeUser DataDefaultHistory
-
拷貝曆史記錄檔案到桌面:
# 打開指令行cmd,輸入以下指令, 自動将History檔案複制到桌面, 檔案名為History, 沒有字尾名 copy "C:Documents and Settings%USERNAME%Local SettingsApplication DataGoogleChromeUser DataDefaultHistory" "C:Documents and Settings%USERNAME%DesktopHistory"
- 注意說明:
%USERNAME%
Mac OS X
- 曆史記錄檔案位置:
~/Library/Application Support/Google/Chrome/Default/History
- 拷貝曆史記錄檔案到桌面:
bash # 打開terminal,輸入以下指令, 自動将History檔案複制到桌面, 檔案名為History, 沒有字尾名 cp ~/Library/Application Support/Google/Chrome/Default/History ~/Desktop/History
- 注意說明:
Application Support
Application Support
Linux/ Unix
- 曆史記錄檔案位置:
~/.config/google-chrome/Default/History
- 拷貝曆史記錄檔案到桌面:
bash # 打開terminal,輸入以下指令, 自動将History檔案複制到桌面, 檔案名為History, 沒有字尾名 cp ~/.config/google-chrome/Default/History ~/Desktop/History
- 注意說明:
如果提示路徑不存在, 請自行擷取History檔案
如何運作
線上示範程式:http://39.106.118.77:8090(普通伺服器,勿測壓)
運作本程式十分簡單,隻需要按照以下指令即可運作:
# 跳轉到目前目錄
cd 目錄名
# 先解除安裝依賴庫
pip uninstall -y -r requirement.txt
# 再重新安裝依賴庫
pip install -r requirement.txt
# 開始運作
python app.py

# 運作成功後,通過浏覽器打開http://localhost:8090
複制
補充
完整版源代碼存放在github上,有需要的可以下載下傳
https://github.com/shengqiangzhang/examples-of-web-crawlers/.一鍵分析你的上網行為(web頁面可視化)
項目持續更新,歡迎您star本項目