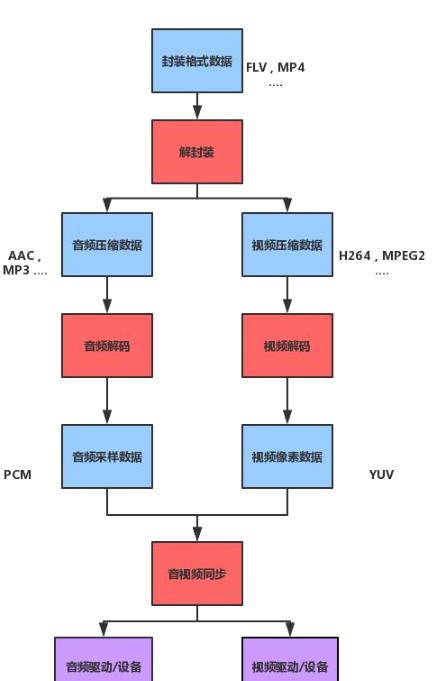
整個音視訊流程
第一節,先做準備工作,功能有:1.前端展示; 2.解封裝;3.各種錯誤回調
為什麼要解封裝,因為解完封裝我們才能拿倒音視訊資訊,音視訊流;
拿到音視訊流我們才分開去解資料,才能繪制視訊;
解封裝的步驟及用的的函數:
第一步:打開媒體位址(檔案路徑, 直播位址rtmp)
avformat_alloc_context
avformat_open_input
第二步:查找媒體中的音視訊流的資訊
avformat_find_stream_info
第三步:根據流資訊,流的個數,用循環來找
第四步:擷取媒體流(視訊,音頻)
formatContext->streams[stream_index];
第五步:從上面的流中 擷取 編碼解碼的【參數】
AVCodecParameters *parameters = stream->codecpar;
第六步:(根據上面的【參數】)擷取編解碼器
avcodec_find_decoder(parameters->codec_id);
第七步:編解碼器 上下文
avcodec_alloc_context3(codec);
第八步:他目前是一張白紙(parameters copy codecContext)
avcodec_parameters_to_context(codecContext, parameters);
第九步:打開解碼器
avcodec_open2(codecContext, codec, nullptr)
第十步:從編解碼器參數中,擷取流的類型 codec_type === 音頻 視訊
parameters->codec_type == AVMediaType::AVMEDIA_TYPE_AUDIO
第十一步: 如果流中 沒有音頻 也沒有 視訊 【健壯性校驗】
第十二步:恭喜你,通知給上層;準備播放
native-lib.cpp 代碼:
JavaVM *vm = 0;
ANativeWindow *window = 0;

Player *player = nullptr;

jint JNI_OnLoad(JavaVM * vm, void * args) {
    ::vm = vm;
    return JNI_VERSION_1_6;
}

extern "C"
JNIEXPORT void JNICALL
Java_com_game_demondk_DerryPlayer_prepareNative(JNIEnv *env, jobject job, jstring data_source) {
    const char * source = env->GetStringUTFChars(data_source,0);
    auto *hepler = new JINCallbackHelper(vm,env,job);
    player = new Player(env, source, hepler);
    player->perpare();
}
Player.cpp代碼:
Player::Player(JNIEnv *env, const char *data_source, JINCallbackHelper *pHelper) {
    this->env = env;
    this->data_source = new char[strlen(data_source) + 1];
    this->helper = pHelper;
    strcpy(this->data_source, data_source);
}


void *task_perpare(void *args) {
    auto *player = static_cast<Player *>(args);
    player->perpare_();
    return nullptr;
}

void Player::perpare() {
    pthread_create(thread_t, 0, task_perpare, this);
}

void Player::perpare_() {
    /**
     * TODO 第一步:打開媒體位址(檔案路徑, 直播位址rtmp)
     */
    avFormatContext = avformat_alloc_context();
    if (!avFormatContext) {
        return;
    }

    //添加參數
    AVDictionary *dictionary = nullptr;
    av_dict_set(&dictionary, "timeout", "5000000", 0);

    /**
     * 1,AVFormatContext *
     * 2,路徑 url:檔案路徑或直播位址
     * 3,AVInputFormat *fmt  Mac、Windows 攝像頭、麥克風, 我們目前安卓用不到
     * 4,各種設定:例如:Http 連接配接逾時, 打開rtmp的逾時  AVDictionary **options
     */
    int result = avformat_open_input(&avFormatContext, this->data_source, nullptr, &dictionary);
    // 釋放字典
    av_dict_free(&dictionary);
    if (result) {
        if (helper) {
            helper->onError(THREAD_CHILD, FFMPEG_CAN_NOT_OPEN_URL);
        }
        //關閉打開流
        avformat_close_input(&avFormatContext);
        return;
    }

    /**
     * TODO 第二步:查找媒體中的音視訊流的資訊
     */
    result = avformat_find_stream_info(avFormatContext, nullptr);
    if (result < 0) {
        if (helper) {
            helper->onError(THREAD_CHILD, FFMPEG_CAN_NOT_FIND_STREAMS);
        }
        avformat_close_input(&avFormatContext);
        return;
    }

    //得到的總時長,要通過轉換
    this->duration = avFormatContext->duration / AV_TIME_BASE;

    AVCodecContext *avCodecContext = nullptr;

    for (int i = 0; i < avFormatContext->nb_streams; ++i) {
        /**
         * TODO 第四步:擷取媒體流(視訊,音頻)
         */
        AVStream *avStream = avFormatContext->streams[i];

        /**
         * TODO 第五步:從上面的流中 擷取 編碼解碼的【參數】
         * 由于:後面的編碼器 解碼器 都需要參數(寬高 等等)
         */
        AVCodecParameters *parameters = avStream->codecpar;

        /**
         * TODO 第六步:(根據上面的【參數】)擷取編解碼器
         */
        AVCodec *codec = avcodec_find_decoder(parameters->codec_id);
        if (!codec) {
            if (helper) {
                helper->onError(THREAD_CHILD, FFMPEG_FIND_DECODER_FAIL);
            }
            avformat_close_input(&avFormatContext);
        }

        /**
        * TODO 第七步:編解碼器 上下文 (這個才是真正幹活的)
        */
        avCodecContext = avcodec_alloc_context3(codec);
        if (!avCodecContext) {
            if (helper) {
                helper->onError(THREAD_CHILD, FFMPEG_ALLOC_CODEC_CONTEXT_FAIL);
            }
            avcodec_free_context(&avCodecContext);
            avformat_close_input(&avFormatContext);
        }

        /**
         * TODO 第八步:他目前是一張白紙(parameters copy codecContext)
         */
        result = avcodec_parameters_to_context(avCodecContext, parameters);
        if (result < 0) {
            if (helper) {
                helper->onError(THREAD_CHILD, FFMPEG_CODEC_CONTEXT_PARAMETERS_FAIL);
            }
            avcodec_free_context(&avCodecContext);
            avformat_close_input(&avFormatContext);
            return;
        }

        /**
         * TODO 第九步:打開解碼器
         */
        result = avcodec_open2(avCodecContext, codec, nullptr);
        if (result) {
            if (helper) {
                helper->onError(THREAD_CHILD, FFMPEG_OPEN_DECODER_FAIL);
            }
            avcodec_free_context(&avCodecContext);
            avformat_close_input(&avFormatContext);
            return;
        }
        //音視訊同步需要參數
        AVRational time_base = avStream->time_base;

        /**
         * TODO 第十步:從編解碼器參數中,擷取流的類型 codec_type  ===  音頻 視訊
         */
        if (parameters->codec_type == AVMediaType::AVMEDIA_TYPE_AUDIO) {

        } else if (parameters->codec_type == AVMediaType::AVMEDIA_TYPE_VIDEO) {

        }
    }
    /**
     * TODO 第十一步: 如果流中 沒有音頻 也沒有 視訊 【健壯性校驗】
     */
    if (!audioChannel && !videoChannel) {
        if (helper) {
            helper->onError(THREAD_CHILD, FFMPEG_NOMEDIA);
        }
        if (avCodecContext) {
            //釋放avCodecContext
            avcodec_free_context(&avCodecContext);
        }
        avformat_close_input(&avFormatContext);
    }

    /**
     * TODO 第十二步:準備成功,通知給上層
     */
    if (helper) { // 隻要使用者關閉了,就不準你回調給Java成 start播放
        helper->onPrepared(THREAD_CHILD);
    }
}
static {
    System.loadLibrary("native-lib");
}
加載native-lib的時候就會執行下面函數,javaVM 主要用來處理子線程回調,因為子線程env不可以垮線程執行,是以需要javaVM裡的線程處理
jint JNI_OnLoad(JavaVM * vm, void * args) {
    ::vm = vm;
    return JNI_VERSION_1_6;
}
處理回調方法:
vm->AttachCurrentThread(&env_child, 0);
env_child->CallVoidMethod(job, jmd_prepared);
vm->DetachCurrentThread();
![與專家面對面:Android開發入門問與答[圖]](data:image/gif;base64,R0lGODlhAQABAIAAAP///wAAACwAAAAAAQABAAACAkQBADs=)