1 MediaRecorder 錄制視訊步驟
這篇文章介紹了Android錄音MediaRecorder使用和SoundPool的使用 主要講解了音頻的錄制和播放,這篇AudioRecord和AudioTrack更加底層的音頻錄制和播放今天這篇文章講解錄制視訊,其實前面已經講過了利用MediaCodec錄制視訊但考慮到簡單開發用的比較多的還是MediaRecorder是以繼續講解視訊的錄制。
如何利用MediaRecorder錄制視訊?
在Camera的文檔中寫的很清楚:https://developer.android.google.cn/guide/topics/media/camera#capture-video
Capturing Videos。
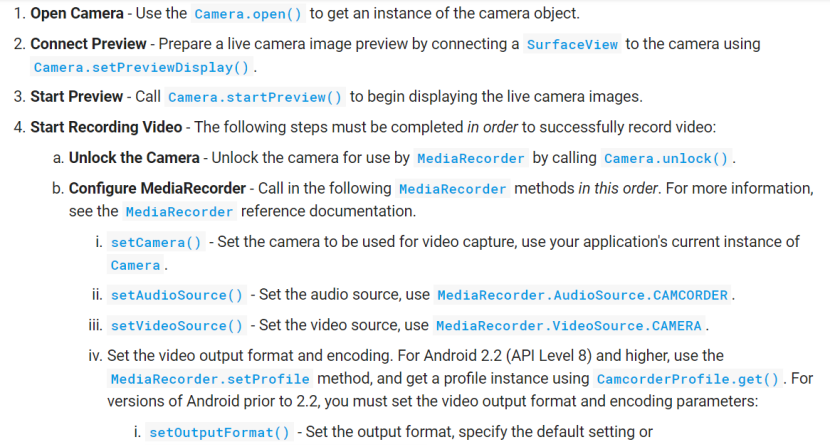
不像利用Camera進行拍照,錄制視訊需要一個嚴格的調用順序,你必須遵從下面的順序才能很好地利用Camera在你的應用中錄制出視訊。

具體步驟:
- 1打開Camera,利用Camera.open()函數打開相機。
- 2設定預覽,把Camera和SurfaceView連接配接,利用Camera.setPreviewDisplay()設定預覽的SurfaceHolder。
- 3開始預覽,調用Camera.startPreview()開始預覽
- 4開始錄制視訊(嚴格按照下面的順序進行操作):
-
- a . unLock Camera,解鎖相機,利用函數Camera.unlock(),這樣Camera才能被MediaRecodrder使用,否則會報錯。
-
- b. 配置MediaRecorder,生成MediaRecorder執行個體
-
-
- (1)利用setCamera()設定Camera被視訊錄制使用,
-
-
-
- (2)setAudioSource(),設定音頻來自哪裡(從哪裡擷取音頻),MediaRecorder.AudioSource.CAMCORDER
-
-
-
- (3)setVideoSource() ,設定視訊來源(從哪裡擷取視訊),MediaRecorder.VideoSource.CAMERA
-
-
-
-
(4)設定輸出視訊檔案的格式和編碼,從Android 2.2及以上版本開始,利用MediaRecorder.setProfile方法進行設定,利用CamcorderProfile.get()可以擷取CamcorderProfile對象,内部包含了系統封裝好的一些配置。
至少需要設定的參數:
setOutputFormat() 設定輸出格式,一般設定為預設或者MediaRecorder.OutputFormat.MPEG_4.
setAudioEncoder() 設定編碼類型一般為預設或者MediaRecorder.AudioEncoder.AMR_NB.
setVideoEncoder() 設定視訊編碼類型一般是預設或者MediaRecorder.VideoEncoder.MPEG_4_SP.
-
-
-
-
- (5)setOutputFile() 設定輸出檔案的存放位置。
-
-
-
- (6)setPreviewDisplay() ,設定預覽的SurfaceHolder。
-
-
- c 準備,調用MediaRecorder.prepare() 應用上面的配置。
-
- d 開始視訊錄制,MediaRecorder.start()
- 5 停止錄制
-
- a 停止MediaRecorder,停止錄制
-
- b 重置 MediaRecorder.reset(),移除設定的參數
-
- c 釋放MediaRecorder
-
- d Lock Camera,Camera.lock(),從Android 4.0 開始,lock操作不是必須的,除非MediaRecorder.prepare()失敗。
- 6 Camera 停止預覽,Camera.stopPreview().
- 7 釋放Camera,Camera.release()。
代碼示例:來自developer
private boolean prepareVideoRecorder(){

    mCamera = getCameraInstance();
    mMediaRecorder = new MediaRecorder();

    // Step 1: Unlock and set camera to MediaRecorder
    mCamera.unlock();
    mMediaRecorder.setCamera(mCamera);

    // Step 2: Set sources
    mMediaRecorder.setAudioSource(MediaRecorder.AudioSource.CAMCORDER);
    mMediaRecorder.setVideoSource(MediaRecorder.VideoSource.CAMERA);

    // Step 3: Set a CamcorderProfile (requires API Level 8 or higher)
    mMediaRecorder.setProfile(CamcorderProfile.get(CamcorderProfile.QUALITY_HIGH));

    // Step 4: Set output file
    mMediaRecorder.setOutputFile(getOutputMediaFile(MEDIA_TYPE_VIDEO).toString());

    // Step 5: Set the preview output
    mMediaRecorder.setPreviewDisplay(mPreview.getHolder().getSurface());

    // Step 6: Prepare configured MediaRecorder
    try {
        mMediaRecorder.prepare();
    } catch (IllegalStateException e) {
        Log.d(TAG, "IllegalStateException preparing MediaRecorder: " + e.getMessage());
        releaseMediaRecorder();
        return false;
    } catch (IOException e) {
        Log.d(TAG, "IOException preparing MediaRecorder: " + e.getMessage());
        releaseMediaRecorder();
        return false;
    }
    return true;
}

//如果是Android 2.2 以前,不能直接使用CamcorderProfile,需要手動設定如下參數:
    // Step 3: Set output format and encoding (for versions prior to API Level 8)
    mMediaRecorder.setOutputFormat(MediaRecorder.OutputFormat.MPEG_4);
    mMediaRecorder.setAudioEncoder(MediaRecorder.AudioEncoder.DEFAULT);
    mMediaRecorder.setVideoEncoder(MediaRecorder.VideoEncoder.DEFAULT);
2 Camera的lock和 unlock
錄制視訊之前需要調用unlock,釋放MediaRecorder時需要調用lock。
/**源碼中的unlock注釋:
- Unlocks the camera to allow another process to access it.
- Normally, the camera is locked to the process with an active Camera
- object until {@link #release()} is called. To allow rapid handoff
- between processes, you can call this method to release the camera
- temporarily for another process to use; once the other process is done
- you can call {@link #reconnect()} to reclaim the camera.
- This must be done before calling
- {@link android.media.MediaRecorder#setCamera(Camera)}. This cannot be
- called after recording starts.
- If you are not recording video, you probably do not need this method.
- @throws RuntimeException if the camera cannot be unlocked.
public native final void unlock();
unlock的作用是Camera屬于硬體裝置,通常情況下Camera被一個使用Camera的程序鎖定,是不允許其他程序使用的。調用unlock後Camera可以允許其他進行使用它,否則如果正被其他程序使用會發生錯誤,經過試驗就是不被其它程序使用不調用這個函數也會發生莫名錯誤,其他程序使用完之後可以調用reconnect釋放Camera。unLock必須在你調用MediaRecorder.setCamera之前調用。注意如果你不是要錄制視訊,隻是簡單地預覽不需要調用這個函數。
/**源碼lock函數注釋*/
- Re-locks the camera to prevent other processes from accessing it.
- Camera objects are locked by default unless {@link #unlock()} is
- called. Normally {@link #reconnect()} is used instead.
- Since API level 14, camera is automatically locked for applications in
- {@link android.media.MediaRecorder#start()}. Applications can use the
- camera (ex: zoom) after recording starts. There is no need to call this
- after recording starts or stops.
- If you are not recording video, you probably do not need this method.
- @throws RuntimeException if the camera cannot be re-locked (for
example, if the camera is still in use by another process).public native final void lock();
Lock函數再次禁止其他程序使用Camera,聽起來有點像reconnect,的确它兩個功能一樣,通常使用reconnect函數。
從api14 開始,錄制視訊時MediaRecorder調用start函數時Camera 會自動的調用Lock,是以再開始錄制視訊之前或者錄制視訊結束之後不需要手動的調用lock函數。
注意:lock和unLock 都是隻有在錄制視訊時才會使用,其他情況用不到這兩個函數。
3 setAudioSource,setVideoSource
設定音頻和視訊的來源
設定音頻來源:
在AudioSource類中包括:
- MediaRecorder.AudioSource.DEFAULT: 預設音頻源
- MediaRecorder.AudioSource.MIC:主麥克風。
- MediaRecorder.AudioSource.VOICE_CALL:來源為語音撥出的語音與對方說話的聲音
- MediaRecorder.AudioSource.VOICE_COMMUNICATION:攝像頭旁邊的麥克風
- MediaRecorder.AudioSource.VOICE_DOWNLINK:下行聲音
- MediaRecorder.AudioSource.VOICE_RECOGNITION:語音識别
-
MediaRecorder.AudioSource.VOICE_UPLINK:上行聲音
一般使用預設或者主麥克風或者攝像頭旁邊的麥克風。
設定視訊來源:
- VideoSource.DEFAULT:預設
- VideoSource.CAMERA:攝像頭
-
VideoSource.SURFACE:Surface作為來源
在錄制視訊的步驟中有一步是調用setCamera設定Camera,這一步相當于設定來源是攝像頭,下面就需要使用VideoSource.CAMERA作為視訊源,還可以使用MediaRecorder的getSurface播放視訊,代替setCamera,這時的視訊來源就是Surface。
4 CamcorderProfile 和 參數設定
public void setProfile(CamcorderProfile profile)
利用setProfile設定參數必須在設定了video和audio Source之後調用,在setOutputFile之前設定。如果時間流逝的CamcorderProfile 被使用,audio相關的源或者參數設定将被忽略。
注意:如果調用了setProfile函數,setOutputFormat,setAudioEncoder,setVideoEncoder,不能再調用設定。
CamcorderProfile mCamcorderProfile = CamcorderProfile.get(Camera.CameraInfo.CAMERA_FACING_BACK,
         CamcorderProfile.QUALITY_HIGH);
 mMediaRecorder.setProfile(mCamcorderProfile);
如果使用其他類型品質參數就需要進行判斷:
CamcorderProfile profile = null;
        if (CamcorderProfile.hasProfile(CamcorderProfile.QUALITY_1080P)) {
            profile = CamcorderProfile.get(CamcorderProfile.QUALITY_1080P);
        } else if (CamcorderProfile.hasProfile(CamcorderProfile.QUALITY_720P)) {
            profile = CamcorderProfile.get(CamcorderProfile.QUALITY_720P);
        } else if (CamcorderProfile.hasProfile(CamcorderProfile.QUALITY_480P)) {
            profile = CamcorderProfile.get(CamcorderProfile.QUALITY_480P);
        }
        if (profile != null) {
            mMediaRecorder.setProfile(profile);
        }
手動設定參數
通過profile可以一步到位配置各個參數,但是缺點是沒辦法設定自己想要的視訊清晰度,因為視訊清晰度是根據碼率和分辨率決定的,而每個profile已經固定了碼率和分辨率,是以無法進行調整。
注意:
幀率通過camera擷取支援的幀率,視訊尺寸的大小,可以根據需要的品質先擷取系統720p的profile,然後取profile.videoFrameWidth; profile.videoFrameHeight作為輸出寬高。
setOutputFormat():設定輸出格式。
系統包括:
DEFAULT:MP4
THREE_GPP:3gp
MPEG_4:.mp4,m4a
RAW_AMR:.arm
AAC_ADTS :aac
…
視訊音頻編碼格式:
視訊編碼格式MediaRecorder.VideoEncoder
DEFAULT,H263,H264,MPEG_4_SP,VP8
音頻編碼格式MediaRecorder.AudioEncoder
default,AAC,HE_AAC,AAC_ELD,AMR_NB,AMR_WB,VORBIS
setVideoFrameRate:設定幀率,24fps已經很流暢,幀率不能太低,也不能太高。
setVideoEncodingBitRate:設定碼率,配合視訊大小可以調節視訊的品質
setVideoSize:設定視訊大小
setAudioEncodingBitRate:設定音頻采樣率
setAudioChannels:設定聲道數
其他設定:
setOrientationHint()對輸出的檔案設定方向,一般和Camera的setDisplayOrientation角度相同。
特别注意:setOrientationHint并沒有對視訊的幀進行旋轉操作,是以真實生成的視訊時沒有旋轉的,它會增加一個Matrix舉證,當output為OutputFormat.THREE_GPP 或者 OutputFormat.MPEG_4時視訊播放時,播放器能夠自動識别。
setMaxDuration:錄制的最長時間
setOutputFile:設定輸出的檔案
setPreviewDisplay:設定Surface預覽視訊
setMaxFileSize:設定錄制檔案的最大值。
5 代碼示例
public class Main20Activity extends AppCompatActivity implements SurfaceHolder.Callback {

    private static int mOrientation = 0;
    private static int mCameraID = Camera.CameraInfo.CAMERA_FACING_BACK;
    private SurfaceView mSurfaceView;
    private SurfaceHolder mSurfaceHolder;
    private Camera mCamera;
    private boolean havePermission = false;
    private Button mStart;
    private Button mStop;
    private MediaRecorder mMediaRecorder;
    private Camera.Size mSize;

    String srcPath = Environment.getExternalStorageDirectory()
            .getPath() + "/mediarecorder/";
    String srcName = "video.mp4";

    @Override
    protected void onCreate(Bundle savedInstanceState) {
        super.onCreate(savedInstanceState);
        setContentView(R.layout.activity_main20);
        mStart = findViewById(R.id.startrecord);
        mStop = findViewById(R.id.stoprecord);
        mStart.setOnClickListener(new View.OnClickListener() {
            @Override
            public void onClick(View v) {
                initMediaRecord();
            }
        });

        mStop.setOnClickListener(new View.OnClickListener() {
            @Override
            public void onClick(View v) {
                if (mMediaRecorder != null ){
                    mMediaRecorder.stop();
                    mMediaRecorder.release();
                    mCamera.lock();
                }
            }
        });

        // Android 6.0相機動态權限檢查,省略了
        if (ContextCompat.checkSelfPermission(this, Manifest.permission.CAMERA)
                == PackageManager.PERMISSION_GRANTED && ContextCompat.checkSelfPermission(this, Manifest.permission.RECORD_AUDIO)
                == PackageManager.PERMISSION_GRANTED) {
            havePermission = true;
            init();
        } else {
        havePermission = false;
            ActivityCompat.requestPermissions(this,
                    new String[]{
                            Manifest.permission.CAMERA,
                            Manifest.permission.WRITE_EXTERNAL_STORAGE,
                            Manifest.permission.RECORD_AUDIO
                    }, 100);
        }
    }

    public void initMediaRecord(){
        //建立MediaRecorder
        mMediaRecorder = new MediaRecorder();
        mMediaRecorder.reset();
        mCamera.unlock();
        //建立錄音檔案
        File mRecorderFile = new File(srcPath+srcName);
        try {
            if (!mRecorderFile.getParentFile().exists()) mRecorderFile.getParentFile().mkdirs();
            mRecorderFile.createNewFile();
        } catch (IOException e) {
            e.printStackTrace();
        }
        mMediaRecorder.setCamera(mCamera);
        mMediaRecorder.setOrientationHint(mOrientation);
        //從麥克風采集
        mMediaRecorder.setAudioSource(MediaRecorder.AudioSource.MIC);
        mMediaRecorder.setVideoSource(MediaRecorder.VideoSource.CAMERA);
        CamcorderProfile mCamcorderProfile = CamcorderProfile.get(Camera.CameraInfo.CAMERA_FACING_BACK, CamcorderProfile.QUALITY_HIGH);
        System.out.println("============mCamcorderProfile============"+mCamcorderProfile.videoFrameWidth+"   "+mCamcorderProfile.videoFrameHeight);
        mMediaRecorder.setProfile(mCamcorderProfile);
        //使用CamcorderProfile做配置的話,輸出格式,音頻編碼,視訊編碼 不要寫,否則會報錯(崩潰)
        /*mMediaRecorder.setOutputFormat(MediaRecorder.OutputFormat.DEFAULT);
        mMediaRecorder.setAudioEncoder(MediaRecorder.AudioEncoder.DEFAULT);
        mMediaRecorder.setVideoEncoder(MediaRecorder.VideoEncoder.H264);*/

        //設定錄制視訊的大小,其實Camera也必須要和這個比例相同,此處為了簡單不做處理
        mMediaRecorder.setVideoSize(mCamcorderProfile.videoFrameWidth,mCamcorderProfile.videoFrameHeight);
        //提高幀頻率,錄像模糊,花屏,綠屏可寫上調試
        mMediaRecorder.setVideoEncodingBitRate(mCamcorderProfile.videoFrameWidth*mCamcorderProfile.videoFrameHeight*24*16);
        mMediaRecorder.setVideoFrameRate(24);
        //所有android系統都支援的适中采樣的頻率
        mMediaRecorder.setAudioSamplingRate(44100);
        //設定檔案錄音的位置
        mMediaRecorder.setOutputFile(mRecorderFile.getAbsolutePath());
        mMediaRecorder.setPreviewDisplay(mSurfaceView.getHolder().getSurface());
        //開始錄音
        try {
            mMediaRecorder.prepare();
            mMediaRecorder.start();
        } catch (IOException e) {
            e.printStackTrace();
        }

    }

     public void init(){
        if(mSurfaceView == null){
            mSurfaceView = findViewById(R.id.surfaceview);
            mSurfaceView.setCustomEvent(new CustomSurfaceView.ONTouchEvent() {
                @Override
                public void onTouchEvent(MotionEvent event) {
                    handleFocus(event, mCamera);
                }
            });
            mSurfaceHolder = mSurfaceView.getHolder();
            mSurfaceHolder.addCallback(this);
            WindowManager wm = (WindowManager) Main23Activity.this.getSystemService(Context.WINDOW_SERVICE);
            int width = wm.getDefaultDisplay().getWidth();
            LinearLayout.LayoutParams layoutParams = (LinearLayout.LayoutParams) mSurfaceView.getLayoutParams();
            layoutParams.width = width;
            layoutParams.height = width*4/3;
            useWidth = width;
            useHeight = width*4/3;
            mSurfaceView.setLayoutParams(layoutParams);
        }

    }

    private void initCamera() {
        if (mCamera != null){
            releaseCamera();
            System.out.println("===================releaseCamera=============");
        }
        mCamera = Camera.open(mCameraID);
        System.out.println("===================openCamera=============");
        if (mCamera != null){
            try {
                mCamera.setPreviewDisplay(mSurfaceHolder);
            } catch (IOException e) {
                e.printStackTrace();
            }
            Camera.Parameters parameters = mCamera.getParameters();
            parameters.setRecordingHint(true);
            {
                //設定擷取資料
                parameters.setPreviewFormat(ImageFormat.NV21);
                //parameters.setPreviewFormat(ImageFormat.YUV_420_888);

                //通過setPreviewCallback方法監聽預覽的回調:
                mCamera.setPreviewCallback(new Camera.PreviewCallback() {
                    @Override
                    public void onPreviewFrame(byte[] bytes, Camera camera) {
                        //這裡面的Bytes的資料就是NV21格式的資料,或者YUV_420_888的資料


                    }
                });
            }

            if(mCameraID == Camera.CameraInfo.CAMERA_FACING_BACK){
                parameters.setFocusMode(Camera.Parameters.FOCUS_MODE_CONTINUOUS_PICTURE);
            }

            mCamera.setParameters(parameters);

            calculateCameraPreviewOrientation(this);
            Camera.Size tempSize = setPreviewSize(mCamera, useHeight,useWidth);
            {
                //此處可以處理,擷取到tempSize,如果tempSize和設定的SurfaceView的寬高沖突,重新設定SurfaceView的寬高
            }

            setPictureSize(mCamera,  useHeight,useWidth);
            mCamera.setDisplayOrientation(mOrientation);
            int degree = calculateCameraPreviewOrientation(Main23Activity.this);
            mCamera.setDisplayOrientation(degree);
            mCamera.startPreview();
        }
    }

    @Override
    public void surfaceCreated(SurfaceHolder holder) {

    }

    @Override
    public void surfaceChanged(SurfaceHolder holder, int format, int width, int height) {
        //當SurfaceView變化時也需要做相應操作,這裡未做相應操作
           if (havePermission){
            initCamera();
        }
    }

    @Override
    public void surfaceDestroyed(SurfaceHolder holder) {
        mCamera.stopPreview();
    }

    private void setPictureSize(Camera camera ,int expectWidth,int expectHeight){
        Camera.Parameters parameters = camera.getParameters();
        Point point = new Point(expectWidth, expectHeight);
        Camera.Size size = findProperSize(point,parameters.getSupportedPreviewSizes());
        parameters.setPictureSize(size.width, size.height);
        camera.setParameters(parameters);
    }

    private Camera.Size setPreviewSize(Camera camera, int expectWidth, int expectHeight) {
        Camera.Parameters parameters = camera.getParameters();
        Point point = new Point(expectWidth, expectHeight);
        Camera.Size size = findProperSize(point,parameters.getSupportedPictureSizes());
        parameters.setPictureSize(size.width, size.height);
        camera.setParameters(parameters);
        return size;
    }

    /**
     * 找出最合适的尺寸,規則如下:
     * 1.将尺寸按比例分組,找出比例最接近螢幕比例的尺寸組
     * 2.在比例最接近的尺寸組中找出最接近螢幕尺寸且大于螢幕尺寸的尺寸
     * 3.如果沒有找到,則忽略2中第二個條件再找一遍,應該是最合适的尺寸了
     */
    private static Camera.Size findProperSize(Point surfaceSize, List<Camera.Size> sizeList) {
        if (surfaceSize.x <= 0 || surfaceSize.y <= 0 || sizeList == null) {
            return null;
        }

        int surfaceWidth = surfaceSize.x;
        int surfaceHeight = surfaceSize.y;

        List<List<Camera.Size>> ratioListList = new ArrayList<>();
        for (Camera.Size size : sizeList) {
            addRatioList(ratioListList, size);
        }

        final float surfaceRatio = (float) surfaceWidth / surfaceHeight;
        List<Camera.Size> bestRatioList = null;
        float ratioDiff = Float.MAX_VALUE;
        for (List<Camera.Size> ratioList : ratioListList) {
            float ratio = (float) ratioList.get(0).width / ratioList.get(0).height;
            float newRatioDiff = Math.abs(ratio - surfaceRatio);
            if (newRatioDiff < ratioDiff) {
                bestRatioList = ratioList;
                ratioDiff = newRatioDiff;
            }
        }

        Camera.Size bestSize = null;
        int diff = Integer.MAX_VALUE;
        assert bestRatioList != null;
        for (Camera.Size size : bestRatioList) {
            int newDiff = Math.abs(size.width - surfaceWidth) + Math.abs(size.height - surfaceHeight);
            if (size.height >= surfaceHeight && newDiff < diff) {
                bestSize = size;
                diff = newDiff;
            }
        }

        if (bestSize != null) {
            return bestSize;
        }

        diff = Integer.MAX_VALUE;
        for (Camera.Size size : bestRatioList) {
            int newDiff = Math.abs(size.width - surfaceWidth) + Math.abs(size.height - surfaceHeight);
            if (newDiff < diff) {
                bestSize = size;
                diff = newDiff;
            }
        }

        return bestSize;
    }

    private static void addRatioList(List<List<Camera.Size>> ratioListList, Camera.Size size) {
        float ratio = (float) size.width / size.height;
        for (List<Camera.Size> ratioList : ratioListList) {
            float mine = (float) ratioList.get(0).width / ratioList.get(0).height;
            if (ratio == mine) {
                ratioList.add(size);
                return;
            }
        }

        List<Camera.Size> ratioList = new ArrayList<>();
        ratioList.add(size);
        ratioListList.add(ratioList);
    }
    /**
     * 排序
     * @param list
     */
    private static void sortList(List<Camera.Size> list) {
        Collections.sort(list, new Comparator<Camera.Size>() {
            @Override
            public int compare(Camera.Size pre, Camera.Size after) {
                if (pre.width > after.width) {
                    return 1;
                } else if (pre.width < after.width) {
                    return -1;
                }
                return 0;
            }
        });
    }

    /**
     * 設定預覽角度,setDisplayOrientation本身隻能改變預覽的角度
     * previewFrameCallback以及拍攝出來的照片是不會發生改變的,拍攝出來的照片角度依舊不正常的
     * 拍攝的照片需要自行處理
     * 這裡Nexus5X的相機簡直沒法吐槽,後置攝像頭倒置了,切換攝像頭之後就出現問題了。
     * @param activity
     */
    public static int calculateCameraPreviewOrientation(Activity activity) {
        Camera.CameraInfo info = new Camera.CameraInfo();
        Camera.getCameraInfo(mCameraID, info);
        int rotation = activity.getWindowManager().getDefaultDisplay()
                .getRotation();
        int degrees = 0;
        switch (rotation) {
            case Surface.ROTATION_0:
                degrees = 0;
                break;
            case Surface.ROTATION_90:
                degrees = 90;
                break;
            case Surface.ROTATION_180:
                degrees = 180;
                break;
            case Surface.ROTATION_270:
                degrees = 270;
                break;
        }

        int result;
        if (info.facing == Camera.CameraInfo.CAMERA_FACING_FRONT) {
            result = (info.orientation + degrees) % 360;
            result = (360 - result) % 360;
        } else {
            result = (info.orientation - degrees + 360) % 360;
        }
        mOrientation = result;
        System.out.println("=========orienttaion============="+result);
        return result;
    }

    @Override
    protected void onResume() {
        super.onResume();
        if (havePermission && mCamera != null)
            mCamera.startPreview();
    }

    @Override
    protected void onPause() {
        super.onPause();
        if (havePermission && mCamera != null)
            mCamera.stopPreview();
    }

    @Override
    public void onRequestPermissionsResult(int requestCode, @NonNull String[] permissions, @NonNull int[] grantResults) {
        super.onRequestPermissionsResult(requestCode, permissions, grantResults);
        switch (requestCode) {
            // 相機權限
            case 100:
                havePermission = true;
                init();
                break;
        }
    }

}
錄制視訊:
播放錄制視訊:
可以看到播放錄制的視訊時發生了旋轉,如何讓播放器知道制品旋轉了,然後按正常的方向播放呢?根據前面講解setOrientationHint的知識,隻需要改變輸出格式為OutputFormat.THREE_GPP 或者 OutputFormat.MPEG_4中的一種,DEFAULT就是預設的mp4格式也滿足這個條件,是以修改代碼。
mMediaRecorder.setCamera(mCamera);
 mMediaRecorder.setOrientationHint(mOrientation);
 //從麥克風采集
 mMediaRecorder.setAudioSource(MediaRecorder.AudioSource.MIC);
 mMediaRecorder.setVideoSource(MediaRecorder.VideoSource.CAMERA);
 CamcorderProfile mCamcorderProfile = CamcorderProfile.get(Camera.CameraInfo.CAMERA_FACING_BACK, CamcorderProfile.QUALITY_HIGH);
 System.out.println("============mCamcorderProfile============"+mCamcorderProfile.videoFrameWidth+"   "+mCamcorderProfile.videoFrameHeight);
/* mMediaRecorder.setProfile(mCamcorderProfile);*/
 //使用CamcorderProfile做配置的話,輸出格式,音頻編碼,視訊編碼 不要寫,否則會報錯(崩潰)
 mMediaRecorder.setOutputFormat(MediaRecorder.OutputFormat.DEFAULT);
 mMediaRecorder.setAudioEncoder(MediaRecorder.AudioEncoder.DEFAULT);
 mMediaRecorder.setVideoEncoder(MediaRecorder.VideoEncoder.H264);

 //設定錄制視訊的大小,其實Camera也必須要和這個比例相同,此處為了簡單不做處理
 mMediaRecorder.setVideoSize(mCamcorderProfile.videoFrameWidth,mCamcorderProfile.videoFrameHeight);
 //提高幀頻率,錄像模糊,花屏,綠屏可寫上調試
 mMediaRecorder.setVideoEncodingBitRate(mCamcorderProfile.videoFrameWidth*mCamcorderProfile.videoFrameHeight*24*16);
 mMediaRecorder.setVideoFrameRate(24);
以上代碼隻是為了展示效果,想要使用需要優化,謝謝。