最近看了很多動畫和一些效果很好的自定義控件,發現了一件事,就是Android的View層設計思想和古老的JavaSwing是如此的相似。這是在原來的基礎上加入了一些輸入移動端的生命周期,使其在使用和性能上更好。但是對核心的了解還是可以借鑒一些的。
如果說Activity就是JavaSwing的JFrame那麼Fragment 就是在JPanel
一個是容器頂層控件,一個是顯示在容器上的中間層控件。
是以這裡插一句話,如果感覺自己android寫的不溜那麼就多看看java的代碼。和設計思想吧。android的東西太多都是繼承自java或者說就是java的衍生品。無論是頂層容器還是底層容器都是為了放互動容器的。
Fragment的使用
一、布局
大家完全可以把Fragment看成一個輕量級的Activity.為什麼輕量,因為他不用在mainfest.xml檔案中添加自己.第二他不能直接啟動,必須依附(attach)在activity之上。
是以在這布局這一塊,Fragment的使用完全可以和activity的布局劃等号,設計圖怎麼畫在這裡就怎麼設計一個 Fragment .
<LinearLayout xmlns:android="http://schemas.android.com/apk/res/android"
    android:layout_width="match_parent"
    android:layout_height="match_parent"
    android:background="#00ff00" >

    <TextView
        android:layout_width="wrap_content"
        android:layout_height="wrap_content"
        android:text="This is fragment 1"
        android:textColor="#000000"
        android:textSize="25sp" />

</LinearLayout>
<LinearLayout xmlns:android="http://schemas.android.com/apk/res/android"
    android:layout_width="match_parent"
    android:layout_height="match_parent"
    android:background="#ffff00" >

    <TextView
        android:layout_width="wrap_content"
        android:layout_height="wrap_content"
        android:text="This is fragment 2"
        android:textColor="#000000"
        android:textSize="25sp" />

</LinearLayout>
簡單的畫了兩個布局背景不同,文字區分1和2
二、在Activity中使用
使用方法一:靜态加載一個Fragment
第一步把這個 fragment執行個體化
public class Fragment1 extends Fragment {

    @Override
    public View onCreateView(LayoutInflater inflater, ViewGroup container, Bundle savedInstanceState) {
        return inflater.inflate(R.layout.fragment1, container, false);
    }
}
二和一 ,一樣
在onCreateView() 中實作的是
{
    View view=inflater.inflate(R.layout.fragment);//這個View就是父容器在這個布局裡的其他控件 好比TextView要依靠他findViewById();
    TextView tv=(TextView)view.findViewById(R.id,textview);
    return view;
}
這樣一個 Fragment在View層就建立成功了。
然後打開或建立activity_main.xml作為主Activity的布局檔案,在裡面加入兩個Fragment的引用,使用android:name字首來引用具體的
<LinearLayout xmlns:android="http://schemas.android.com/apk/res/android"
    android:layout_width="match_parent"
    android:layout_height="match_parent"
    android:baselineAligned="false" >

    <fragment
        android:id="@+id/fragment1"
        **android:name="com.example.fragmentdemo.Fragment1"**
        android:layout_width="0dip"
        android:layout_height="match_parent"
        android:layout_weight="1" />

    <fragment
        android:id="@+id/fragment2"
        **android:name="com.example.fragmentdemo.Fragment2"**
        android:layout_width="0dip"
        android:layout_height="match_parent"
        android:layout_weight="1" />

</LinearLayout>
最後打開或建立MainActivity作為程式的主Activity,裡面的代碼非常簡單,都是自動生成的:
public class MainActivity extends Activity {

    @Override
    protected void onCreate(Bundle savedInstanceState) {
        super.onCreate(savedInstanceState);
        setContentView(R.layout.activity_main);
    }

}
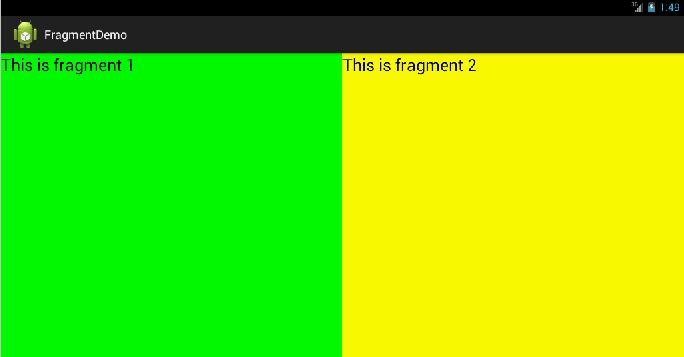
如我們的設計一樣,兩個Fragment平分了螢幕
使用方法二:動态添加
這回我們直接在Activity中使用Fragment
public class MainActivity extends Activity {

    @Override
    protected void onCreate(Bundle savedInstanceState) {
        super.onCreate(savedInstanceState);
        setContentView(R.layout.activity_main);
        Display display = getWindowManager().getDefaultDisplay();
        if (display.getWidth() > display.getHeight()) {
            Fragment1 fragment1 = new Fragment1(); //建立Fragment
            getFragmentManager().beginTransaction().replace(R.id.main_layout, fragment1).commit(); //添加Fragment送出
        } else {
            Fragment2 fragment2 = new Fragment2();
            getFragmentManager().beginTransaction().replace(R.id.main_layout, fragment2).commit();
        }
    }
}
首先,我們要擷取螢幕的寬度和高度,然後進行判斷,如果螢幕寬度大于高度就添加fragment1,如果高度大于寬度就添加fragment2。動态添加Fragment主要分為4步:
1.擷取到FragmentManager,在Activity中可以直接通過getFragmentManager得到。
2.開啟一個事務,通過調用beginTransaction方法開啟。
3.向容器内加入Fragment,一般使用replace方法實作,需要傳入容器的id和Fragment的執行個體。
4.送出事務,調用commit方法送出。
現在運作一下程式,效果如下圖所示:
豎屏顯示結果

橫屏顯示結果
在實戰中主要使用的是第二種方法使用我們的Fragment.
即底部是三個activity切換按鈕上面是三個Fragment這裡的,這裡對Fragment的使用方法就是使用動态加載的方法。
三、Fragment的生命周期 Fragment 就是一個輕量的Activity那麼他的聲明周期就和Activity非常像了。
生命周期如下:
1.onAttach() 在Fragment和Activity建立關聯的時候調用
2.onCreate() 初始化Fragment本身為inflate view做準備
3.onCreateView() 對布局中的所有控件進行初始化 綁定
4.onActivityCreated
5.onStart
6onResume
在按下home之後
1.onPause 程式挂起
2.onStop 目前activity 停止
在傳回程式之後
1.onStart 開始
2.onResume 恢複
點選back退出程式
1onPause
2onStop
3onDestoryView Fragment 的View被移除了。
4onDestory
5onDetach Fragment和Activiy解除關聯的時候調用
注:此處并沒有onRestart()方法!
三、Fragment通信
這裡的通信主要分為
fragment->fragment 通過getActivity()為橋梁進行通信
Activity->fragment
fragment-activity 最簡單 所有activity 之間的通信方法這種時候都可以用
如在之前Fragment2中添加一個button那麼我們需要調用其他相關的Fragment是如何實作的那。
public class Fragment2 extends Fragment {

    @Override
    public View onCreateView(LayoutInflater inflater, ViewGroup container, Bundle savedInstanceState) {
        return inflater.inflate(R.layout.fragment2, container, false);
    }

    @Override
    public void onActivityCreated(Bundle savedInstanceState) {
        super.onActivityCreated(savedInstanceState);
        Button button = (Button) getActivity().findViewById(R.id.button);
        button.setOnClickListener(new OnClickListener() {
            @Override
            public void onClick(View v) {
                TextView textView = (TextView) getActivity().findViewById(R.id.fragment1_text);
                Toast.makeText(getActivity(), textView.getText(), Toast.LENGTH_LONG).show();
            }
        });
    }
}
當點選按鈕的時候就會在Toast中顯示Fragment1中的内容。
當然兩個Fragment需要使用一個共同的activity父容器。
最後分享一些使用心得
補充知識點:
1、什麼是FragmentTransaction?
使用Fragment時,可以通過使用者互動來執行一些動作,比如增加、移除、替換等。
所有這些改變構成一個集合,這個集合被叫做一個transaction。
可以調用FragmentTransaction中的方法來處理這個transaction,并且可以将transaction存進由activity管理的back stack中,這樣使用者就可以進行fragment變化的回退操作。
可以這樣得到FragmentTransaction類的執行個體:
ragmentManager  mFragmentManager = getSupportFragmentManager();
ragmentTransaction  mFragmentTransaction = mFragmentManager.beginTransaction();
在多個 Fragment 之間進行切換的時候
replace()和hide的差別
首先replace 是代替,之前的Fragment會被清空掉,在再次切換回來的時候會進行重新加載。而hide是将之前的一個fragment 進行隐藏,将新的fragment 疊在上面進行顯示.等在次調用的時候進行顯示。不需要重新加載。測試這個最簡單的方法就是 設計兩個fragment 在同一位置上放一個按鈕,一個有監聽一個沒有,但現實沒有監聽的按鈕點選按鈕的時候會響應一号按鈕的監聽事件。
另外一個對于 FragmentTransaction對象在commit之後就會失效。是以建議直接使用fragmentManager.beginTransaction() 這樣就不會産生失效的問題了。
commit 于commitAllowingStateLoss();的差別
簡單來說就是避免報錯。
他們都調用了commitInternal
public int commit() {
return commitInternal(false);
}
public int commitAllowingStateLoss() {
return commitInternal(true);
}
這個兩個方法差別就在傳參判斷後的處理方法checkStateLoss
當使用commit方法時,系統将進行狀态判斷,如果狀态(mStateSaved)已經儲存,将發生”Can not perform this action after onSaveInstanceState”錯誤。
如果mNoTransactionsBecause已經存在,将發生”Can not perform this action inside of ” + mNoTransactionsBecause錯誤