由于Ogre自身沒有實作視訊紋理,我們需要自己想辦法讀取視訊并顯示到某個物體上。網上已有人通過TheoraVideoPlugin實作視訊播放,但需要編譯libogg等幾個第三方庫,其自身帶的Demo也不完善,不便于利用。由于最近在搞OpenCV,就想到是不是可以通過OpenCV來讀取視訊,并将每幀圖檔轉化為Ogre可讀的Buffer,然後将其顯示到實體上。Google之後發現,已經有人有類似的想法,但給出的答案沒有處理好圖檔的RGB問題,總是報錯。經過幾個小時的修改,我已經成功實作了Ogre的視訊紋理。
(1)首先當然要有OpenCV庫(include檔案、lib檔案、dll檔案),可以自己編譯或下載下傳已經編譯好的版本。我采用的是OpenCV 2.0。
需要的lib檔案是cv200.lib,cxcore200.lib和highgui200.lib(根據OpenCV的版本不同,檔案的名稱也會不同)及相應的dll檔案。
(2)讀取視訊檔案
IplImage*  mVideoFrame;
CvCapture* mVideoCapture;
mVideoCapture = cvCreateFileCapture("..\\media\\xxx.avi");
(3)建立視訊幀的圖檔及其相應的材質檔案
這裡要特别注意的就是OpenCV的IplImage的圖檔資料中RGB的存儲順序,它預設的存儲順序是BGR。故在設定TexturePtr時我們也應該注意其圖檔格式,否則會出現各種詭異的錯誤。這裡我們添加了A通道,圖檔格式為PF_B8G8R8A8。
void createVideoTexture()
{
	mVideoFrame = cvQueryFrame(mVideoCapture);
	if(!mVideoFrame)
	{
		return;
	}

	// Implementing a video texture
	Ogre::TexturePtr texture = Ogre::TextureManager::getSingleton().createManual(
		"VideoTexture",      // name
		Ogre::ResourceGroupManager::DEFAULT_RESOURCE_GROUP_NAME,
		Ogre::TEX_TYPE_2D,   // type
		mVideoFrame->width,  // width
		mVideoFrame->height, // height
		0,                   // number of mipmaps
		Ogre::PF_B8G8R8A8,   // pixel format
		Ogre::TU_DYNAMIC_WRITE_ONLY_DISCARDABLE // usage, for textures updated very often
		);
	// Get the pixel buffer
	Ogre::HardwarePixelBufferSharedPtr pixelBuffer = texture->getBuffer();
	// Lock the pixel buffer and get a pixel box
	unsigned char* buffer = static_cast<unsigned char*>(
		pixelBuffer->lock(0, mVideoFrame->width*mVideoFrame->height*4, Ogre::HardwareBuffer::HBL_DISCARD) );
	for(int y = 0; y < mVideoFrame->height; ++y)
	{
		for(int x = 0; x < mVideoFrame->width; ++x)
		{
			buffer[ ((y*mVideoFrame->width)+x)*4 + 0 ] = mVideoFrame->imageData[ ((y*mVideoFrame->width)+x)*3 + 0 ]; // B
			buffer[ ((y*mVideoFrame->width)+x)*4 + 1 ] = mVideoFrame->imageData[ ((y*mVideoFrame->width)+x)*3 + 1 ]; // G
			buffer[ ((y*mVideoFrame->width)+x)*4 + 2 ] = mVideoFrame->imageData[ ((y*mVideoFrame->width)+x)*3 + 2 ]; // R
			buffer[ ((y*mVideoFrame->width)+x)*4 + 3 ] = 255;                                                        // A
		}
	}
	// Unlock the pixel buffer
	pixelBuffer->unlock();

	// Create a materail using the texture
	Ogre::MaterialPtr material = Ogre::MaterialManager::getSingleton().create(
		"VideoTextureMaterial", // name
		Ogre::ResourceGroupManager::DEFAULT_RESOURCE_GROUP_NAME);
	material->getTechnique(0)->getPass(0)->createTextureUnitState("VideoTexture");
	material->getTechnique(0)->getPass(0)->setDepthCheckEnabled(false);
	material->getTechnique(0)->getPass(0)->setDepthWriteEnabled(false);
	material->getTechnique(0)->getPass(0)->setLightingEnabled(false);
}
(4)建立一個長方形實體來展示視訊紋理
Ogre::Rectangle2D* mVideoScreen = new Ogre::Rectangle2D(true);
mVideoScreen->setCorners(-0.5f, 1.0f, 0.5f, -1.0f);
mVideoScreen->setBoundingBox(Ogre::AxisAlignedBox(-100000.0f * Ogre::Vector3::UNIT_SCALE, 100000.0f * Ogre::Vector3::UNIT_SCALE));
mVideoScreen->setMaterial( material->getName() );
// Attach it to a SceneNode
Ogre::SceneNode* videoScreenNode = mSceneMgr->getRootSceneNode()->createChildSceneNode("VideoScreenNode");
videoScreenNode->attachObject(mVideoScreen);
(5)每幀更新視訊
方法和(3)差不多,這裡就不贅述了。
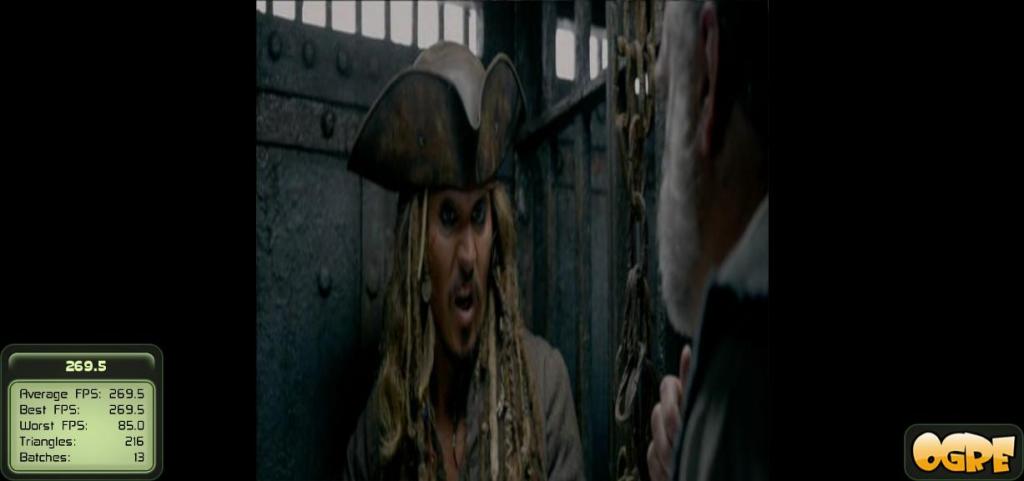
實作效果如下:
源代碼可在http://download.csdn.net/detail/zhuxiaoyang2000/3582906找到。
![“我心中的網絡安全”征文比賽-高中組一等獎[圖]](data:image/gif;base64,R0lGODlhAQABAIAAAP///wAAACwAAAAAAQABAAACAkQBADs=)