《聖經》記載,當時人類聯合起來興建希望能通往天堂的高塔;為了阻止人類的計劃,上帝讓人類說不同的語言,使人類互相之間不能溝通,計劃是以失敗。
像“Homography”這樣的術語經常提醒我,我們仍然在與溝通鬥争。Homography(單應性)是一個簡單的概念,卻有一個奇怪的名字!
1 介紹
1.1 什麼是Homography
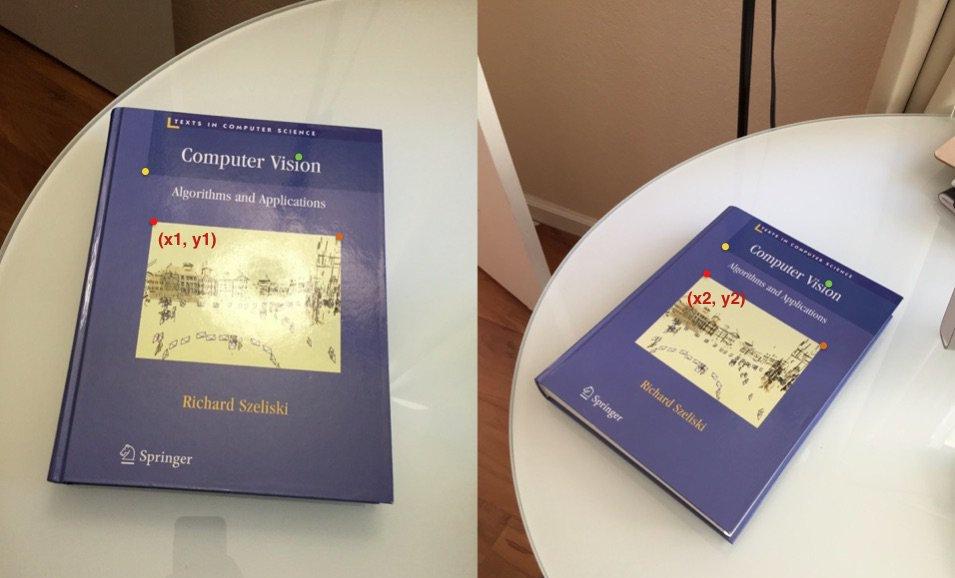
考慮圖1所示的同一個平面(比如書皮)的兩幅圖像。紅點表示兩幅圖像中相同的實體坐标點。在計算機視覺術語中,我們稱之為對應點。
Homography就是将一張圖像上的點映射到另一張圖像上對應點的3x3變換矩陣。是以該矩陣我們可以表示為:

讓我們考慮一組對應點,
位于第一張圖像和
位于第二張圖像中。然後,Homography以下列方式映射它們:
1.2 使用Homography進行圖像對齊
隻要它們位于現實世界中的同一平面上,上述等式對于所有對應點都是正确的。換句話說,您可以将單應性應用于第一張圖像,第一張圖像中的書籍将與第二張圖像中的書籍對齊!見下圖。那麼對于不在此平面上的點呢?這時再應用 Homography 就無法再對齊到對應點了。比如下圖的桌子,地闆。對于這種圖像中有多個平面的情況,我們就需要針對每一個平面使用單獨的Homography進行對齊。
1.3 Homography的應用-全景拼接
在上一節中,我們了解到如果已知兩個圖像之間的Homography,我們可以将一個圖像映射到另一個圖像上。但是,有一個很大的問題。圖像必須位于同一個平面(書的頂部),并且隻有該平面部分才會正确對齊。事實證明,如果您拍攝任何不包括一個平面的場景,然後通過旋轉相機拍攝第二張照片,這兩張圖檔就可以通過Homography相關聯!您剛剛拍攝的完全随意的3D場景的兩個圖像可以用Homography相關聯。這兩個圖像将共享一些可以對齊和拼接的公共區域,并且可以獲得兩個圖像的全景圖。然而這隻是很粗糙的全景拼接,但基本原則是使用Homography和智能拼接。
2 Homography的計算
要計算兩個圖像之間的單應性,您需要知道兩個圖像之間至少有4個點對應關系。如果你有超過4個對應點,那就更好了。原因在于對于 H 矩陣,一般設 H22 為 1, 是以 H 有 8 個未知參數。至少需要8 個等式才能求解。而一組對應點可以提供 2 個等式,是以,至少需要 4 組對應點(任意三點不共線)來求得 H。OpenCV将穩健地估計最适合所有對應點的單應性。通常,這些點對應是通過比對圖像之間的SIFT或SURF等特征自動找到的,但在這篇文章中我們隻是提前設定特征點。代碼如下:
C++代碼:
// OpenCV_Homography.cpp : 此檔案包含 "main" 函數。程式執行将在此處開始并結束。
//

#include "pch.h"
#include <iostream>
#include <opencv2/opencv.hpp>

using namespace cv;
using namespace std;

int main(int argc, char** argv)
{
    // Read source image 原圖
    Mat im_src = imread("./image/book2.jpg");
    // Four corners of the book in source image 4個角點
    vector<Point2f> pts_src;
    pts_src.push_back(Point2f(141, 131));
    pts_src.push_back(Point2f(480, 159));
    pts_src.push_back(Point2f(493, 630));
    pts_src.push_back(Point2f(64, 601));

    // Read destination image.目标圖
    Mat im_dst = imread("./image/book1.jpg");

    // Four corners of the book in destination image. 4個對應點
    vector<Point2f> pts_dst;
    pts_dst.push_back(Point2f(318, 256));
    pts_dst.push_back(Point2f(534, 372));
    pts_dst.push_back(Point2f(316, 670));
    pts_dst.push_back(Point2f(73, 473));

    // Calculate Homography 計算Homography需要至少4組對應點.
    // pts_src : 源圖像點坐标,pts_dst : 結果圖像坐标
    Mat h = findHomography(pts_src, pts_dst);

    // Output image
    Mat im_out;
    // Warp source image to destination based on homography 仿射變換
    warpPerspective(im_src, im_out, h, im_dst.size());

    // Display images
    imshow("Source Image", im_src);
    imshow("Destination Image", im_dst);
    imshow("Warped Source Image", im_out);

    waitKey(0);
    return 0;
}
python代碼:
#!/usr/bin/env python

import cv2
import numpy as np

if __name__ == '__main__' :

    # Read source image.
    im_src = cv2.imread('./image/book2.jpg')
    # Four corners of the book in source image
    pts_src = np.array([[141, 131], [480, 159], [493, 630],[64, 601]])

    # Read destination image.
    im_dst = cv2.imread('./image/book1.jpg')
    # Four corners of the book in destination image.
    pts_dst = np.array([[318, 256],[534, 372],[316, 670],[73, 473]])

    # Calculate Homography
    h, status = cv2.findHomography(pts_src, pts_dst)

    # Warp source image to destination based on homography
    im_out = cv2.warpPerspective(im_src, h, (im_dst.shape[1],im_dst.shape[0]))

    # Display images
    cv2.imshow("Source Image", im_src)
    cv2.imshow("Destination Image", im_dst)
    cv2.imshow("Warped Source Image", im_out)

    cv2.waitKey(0)
3 總結
舉個例子,例如虛拟廣告牌,把下圖1替換下圖2的廣告,得到下圖3
實際步驟很簡單
1 用選擇上圖2時代廣場上廣告屏的 4 個頂點,作為 pts_dst;
2 選取欲嵌入的圖像的 4 個頂點,假設圖像尺寸 W x H, 那麼 四個頂點就是 (0,0), (0, W-1), (H - 1, 0), (H - 1, W - 1)。作為pts_src 類似下面代碼,這樣pts_src 和pts_dst就是一組對應點;
// Create a vector of points.
    vector<Point2f> pts_src;
    pts_src.push_back(Point2f(0,0));
    pts_src.push_back(Point2f(size.width - 1, 0));
    pts_src.push_back(Point2f(size.width - 1, size.height -1));
    pts_src.push_back(Point2f(0, size.height - 1 ));
// Calculate Homography 計算Homography需要至少4組對應點.
    // pts_src : 源圖像點坐标,pts_dst : 結果圖像坐标
    Mat h = findHomography(pts_src, pts_dst);
// Warp source image
    warpPerspective(im_src, im_temp, h, im_temp.size());